
Why this Kali Linux post install checklist matters
Fresh Kali install? Cool. But you're not done not even close. Kali is a rolling-release distro built for security work, which means the moment you boot it for the first time, packages are already drifting and defaults are already worth reviewing.
This checklist walks through the 15 things I do (in order) after every fresh Kali setup. The goal isn't to make Kali "look cool." It's to make it stable, current, recoverable, and safe to actually use. If you've just finished installing Kali Linux on a virtual server, or you're new to what Kali Linux is, this is the bridge between "it boots" and "it's ready for real lab work."
Here's what you'll accomplish:
- Update the system properly without breaking it
- Verify repos so future installs don't blow up
- Lock down users, SSH, and the firewall
- Set snapshots and backups before experimenting
- Install only the tools you actually need
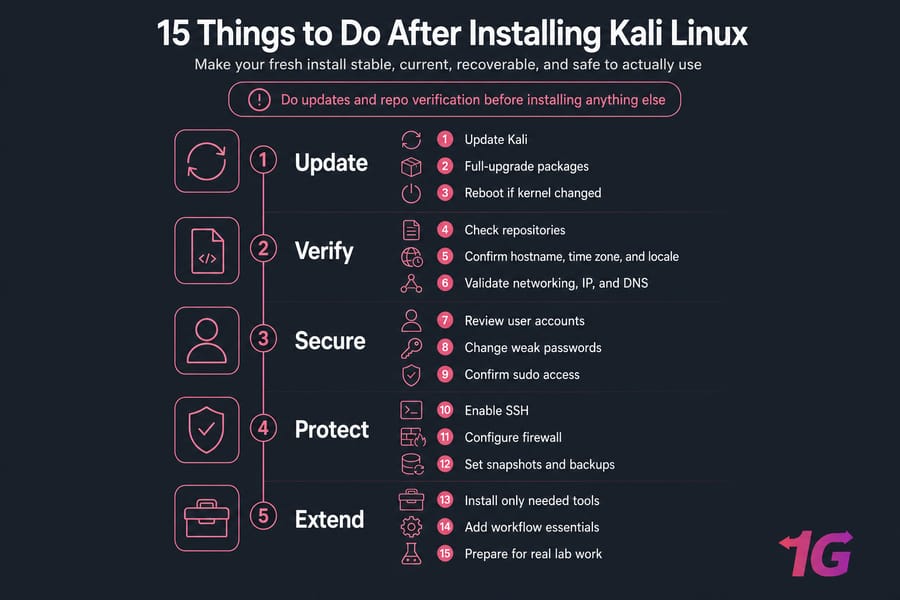
Key Takeaway: Do updates and repo verification before installing anything else. Skip that order and you'll spend the afternoon untangling broken packages.
1) Update Kali Linux after install with apt
First job, every time. A fresh Kali ISO is already a few weeks (or months) behind kali-rolling, so the very first command you run should pull in the latest package lists and upgrades.
sudo apt update
sudo apt full-upgrade -y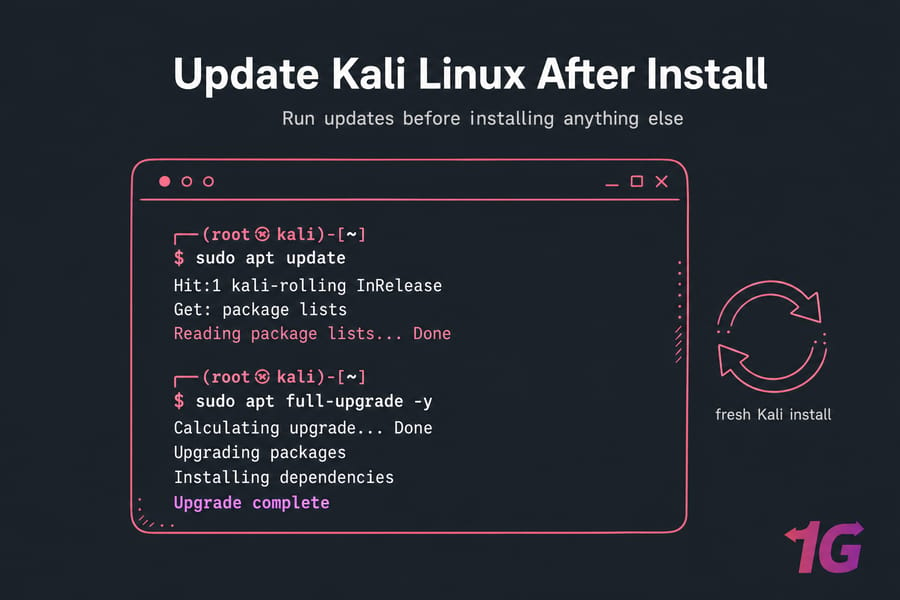
What's the difference between upgrade and full-upgrade in Kali?
Plain apt upgrade updates packages but refuses to remove anything. On a rolling release like Kali, that's a problem — dependencies shift constantly, and sometimes a package has to be removed for newer ones to land cleanly. full-upgrade handles that. It's the right choice on Kali, full stop.
Commands to run on a fresh Kali install
After the upgrade finishes, check your kernel and reboot if it changed:
uname -r
sudo reboot
What to do if package updates fail
If you hit "could not get lock" or 404 errors on mirrors, wait a minute and retry. If it persists, your repos may be wrong — which is exactly the next step. For deeper help, see how to update Kali Linux.
2) Verify Kali Linux repository setup before installing tools
This is the step almost every beginner skips, and it's the one that bites hardest later. Kali uses its own rolling repo, not Debian's, not Ubuntu's. Mixing them is a fast track to a broken system.
Check your sources file:
cat /etc/apt/sources.listYou should see one active line pointing at the official Kali rolling repository — something along the lines of deb http://http.kali.org/kali kali-rolling main contrib non-free non-free-firmware. If yours doesn't match the current official format, check Kali's docs before editing; the exact line evolves over time.
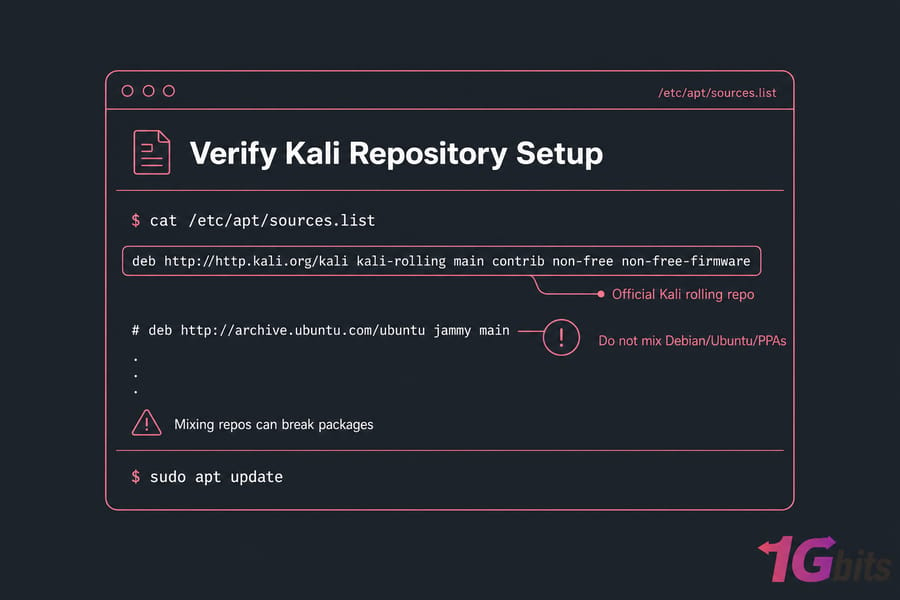
Warning: Don't paste random Debian, Ubuntu, or "extra tools" PPAs into your sources. They'll pull incompatible libraries and quietly wreck your package state. If you ever inherit a broken setup, our notes on fixing broken packages apply to Kali too.
After any edit, refresh:
sudo apt update3) Check user accounts, password hygiene, and sudo access in Kali
Modern Kali installs already nudge you toward a non-root user — good. But you still need to confirm a few things.
Change your password if it's weak or default:
passwdConfirm sudo works without surprises:
sudo whoamiIf that returns root, you're set. For background, our guide on sudo in Linux explains the model, and how to change a password in Linux covers password policy basics.
Should you use root or a regular user in Kali?
Use a regular user. I know — old Kali habits and a thousand YouTube tutorials say "just be root." But least privilege is a habit worth building. Drop into root only when a tool genuinely needs it (and many don't, despite what their docs imply).
4) Configure hostname, time zone, and locale on Kali Linux
This sounds boring. It's not. Wrong time breaks TLS certificate validation, scrambles log timestamps, and confuses scanners. Wrong hostname makes remote sessions a guessing game.
sudo hostnamectl set-hostname kali-lab
timedatectl
sudo timedatectl set-timezone Europe/London
Adjust the timezone to yours. Verify time is syncing:
timedatectl statusLook for "System clock synchronized: yes." For deeper tweaks, check how to change a hostname in Linux and how to set the date and time on Linux.
5) Validate networking, IP address, and DNS on Kali
Updates work? Great. But before you trust the network for tool installs and scanning practice, confirm the basics.
ip a
ip r
ping -c 3 1.1.1.1
ping -c 3 kali.org
The first ping tests raw connectivity. The second tests DNS. If raw IPs work but names don't, DNS is broken — see how to change DNS on Linux. To grab your current address quickly, our note on checking your IP address in Linux has you covered.
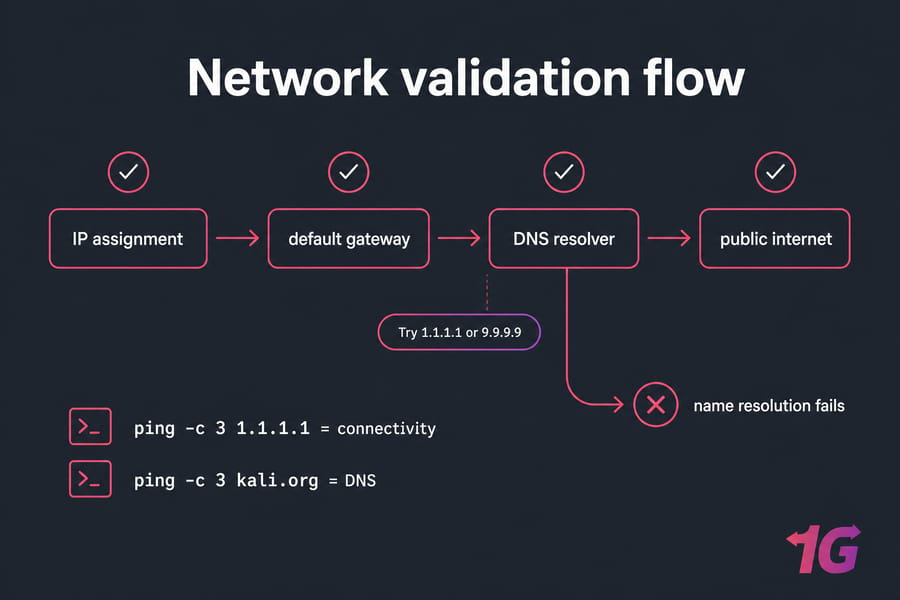
When to change DNS servers on Kali
If you're on a VPS or a flaky home network, swapping to 1.1.1.1 or 9.9.9.9 often fixes intermittent name resolution. On Kali, the right place depends on whether NetworkManager or systemd-resolved is in charge — don't blindly edit /etc/resolv.conf without checking.
6) Enable SSH on Kali Linux for remote management
If you're running Kali in a VM or on a VPS, SSH is how you'll actually live in it day to day.
sudo apt install -y openssh-server
sudo systemctl enable --now ssh
sudo systemctl status ssh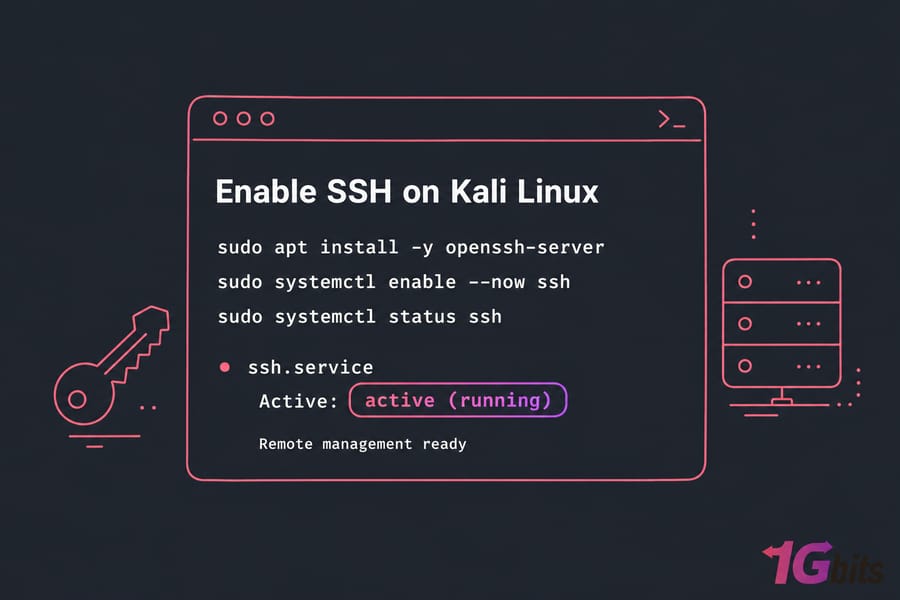
Now harden it. Don't skip this part — exposed SSH gets brute-forced within hours on most public IPs.
- Generate keys (see how to generate an SSH key) and disable password auth once keys work
- Disable root login if it's enabled
- Optionally change the SSH port — here's how — but treat it as noise reduction, not real security
If SSH itself is new to you, start with how to SSH into a Linux machine.
Warning: If your Kali box is on the public internet, use keys. Password auth alone on port 22 is asking for a bad day.
7) Apply Kali Linux security hygiene and firewall basics
"Does Kali need a firewall?" Depends entirely on where it lives. On a personal laptop behind NAT with no listening services, probably not urgent. On a VPS with a public IP, absolutely yes.
sudo apt install -y ufw
sudo ufw default deny incoming
sudo ufw default allow outgoing
sudo ufw allow 22/tcp
sudo ufw enable
Check what's actually listening on your machine:
sudo ss -tulpn| Before hardening | After hardening |
| SSH on port 22, root login allowed, password auth on | SSH on port 22 (or custom), root login off, key auth only |
| No firewall, all ports reachable | UFW: deny incoming except SSH |
| Random services from metapackages exposed | Only what you actually use |
More depth: configuring a firewall on your VPS, disabling root login in Linux, and checking Linux open ports.
8) Install VM tools, guest additions, or drivers if needed
Running Kali in a hypervisor? Install the integration package now. You get proper display scaling, clipboard sharing, and shared folders — small things that make hours of work less painful.
| Environment | What to install | Why it matters |
| VirtualBox | virtualbox-guest-x11 | Display resize, clipboard, shared folders |
| VMware Workstation/Fusion | open-vm-tools, open-vm-tools-desktop | Better graphics, time sync, clipboard |
| Bare metal | Firmware + GPU drivers | Wi-Fi, suspend, GPU acceleration |
| VPS | Usually nothing — provider handles it | You manage Kali via SSH anyway |
Not sure which hypervisor to pick for your home lab? Our comparisons on best virtual machine software and KVM vs VirtualBox are a decent starting point.
9) Set up snapshots, backups, and recovery points for Kali
This is where I'll get a little preachy. Before you install the first pentest suite, before you experiment with any tool, take a snapshot. Future-you will be grateful.
| Method | Best for | Pros | Limitations |
| Hypervisor snapshot | VM users | Instant rollback, full state | Tied to that VM; not a real backup |
| VPS provider snapshot | Hosted Kali | Off-host, restorable anytime | Usually paid per GB |
| Timeshift | Bare-metal Kali | Easy system-level rollback | Not for user data backup |
| rsync to external storage | Configs and project files | Granular, scriptable | Manual unless scheduled |
Pro Tip: Take your first snapshot after updates and baseline config succeed — not before. Otherwise you're just preserving a broken state.
Snapshots are not backups. They protect against your own mistakes, not against disk failure or a compromised host. Pair both. For scheduled jobs, see how to schedule automatic backups for Linux server.
Need a Stable Remote Environment for Kali Linux?
If you'd rather run Kali on a remote lab box instead of your local machine, a Kali Linux VPS gives you persistent access, full root control, and an easier way to test SSH, networking, and tool deployment from anywhere.
10) Install essential Kali Linux tools without bloating the system
Kali ships with a base set of tools — the default install is intentionally lean these days. Don't undo that by running apt install kali-linux-everything on day one. You'll get gigabytes of stuff you don't understand and won't use.
Pick by use case:
| Tool | Purpose | Install only if… |
| nmap | Network scanning | You're doing recon (almost everyone) |
| wireshark | Packet capture and analysis | You'll inspect traffic |
| burpsuite | Web app testing proxy | You're testing web apps |
| searchsploit | Offline exploit DB search | You research known CVEs |
| openvas / gvm | Vulnerability scanning | You need scheduled scans |
| git, curl, tmux | Daily workflow basics | Always |
For specific walkthroughs: Nmap commands and usage, install SearchSploit on Kali Linux, and install OpenVAS in Kali Linux.
Quick Summary: Start lean. Install what supports your current workflow, not every metapackage Kali offers.
11) Customize the Kali terminal and shell for faster workflow
You're going to live in this terminal. A few lightweight tweaks pay off forever.
Open your shell config:
nano ~/.bashrcAdd a couple of aliases that save typing:
alias ll='ls -lah'
alias update='sudo apt update && sudo apt full-upgrade -y'
alias ports='sudo ss -tulpn'
Enable reverse history search (Ctrl+R) muscle memory, and consider installing tmux so a dropped SSH session doesn't kill your work. Deeper dive on customizing your .bashrc and choosing a terminal for Linux.
12) Install quality-of-life packages for daily Kali use
Small utilities, big difference:
sudo apt install -y htop tree wget curl vim net-toolshtop— see CPU, RAM, and processes at a glancetree— visualize folder structures fastwgetandcurl— download and test endpointsvimornano— pick your editor, just pick onenet-tools— only if you genuinely needifconfig-era commands
If you're new to the command line in general, our basic Linux commands reference is a solid bookmark.
13) Clean up packages and verify system health
After all that installing, tidy up:
sudo apt autoremove -y
sudo apt clean
Then confirm the system is happy:
| Check | Command | What "good" looks like |
| Disk space | df -h |
Root partition well under 80% full |
| Memory | free -h |
Some swap headroom available |
| Services | systemctl --failed |
Zero failed units |
| Package state | sudo apt -f install |
"0 to upgrade, 0 to install" |
Quick references: df command in Linux, listing running services, and Linux commands to check RAM.
14) Common Kali Linux after install mistakes to avoid
Quick list. I've watched all of these break someone's lab — sometimes mine, years ago.
| Mistake | Why it's risky | Safer alternative |
| Mixing Debian/Ubuntu/third-party repos | Library conflicts, unbootable system | Stick to kali-rolling only |
| Running everything as root | One typo deletes your whole setup | Use sudo on demand |
| Installing every pentest metapackage | Bloat, dependency hell, slow updates | Install per use case |
| Skipping snapshots before experiments | No rollback when something breaks | Snapshot after baseline setup |
| Exposing SSH with weak password auth | Brute force attacks within hours | Keys only, optional port change |
| Ignoring time sync | TLS errors, broken logs, weird tool behavior | Verify with timedatectl |
If apt itself starts misbehaving, see how to fix the apt command not found error and the broken packages guide.
15) Next steps after your Kali Linux setup is complete
Your Kali Linux post installation checklist is done. The system is current, the repos are clean, you're not running as root, SSH is locked down, and you have a snapshot to fall back on. That's a real baseline.
From here, three solid directions:
- Learn the language. Spend an hour with Kali Linux commands for beginners. Comfort with the shell matters more than memorizing every tool.
- Add focused tools. Pick a use case — web testing, network scanning, vulnerability assessment — then install only what serves it. Start with SearchSploit or OpenVAS if either fits your goals.
- Move to a persistent lab. Local VMs are fine for learning, but if you want a box that's always on, reachable from anywhere, and not eating your laptop's battery, a hosted setup makes life easier.
Ready to Run Kali Linux in a Faster, Always-Available Lab?
Once your post-install checklist is complete, the next question is where Kali should live long term. For remote pentesting labs, learning environments, and tool hosting, 1Gbits offers Kali Linux VPS and Linux VPS plans with full root access, global locations, and support that actually knows Linux. Get a Kali Linux VPS or view Linux VPS plans to keep the momentum going.

Leave A Comment