
Spinning up WordPress on a fresh Ubuntu box isn't hard, but there are about a dozen places where things quietly break. Wrong file ownership. A forgotten PHP extension. A virtual host pointing at the wrong document root. I've fixed all of these on client servers more times than I'd like to admit.
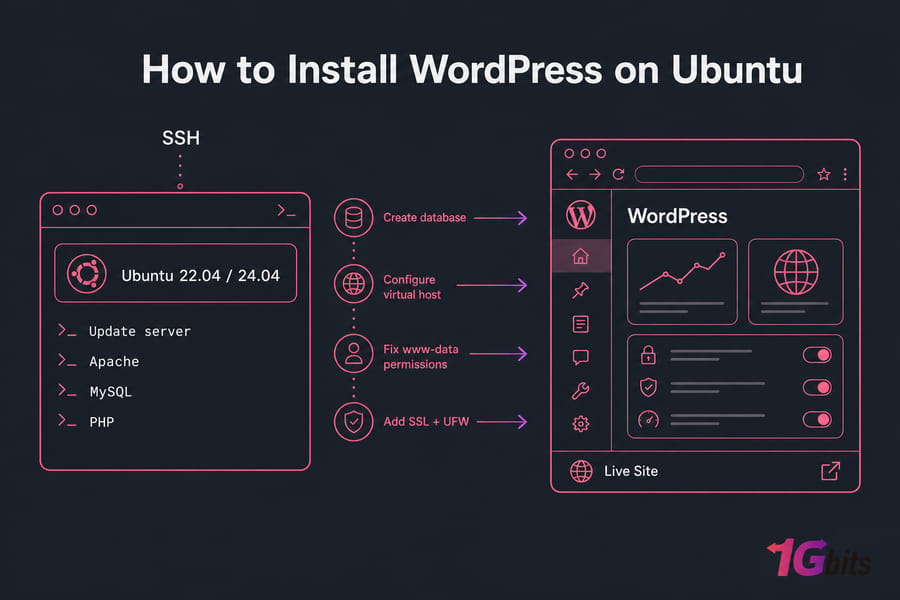
This guide walks you through a clean, production-ready WordPress installation on Ubuntu 22.04 or 24.04, using Apache, MySQL, and PHP. We'll cover the database, virtual host, permissions, SSL, and the errors that trip people up. If you're running a fresh Ubuntu VPS, you'll be live in under an hour.
Quick answer: To install WordPress on Ubuntu, update the server, install Apache, PHP, and MySQL or MariaDB, create a dedicated WordPress database and user, download WordPress into your web root, configure an Apache virtual host, fix file ownership for www-data, then finish setup in a browser. For production, add a Let's Encrypt SSL certificate and a UFW firewall rule.
What you need before an Ubuntu WordPress installation
Before touching a single command, make sure your environment is actually ready. Skipping this step is the number one reason people end up troubleshooting DNS or firewall problems halfway through the install.
Minimum server requirements for WordPress on Ubuntu
WordPress itself is pretty light, but a real production site needs breathing room. Here's what I recommend at a minimum:
- OS: Ubuntu 22.04 LTS or 24.04 LTS (avoid 18.04 — package names and PHP versions differ)
- RAM: 1 GB minimum, 2 GB+ if you plan to run a few plugins and caching
- CPU: 1 vCPU works for small sites; 2+ for anything with real traffic
- Storage: 20 GB SSD or more
- Ports: 80 and 443 open at the firewall and provider level
Domain, DNS, and SSH access checklist
You'll need a few things before SSH-ing in:
- A sudo user (don't run everything as root — bad habit)
- SSH access to the server (see how to connect to a VPS if you're new to this)
- A domain name with an A record pointing to your server's public IP
- Time for DNS propagation — usually 15 minutes to a few hours
Supported Ubuntu versions and PHP compatibility
This guide is written for Ubuntu 22.04 and 24.04. On 22.04 you'll get PHP 8.1 from default repos. On 24.04, PHP 8.3. Both work fine with current WordPress. You can check your version with lsb_release -a — see how to check Ubuntu version for details.
Pro tip: Use a fresh Ubuntu VPS rather than recycling one that's been hosting something else. Old configs and conflicting packages are a special kind of pain to debug.
Once your server and domain are ready, the next decision is your web stack.
Apache vs Nginx for WordPress on Ubuntu
People love to argue about this. Honestly? For most WordPress sites, the choice doesn't matter as much as the internet pretends. Both work. Both are fast enough when configured correctly.
When Apache is the easier choice for beginners
Apache has one big advantage for WordPress: .htaccess support. WordPress writes rewrite rules there automatically, and many plugins assume Apache. Less configuration, fewer surprises.
When Nginx may be better for performance
Nginx handles concurrent connections more efficiently and uses less memory under load. The trade-off is that you'll edit server blocks manually, and plugins that touch .htaccess can't write to it. If you want to go that route, see how to install Nginx on Ubuntu and the broader Apache vs Nginx comparison.
Which setup this guide uses by default
| Feature | Apache (LAMP) | Nginx (LEMP) |
| Beginner-friendly | Yes — handles .htaccess |
Steeper learning curve |
| Memory usage | Higher | Lower |
| WordPress plugin compatibility | Excellent | Good (some need tweaks) |
| Permalinks setup | Automatic via mod_rewrite | Manual server block edit |
| Best for | First-time installs, plugin-heavy sites | High-traffic, performance-tuned sites |
For the fastest path to a working site, we'll use Apache in the steps below.
Install the required packages on Ubuntu for WordPress
SSH into your server as your sudo user. We'll update the system first, then install the full LAMP stack plus the PHP extensions WordPress actually needs.
Update Ubuntu packages safely
Always refresh package lists before installing anything:
sudo apt update && sudo apt upgrade -yThis pulls the latest package metadata and upgrades existing packages. Expect a few minutes on a fresh server.
Install Apache, MySQL, PHP, and PHP extensions
Now install the web server, database, PHP, and the extensions WordPress depends on:
sudo apt install apache2 mysql-server php php-mysql php-curl php-gd php-xml php-mbstring php-zip php-soap php-intl libapache2-mod-php -yQuick rundown of why each PHP extension matters:
php-mysql— database connection (mandatory)php-curl— outbound HTTP requests, used by plugins and the dashboardphp-gd— image cropping and thumbnailsphp-xml,php-mbstring— content parsing, multibyte textphp-zip— plugin and theme uploadsphp-soap,php-intl— useful for various plugins (WooCommerce, translations)
If you want a deeper dive on the full stack, see install LAMP on Ubuntu.
Enable and verify services with systemctl
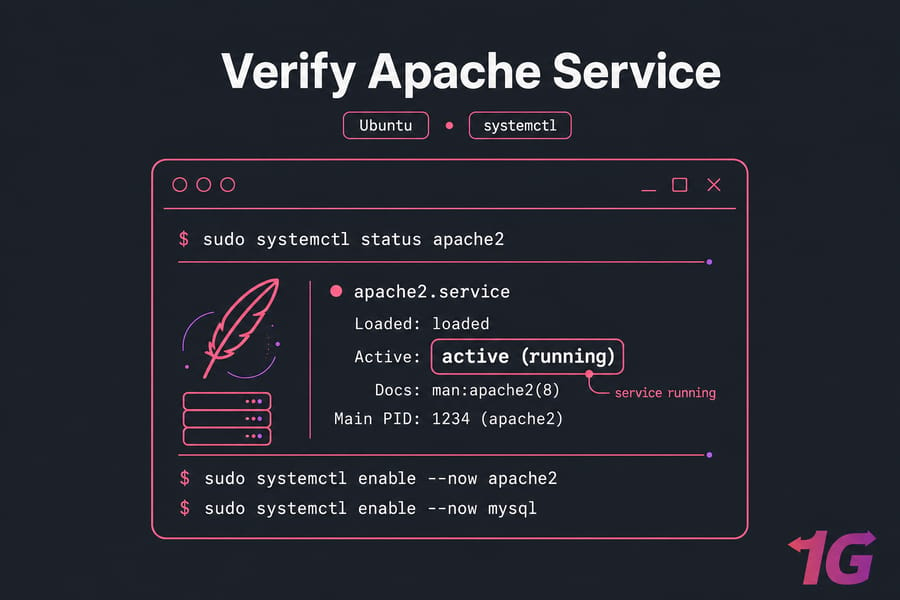
Make sure both services are running and set to start on boot:
sudo systemctl enable --now apache2
sudo systemctl enable --now mysql
sudo systemctl status apache2
You should see active (running) in green. Visit your server's IP in a browser and you'll get the default Apache welcome page. That confirms the web server works.
Create a WordPress MySQL database and user
WordPress needs its own database and a dedicated user. Never — and I mean never — point wp-config.php at the MySQL root account. If WordPress gets compromised, the attacker owns your entire database server.
Secure MySQL before creating the database
Run the security script first:
sudo mysql_secure_installationSet a strong root password, remove anonymous users, disallow remote root login, and drop the test database. Need more depth? Install MySQL Server on Ubuntu covers this in more detail.
SQL commands to create the WordPress database
Log into the MySQL shell:
sudo mysql -u root -pThen run these commands, swapping the placeholders for your real values:
CREATE DATABASE db_name DEFAULT CHARACTER SET utf8mb4 COLLATE utf8mb4_unicode_ci;
CREATE USER 'db_user'@'localhost' IDENTIFIED BY 'strong_password';
GRANT ALL PRIVILEGES ON db_name.* TO 'db_user'@'localhost';
FLUSH PRIVILEGES;
EXIT;
How to grant the right database privileges
Notice the grant is scoped to db_name.* — that's the WordPress database only. The user can do anything inside that database and nothing outside. That's exactly what you want. For more on user management, see how to create a MySQL user and how to secure MariaDB and MySQL.
Warning: Never paste the MySQL root account into wp-config.php. Always use a dedicated, scoped user.
With the database ready, you can install the WordPress application files.
Download WordPress and configure wp-config.php on Ubuntu
Time to grab WordPress from the source and drop it into your web directory.
Get the latest WordPress package from WordPress.org
Move to a temp directory and download the current release:
cd /tmp
wget https://wordpress.org/latest.tar.gz
tar -xzvf latest.tar.gz
This creates a wordpress folder with all the core files.
Move WordPress files into the web root
I prefer a domain-specific document root over dumping everything in /var/www/html. Cleaner, easier to manage multiple sites later:
sudo mkdir -p /var/www/yourdomain.com
sudo cp -a /tmp/wordpress/. /var/www/yourdomain.com/
Edit wp-config.php with database credentials and salts
Copy the sample config and open it for editing (see the nano editor guide if you're new to terminal editors):
cd /var/www/yourdomain.com
sudo cp wp-config-sample.php wp-config.php
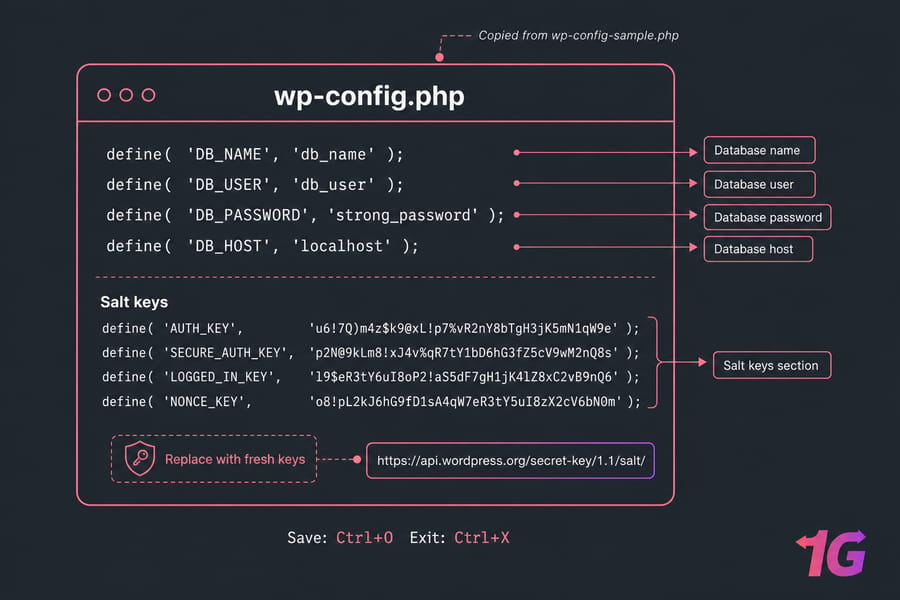
sudo nano wp-config.phpFind and update these lines:
define( 'DB_NAME', 'db_name' );
define( 'DB_USER', 'db_user' );
define( 'DB_PASSWORD', 'strong_password' );
define( 'DB_HOST', 'localhost' );
Then replace the salt block. Grab fresh keys from https://api.wordpress.org/secret-key/1.1/salt/ and paste them over the placeholder section. Save with Ctrl+O, exit with Ctrl+X.
Now Apache needs to know how to serve this directory.
Set up an Apache virtual host for WordPress
Default site configs don't know about your domain. You need a virtual host that points yourdomain.com at /var/www/yourdomain.com.
Example virtual host configuration for a domain
Create a new vhost file:
sudo nano /etc/apache2/sites-available/yourdomain.com.confPaste this in, swapping yourdomain.com for your actual domain:
<VirtualHost *:80>
    ServerName yourdomain.com
    ServerAlias www.yourdomain.com
    DocumentRoot /var/www/yourdomain.com

    <Directory /var/www/yourdomain.com>
        AllowOverride All
        Require all granted
    </Directory>

    ErrorLog ${APACHE_LOG_DIR}/yourdomain_error.log
    CustomLog ${APACHE_LOG_DIR}/yourdomain_access.log combined
</VirtualHost>
The AllowOverride All directive is critical — without it, WordPress can't write rewrite rules to .htaccess and permalinks will break.
Enable rewrite and required Apache modules
Enable the site, enable mod_rewrite, and disable the default site:
sudo a2ensite yourdomain.com.conf
sudo a2dissite 000-default.conf
sudo a2enmod rewrite
Test and reload Apache configuration
Always validate before reloading — saves you from typos that kill the server:
sudo apache2ctl configtest
sudo systemctl reload apache2
You should see Syntax OK. If something fails, double-check your vhost file. The Apache error log is your friend here, and restarting Apache properly matters.
Before opening the installer, fix ownership and permissions so WordPress can run safely.
Set correct WordPress permissions on Ubuntu
This is where I see beginners cause themselves the most pain. Wrong permissions either break uploads and plugin installs, or — worse — leave the site wide open.
Recommended ownership for web server files
Apache runs as the www-data user on Ubuntu. WordPress files need to be owned by that user:
sudo chown -R www-data:www-data /var/www/yourdomain.com
sudo find /var/www/yourdomain.com -type d -exec chmod 755 {} \;
sudo find /var/www/yourdomain.com -type f -exec chmod 644 {} \;
For background on these commands, check chown in Linux and recursive chown usage.
Safe chmod settings for files and directories
| Item | Owner | Permission | Why |
| Directories | www-data | 755 | Web server can traverse, others can read |
| Files | www-data | 644 | Readable by web server, not writable by others |
wp-config.php |
www-data | 640 | Hides DB credentials from other users |
wp-content/uploads |
www-data | 755 | WordPress can write media |
.htaccess |
www-data | 644 | Writable for permalink rules, readable by Apache |
Common permission mistakes that break WordPress
Warning: Never run chmod -R 777 on your WordPress directory. It "fixes" everything temporarily and creates a massive security hole. If you hit a permission denied error, the answer is correct ownership, not wide-open permissions.
At this point, your server is ready for the browser-based installer.
Finish the WordPress setup in your browser
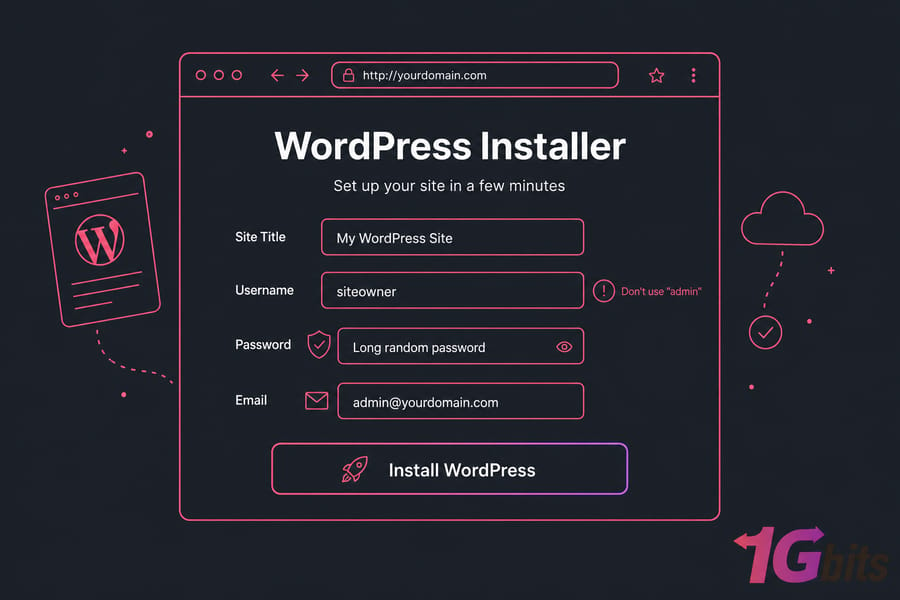
Open http://yourdomain.com in a browser. You should see the WordPress language picker.
Run the installation wizard
Walk through the prompts:
- Select your language
- Enter the site title
- Pick an admin username — don't use "admin", it's the first thing bots try
- Use a long, randomly generated password (see how to choose a strong password)
- Enter a real admin email — you'll need it for password resets
- Click "Install WordPress"
Verify permalinks, media uploads, and login access
Log in at http://yourdomain.com/wp-admin. Then:
- Go to Settings → Permalinks and choose "Post name" — this writes the
.htaccessrules - Upload a test image under Media → Add New to confirm
uploadspermissions work - Delete the sample post and "Hello Dolly" plugin
If the installer doesn't load, check DNS propagation, Apache status, and your firewall. More on that in the troubleshooting section below.
Your site is live — but it still needs HTTPS.
Secure WordPress on Ubuntu with SSL and firewall rules
Running production WordPress without HTTPS in 2024 is malpractice. Browsers flag it, search engines penalize it, and login credentials would travel in plain text. Let's fix that.
Open HTTP and HTTPS in UFW
Set up the firewall to allow web traffic and SSH:
sudo ufw allow OpenSSH
sudo ufw allow 'Apache Full'
sudo ufw enable
sudo ufw status
For broader firewall guidance, see how to configure a firewall on your VPS.
Install a Let's Encrypt certificate with Certbot
Certbot handles everything — issuing the cert and patching your Apache config:
sudo apt install certbot python3-certbot-apache -y
sudo certbot --apache -d yourdomain.com -d www.yourdomain.com
Pick the option to redirect HTTP to HTTPS when prompted. For the full walkthrough, see install Let's Encrypt SSL certificate on Linux.
Force HTTPS and protect the wp-admin area
Test auto-renewal so you never get caught with an expired cert:
sudo certbot renew --dry-runPro tip: Run the dry-run test immediately after install. If it fails six months from now, you'll find out when your site is already down.
For a deeper hardening pass — login limits, file editing lockdown, security headers — read how to secure a WordPress site on a VPS.
If something still isn't working, these are the most common Ubuntu WordPress issues to check.
Troubleshoot common WordPress on Ubuntu errors
Even with a clean install, things break. Here's the diagnostic table I keep open when fixing client sites:
| Error | Likely Cause | Fix |
| Error establishing a database connection | Wrong DB credentials or MySQL down | Recheck wp-config.php; run sudo systemctl status mysql |
| 403 Forbidden | Wrong file ownership or missing index | Re-run chown -R www-data:www-data; check vhost Require all granted. See fixing 403 errors |
| White screen of death | PHP error or memory exhaustion | Enable WP_DEBUG in wp-config.php; check Apache error log |
| 500 Internal Server Error | Broken .htaccess or PHP fatal |
Rename .htaccess, reload site. See 500 error guide |
| Broken permalinks (404 on posts) | mod_rewrite disabled or AllowOverride None |
sudo a2enmod rewrite; set AllowOverride All in vhost |
| Missing PHP module warning | Extension not installed | Install missing package, then sudo systemctl reload apache2 |
| Site doesn't resolve | DNS not propagated or wrong A record | Check with dig yourdomain.com. See DNS resolution issues |
| Media uploads fail | uploads not writable by www-data |
Fix ownership on wp-content/uploads |
Reading the logs when stuck
When something fails silently, the logs almost always have the answer:
sudo tail -f /var/log/apache2/error.log
sudo journalctl -u apache2 -n 50
The first few lines of an error message usually point straight at the problem — a missing file, a syntax error, a permission denied. Read them carefully before changing anything.
Once WordPress is stable, the next step is making it fast and resilient.
Next steps to optimize WordPress on a VPS
Getting WordPress installed is the start, not the finish line. Here's what I tackle next on every production site:
- Caching — page cache (WP Super Cache, LiteSpeed, or W3 Total Cache), plus object cache via Redis for busy sites
- Backups — automated daily backups, ideally off-server. See scheduling automatic Linux backups
- Monitoring — uptime checks and basic resource alerts
- Updates — keep core, plugins, themes, and Ubuntu packages patched (
sudo apt update && sudo apt upgrademonthly at minimum) - Hardening — limit login attempts, disable file editing in
wp-config.php, install Fail2ban - Image optimization — WebP conversion and lazy loading
For a full performance pass, see optimize WordPress on a VPS. If you'd rather skip the manual setup entirely, WordPress with Docker or Ansible automation are solid alternatives.
And if server maintenance isn't how you want to spend your time, look at WordPress VPS hosting or managed VPS hosting both shift the heavy lifting away from you.

Leave A Comment