
To use Ansible to install WordPress, create an inventory for your server, define variables for the domain and database, then run a playbook that installs Nginx, PHP-FPM, MariaDB, downloads WordPress, templates wp-config.php, sets file permissions, and enables the web server. This makes WordPress deployment repeatable and easier to manage.
If you've ever built the same WordPress stack twice, you already know why this matters. Manual installs work until you need a second server, a rebuild, or a clean audit trail. This guide shows exactly how to use Ansible to install WordPress on Ubuntu, with a working structure you can reuse on a VPS.
If you're still choosing infrastructure, it helps to understand what is VPS hosting and how to host a website on a Linux VPS. For this tutorial, we'll assume a single Ubuntu VPS as the first target.
What is Ansible WordPress install automation?
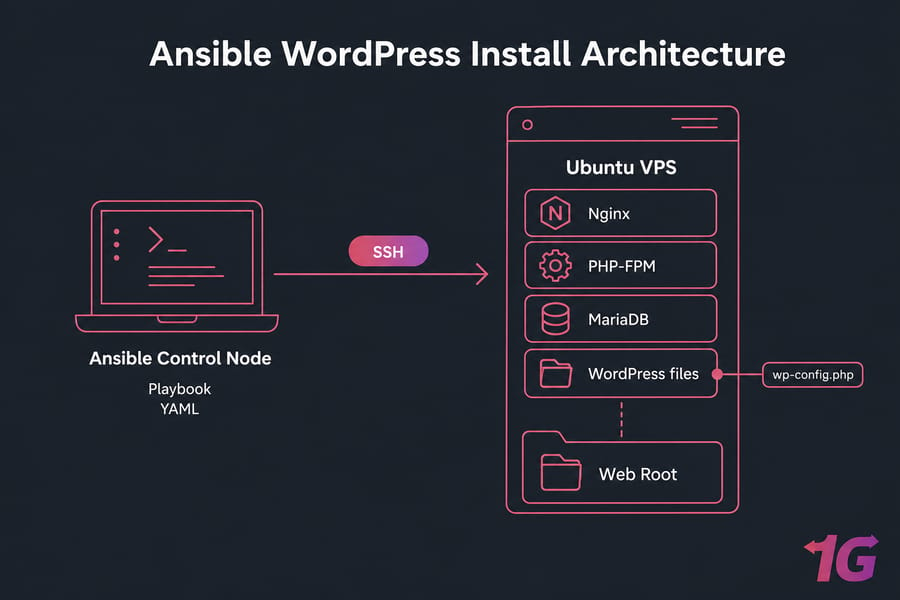
Ansible is a configuration management tool. In this case, it connects over SSH from your control node your laptop or admin box to a managed node, which is your Ubuntu VPS, and applies a playbook.
That playbook is just YAML describing the work: install packages, create a database, drop config files, restart services, and make WordPress available in the browser. Simple idea. Very useful in practice.
What “ansible wordpress install” really means is automating the whole stack around WordPress, not just downloading the ZIP. You're provisioning the web server, PHP runtime, database layer, permissions, and application config in one repeatable workflow.
The big win is idempotency. Run the playbook once, it builds the stack. Run it again, and it should only change what drifted or what you updated. I've seen this save hours after a failed manual tweak on a live VPS.
Before writing the playbook, make sure your VPS and control node are ready. If you need a quick refresher on server basics, check what is a Linux server.
Why install WordPress with Ansible instead of manually?
| Method | Strengths | Weaknesses | Best Fit |
| Manual setup | Fast for a one-off test | Easy to forget steps and cause config drift | Single temporary site |
| Ansible | Repeatable provisioning, easier rebuilds, cleaner team workflow | Upfront YAML work and trickier debugging | VPS-based repeat deployments |
| Docker | Portable and isolated application stack | Different operational model and persistence planning | Container-focused teams |
Manual setup is fine when you're experimenting. But once you want to automate WordPress installation across staging, production, or multiple client sites, Ansible starts paying for itself quickly.
You get faster redeploys, less configuration drift, and a clear record of how the server was built. That's huge when a plugin update goes sideways and you need to rebuild cleanly instead of guessing what changed three weeks ago.
There are trade-offs. Your first playbook takes longer than a manual install, YAML is picky, and troubleshooting partial failures can be annoying. No point pretending otherwise.
And Ansible isn't the only option. If you'd rather package the app stack differently, you can install WordPress with Docker on a VPS. But for classic VPS provisioning, Ansible is usually the better long-term choice.
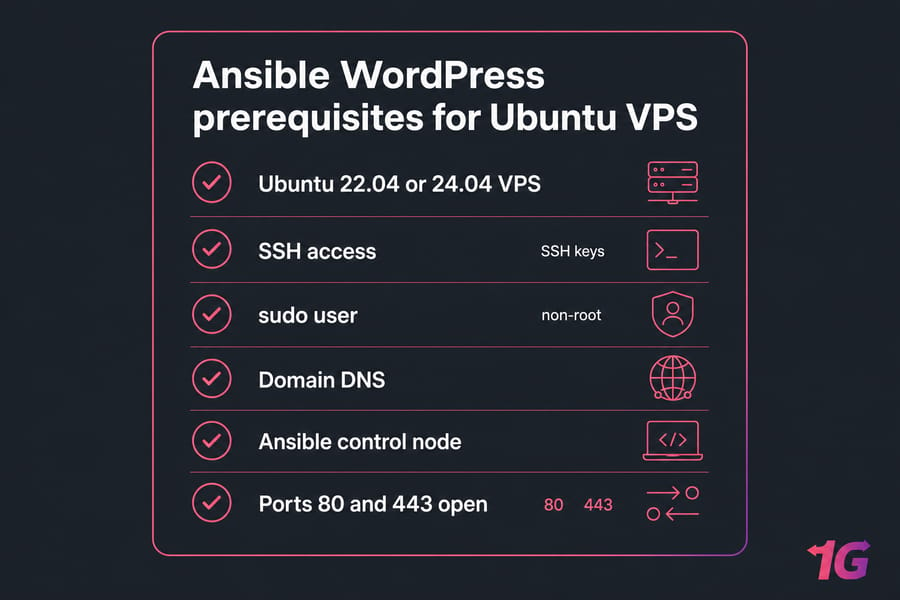
Ansible WordPress prerequisites for Ubuntu VPS
| Item | Minimum | Recommended | Why It Matters |
| OS | Ubuntu 22.04 | Ubuntu 24.04 or 22.04 | Modern package names and current support |
| CPU | 1 vCPU | 2 vCPU | Helps PHP-FPM and MariaDB stay responsive |
| RAM | 2 GB | 4 GB | Enough headroom for small production use |
| Storage | 20 GB | NVMe storage | Faster admin panel and plugin operations |
| Access | SSH with sudo | SSH keys with non-root sudo user | Safer admin workflow |
| Network | Port 80 open | Ports 80 and 443 open | HTTP now, HTTPS after SSL |
Use Ubuntu 22.04 or 24.04 if you want fewer surprises. Debian can work too, but package names or service defaults may need minor edits.
Your control node needs Ansible installed and SSH access to the target host. A non-root sudo user is strongly recommended. Root-only workflows are convenient right up until they aren't.
You'll also need a domain pointing to the server IP, UFW or another firewall allowing 80 and 443, and baseline package updates on the VPS. If you need a clean box for this, a Ubuntu VPS or general Linux VPS hosting plan is a practical place to start.
Make sure you can SSH into your server before touching Ansible. Seriously — most beginner failures happen before the playbook even starts.
WordPress Ansible playbook architecture: Nginx, PHP-FPM, and MariaDB
We're using a LEMP stack here: Linux, Nginx, MariaDB, and PHP-FPM. Apache works too, but Nginx plus PHP-FPM is a strong default for Ubuntu VPS hosting because it's lean, predictable, and well-documented.
MariaDB stores the WordPress data. PHP-FPM executes PHP. Nginx serves static files and passes PHP requests to the FPM socket. WordPress sits in the web root and reads its database credentials from wp-config.php.
The automation layout usually includes an inventory, variable files, templates, handlers, and the playbook itself. If you want to go further later, you can split this into proper Ansible roles.
ansible-wordpress/
├── inventory.ini
├── group_vars/
│   └── wordpress.yml
├── wordpress.yml
├── templates/
│   ├── nginx-wordpress.conf.j2
│   └── wp-config.php.j2
└── files/
If you need manual references for individual components, these help: install Nginx on Ubuntu, install MariaDB on Ubuntu, and learn what Nginx is. But the point here is to automate the stack as one unit.
How to create the Ansible inventory and variables for WordPress
Start with the inventory. For a single VPS, keep it boring and clear.
[wordpress]
wp1 ansible_host=203.0.113.10 ansible_user=deploy ansible_ssh_private_key_file=~/.ssh/id_rsa

[wordpress:vars]
ansible_become=true
Your host group can be wordpress, web, or whatever fits your environment. The key fields are ansible_host, ansible_user, and your SSH key path.
Then define reusable variables in group_vars/wordpress.yml.
domain_name: example.com
web_root: /var/www/example.com
db_name: wordpress
db_user: wpuser
db_password: !vault |
  $ANSIBLE_VAULT;1.1;AES256
  encrypted_value_here
wp_table_prefix: wp_
php_version: "8.3"| Variable | Example | Purpose | Required? |
| domain_name | example.com | Used in Nginx config and site URL | Yes |
| web_root | /var/www/example.com | WordPress installation directory | Yes |
| db_name | wordpress | Database name | Yes |
| db_user | wpuser | Database username | Yes |
| db_password | vault secret | Database password | Yes |
| wp_table_prefix | wp_ | WordPress table prefix | Yes |
| php_version | 8.3 | PHP package and socket version | Usually |
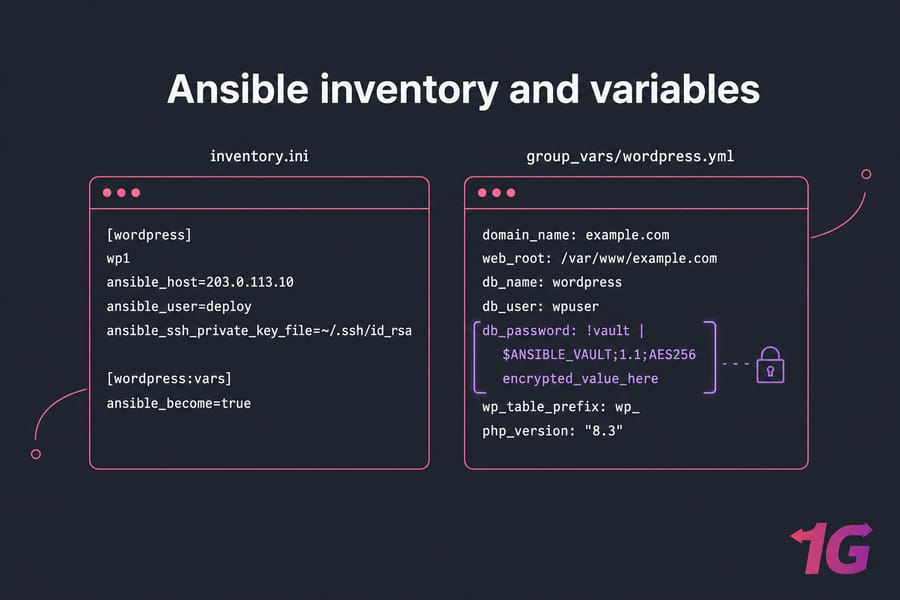
Use Ansible Vault for secrets. Don't hardcode passwords into a public repo. That's the kind of mistake people make once.
ansible-vault create group_vars/vault.yml
ansible-vault edit group_vars/vault.yml
If you need SSH key help first, see how to generate one and why SSH keys are better than password auth.
How to write an Ansible playbook to install WordPress
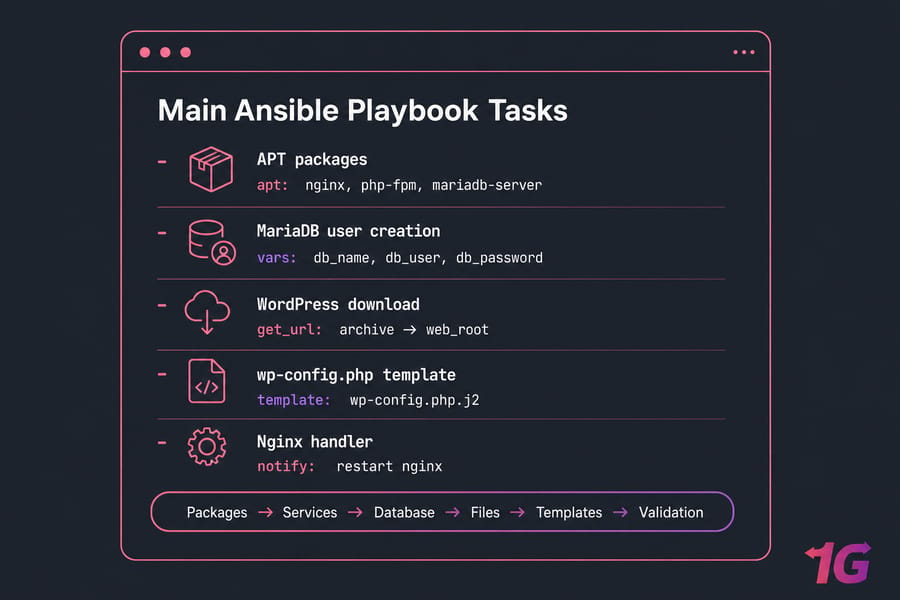
This is the core of the workflow. The wordpress ansible playbook below installs the packages, creates the database, downloads WordPress, templates config files, and enables the site.
---
- name: Install WordPress on Ubuntu
  hosts: wordpress
  become: true

  vars_files:
    - group_vars/wordpress.yml

  handlers:
    - name: restart nginx
      service:
        name: nginx
        state: restarted

    - name: restart php-fpm
      service:
        name: "php{{ php_version }}-fpm"
        state: restarted

  tasks:
    - name: Update apt cache
      apt:
        update_cache: yes
        cache_valid_time: 3600

    - name: Install required packages
      apt:
        name:
          - nginx
          - mariadb-server
          - python3-pymysql
          - unzip
          - curl
          - "php{{ php_version }}-fpm"
          - "php{{ php_version }}-mysql"
          - "php{{ php_version }}-cli"
          - "php{{ php_version }}-curl"
          - "php{{ php_version }}-xml"
          - "php{{ php_version }}-mbstring"
          - "php{{ php_version }}-zip"
          - "php{{ php_version }}-gd"
        state: present

    - name: Ensure services are enabled
      service:
        name: "{{ item }}"
        enabled: yes
        state: started
      loop:
        - nginx
        - mariadb
        - "php{{ php_version }}-fpm"

    - name: Create web root
      file:
        path: "{{ web_root }}"
        state: directory
        owner: www-data
        group: www-data
        mode: '0755'

    - name: Create WordPress database
      community.mysql.mysql_db:
        name: "{{ db_name }}"
        state: present
        login_unix_socket: /run/mysqld/mysqld.sock

    - name: Create WordPress database user
      community.mysql.mysql_user:
        name: "{{ db_user }}"
        password: "{{ db_password }}"
        priv: "{{ db_name }}.*:ALL"
        host: localhost
        state: present
        login_unix_socket: /run/mysqld/mysqld.sock

    - name: Download latest WordPress archive
      get_url:
        url: https://wordpress.org/latest.tar.gz
        dest: /tmp/wordpress.tar.gz
        mode: '0644'

    - name: Extract WordPress
      unarchive:
        src: /tmp/wordpress.tar.gz
        dest: /tmp
        remote_src: yes
        creates: /tmp/wordpress

    - name: Copy WordPress files to web root
      copy:
        src: /tmp/wordpress/
        dest: "{{ web_root }}/"
        remote_src: yes
        owner: www-data
        group: www-data
        mode: preserve

    - name: Template wp-config.php
      template:
        src: templates/wp-config.php.j2
        dest: "{{ web_root }}/wp-config.php"
        owner: www-data
        group: www-data
        mode: '0640'
      notify: restart php-fpm

    - name: Template Nginx server block
      template:
        src: templates/nginx-wordpress.conf.j2
        dest: /etc/nginx/sites-available/{{ domain_name }}
        mode: '0644'
      notify: restart nginx

    - name: Enable WordPress site
      file:
        src: /etc/nginx/sites-available/{{ domain_name }}
        dest: /etc/nginx/sites-enabled/{{ domain_name }}
        state: link
      notify: restart nginx

    - name: Disable default Nginx site
      file:
        path: /etc/nginx/sites-enabled/default
        state: absent
      notify: restart nginx

    - name: Set WordPress ownership
      file:
        path: "{{ web_root }}"
        owner: www-data
        group: www-data
        recurse: yes

    - name: Set directories to 755
      shell: find {{ web_root }} -type d -exec chmod 755 {} \;
      changed_when: false

    - name: Set files to 644
      shell: find {{ web_root }} -type f -exec chmod 644 {} \;
      changed_when: false

    - name: Validate Nginx config
      command: nginx -t
      changed_when: false
Two template files finish the job.
server {
    listen 80;
    server_name {{ domain_name }} www.{{ domain_name }};
    root {{ web_root }};
    index index.php index.html;

    location / {
        try_files $uri $uri/ /index.php?$args;
    }

    location ~ \.php$ {
        include snippets/fastcgi-php.conf;
        fastcgi_pass unix:/run/php/php{{ php_version }}-fpm.sock;
    }

    location ~* \.(js|css|png|jpg|jpeg|gif|ico|svg)$ {
        expires max;
        log_not_found off;
    }

    location ~ /\.ht {
        deny all;
    }
}
<?php
define( 'DB_NAME', '{{ db_name }}' );
define( 'DB_USER', '{{ db_user }}' );
define( 'DB_PASSWORD', '{{ db_password }}' );
define( 'DB_HOST', 'localhost' );
$table_prefix = '{{ wp_table_prefix }}';
if ( ! defined( 'ABSPATH' ) ) {
define( 'ABSPATH', __DIR__ . '/' );
}
require_once ABSPATH . 'wp-settings.php';Task ordering matters. Packages first, then services, then database, then files, then templates, then validation. That's what keeps the playbook readable and mostly idempotent.
Pro tip: split templates, vars, and handlers early. Your single-server setup can grow into an ansible role wordpress setup structure later with very little pain.
Need the manual component docs for cross-checking? See how to install LAMP on Ubuntu for contrast, install Nginx on Ubuntu, and how to secure database services.
How to run the Ansible playbook and verify WordPress works
Run the deployment from your control node:
ansible-playbook -i inventory.ini wordpress.yml --ask-vault-passIf your sudo setup needs it, add --ask-become-pass. With SSH keys configured properly, you usually won't need an SSH password prompt.
After the run completes, verify the services from the VPS itself.
systemctl status nginx
systemctl status php8.3-fpm
systemctl status mariadb
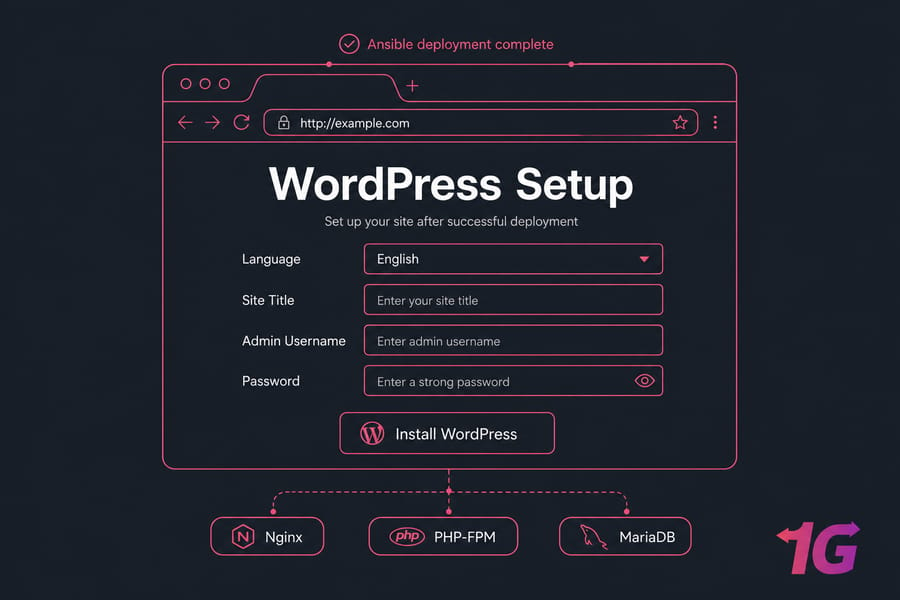
curl -I http://example.comYou should see a valid HTTP response and, in the browser, the WordPress setup page asking for site title, admin username, and password. That's the moment you know the stack is alive.
If you need deeper log inspection, this guide on Linux logs is worth keeping open in another tab.
How to secure a WordPress deployment with Ansible
A working deployment isn't production-ready yet. Not even close.
Start with basics: use a non-root sudo user, store database credentials in Ansible Vault, and keep wp-config.php tighter than the rest of the web root. Incorrect permissions on wp-content can also break uploads, so don't get too aggressive.
Open only what you need in UFW: SSH, HTTP, and HTTPS. If you need help, here's how to configure a firewall on your VPS.
ufw allow OpenSSH
ufw allow 80/tcp
ufw allow 443/tcp
ufw enable
Next, add TLS. After DNS is pointing correctly, use Certbot and install Let’s Encrypt SSL certificate on Linux. You should also disable directory listing in Nginx, keep packages updated, and plan backups before plugin sprawl starts.
For deeper post-install guidance, read how to secure a WordPress site on a VPS. And yes, backups matter more than people think — especially right before theme changes.
If you want server control without handling every OS task yourself, managed VPS hosting can reduce the operational load.
Common Ansible WordPress errors and fixes
| Error | Likely Cause | Fix |
| Host unreachable | Bad IP, closed SSH port, wrong key | Test SSH manually and verify inventory values |
| Sudo failed | User lacks sudo privileges | Add sudo rights or use the correct admin account |
| YAML syntax error | Indentation or quoting issue | Validate spacing carefully; YAML is unforgiving |
| Package not found | Wrong PHP version or stale apt cache | Update cache and confirm package names on Ubuntu version |
| DB connection error | Bad credentials or socket/auth mismatch | Recheck DB vars and MariaDB module login method |
| 403 Forbidden | Bad permissions or Nginx root mismatch | Fix ownership, modes, and server block paths |
| 500 error | PHP extension missing or config issue | Check PHP modules, logs, and wp-config settings |
| Nginx test failed | Invalid server block syntax | Run nginx -t and fix the reported line |
| Site not resolving | DNS not pointed yet | Wait for DNS propagation or correct the A record |
When Ansible fails, check three things first: SSH connectivity, variable values, and service logs. That's where most real issues live.
For Nginx, run nginx -t. For service failures, use journalctl -u nginx or the PHP-FPM unit. For WordPress app problems, inspect logs and confirm the right PHP modules are installed. Missing php-mysql or php-xml still catches people out.
If the site returns 403 or 500 after deployment, don't just rerun the playbook blindly. Verify web root ownership, wp-config.php permissions, and database credentials. I've seen a single typo in db_name waste an hour.
For broader debugging help, keep these handy: Linux logs, guides for 500 and 403 errors, and common SSH connection failures.
Ansible vs Docker vs manual WordPress installation
| Approach | Setup Time | Repeatability | Scalability | Ideal Use Case |
| Manual | Fastest once | Low | Low | Single test site |
| Docker | Moderate | High | High | Container-based workflows |
| Ansible | Moderate upfront | High | High | Repeatable VPS provisioning |
Manual installs are easiest for a one-off beginner project. Docker gives you portable app isolation. Ansible focuses on provisioning the server consistently, which is why it's such a good fit for classic VPS hosting and multi-site reuse.
Ansible doesn't replace Docker, by the way. They solve different problems. If your team thinks in infrastructure and servers, Ansible is often the cleaner long-term path.
Best VPS setup for automated WordPress hosting
| Site Type | CPU | RAM | Storage | Notes |
| Testing / lab | 1 vCPU | 2 GB | 20 GB | Fine for learning and validation |
| Small live site | 2 vCPU | 4 GB | 40 GB NVMe | Good starting point for production-ish use |
| Growing site | 4 vCPU | 8 GB | 80 GB NVMe | More room for plugins, traffic, and cache layers |
| Agency / multiple sites | 4+ vCPU | 8+ GB | 100 GB+ NVMe | Better for repeated playbook-driven deployments |
Wrapping Up: Deploy WordPress Faster with Ansible
If you want to install WordPress on VPS with Ansible, shared hosting usually gets in the way. You need SSH access, sudo control, predictable package management, and enough resources to run Nginx, PHP-FPM, MariaDB, and updates without choking.
NVMe storage helps more than people expect. WordPress admin feels snappier, plugin updates finish faster, and database-heavy tasks hurt less.
If you want a clean server you fully control, look at Linux VPS hosting or an Ubuntu VPS. If you want a stack tailored to this use case, WordPress VPS hosting makes sense. And if you want less hands-on maintenance, managed VPS hosting is the softer landing.
Need a clean Ubuntu VPS for your WordPress Ansible playbook? 1Gbits gives you root access, scalable resources, and fast storage the parts that actually matter when you're doing repeatable deployments.
That's the practical answer to how to use Ansible to install WordPress: define the host, set the variables, automate the LEMP stack, template the app config, and verify everything before calling it done. Once you have that workflow, rebuilding or scaling gets a lot less painful.
If you're ready to launch WordPress faster with the right VPS, start with WordPress VPS hosting or a flexible Ubuntu-based plan from 1Gbits and put your playbook to work.

Leave A Comment