")
Securing your site with HTTPS used to be a paid hassle. Now? It's free, automated, and (mostly) painless once you know the moving parts. This guide walks you through how to install a Let's Encrypt SSL certificate on a Linux server, whether you're running Nginx or Apache, and shows you how to keep it renewing on autopilot so it never expires on you at 2 a.m.
I'll keep things practical. Real commands, real file paths, and the troubleshooting steps I actually use when something breaks during validation.
Quick Answer: Installing a Let's Encrypt SSL Certificate
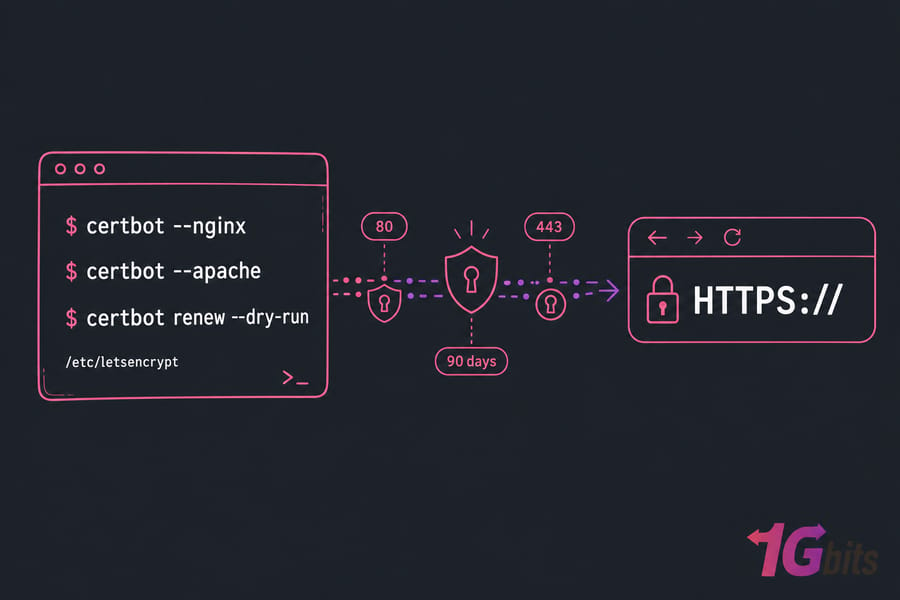
To install a Let's Encrypt SSL certificate, point your domain to your server, install Certbot, and run Certbot with your web server plugin either certbot --nginx or certbot --apache. Then enable HTTPS redirection, test the certificate in a browser, and confirm automatic renewal works with certbot renew --dry-run.
- Point your domain's A record to the server IP.
- Open ports 80 and 443 in the firewall.
- Install Certbot and the matching plugin (python3-certbot-nginx or python3-certbot-apache).
- Run Certbot, choose redirect, and let it edit your config.
- Verify with a browser and certbot renew --dry-run.
What a Let's Encrypt SSL Certificate Does for HTTPS Security
Let's Encrypt is a free, automated certificate authority. It issues domain-validated TLS certificates that browsers trust the same way they trust any paid certificate. The catch? Each cert is valid for only 90 days. That's intentional — short lifetimes force automation, and automation prevents the "oh god, the cert expired again" Slack message.
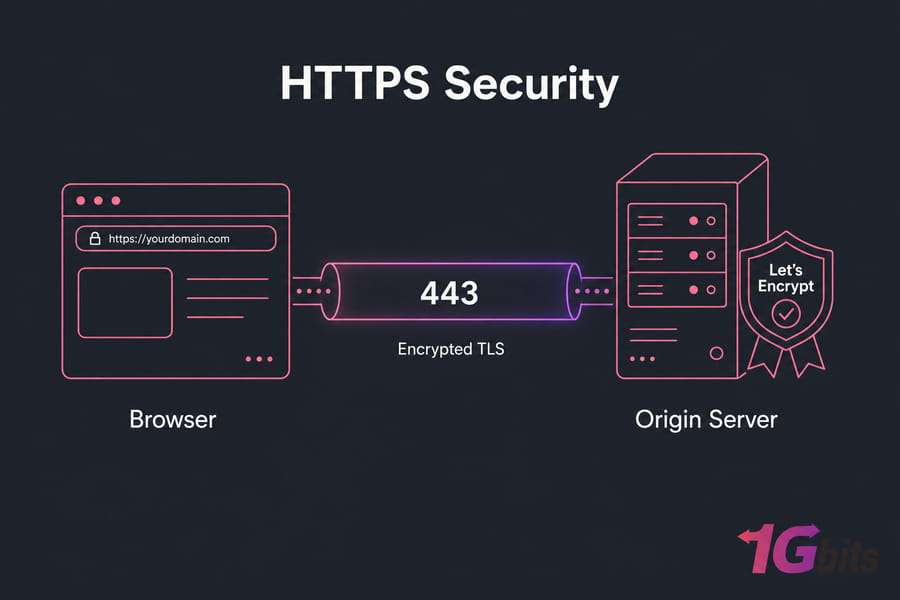
When a visitor hits your HTTPS site, the certificate proves your server actually controls the domain, and traffic between browser and server gets encrypted. No more "Not Secure" warnings. No more browser shaming.
How Let's Encrypt Differs from Paid SSL Certificates
For most websites, the practical difference is zero. Browsers treat them identically. The real distinctions:
- Cost: Let's Encrypt is free. Paid certs run anywhere from $10 to several hundred per year.
- Validation type: Let's Encrypt only does Domain Validation (DV). If you need Organization (OV) or Extended Validation (EV), you'll need a paid CA.
- Lifetime: 90 days vs. 1+ year for paid certs.
- Automation: Built around the ACME protocol. Issuance and renewal are designed to be hands-off.
If you want a deeper foundation, our explainer on what is ssl covers the basics without the marketing fluff.
How Certbot Automates Certificate Issuance and Renewal
Certbot is the official ACME client maintained by the EFF. It talks to Let's Encrypt's servers, proves you own the domain, downloads the certificate, and (if you let it) edits your Nginx or Apache config to use it. It also installs a systemd timer or cron job that renews everything automatically. That last bit is the part most tutorials gloss over — and it's the part that matters most long-term.
Prerequisites to Install Let's Encrypt on a Linux Server
Skip these checks and you'll spend an hour fighting Certbot for no reason. I've watched it happen too many times. Run through this list before you touch a single command.
| Requirement | How to Check | Why It Matters |
| Domain points to server IP | dig +short example.com | Validation fails if DNS doesn't match |
| Port 80 open | sudo ufw status or ss -tlnp | HTTP-01 challenge uses port 80 |
| Port 443 open | Same as above | HTTPS traffic flows here once installed |
| Web server installed and serving the domain | Visit http://example.com | Certbot needs a working vhost/server block |
| sudo or root access | sudo -v | Certbot writes to /etc/letsencrypt and reloads services |
| Email address | Anything you check | Used for expiry notices and account recovery |
| No CDN proxying during install | Cloudflare orange cloud → grey, temporarily | Proxy can intercept the ACME challenge |
Check That Your Domain Points to the Correct Server IP
Open a terminal and run:
dig +short example.com
dig +short www.example.com
Both should return your server's public IP. If they don't, fix DNS first and wait for propagation. Trying to issue a certificate before DNS resolves is the #1 reason people get stuck.
One more thing — if you've got an AAAA record for IPv6, make sure your server is actually serving traffic on that address too. A broken AAAA record is a surprisingly common silent killer. Either fix it or remove it before requesting the cert.
Open Ports 80 and 443 Before Running Certbot
The HTTP-01 challenge needs to reach your server on port 80. Even if your site already runs on HTTPS-only via another method, you still need 80 open for validation.
sudo ufw allow 80/tcp
sudo ufw allow 443/tcp
sudo ufw reload
If you're on a cloud provider, check the security group or network firewall too. The OS firewall isn't the only one in play.
Confirm Whether Your Site Uses Nginx or Apache
Quick check:
sudo systemctl status nginx
sudo systemctl status apache2
Whichever one is active determines which Certbot plugin you need. If neither is running, install one before continuing.
Warning: Don't request a certificate until DNS fully points to your server. Failed attempts count toward Let's Encrypt's rate limits, and you can get locked out for hours.
How to Install Certbot on Ubuntu and Debian
Ubuntu and Debian both ship Certbot in their default repos. That's the path I recommend — it's clean, integrates with apt, and gets security updates with the rest of your system.
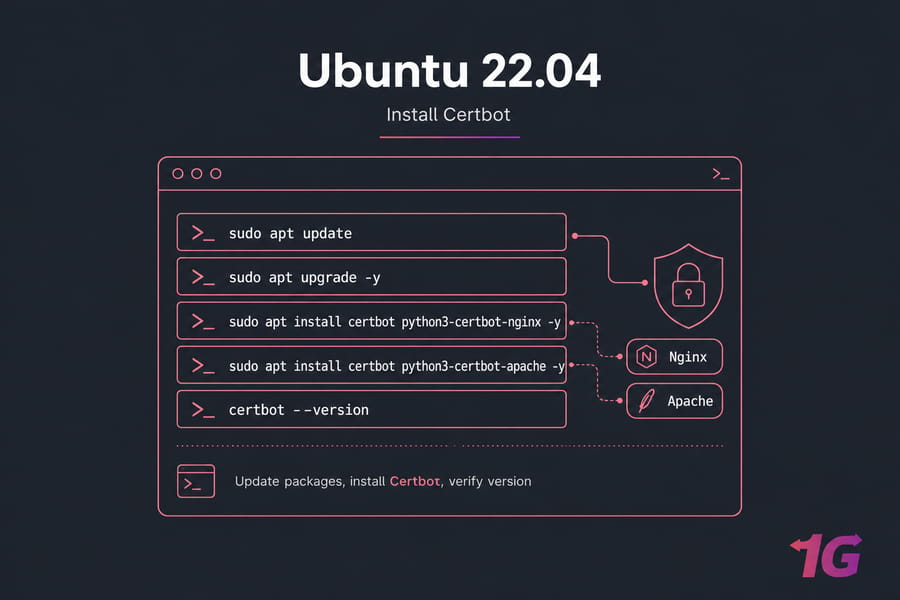
Update Package Indexes Before Installing Certbot
sudo apt update
sudo apt upgrade -y
Always update first. Stale package lists lead to mismatched dependencies, and you don't want that during an SSL install.
Install Certbot for Nginx
sudo apt install certbot python3-certbot-nginx -y
That installs Certbot itself plus the Nginx plugin, which is what lets Certbot read and rewrite your Nginx config automatically.
Install Certbot for Apache
sudo apt install certbot python3-certbot-apache -y
Same idea, different plugin. Don't install both unless you're actually running both web servers — you'll just confuse yourself later.
Verify That Certbot Is Installed Correctly
certbot --version
You should see something like certbot 2.x.x. If you get "command not found," your PATH is off or the install didn't complete re-run apt install and watch for errors.
Install Let's Encrypt SSL on Nginx with Certbot
This is where it gets satisfying. One command, a couple of prompts, and your site is live on HTTPS.
Run Certbot for Your Nginx Server Block
sudo certbot --nginx -d example.com -d www.example.com
Replace example.com with your actual domain. The -d flag stacks — list every hostname you want covered. Always include both the apex (example.com) and the www variant unless you have a strong reason not to.
Certbot will:
- Ask for your email (used for expiry warnings).
- Make you accept the Let's Encrypt Terms of Service.
- Detect your Nginx server blocks and ask which one to secure.
- Run the HTTP-01 challenge.
- Ask whether to redirect HTTP to HTTPS — pick option 2 (redirect) unless you have a specific reason not to.
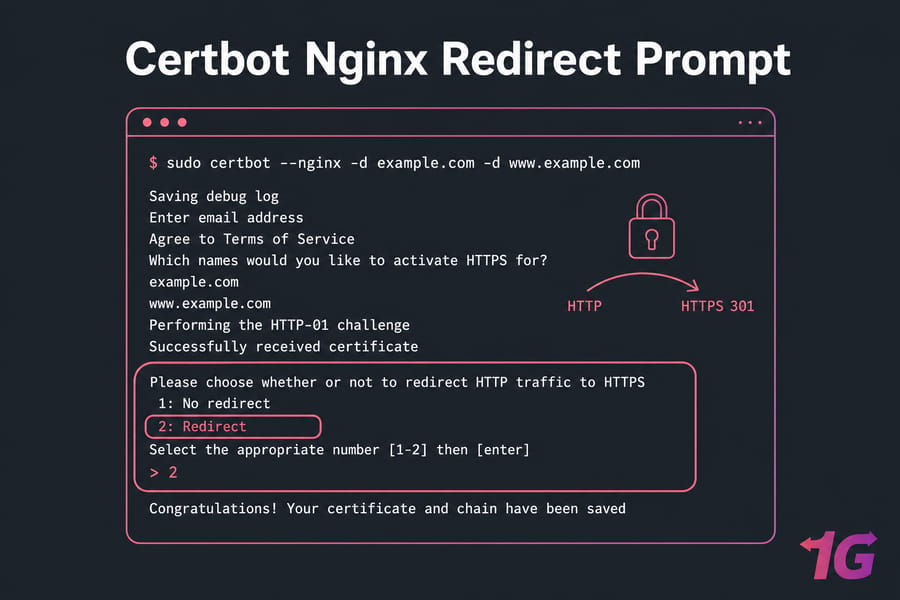
Choose the HTTPS Redirect Option Safely
When Certbot offers to redirect, it modifies your server block to issue a 301 from HTTP to HTTPS. This is what you want. The only time I'd skip it is if you have an unusual setup like a reverse proxy already handling redirects upstream and even then, I'd usually still pick redirect.
Key Takeaway: Certbot can edit Nginx config automatically, but always test with nginx -t before reload. A typo in the config file (yours or Certbot's) will take the site offline on reload.
sudo nginx -t
sudo systemctl reload nginx
Where Nginx Let's Encrypt Certificate Files Are Stored
Certbot drops everything into /etc/letsencrypt/live/yourdomain/. Inside, you'll find:
fullchain.pem— your certificate plus the intermediate chain (this is what Nginx serves)privkey.pem— the private key (keep this locked down)cert.pem— just your domain's certificatechain.pem— just the intermediate chain
These are symlinks to the actual files in /etc/letsencrypt/archive/. Don't move them — Certbot expects them where they are. If you want to dig deeper into web server tuning, our piece on configuring SSL with Nginx covers cipher suites and HTTP/2.
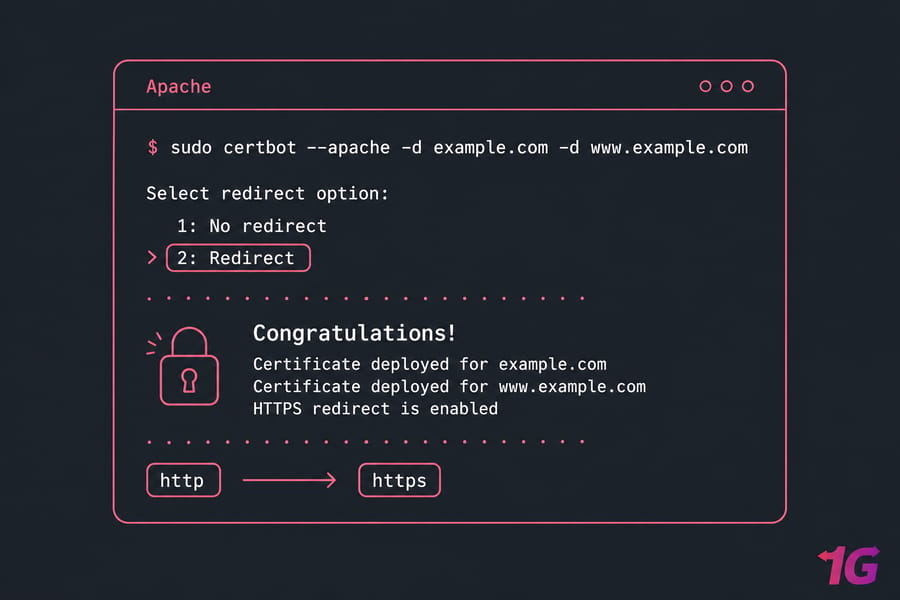
Install Let's Encrypt SSL on Apache with Certbot
Apache works the same way conceptually, but the plugin reads VirtualHosts instead of server blocks.
Run Certbot for Your Apache VirtualHost
sudo certbot --apache -d example.com -d www.example.com
Same prompt flow as Nginx. Certbot scans your /etc/apache2/sites-enabled/ directory, finds the VirtualHost matching your domain, and either modifies it directly or creates an SSL-enabled copy.
If you get an error about mod_ssl not being enabled, fix it with:
sudo a2enmod ssl
sudo systemctl restart apache2
Then re-run Certbot.
Enable HTTPS Redirect in Apache
Pick the redirect option when Certbot prompts. It adds a rewrite rule to your HTTP VirtualHost that pushes traffic to HTTPS. Test the config before reloading:
sudo apachectl configtest
sudo systemctl reload apache2
If apachectl configtest reports "Syntax OK," you're good. If not, read the error carefully it usually points to the exact line.
Key Takeaway: Apache VirtualHosts must already match your domain for Certbot to detect and configure them cleanly. If you've got a placeholder default vhost responding to your domain, fix that first.
Where Apache Let's Encrypt Certificate Files Are Stored
Same place as Nginx: /etc/letsencrypt/live/yourdomain/. Apache references fullchain.pem and privkey.pem in the SSL VirtualHost — Certbot adds those directives for you.
Verify SSL Installation and Force HTTPS Correctly
Don't just trust that it worked. Verify. Five minutes of checking now saves a week of "why won't this load on Safari" debugging later.
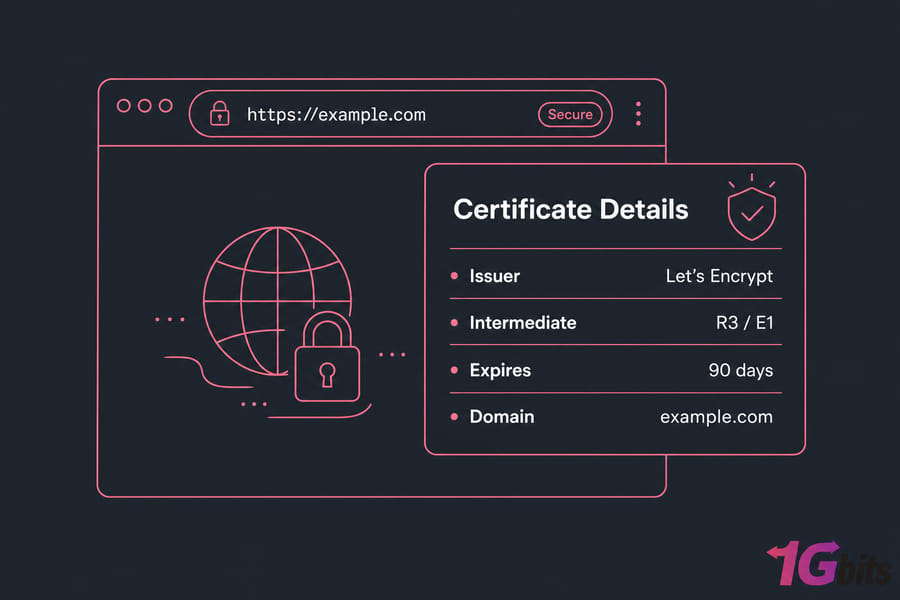
Check the Certificate in a Browser
Open https://example.com in your browser. Click the padlock. Confirm:
- Issuer is "Let's Encrypt" (or "R3" / "E1" / similar Let's Encrypt intermediate)
- Expiry is roughly 90 days out
- The domain matches what you requested
Test HTTPS from the Command Line
curl -I http://example.com
curl -I https://example.com
The first should return a 301 redirect to HTTPS. The second should return 200 (or whatever your app returns). If the first doesn't redirect, the redirect step didn't take — re-run Certbot or check your config.
For deeper inspection of the cert chain:
openssl s_client -connect example.com:443 -servername example.com
Look for "Verify return code: 0 (ok)" near the bottom. That confirms the full certificate chain is valid.
Confirm the Full Certificate Chain Is Valid
If the padlock doesn't show, but the cert is valid, you've probably got mixed content — HTTP-loaded images, scripts, or stylesheets on an HTTPS page. Open the browser console and look for warnings. Fix the URLs in your app's templates or database.
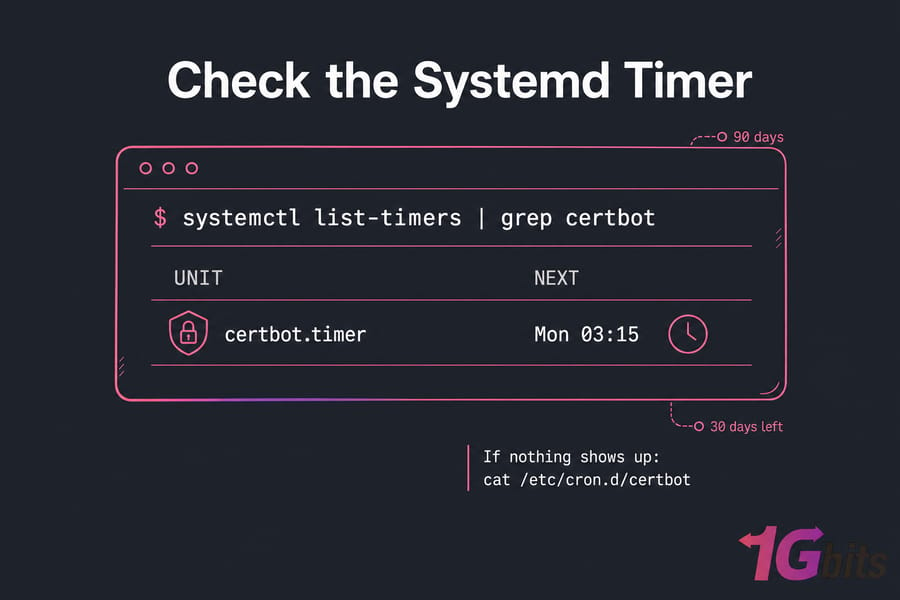
Auto-Renew Let's Encrypt Certificates with Certbot Renew
Here's the part that keeps your site secure six months from now. Let's Encrypt certs expire every 90 days. Certbot tries to renew them when there are 30 days left. If you've installed via apt, the systemd timer or cron job is already set up but you should verify it.
Check the Systemd Timer or Cron Job
systemctl list-timers | grep certbot
You should see something like certbot.timer with a "next run" timestamp. If nothing shows up, check for a cron entry instead:
cat /etc/cron.d/certbot
One of those should exist. If neither does, something went sideways during install.
Test Renewal with a Dry Run
This is the single most important command in this entire guide:
sudo certbot renew --dry-run
It simulates a full renewal against Let's Encrypt's staging server without actually replacing your cert. If the dry run succeeds, real renewals will succeed. If it fails, you'll get the exact error message and can fix it now — not at 3 a.m. when the cert actually expires.
Pro Tip: A successful certbot renew --dry-run is the fastest way to confirm your setup won't expire unexpectedly. Run it once a month if you're paranoid (I am).
Reload Nginx or Apache After Renewal If Needed
Certbot's Nginx and Apache plugins handle reload automatically. If you've installed the cert via webroot or another method, you may need a deploy hook:
sudo certbot renew --deploy-hook "systemctl reload nginx"
Or for Apache:
sudo certbot renew --deploy-hook "systemctl reload apache2"
Check renewal logs at /var/log/letsencrypt/letsencrypt.log if anything looks off.
Let's Encrypt Wildcard Certificate and DNS Challenge Options
Standard Let's Encrypt certs use the HTTP-01 challenge Certbot drops a file in your webroot, Let's Encrypt fetches it, and you're validated. But HTTP-01 can't issue wildcard certificates. For that, you need DNS-01.
| Feature | HTTP-01 (Standard) | DNS-01 (Wildcard-capable) |
| Validation method | File on web server | TXT record in DNS |
| Wildcard support | No | Yes (*.example.com) |
| Setup difficulty | Easy | Moderate (DNS API needed for automation) |
| Best for | Single sites and known subdomains | Many subdomains or dynamic subdomain creation |
When to Use DNS-01 Instead of HTTP-01
DNS-01 makes sense if you're running dozens of subdomains, can't expose port 80 publicly, or specifically need a wildcard. To automate it, your DNS provider needs an API and a matching Certbot plugin (Cloudflare, Route53, DigitalOcean, and others have official plugins).
Wildcard Certificate Limitations Beginners Should Know
A wildcard sounds appealing, but it's not always the right call. Wildcards only cover one level — *.example.com covers blog.example.com but not api.staging.example.com. They also concentrate risk: if the private key leaks, every subdomain is compromised. For a typical website with a handful of subdomains, just list them with -d flags.
Common Let's Encrypt SSL Errors and Troubleshooting Fixes
Let's get into the failure modes. Most are quick fixes once you know what to look for.
| Error / Symptom | Likely Cause | Fix |
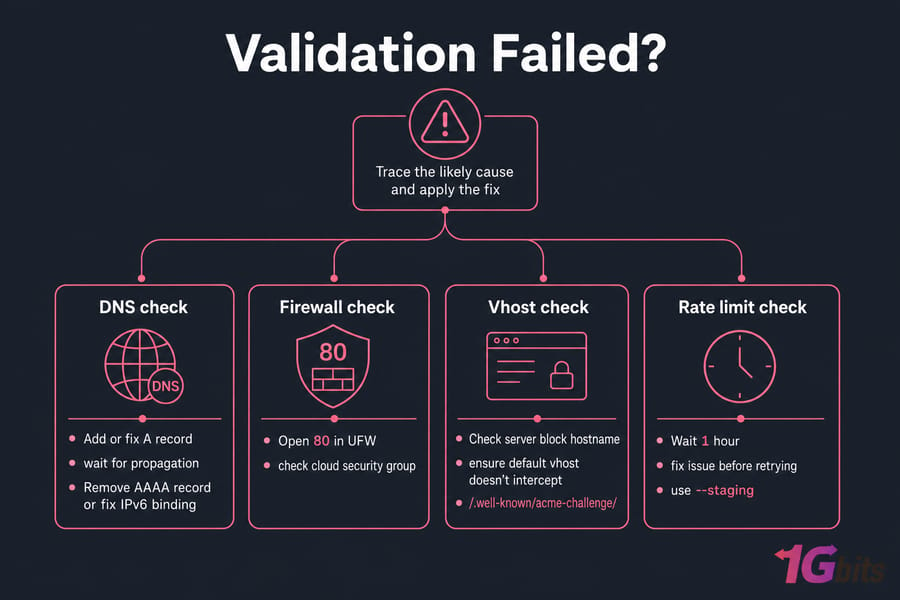
| "DNS problem: NXDOMAIN looking up A" | Domain not pointing to server | Add or fix A record, wait for propagation |
| "Connection refused" or timeout on port 80 | Firewall blocking port 80 | Open 80 in UFW and cloud security group |
| "Invalid response from /.well-known/acme-challenge/..." | Web server misconfigured or wrong vhost serving | Check server block hostname; ensure default vhost doesn't intercept |
| "Fetching ... 522 / 521" via Cloudflare | CDN proxy blocking origin or origin down | Set Cloudflare to DNS-only (grey cloud) during install |
| "Too many failed authorizations recently" | Hit Let's Encrypt rate limit | Wait 1 hour; fix issue before retrying; use --staging for testing |
| "DNS problem: SERVFAIL looking up AAAA" | Broken IPv6 record | Remove AAAA record or fix IPv6 binding |
| Browser shows "Not Secure" after install | Mixed content or wrong cert served | Fix HTTP asset URLs; check vhost order |
| "NET::ERR_CERT_AUTHORITY_INVALID" in browser | Missing intermediate chain | Use fullchain.pem, not cert.pem |
| Renewal silently failing | Web server change or port blocked | Run certbot renew --dry-run, check /var/log/letsencrypt/ |
| Wrong certificate served | Multiple vhosts, no SNI default | Specify default_server in Nginx or set ServerName/ServerAlias correctly in Apache |
Domain Validation Failed Because DNS Is Incorrect
Easily the most common issue. Run dig +short example.com from outside your server (use a tool like dnschecker.org if you can't). If the result doesn't match your server IP, that's your problem. Wait for propagation — sometimes it's instant, sometimes it takes hours depending on TTL.
Firewall, Reverse Proxy, or CDN Blocks the Challenge
If you're behind Cloudflare with the orange cloud on, the ACME challenge can fail because Cloudflare proxies the request and your origin returns something unexpected. Either turn the proxy off temporarily, or use the DNS-01 challenge with the Cloudflare plugin. Same logic applies to other CDN proxies.
Warning: Cloud proxies and CDN orange-cloud settings can interfere with validation if origin traffic is misconfigured. When in doubt, disable proxying during the initial issuance.
Too Many Requests and Let's Encrypt Rate Limits
Let's Encrypt enforces strict rate limits — 50 certs per registered domain per week, 5 duplicate certs per week, and 5 failed validations per account per hostname per hour. If you're testing, always use --staging first:
sudo certbot --nginx -d example.com --staging
Staging certs aren't trusted by browsers, but they don't count against rate limits. Once your staging run succeeds, drop the flag and re-run for the real cert.
Browser Still Shows SSL or Certificate Authority Errors
If the cert installs fine but browsers complain, the usual culprits are: serving cert.pem instead of fullchain.pem (chain missing), system clock badly out of sync, or an old cached cert. Force-refresh, try incognito, and double-check your config references fullchain.pem.
Best VPS Hosting Environment for Let's Encrypt and Website Security
SSL setup goes smoother on infrastructure where you actually control DNS, firewall, and package management. Shared hosting often hides these knobs behind a control panel, which means when something breaks, you're stuck waiting on support.

When a Self-Managed Linux VPS Makes Sense
If you want root access, custom Nginx tuning, multiple domains, or wildcard certs with DNS-01 automation — a self-managed Linux VPS is the cleanest fit. You install whatever Certbot plugin you want, edit configs directly, and there's no panel fighting your changes.
When Managed VPS Is Better for Hands-Off SSL Maintenance
If you'd rather not deal with renewals, firewall rules, or web server upgrades, managed VPS hosting handles that side for you while still giving you a real server (not shared). Good middle ground for teams that want VPS-grade performance without dedicating a sysadmin.
Final Checklist
- Domain A record points to server IP
- Ports 80 and 443 are open in OS firewall and cloud security group
- Web server (Nginx or Apache) is installed and serving the domain
- Certbot and matching plugin installed via apt
- Certificate issued via
certbot --nginxorcertbot --apache - HTTPS redirect enabled
- Browser shows valid Let's Encrypt cert and padlock
curl -I http://example.comreturns 301 to HTTPScertbot renew --dry-runsucceeds- Systemd timer or cron job for renewal verified active
Hit all ten and you're done. Properly done not "works for now and will probably break in 89 days" done.
That's the complete workflow. If you're still picking infrastructure, choose something with clean DNS control, easy firewall management, and apt-based package installs that combination is what makes Certbot feel effortless. A Linux VPS gives you the full root access needed to run through this entire guide from top to bottom.

Leave A Comment