
This tutorial will go through the steps to install Nginx on Ubuntu 20.04 server. We will set up a basic site and make some configurations.
Nginx (which is pronounced as Engine-X) is an open-source web server that is extremely popular amongst the whole world. It is responsible for hosting some of the plane's largest and highest-traffic websites. It is often used as an entire web server, reverse proxy, or HTTP cache.
Since it’s free to use and has loads of powerful features, it’s a favourite among most web administrators. It is extremely lightweight software with powerful features packed with it.
What you will need:
- A user with Sudo privileges
- A VPS (server) running with Ubuntu 20.04
- Basic knowledge of Linux commands
Install Nginx
Nginx is directly available in Ubuntu’s default repositories, and installing it directly from the repository is possible. However, before we’re going to install it, we will update the local package index so that we will have the most recent package listings.
sudo apt update
sudo apt install nginx
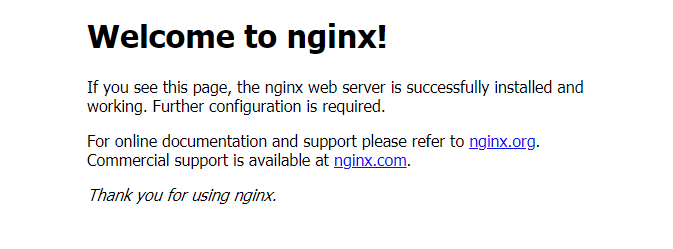
Once updated, you can install Nginx. Now go to your browser and enter the server IP address; you will see this page. If you see it, you have successfully installed Nginx on your Ubuntu server.
Configure the firewall
Before we proceed further, we will get some firewall configurations to allow access to the service. If you don’t have ufw firewall active, you can skip this section. You can list the application configurations by,
sudo ufw app list
And you will see the listing as follows.
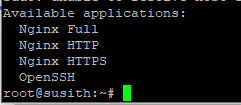
As demonstrated by the output, there are three profiles available for Nginx:
- Nginx Full: This profile opens both port 80 (normal, unencrypted web traffic) and port 443 (TLS/SSL encrypted traffic)
- Nginx HTTP: This profile opens only port 80 (normal, unencrypted web traffic)
- Nginx HTTPS: This profile opens only port 443 (TLS/SSL encrypted traffic)
You should enable the most restrictive profile that will still allow the traffic you’ve configured. Right now, we will only need to allow traffic on port 80.
sudo ufw allow 'Nginx HTTP'
To verify the changes, enter the following command:
sudo ufw status
Now everything is running well, so let’s get familiar with some of the common commands you can use to manage Nginx.
Additionally, it's important to keep your system secure by managing user access. If you need to change the password for any user on your Ubuntu server, check out our guide on how to change password in Ubuntu for detailed instructions.
Managing Nginx
If you want to stop your web server:
sudo systemctl stop nginx
Now to start the server once again, you can enter the following command:
sudo systemctl start nginx
If you would like to restart the server, enter the following command:
sudo systemctl restart nginx
If you would like to restart the server when you are making configuration changes without dropping the connection, enter the following command:
sudo systemctl reload nginx
By default, Nginx is configured to start automatically when the server boots. If this is not what you want, you can disable this behaviour by typing:
sudo systemctl disable nginx
To re-enable during start-up, enter:
sudo systemctl enable nginx
These commands are the most basic commands that you can use to manage the server!
Create your website
One of the top features of using an Nginx web server is the server block. This can encapsulate configuration details and host more than one domain from a single server. By default Nginx in Ubuntu 20.04 has one server block enabled default to serve documents out of the directory /var/www/html.
This will be perfect if you have a single website; however, it’s not recommended if you will host multiple websites. Therefore instead of using the directory mentioned above, we can create a directory that matches your domain.
If you're planning to deploy Django with Nginx on your Ubuntu server, you can follow our comprehensive guide on how to install Django on Ubuntu to get started with the necessary setup and configuration.
So let’s create a simple HTML page in /var/www/sample/ and let’s create a simple HTML file. Instead of ‘sample’, you can enter whatever you want (suggestion: use your domain name).
Enter the directory:
cd /var/www
Create the sample directory and enter the directory:
sudo mkdir sample
cd sample
Now we will create a sample index.html file using the Nano text editor:
nano /var/www/sample/index.html
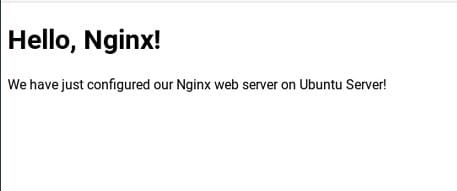
Add the following sample HTML text in the window:
<!doctype html>
<html>
<head>
    <meta charset="utf-8">
    <title>Hello, Nginx!</title>
</head>
<body>
    <h1>Hello, Nginx!</h1>
    <p>We have just configured our Nginx web server on Ubuntu Server!</p>
</body>
</html>
Don’t forget to save the file and exit it. To save the file, press CTRL+X and Y and then press ENTER.
Setting up virtual hosts
Now we need to set up the virtual hosts. For Nginx to serve the content, we created above, creating a server block with the correct directives is necessary. Instead of modifying the default configuration file directly, let’s make a new one at /etc/nginx/sites-available/sample:
sudo nano /etc/nginx/sites-available/sample
Now in the opened configuration file, copy and paste the following file. Don’t forget to change the name that you chose earlier (in this case, we are using a sample). The following configuration block is similar to the default but updated for our new directory and domain name:
server {
        listen 80;
        listen [::]:80;
        root /var/www/sample;
        index index.html index.htm index.nginx-debian.html;
        server_name sample www.sample;
        location / {
                try_files $uri $uri/ =404;
        }
}
Note that we’ve updated the root configuration to our new directory and the servr_name to our domain name.
Next, let’s enable the file by creating a link from it to the sites-enabled directory, which Nginx reads from during startup. This will create two server blocks enabled and configured to respond to requests.
sudo ln -s /etc/nginx/sites-available/sample /etc/nginx/sites-enabled/
You might encounter problems adding additional server names; therefore, adjust a small value in the /etc/nginx/nginx.conf file. First, open the file:
sudo nano /etc/nginx/nginx.conf
Find the server_names_hash_bucket_size directive and remove the # symbol to uncomment the line.
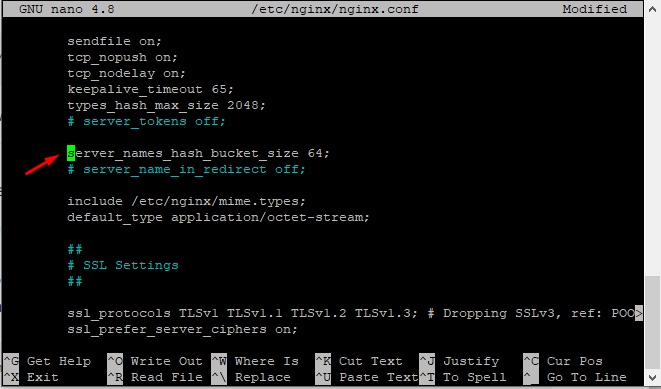
Save and close the file once done. Next, test to make sure that there are no syntax errors in any of your Nginx files:
sudo nginx -t
Activate virtual host
We’re ready with all the needed configurations; let’s go ahead and restart the Nginx that will enable the changes made:
sudo systemctl restart nginx
Test your Nginx server
Let’s check if everything works as it should. Open our newly created site in a web browser. Remember that we used:80 port.
To enhance the functionality of your Ubuntu server, you may want to consider adding users for managing different tasks. Learn how to add users on Ubuntu by following this guide: How to Add Users on Ubuntu. This will allow you to organize access and permissions on your server more effectively.
If you see an output similar to the one seen below, you have successfully configured and set up the Nginx Web server.
Conclusion
Now that your web server is installed, you have many options for the type of content to serve and the technologies you want to use to create a richer experience. If you're looking to host your server on a reliable platform, consider using an Ubuntu VPS for enhanced control and flexibility. With an Ubuntu VPS, you can scale your resources to match your needs, ensuring optimal performance for your web applications.
Additionally, if you want remote access to your server's graphical interface, setting up an Ubuntu RDP server is a great solution. This allows you to manage your server from anywhere with ease, offering a seamless experience for administration tasks.
If you encounter any problems along the way, don’t hesitate to contact us; we will be happy to assist you. If you liked this article, don’t forget to share it with your colleagues to help them as well.
People also read:
- How To Install Nginx on Centos 7
- How To Configure SSL with Nginx
- How To Install phpMyAdmin with Nginx on CentOS
- How To Fix 502 Bad Gateway Error on Nginx
- How to take a screenshot in Ubuntu?
Leave A Comment