
Before we get to the steps on how to install MariaDB on Ubuntu, we will need to understand what is MariaDB. MariaDB is an open-source database management system that is a backward compatible replacement for MySQL. It is a multi-threaded relational database management system. MariaDB is maintained and developed by the MariaDB Foundation, which comprises some of the original developers of MySQL.
This is commonly used as an alternative for the MySQL portion of the LAMP stack. It can be used as a direct replacement for MySQL. This tutorial will go through two methods of installing MariaDB on your Ubuntu server (we recommend using the first one). Then we will set up MariaDB with the initial configurations and get it up and running.
Note that the following method is exactly the same for installing MariaDB on Ubuntu 16.04, Ubuntu 18.04 and Ubuntu 20.04.
Prerequisites
In order to get MariaDB set on your Ubuntu server, we will need:
- A server running Ubuntu 18.04 operating system (can be replaced with Ubuntu 20.04 or Ubuntu 16.04)
- A user account with sudo privileges
- Basic understanding of Linux commands
Installing MariaDB on Ubuntu 18.04
We will be using MariaDB 10.3 version throughout the tutorial.
To install MariaDB on your server, we will need to update the packages index:
sudo apt update
Now the packages are updated, we can go ahead and install the latest version of MariaDB by issuing the following command:
sudo apt install mariadb-server
When prompted to continue, press y.
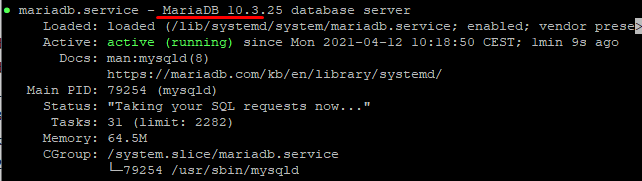
Once MariaDB is installed successfully, it will start automatically, and to check it for yourself, enter the following command. You will see an output similar to the one below.
sudo systemctl status mariadb
If the command does not end automatically, press q to exit back to the terminal.
To check for the version, you can use the following:
mysql –V

Congratulations, you successfully installed MariaDB on your Ubuntu 18.04 server. In the next part, we will go through the MariaDB installation process using the MariaDB repositories. You can skip the next section and move to the configurations if you already have the server.
Installing MariaDB using the MariaDB Repositories
Before proceeding with this installation, you should go to the MariaDB repository and check if a new version is available for you to install. At the time of writing this article, the most recent stable version was MariaDB 10.6.
First, we will add the software properties common package.
sudo apt-get install software-properties-common
Now we will go ahead and add the MariaDB GPG key to your system by entering the following command:
sudo apt-key adv --fetch-keys 'https://mariadb.org/mariadb_release_signing_key.asc'
Now that we have added the key, we add the MariaDB repository using:
sudo add-apt-repository 'deb [arch=amd64,arm64,ppc64el] https://mariadb.mirror.serveriai.lt/repo/10.5/ubuntu bionic main'
Now we’re all set. In order to install packages from the MariaDB repository, we will need to update the package list.
sudo apt update
Now that the repository is added, install the MariaDB package with:
sudo apt install mariadb-server
Once the service is activated automatically, enter the following command to verify if the service is running:
sudo systemctl status mariadb
Congratulations, you have successfully installed MariaDB on Ubuntu 18.04.
Configuring MariaDB
For new MariaDB installations, we need to include some security scripts. Running this script will change some default options. We will use it to block remote root logins and to remove unused database users.
Run the following command:
sudo mysql_secure_installation
Once this command is run, you will go through a series of prompts where you can make some changes. The first prompt will ask you to enter the current database root password, but we can ignore this since we didn’t set one up. Press Enter to skip to the next one.
From this point onwards, you can press Y to go forward with the default security measures. This will remove some anonymous users and the test database, disable remote root logins, and load these new rules so that MariaDB immediately implements your changes.
Connect to MariaDB from the command line
We can use the MariaDB client to connect to the MariaDB server through the terminal. To log in to the MariaDB server as the root user (the user you created in the previous step), type:
mysql -u root –p
If you configured a separate administrative user with password authentication, add the username of the separate account instead of the root.
You will be prompted to enter the root password you have previously set when the mysql_secure_installation script was run. MariaDB is up and running, and your user can authenticate successfully.
Conclusion
In this guide, we covered the installation of MariaDB on an Ubuntu VPS server running Ubuntu 18.04, and demonstrated how to use it as a direct replacement for SQL Server. We also added essential security measures during the installation process to ensure the server is ready for secure connections from the command line.
Additionally, if you're looking to manage your Ubuntu server remotely, setting up an RDP server for Ubuntu could be a great option to provide a graphical interface for easier access.
If you liked this tutorial, don’t forget to share it with your colleagues; your feedback is important to us. So let us know in the comments below!
People also read:
Leave A Comment