
![How to Set Up a Project Zomboid Dedicated Server 🎮 [2026]](https://1gbits.com/cdn-cgi/image/width=1200,quality=80,format=auto/https://s3.1gbits.com/blog/2026/09/how-to-setup-project-zomboid-dedicated-server-main.webp "How to Set Up a Project Zomboid Dedicated Server 🎮 [2026]")
Quick answer: To set up a Project Zomboid dedicated server, install the server files with SteamCMD (app ID 380870), edit the servertest.ini config to set your server name and admin password, open UDP ports 16261 and 16262 in your firewall (and forward them on your router if you're hosting at home), launch the server with StartServer64.bat on Windows or ./start-server.sh on Linux, then have friends connect by IP and port.
This guide walks the whole thing end to end — Windows and Linux paths, server sizing by player count, the config file that actually matters, ports and NAT, Workshop mods, backups, and a troubleshooting table for when the server refuses to show up. I've built these for four-person co-op groups and for 30-slot modded worlds, and the failure points are almost always the same three things. We'll cover those too.
What you need before setting up a Project Zomboid dedicated server
A "dedicated server" here just means the game world runs as its own headless process, separate from any player's game client. Nobody has to be online for the world to keep existing. That's the whole appeal.
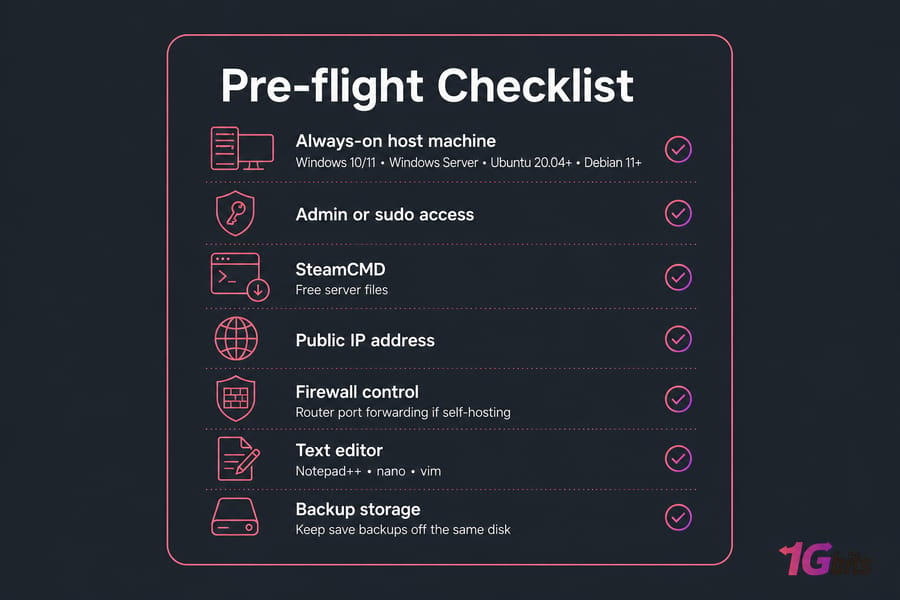
Here's your pre-flight checklist:
- A machine that stays on 24/7 — Windows 10/11, Windows Server, Ubuntu 20.04+, or Debian 11+
- Admin or
sudoaccess on that machine - SteamCMD (free, no game purchase needed for the server files)
- A public IP address, or a hosted server that already has one
- Permission to edit firewall rules — and router port forwarding if you're self-hosting
- A text editor: Notepad++ on Windows,
nanoorvimon Linux - Somewhere to keep save backups that isn't the same disk
If you're deploying remotely, you'll manage everything over how to SSH on Linux or RDP on Windows. New to remote access? The guide on logging into a VPS covers first-connection basics.
Once the basics are in place, the next question is how much RAM and CPU your player count actually needs.
Project Zomboid server requirements by player count
Project Zomboid is a Java-based game, and the server process is more sensitive to single-thread CPU speed and disk responsiveness than to core count. RAM scales with players, loaded map cells, and mods. Treat these as solid starting points, not gospel — a heavily modded 8-player world can eat more than a vanilla 16-player one.
| Players | RAM | CPU | Storage | Best hosting type |
| 2–4 (vanilla co-op) | 4 GB | 2 fast cores | 20 GB SSD | Home PC or small game VPS |
| 5–8 | 6–8 GB | 2–4 cores | 30 GB SSD/NVMe | Game VPS |
| 9–16 | 10–12 GB | 4+ cores, high clock | 50 GB NVMe | Large VPS or entry dedicated |
| 16+ public/modded | 16–24 GB | 6+ cores, high clock | 80 GB+ NVMe | Dedicated server |
Two things people underestimate. First, disk speed: the world save is thousands of small chunk files being written constantly, so an NVMe vs SSD difference is genuinely noticeable during large-group play. Second, mods — every Workshop item you add costs RAM at load and can add per-tick CPU work. If you're unsure how much memory to allocate, the breakdown on how much RAM you need is a decent sanity check.
Pro tip: leave 25–30% RAM headroom above your target. Raising zombie population or adding a big map mod later shouldn't require a rebuild.
Home hosting vs VPS vs dedicated server for Project Zomboid
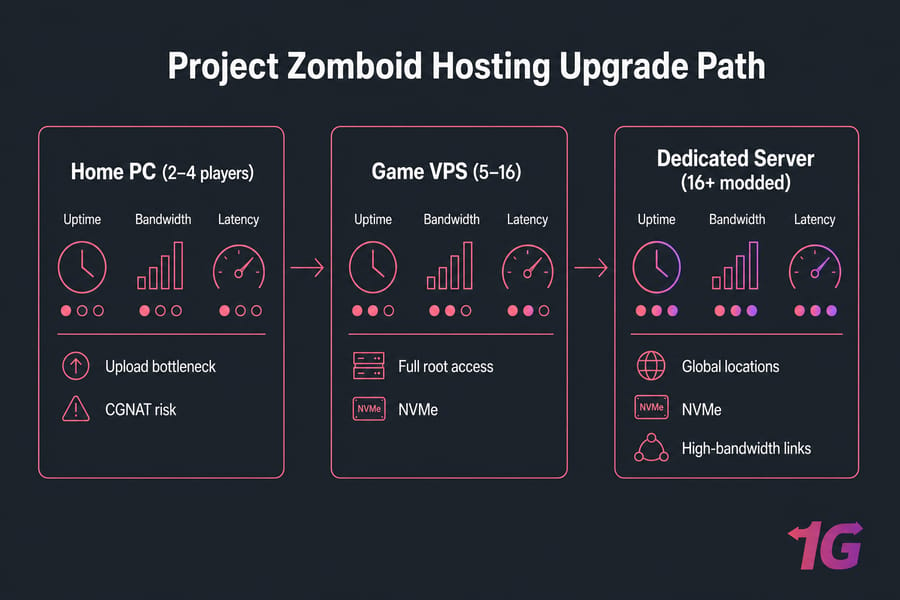
| Factor | Home PC | Game VPS | Dedicated server |
| Cost | Free (electricity) | Low monthly | Higher monthly |
| Uptime | Depends on your PC | 24/7 | 24/7 |
| Upload bandwidth | Usually the bottleneck | High | Very high |
| NAT / port issues | Common (CGNAT risk) | None | None |
| Control | Full | Root access | Full hardware control |
| Best for | 2–4 friends, testing | Private groups up to ~16 | Public, mod-heavy, 16+ |
Honest take: for three friends playing a few evenings a week, your desktop is fine. The moment you care about the world existing while you sleep, self-hosting starts costing you more in frustration than a server costs in money. A game VPS hosting plan handles most private groups comfortably, while game dedicated servers make sense for public or heavily modded worlds. If you're weighing the two, the comparison of VPS vs dedicated server lays out the trade-offs properly.
How to install a Project Zomboid server with SteamCMD on Windows
- Create two folders:
C:\steamcmdandC:\pzserver. Keep them off the system drive if you can — avoidProgram Files, permissions there cause headaches. - Download SteamCMD for Windows from Valve's official developer page and extract
steamcmd.exeintoC:\steamcmd. - Open Command Prompt as Administrator (see the Windows command prompt primer if that's unfamiliar) and run
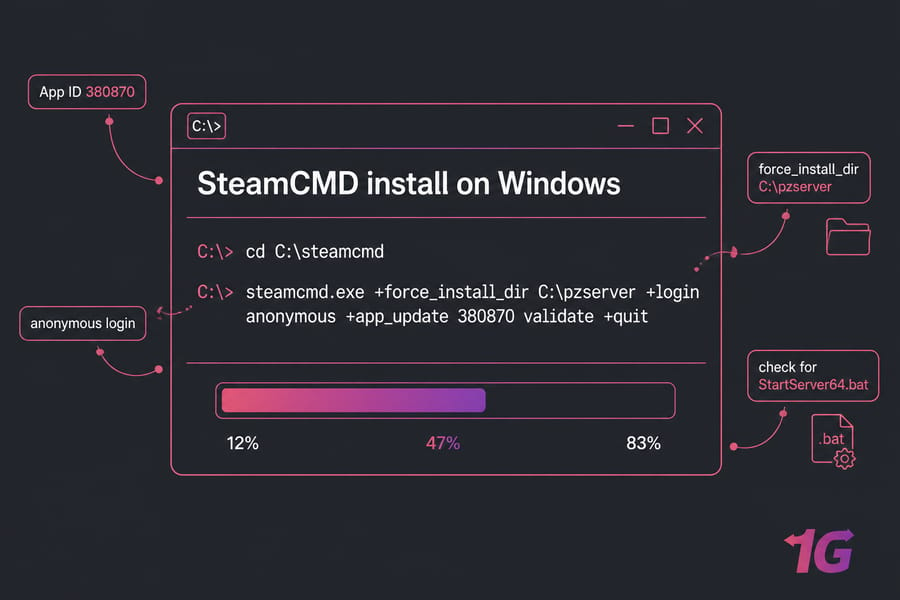
steamcmd.exeonce so it self-updates. - Now install the server files:
cd C:\steamcmd
steamcmd.exe +force_install_dir C:\pzserver +login anonymous +app_update 380870 validate +quit
App ID 380870 is the Project Zomboid Dedicated Server package. It's anonymous-login, so you don't need Steam credentials. The download is a few gigabytes and takes a while — the progress percentage sometimes appears to stall, that's normal.
When it finishes, check C:\pzserver for StartServer64.bat. That's your launch file. If it's missing, re-run the command with validate — a truncated download is the usual culprit.
How to install a Project Zomboid Linux server on Ubuntu or Debian
Linux is my preferred host for this — lower overhead, better process control. Package names shift slightly between distro versions, so adjust if something isn't found.
- Update and add 32-bit support (SteamCMD is a 32-bit binary):
sudo dpkg --add-architecture i386
sudo apt update && sudo apt upgrade -y
sudo apt install -y lib32gcc-s1 lib32stdc++6 screen curl wget tar- Create a non-root service user. Never run a game server as root.
sudo useradd -m -s /bin/bash pzserver
sudo su - pzserver
mkdir -p ~/steamcmd ~/pzserver && cd ~/steamcmd- Install SteamCMD:
curl -sqL "https://steamcdn-a.akamaihd.net/client/installer/steamcmd_linux.tar.gz" | tar zxvf -
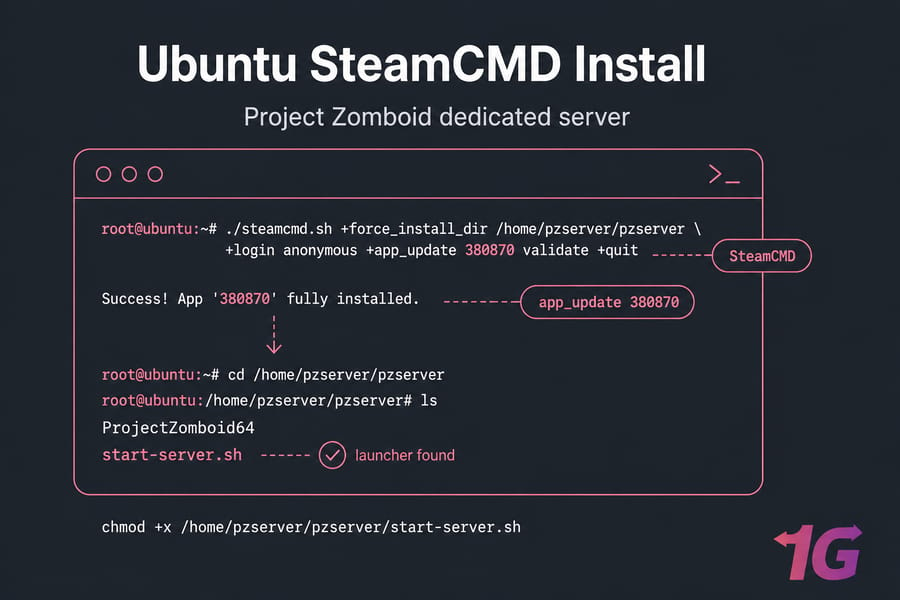
./steamcmd.sh +force_install_dir /home/pzserver/pzserver +login anonymous +app_update 380870 validate +quit- Fix permissions and make the launcher executable:
chmod +x /home/pzserver/pzserver/start-server.shNow the part beginners skip: the server dies when your SSH session closes. Run it inside screen (the Linux screen command guide covers detaching and reattaching), or better, wrap it in a systemd unit so it restarts automatically after a crash or reboot. If you haven't written one before, managing Linux services with systemctl walks through the syntax.
Project Zomboid server config: settings, passwords, and server name
Here's the thing that confuses everyone: the config files don't live in the install folder. They're generated in your user directory on first launch. So launch the server once, let it ask for an admin password, then shut it down and edit.
- Windows:
C:\Users\<YourUser>\Zomboid\Server\ - Linux:
/home/pzserver/Zomboid/Server/
You'll find three files, named after your server (default is servertest):
| File | Controls |
servertest.ini |
Name, passwords, ports, player limit, mods, PvP, whitelist |
servertest_SandboxVars.lua |
Zombie population, loot rarity, day length, XP rates |
servertest_spawnregions.lua |
Which spawn towns players can pick |
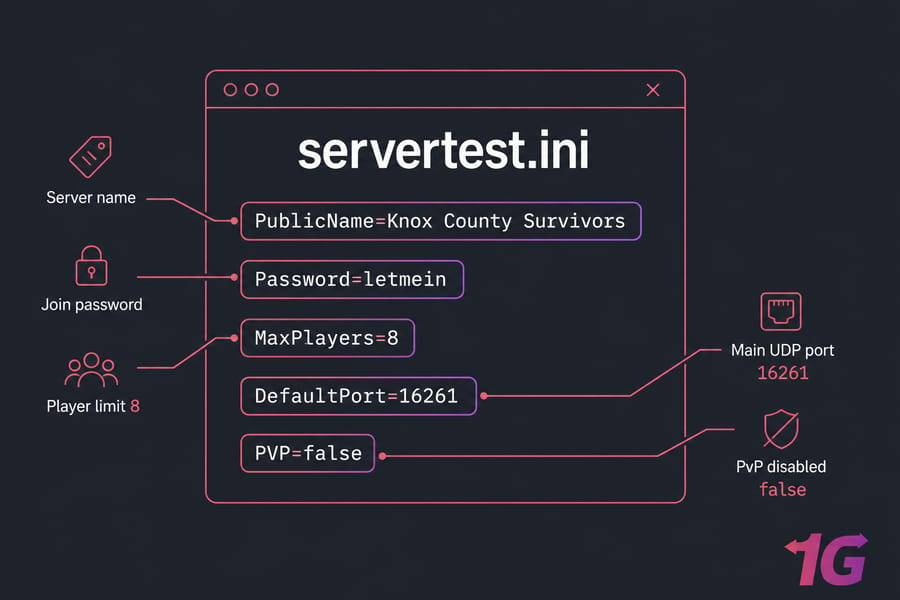
Copy all three somewhere safe before you touch them. Example .ini values for a private co-op world (verify option names against your current build — The Indie Stone occasionally renames things):
PublicName=Knox County Survivors
PublicDescription=Private co-op, ask before looting
Public=false
Password=letmein
MaxPlayers=8
DefaultPort=16261
PVP=false
Open=true
PauseEmpty=true
SaveWorldEveryMinutes=0
BackupsCount=10
BackupsOnStart=true
Set Public=false for friends-only servers — they'll join by direct IP. Set it true only if you want a listing in the public server browser. The admin password is set at first launch, not in this file, and please don't reuse a real password there.
Project Zomboid server ports and firewall setup
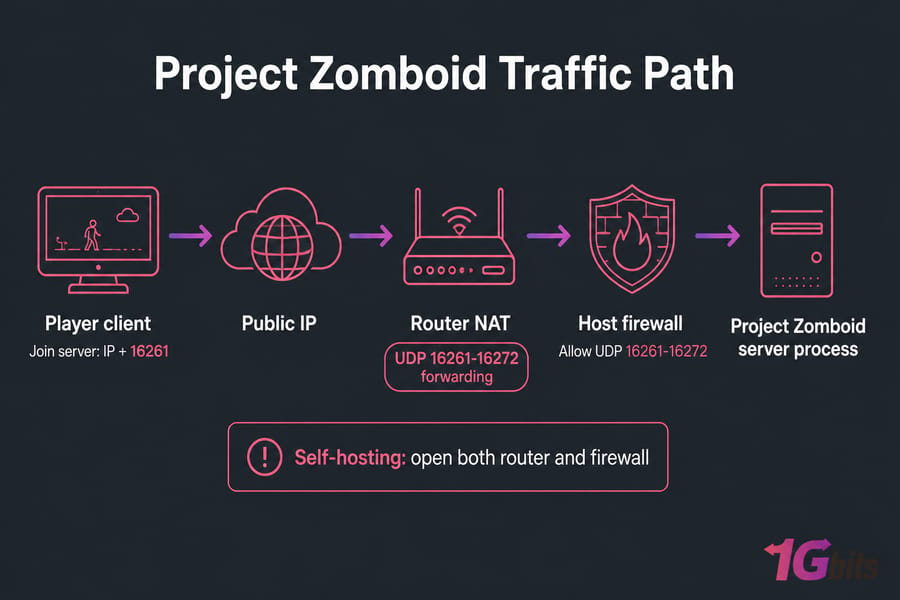
This is where most setups fail. Two separate things must happen: the firewall on the host must allow traffic, and — if you're behind a home router — the router must forward that traffic to the host's internal IP.
| Port | Protocol | Purpose | Required? |
| 16261 | UDP | Main game traffic and server query | Yes |
| 16262–16272 | UDP | Direct player connections (one per slot on some builds) | Yes |
| 8766–8767 | UDP | Steam query/discovery on older builds | Only if listed in your .ini |
| 27015 | TCP | RCON remote admin | Optional |
Windows Firewall, from an elevated prompt:
netsh advfirewall firewall add rule name="PZ UDP" dir=in action=allow protocol=UDP localport=16261-16272Linux with UFW:
sudo ufw allow 16261:16272/udp
sudo ufw reload
Or firewalld on RHEL-family systems:
sudo firewall-cmd --permanent --add-port=16261-16272/udp
sudo firewall-cmd --reload
For deeper rule design on a hosted box, see configure a firewall on your VPS.
Common mistake #1: opening the host firewall and stopping there. If you're self-hosting, you also need router rules — walk through port forward on your router and the general port forwarding explainer. Forward UDP 16261–16272 to your host's static LAN IP. Skip UPnP; it's unreliable for game servers.
Verify with check open ports in Linux, then test from outside your network — a phone on mobile data works fine as a test client.
How to start the server and connect players
- Launch it. Windows: double-click
StartServer64.bat. Linux:./start-server.shinside a screen session. - First boot takes several minutes — it generates the world and asks for an admin password.
- Wait for the line confirming the server is listening. Don't let players connect before that.
- In-game, players choose Join → Add Server, enter your public IP and port
16261, plus the server password if set. - Public servers appear in the browser list under the name from
PublicName— indexing can lag a few minutes. - Log in as
adminwith your password to get moderation tools and the admin context menu.
Not sure of your IP? Run curl ifconfig.me, or see how to get an IP address in Linux and the background on what an IP address is. Confirm the save folder appeared under Zomboid/Saves/Multiplayer/ before inviting everyone.
Project Zomboid server mods and Workshop setup
Mods go in two lines of servertest.ini, and both are required:
WorkshopItems=2169435993;2392709985
Mods=Authenticzombies;BetterSortCC
WorkshopItems takes numeric Workshop IDs from the Steam page URL. Mods takes the internal mod ID, which the author lists on the Workshop description (they're different values, and mixing them up is the number one modded-server failure).
Rules I follow without exception:
- Add mods two or three at a time, restart, verify, repeat. Never twelve at once.
- Every player must subscribe to the identical mod list — mismatches produce instant disconnects.
- Back up the save before adding or removing any map or gameplay-overhaul mod. Removing one mid-world can corrupt chunks.
- After a game update, wait for mod authors to patch before updating the server.
Optimization, backups, and restart routines
Keep the world save on NVMe. Restart the server every 12–24 hours — Java memory usage creeps, and a scheduled restart beats an unscheduled crash. Use PauseEmpty=true so the world doesn't burn CPU when nobody's on.
Backups are non-negotiable. The built-in BackupsCount and BackupsOnStart settings help, but they live on the same disk, which isn't a backup. Set up an off-server copy of the Zomboid/Saves and Zomboid/Server directories using the guide on scheduling automatic backups — and actually test a restore once. Untested backups have a habit of being empty.
Watch resource use with the tooling in Linux monitoring, and if things feel sluggish, monitoring and improving VPS speed covers the usual suspects.
Server not showing up or not responding: fixes
| Problem | Likely cause | Fix |
| Server missing from browser | Public=false or slow indexing |
Set Public=true, restart, wait 5–10 min |
| Connection timeout | Ports not forwarded | Forward UDP 16261–16272 to host LAN IP |
| Works on LAN only | NAT or CGNAT | Ask ISP for a public IP, or host remotely |
| Instant disconnect | Mod list mismatch | Sync Workshop and Mod IDs on all clients |
| "Incompatible version" | Client on Beta/Unstable branch | Match client and server branches, re-run app_update |
| Config changes ignored | Edited while process was running | Stop server, edit, then start |
| Crash on startup | Broken mod or bad Lua edit | Check Zomboid/Logs, remove last change |
| Severe lag with 8+ players | RAM ceiling or slow disk | Raise heap allocation, move save to NVMe |
Common mistake #2: editing the .ini while the server is live. Project Zomboid overwrites it on shutdown, silently discarding your changes. Stop first.
Logs live in Zomboid/Logs and Zomboid/console.txt. Read the last 50 lines before changing anything — the general Linux server troubleshooting workflow applies here, and if SSH itself drops mid-session, see fixing the connection reset by peer SSH error.
When self-hosting stops being enough
The signs are consistent: your PC has to stay on so friends can play, upload bandwidth caps out around six players, CGNAT blocks direct connections entirely, or a mod-heavy world starts hitching every time zombies horde up. That's the point to move off your desk.
1Gbits runs Project Zomboid dedicated server hosting with full root access, NVMe storage, global locations so you can sit close to your player base, and high-bandwidth links that don't share a pipe with your household Netflix. Smaller groups do fine on a game VPS; public and heavily modded worlds want dedicated hardware. Browse options at buy a dedicated server, see why 1Gbits, and note that support is available around the clock if a deployment goes sideways.
Running other survival worlds too? The same patterns carry over — see how to set up a Valheim dedicated server, set up an ARK dedicated server, or set up a Minecraft server on a VPS.

Leave A Comment