
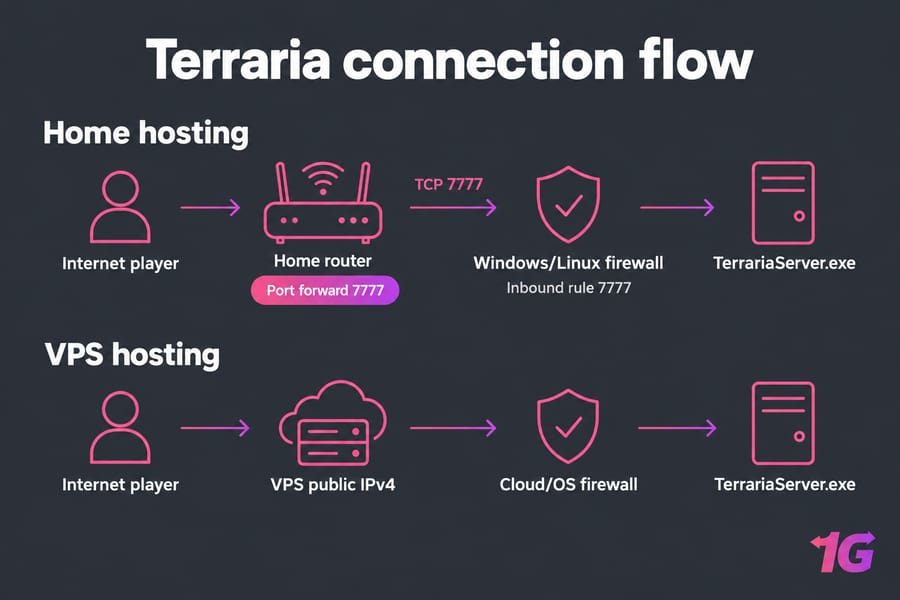
Quick answer: Terraria server ports are simple. By default, the game listens on port 7777. If you host from home, you'll usually need to forward 7777 on your router and allow it through your Windows or Linux firewall. Give internet players your public IPv4 address and give players on your own Wi-Fi your local IPv4 address. If you change the port, everyone has to type the new one when they join.
When friends can't connect, the problem is nearly always one of four things: the IP you shared, the port, the firewall or the router. This guide covers each one so you can work out which it is.
Before you start, you'll need:
- A working Terraria dedicated server
- Admin or root access to the server OS
- Access to your router's admin panel, if you host from home
- The port set in
serverconfig.txtor your launch command
Terraria server port 7777 explained
The Terraria Wiki says the server runs on TCP port 7777 by default. It also says that if you're behind NAT, which covers most home connections, you have to forward that port before anyone outside your network can join.
So what about TCP versus UDP? The wiki lists TCP. Some cloud and hosting guides tell you to open 7777 on both TCP and UDP. In practice, TCP is required. Adding a UDP rule does no harm and rules out one more variable while you troubleshoot. I usually open both on a VPS and then move on.
You can change the port, and it makes sense to do so when 7777 is already taken, for example by a second Terraria world on the same machine. Changing it doesn't make the server faster, though.
Terraria server IPv4: local IP vs public IP
Most failed connections I've helped debug came down to someone sharing the wrong address. If you need a refresher on what an IP address is, start there. The short version: your router gives every device a private address, and the whole household shares one public address on the internet.
| IP type | Example | Who uses it | Share it? |
| Loopback | 127.0.0.1 | Only the host machine | Never |
| Local/private IPv4 | 192.168.1.50, 10.0.0.12 | Players on your home network | LAN players only |
| APIPA | 169.254.x.x | Nobody (it means DHCP failed) | Never |
| Public IPv4 | 203.0.113.25 | Players over the internet | Yes, with the port |
Run ipconfig on Windows or ip a on Linux to find your local address. To get your public address, search "what is my IP" from the server's network. There's more background in this article: IPv4 explained.
Watch out for dynamic IPs. Most ISPs change residential public addresses now and then, so a server your friends saved last week can stop working overnight. The same thing can happen on your LAN.
Pro tip: Reserve the server's local IP in your router's DHCP settings. If the address moves after a reboot, your port forward will point at nothing.
Terraria port forwarding vs firewall rules
These two settings do different jobs, so they don't replace each other. Port forwarding tells your router which machine should receive incoming traffic on 7777. The firewall decides whether that machine accepts the traffic once it arrives.
| Item | Where you set it | Home hosting | VPS / dedicated |
| Port forwarding | Router admin panel | Yes | No |
| OS firewall rule | Windows Defender, UFW, firewalld | Yes | Yes |
| Cloud firewall | Provider panel | No | Sometimes |
| UPnP | upnp=1 in config |
Optional | Not applicable |
Router menus differ between brands, so use this walkthrough on how to port forward on your router for the actual clicks. Terraria's config file also has a upnp=1 setting that tries to forward the port for you. It's handy when it works, but plenty of routers ignore it or ship with UPnP turned off. Set up a manual forward instead.
On a VPS with its own public IP, there's no router in the way. You open the firewall and you're finished.
Windows Defender Firewall setup for Terraria
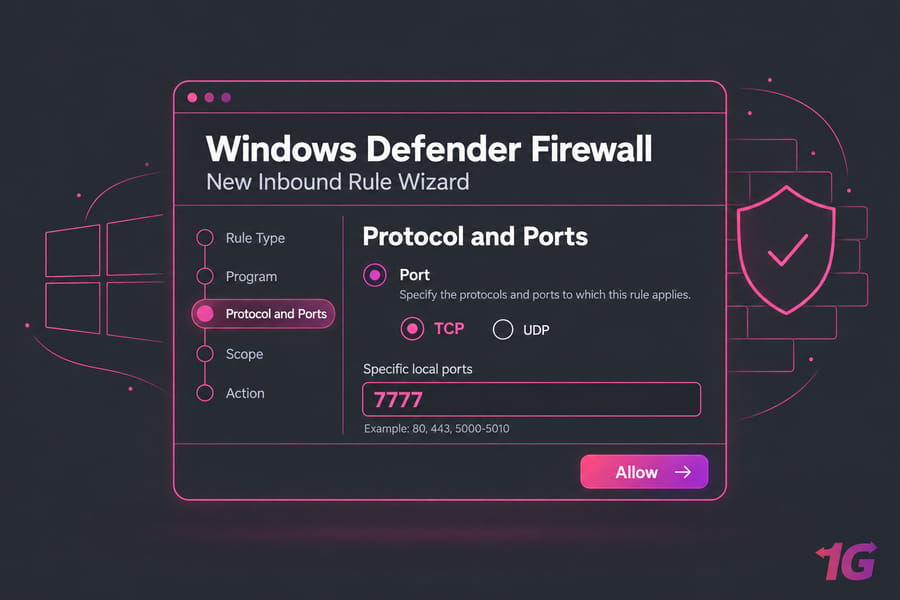
The safest option is to allow the program itself. Open Windows Defender Firewall → Allow an app through firewall, click Allow another app, and select TerrariaServer.exe. If you'd rather open the port directly, go to Advanced settings → Inbound Rules → New Rule → Port → TCP → 7777 → Allow.
From an elevated command prompt you can do the same thing with netsh advfirewall:
netsh advfirewall firewall add rule name="Terraria TCP 7777" dir=in action=allow protocol=TCP localport=7777
netsh advfirewall firewall add rule name="Terraria UDP 7777" dir=in action=allow protocol=UDP localport=7777
Or use PowerShell:
New-NetFirewallRule -DisplayName "Terraria 7777" -Direction Inbound -Protocol TCP -LocalPort 7777 -Action Allow
Get-NetFirewallRule -DisplayName "Terraria*"
The second line confirms the rule exists. Then run netstat -ano | findstr 7777 to check the server is actually listening. This guide has more detail on how to check open ports in Windows.
Warning: Don't switch the firewall off to "fix" connection problems. Add a specific rule instead.
Ubuntu UFW firewall rules for port 7777
On Ubuntu or Debian, allow SSH first so you don't lock yourself out:
sudo ufw allow OpenSSH
sudo ufw allow 7777/tcp
sudo ufw allow 7777/udp
sudo ufw enable
sudo ufw status verbose
Together these commands open SSH and Terraria, turn UFW on and list the active rules. If you run SSH on a custom port, allow that port number instead of OpenSSH. For a more complete hardening routine, see how to configure a firewall on your VPS.
firewalld on AlmaLinux, Rocky Linux and CentOS
sudo firewall-cmd --get-active-zones
sudo firewall-cmd --permanent --zone=public --add-port=7777/tcp
sudo firewall-cmd --permanent --zone=public --add-port=7777/udp
sudo firewall-cmd --reload
sudo firewall-cmd --zone=public --list-ports
Before adding the rule, check which zone your network interface actually uses. Adding a port to public does nothing if the interface sits in a different zone.
Quick summary: Rules added without --permanent only last until the next reload or reboot.
How to change the Terraria port in serverconfig.txt
# Set the port number
port=7777
# Automatically forward ports with UPnP
upnp=1
Change port=7777 to something like port=7778, save the file and restart the server. Then update all three places that depend on it: your firewall rule, your router forward and the details you give players. In Join via IP, players now have to type 7778. This is the same config file covered in our guide on how to host a modded Terraria server.
Why friends can't connect to your Terraria server
| Symptom | Likely cause | Fix |
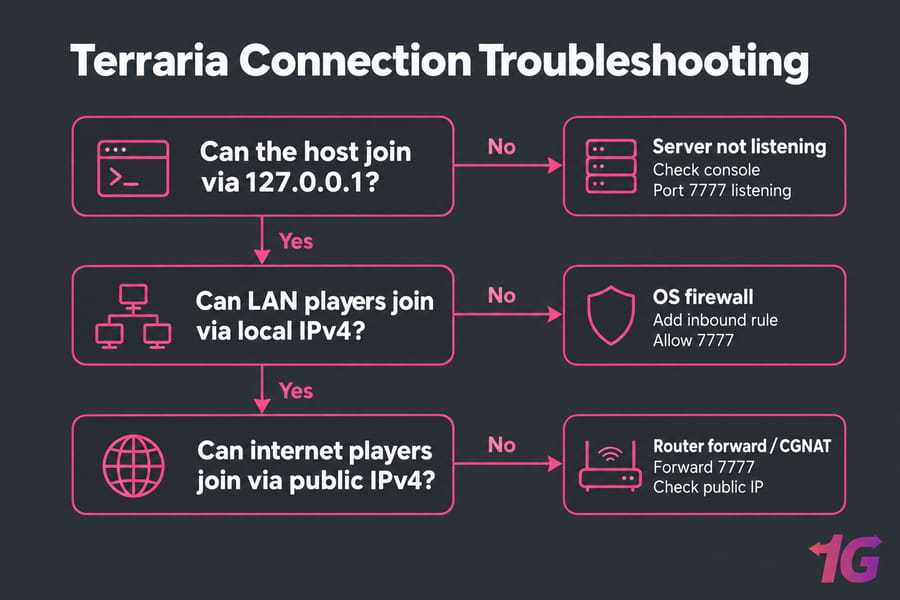
| Nobody can join, not even you | Server not listening | Check the console, then run ss -tlnp | grep 7777 |
| Host joins, LAN players can't | OS firewall | Add an inbound rule for 7777 |
| LAN works, internet doesn't | Missing router forward | Forward 7777 to the reserved local IP |
| Worked yesterday, not today | Public or local IP changed | Share the new IP and reserve the LAN IP |
| Forward is correct, still closed | CGNAT or double NAT | Ask your ISP for a public IP, or move to a VPS |
| "Connection failed" after a config edit | Custom port not shared | Give players the IP and the new port |
About CGNAT: if the WAN IP shown in your router doesn't match what "what is my IP" reports, your ISP is putting you behind carrier-grade NAT. Forwarding on your own router won't help in that case. On Linux, see how to check Linux open ports to confirm the server is listening. If people can connect but the game stutters, read how to fix Terraria server lag.
Secure Terraria hosting on a VPS or dedicated server
- Open only SSH or RDP plus your Terraria port.
- Keep the OS and server files up to date.
- Back up your
.wldfiles on a schedule. - Reserve a static local IP if you host from home.
Things get much simpler when you take the home network out of the picture. With Terraria dedicated server hosting or gaming VPS hosting from 1Gbits, you get a public IP, full firewall control and a world that stays online when your PC is off. You don't have to deal with router forwarding or CGNAT at all.

Leave A Comment