

To set up a V Rising dedicated server, install Stunlock Studios' free V Rising Dedicated Server app, copy its example start script, and name the server. Then move the two JSON config files where updates won't overwrite them, open UDP ports 9876 and 9877, and launch. Friends can find it by name in the server list or join by IP with direct connect. The steps below follow the current official instructions, which cover the 1.1.x server branch.
Before you start, have these ready:
- A Windows PC, Windows VPS, or Windows dedicated server
- A Steam account (for Steam Tools) or SteamCMD
- Admin rights on the machine and access to its firewall or your router
- Your public IP address if you host from home
- V Rising installed on each player's PC
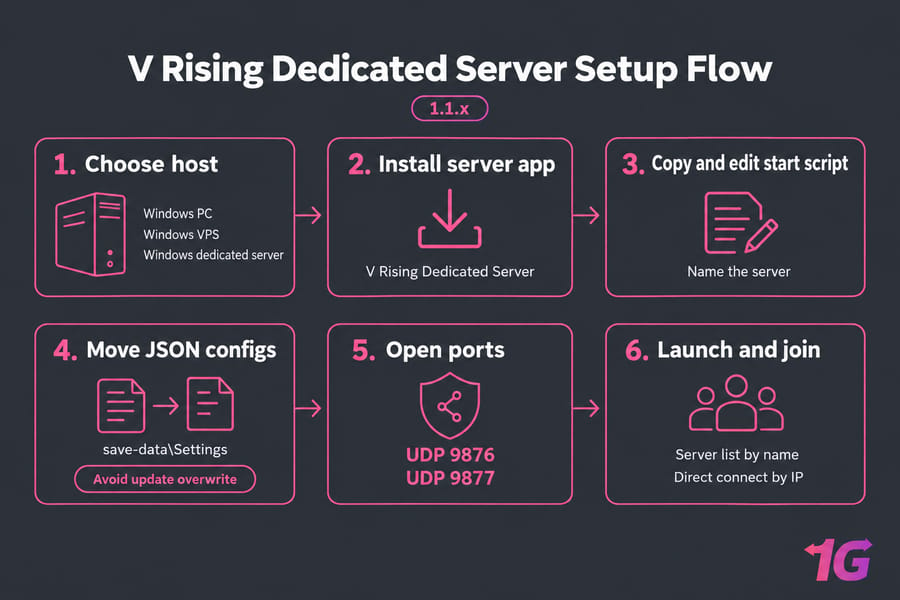
What is a V Rising dedicated server?
It's a separate program, the V Rising Dedicated Server, which Stunlock Studios publishes as its own app under Tools in your Steam library. It runs the world without anyone having the game open, so the world stays up when the host logs off, and you control the uptime, the rules and the admin list.
Dedicated server vs private co-op world
A private game started from the V Rising client runs a server in the background on your PC, and that server stops when you close the game. A dedicated server runs on its own, usually on a machine that stays on 24/7.
| Feature | Private game from the client | Dedicated server |
| World online when host is offline | No | Yes |
| Software | Game client | V Rising Dedicated Server app |
| Config control | In-game menus | Full JSON files, admin list, launch parameters |
| Best for | Casual sessions with 1 to 3 friends | Persistent PvE or PvP worlds, communities |
Who should host their own V Rising server?
Run your own if your group plays on different schedules, you want custom rules (clan size, loot rates, PvP windows), or you're building a public community. If you'd rather not touch config files at all, V Rising dedicated server hosting takes the hardware and networking off your plate.
V Rising server hosting options: self-hosting vs renting
There are three places to run the server.
| Option | Best for | Pros | Cons |
| Your own PC | Testing, small friend groups | No extra cost, you already have the hardware | PC must stay on, port forwarding, home upload speed limits, ISP NAT issues |
| VPS | Small to mid groups that want 24/7 uptime | Public IP, datacenter bandwidth, cheaper than bare metal | Shared physical host, resources capped by plan |
| Dedicated server | Large PvP communities, several game servers on one box | All CPU and RAM are yours, no noisy neighbours | Higher monthly cost, more to manage |
Hosting on your own PC
This is the fastest way to try things out, but the world exists only while your PC is on, and your router, Windows Firewall and ISP all stand between you and your players. Some ISPs put customers behind carrier-grade NAT, and then port forwarding won't work at all.
Hosting on a VPS or dedicated server
A gaming VPS gives you a public IP and a machine that never sleeps, which fixes the two most common home-hosting problems. A game dedicated server makes sense once you're running a busy PvP server, heavy mods, or several game servers side by side.
Which option is best for 2 to 4, 5 to 10, or 10+ players?
Stunlock doesn't publish a player-to-hardware table, so treat this as a rule of thumb. A home PC or small VPS is fine for 2 to 4 friends. For 5 to 10 regulars who expect the world to be up all the time, use a VPS. For 10 or more, especially on PvP, a dedicated server keeps tick rate steady during raids. Watch CPU and RAM during your busiest hours and scale from what you measure.
V Rising server requirements and prerequisites
Software you need before starting
- Steam with access to the Tools section, or SteamCMD for headless installs
- A text editor (Notepad works; Notepad++ or VS Code catch JSON errors)
- Remote access to your machine if it's rented. If you haven't done that before, here's how to connect to a VPS over RDP.
Recommended hardware and network baseline
Stunlock lists no official minimum spec. Plan on a modern multi-core CPU, enough RAM for the server plus Windows, SSD storage for fast saves, and a stable upload connection. Memory use grows with player count and with how much players have built, so leave headroom.
Windows-first setup path and Linux caveat
The official server build is a Windows executable, and Stunlock's instructions are written for Windows. Community guides run it on Linux through Wine or Docker images. They work for many people, but they're unofficial and an update can break them. If you're choosing an OS for the host, compare Linux vs Windows dedicated servers first. For a first server, I'd stay on Windows.
V Rising dedicated server setup: step-by-step
Step 1: Install the V Rising Dedicated Server app
In Steam, open Library, switch the filter to include Tools, search "v rising" and install V Rising Dedicated Server. It's free.
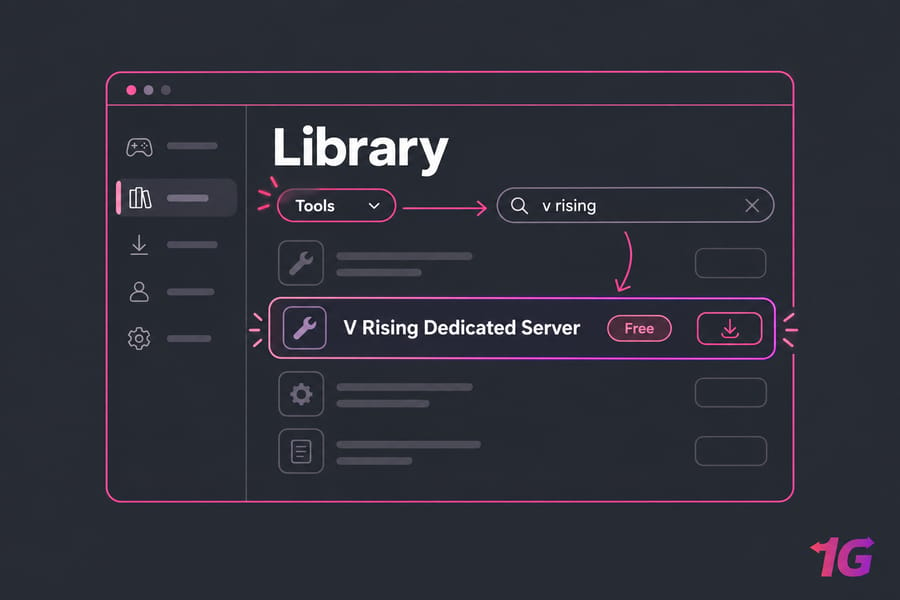
On a server without the Steam client, use SteamCMD. The server's Steam AppID is 1829350:
steamcmd +force_install_dir C:\VRisingServer +login anonymous +app_update 1829350 validate +quitRun the same command again, with the server stopped, whenever you want to update.
Step 2: Launch VRisingServer.exe once
Clicking Launch in Steam doesn't start the server; it opens a Notepad file with a link to the GitHub instructions. Instead, click the gear icon, choose Manage, then Browse local files, and run VRisingServer.exe from the install folder. It starts with default settings and generates its folders. Close it with Ctrl+C once it finishes loading.
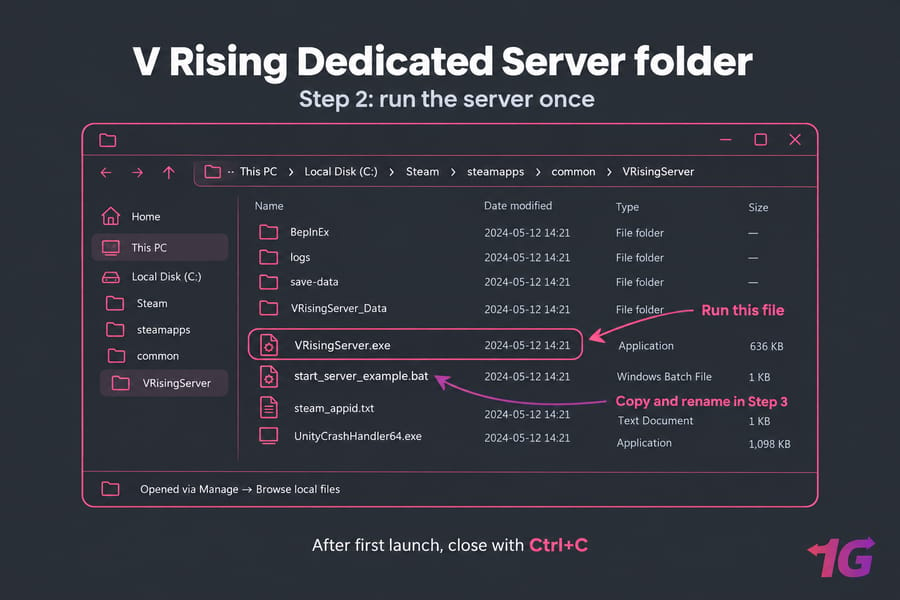
Step 3: Copy and rename start_server_example.bat
Copy start_server_example.bat and name the copy something like start_server.bat. Updates can overwrite the example file and wipe your edits, so always work in the copy.
Step 4: Set your server name, save name, and launch parameters
Open your copy in Notepad. The stock version looks like this:
@echo off
set SteamAppId=1604030
echo "Starting V Rising Dedicated Server - PRESS CTRL-C to exit"
@echo on
VRisingServer.exe -persistentDataPath .\save-data -serverName "My V Rising Server" -saveName "world1" -logFile ".\logs\VRisingServer.log"
Change -serverName to the name players will search for and -saveName to your world's folder name. The -persistentDataPath .\save-data flag keeps saves and settings in a folder inside the install directory, which makes backups easy. Leave SteamAppId=1604030 alone; that's the game client's ID, and the server uses it at runtime.
Command-line parameters override the JSON settings, so a name set here wins over the one in the config file.
Step 5: Start the server and verify it is running
Double-click start_server.bat. Let the console finish loading, then check logs\VRisingServer.log for errors. Leave the window open; closing it stops the server.
If you've had to set up a Valheim dedicated server or a Project Zomboid dedicated server, the pattern is the same: install, script, config, ports.
V Rising server settings explained
The server reads two JSON files. Their defaults live in VRisingServer_Data\StreamingAssets\Settings\, but updates overwrite that folder, so don't edit them there. Copy both files into save-data\Settings\ (create the folder if it's missing) and edit those copies. Without -persistentDataPath, the server uses %USERPROFILE%\AppData\LocalLow\Stunlock Studios\VRisingServer\Settings instead.
| File | Purpose | Common fields | Edit frequency |
ServerHostSettings.json |
Server identity and hosting | Name, Description, Port, QueryPort, MaxConnectedUsers, Password, SaveName, ListOnSteam, ListOnEOS, Rcon | Rarely, after setup |
ServerGameSettings.json |
Gameplay rules | Game mode (PvP/PvE), clan size, castle damage, loot and crafting rates | Whenever you tune the rules |
adminlist.txt |
Who can use admin commands | One SteamID64 per line | When admins change |
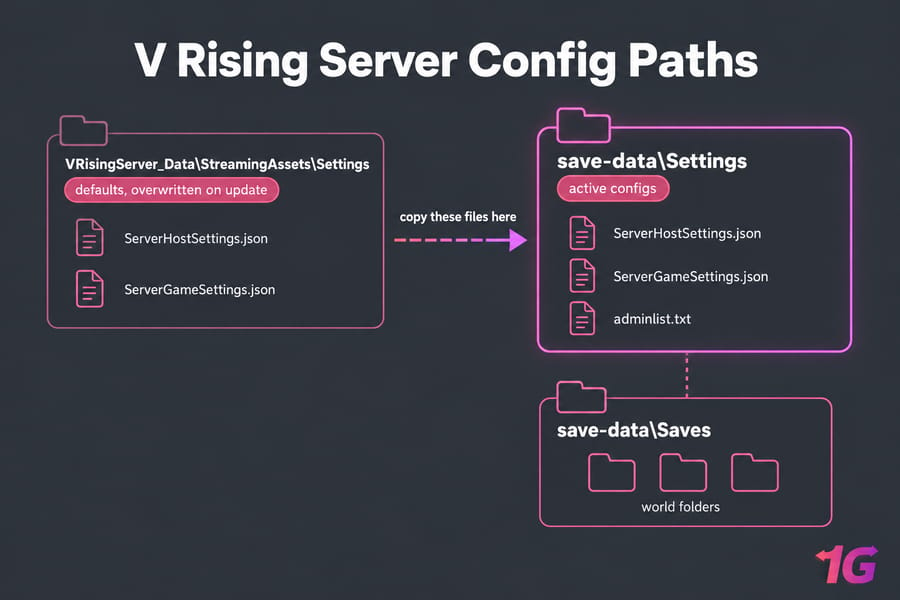
What ServerHostSettings.json controls
A trimmed example with the fields most people change:
{
  "Name": "Night Court PvE",
  "Description": "Friends-only PvE, restarts 6am UTC",
  "Port": 9876,
  "QueryPort": 9877,
  "MaxConnectedUsers": 10,
  "SaveName": "world1",
  "Password": "changeme",
  "ListOnSteam": true,
  "ListOnEOS": true
}
Leave the password empty for a public server. Set ListOnSteam and ListOnEOS to true if you want the server in the in-game list.
What ServerGameSettings.json controls
This file holds the world rules. For a relaxed friends server, set the game mode to PvE and raise resource and crafting multipliers. On PvP, clan size, castle damage mode and raid time windows change the experience most. To design rules visually, create a private world in the client with the settings you like and copy its ServerGameSettings.json into save-data\Settings\.
Stunlock recommends restarting the server daily. A scheduled task that stops the server, runs the SteamCMD update and starts the script again handles restarts and updates in one go.
V Rising server ports and firewall setup
| Port | Protocol | Purpose | Must open? |
| 9876 | UDP | Game traffic | Yes |
| 9877 | UDP | Steam server list queries | Yes, for list visibility |
| Your RCON port | TCP | Remote console, only if you enable RCON | Only if used |
These are the defaults. If you change Port or QueryPort, open the new numbers instead.
Windows Firewall rules
Open Windows Defender Firewall with Advanced Security, go to Inbound Rules, choose New Rule, select Port, then UDP, and enter 9876-9877. Allow the connection and name the rule. Or run this in an admin PowerShell window:
New-NetFirewallRule -DisplayName "V Rising" -Direction Inbound -Protocol UDP -LocalPort 9876,9877 -Action AllowOn a rented server, also check the provider's cloud firewall or security group. For a walkthrough, see how to configure a firewall on your VPS.
Router port forwarding for home hosting
Give the host PC a static local IP, then forward UDP 9876 and 9877 to it in your router's admin page. Router menus vary; this guide shows how to port forward on your router step by step. It's the same process used to configure Terraria server ports, with different numbers.
How to test whether the ports are open
Most online port checkers only test TCP, so they'll report UDP ports as closed when they're fine. The reliable test is a friend outside your network using direct connect. If that works, your ports are open.
How to join your V Rising server
- Open V Rising and go to Play, then Online Play, then Find Servers.
- Search for your exact server name. A freshly launched server can take a few minutes to appear.
- If it doesn't show, use Direct Connect and enter
PUBLIC_IP:9876. - Enter the password if you set one.
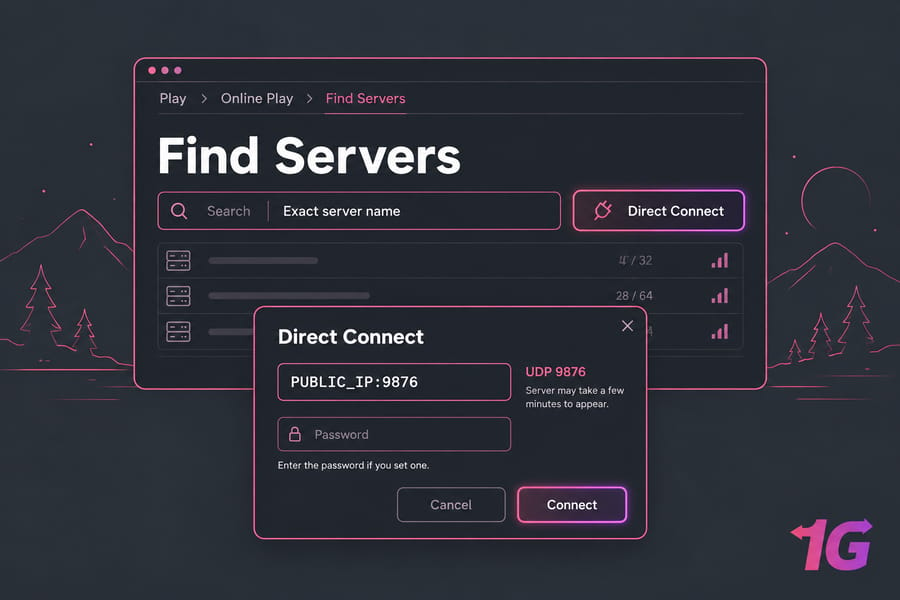
If you host and play on the same home network, you may need the server's local IP for direct connect, because many routers don't support connecting to their own public IP from inside the network.
V Rising admin setup and server management
How to add your SteamID to adminlist.txt
Find your SteamID64, the 17-digit number in your Steam profile URL (any SteamID finder will also show it). Add it on its own line in adminlist.txt inside save-data\Settings\, copying the file from the default Settings folder if it isn't there yet. Restart the server so it reads the list.
How to enable the in-game console
In V Rising, go to Options, then General, and tick Console Enabled. Join your server, press the ~ key and type adminauth. Type list to see the available commands.
Basic admin workflow for private servers
On most friend servers, admin work means kicking or banning, checking bug reports, and running restarts. Back up the save-data\Saves folder before every update. Copying it to another drive or cloud storage takes seconds and can save a 60-hour world.
V Rising server not showing up: common fixes
| Problem | Likely cause | Fix |
| Not in the list right after launch | The list hasn't refreshed yet | Wait a few minutes, then search the exact name |
| Not in the list, direct connect works | Query port blocked or listing disabled | Open UDP 9877; check ListOnSteam and ListOnEOS |
| Neither list nor direct connect works | Game port blocked | Check Windows Firewall, router forward, cloud firewall |
VRisingServer.exe missing or won't start |
Antivirus quarantined it | Restore it, add an exclusion for the folder, verify files |
| Settings changes ignored | Edited the default files, or a launch parameter overrides them | Edit files in save-data\Settings; check the .bat flags |
| Name or settings reverted after update | Edited start_server_example.bat or the defaults | Use a renamed script and the save-data copies |
| Ports forwarded, still unreachable from home | ISP carrier-grade NAT | Ask your ISP for a public IP or host on a VPS |
Antivirus or missing .exe issues
Stunlock's support pages name antivirus blocking as the first thing to check for hosting problems. Open Windows Defender's protection history, restore the file, and exclude the server folder. Then repair the install: right-click the app in Steam, open Properties, then Installed Files, then Verify integrity of game files. On SteamCMD, rerun the update command with validate.
Common mistakes
- Editing the JSON files in StreamingAssets instead of save-data\Settings
- Keeping your edits in
start_server_example.bat - Opening 9876 but forgetting 9877
- Expecting the server to appear in the list the moment the console loads
- Invalid JSON from a missing comma, which can stop your settings from loading
Test direct connect first. It tells you right away whether you have a networking problem or a listing problem.
Should you use a VPS or dedicated server for V Rising?
In a datacenter the server has its own public IP, so NAT, ISP and router problems go away and you only manage one firewall.
When a gaming VPS is enough
A VPS fits small and mid-size groups, PvE worlds, and testing a server before you open it up. You get 24/7 uptime and a public IP for less than bare metal. For a shortlist, see best game VPS hosting providers.
When to upgrade to a dedicated server
Upgrade when big raids lag, when you run mods, or when you want several servers on one machine (V Rising alongside a Conan Exiles dedicated server, for example). A dedicated server doesn't share CPU with other customers, so performance holds at peak hours. You can buy a dedicated server sized for your player count.
Why low-latency hosting matters for PvP
V Rising combat depends on dodges and skill timing, so a distant server makes fights feel delayed. Pick a location close to most of your community. If you want a 24/7 server without home-network trouble, see 1Gbits V Rising hosting plans, which come with full root access.
Final checklist before you invite players
- The server starts from your renamed script with no errors in the log
- Both JSON files and adminlist.txt are in save-data\Settings
- UDP 9876 and 9877 are open in Windows Firewall, the router, or the cloud firewall
- A friend outside your network can direct connect
- adminauth works in the in-game console
- Save folder backups and a daily restart are scheduled
Once all six check out, share the server name and IP with your group. If keeping a home PC online is the part you'd rather skip, move the same setup to a gaming VPS or game dedicated server. The save-data folder copies over and works the same way.

Leave A Comment