
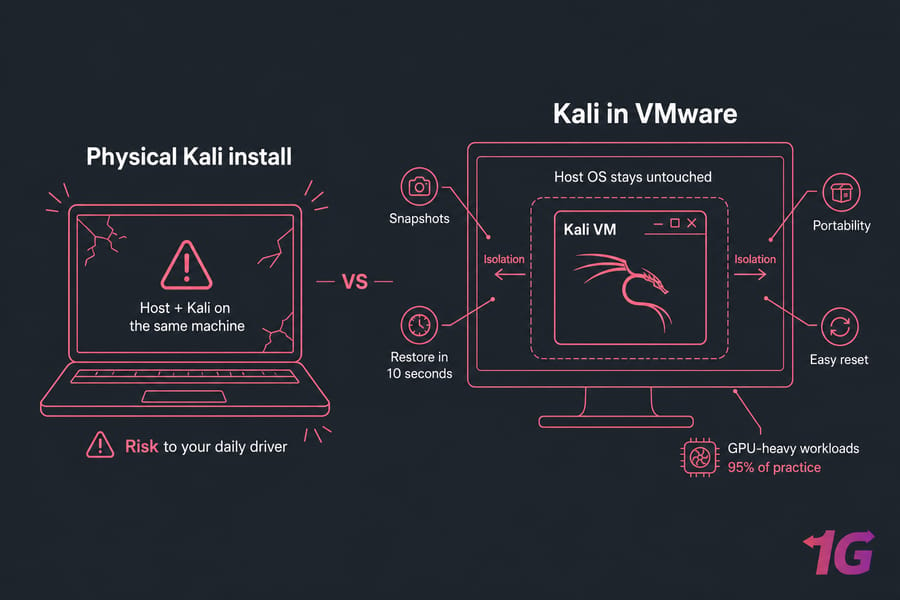
If you're learning pentesting or just want a safe place to break things, running Kali Linux inside VMware is the smartest move. You get isolation from your main system, snapshots you can roll back to in seconds, and zero risk of nuking your daily driver. I've watched plenty of beginners install Kali directly on their laptop, regret it within a week, and end up reimaging. Don't be that person.
Here's why a Kali VM beats a physical install for most people:
- Isolation — your host OS stays untouched, even if you bork the guest.
- Snapshots — break something, restore in 10 seconds.
- Portability — copy the VM to another machine and pick up where you left off.
- Easy reset — perfect for labs, CTFs, and tool testing.
The trade-off? GPU-heavy workloads (hashcat with serious cracking, for instance) won't perform as well as bare metal. For learning, labs, and 95% of practice, that's a non-issue. If you're new to what Kali Linux is or how virtual machines work, skim those quickly before continuing.
Kali Linux VMware image vs ISO: which should you pick
This is the first real decision. Get it right and you save an hour. Get it wrong and you'll wonder why the install feels harder than it should.
The prebuilt Kali VMware image is exactly what it sounds like — Offensive Security already built the VM for you. You download it, extract it, open the .vmx file in VMware, and you're booting Kali in under five minutes. The ISO install is the manual route: create a new VM, point it at the Kali ISO, and walk through the Debian-style installer yourself.
| Method | Setup Time | Difficulty | Flexibility | Best For |
| Prebuilt VMware image | ~5 minutes | Very easy | Limited (preconfigured) | Beginners, fast labs |
| ISO install | 20–40 minutes | Moderate | Full control | Custom partitions, clean builds |
My honest take: if this is your first Kali VM, use the image. Once you've gotten comfortable, try the ISO path when you want to control disk layout, desktop environment, or installed tool sets. If you're weighing platforms entirely, the VMware vs VirtualBox comparison is worth a glance.
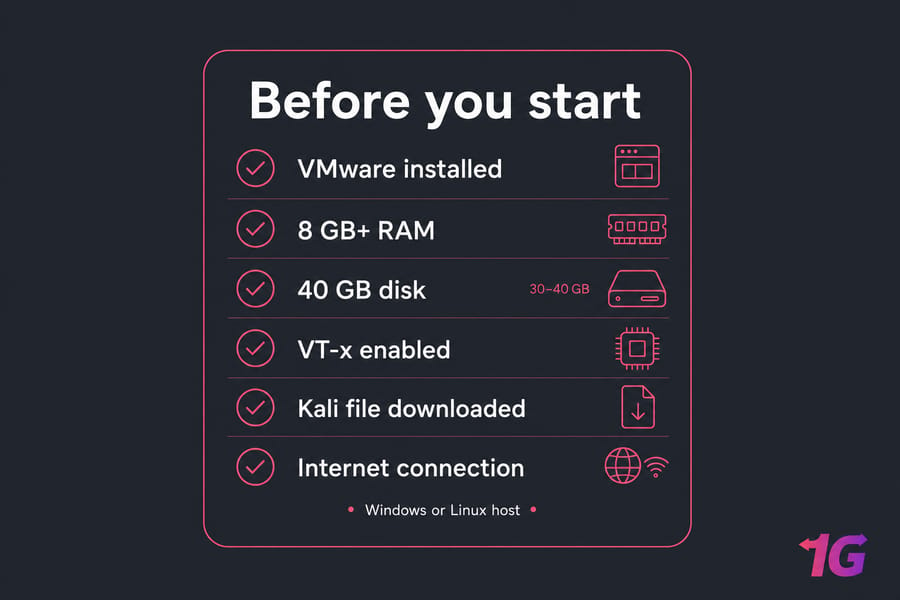
What you need before you start
Quick checklist. Don't skip this half the "VMware is broken" complaints come from missed prerequisites.
- Windows or Linux host with VMware Workstation Pro or VMware Workstation Player installed
- At least 8 GB host RAM (16 GB is much smoother)
- 30–40 GB free disk, ideally on SSD or NVMe
- Hardware virtualization (VT-x / AMD-V) enabled in BIOS/UEFI
- The Kali Linux ISO or official prebuilt VMware image from kali.org/get-kali
- A working internet connection for updates
One quick note on ethics: Kali is a security toolkit. Use it on systems you own or have written permission to test. Lab-only mindset, always.
Install Kali Linux on VMware Workstation using the prebuilt image
This is the fastest path. Here's the flow.
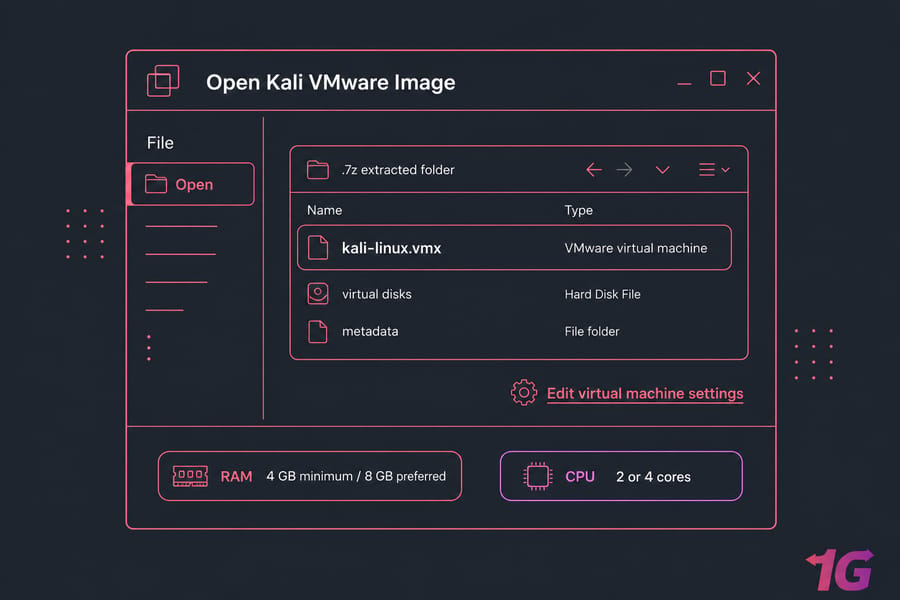
- Download the official Kali VMware image from kali.org/get-kali under the "Virtual Machines" section. You'll get a compressed archive (typically
.7z). - Extract the archive using 7-Zip or a similar tool. Inside you'll find the
.vmxfile, virtual disks, and metadata. - In VMware Workstation, go to File → Open and select the
.vmxfile. VMware Player uses the same menu path. - When prompted about whether the VM was moved or copied, choose "I Copied It". This regenerates the MAC address and UUID.
- Before powering on, click Edit virtual machine settings. Bump RAM to 4 GB (minimum) or 8 GB if your host can spare it. Set CPU cores to 2 or 4.
- Hit Power on this virtual machine. Kali should boot to the login screen within a minute.
For login, always check the credentials shown on the official Kali download page — they've changed over the years, so don't trust outdated tutorials (including older ones of mine).
If you're on Player, the steps are identical except some advanced hardware tweaks (like adding extra network adapters or fine-grained CPU controls) are limited compared to Pro.
Install Kali Linux from ISO in VMware Player or Workstation
Want a clean, customized install? Use the ISO. Takes longer, but you control everything.
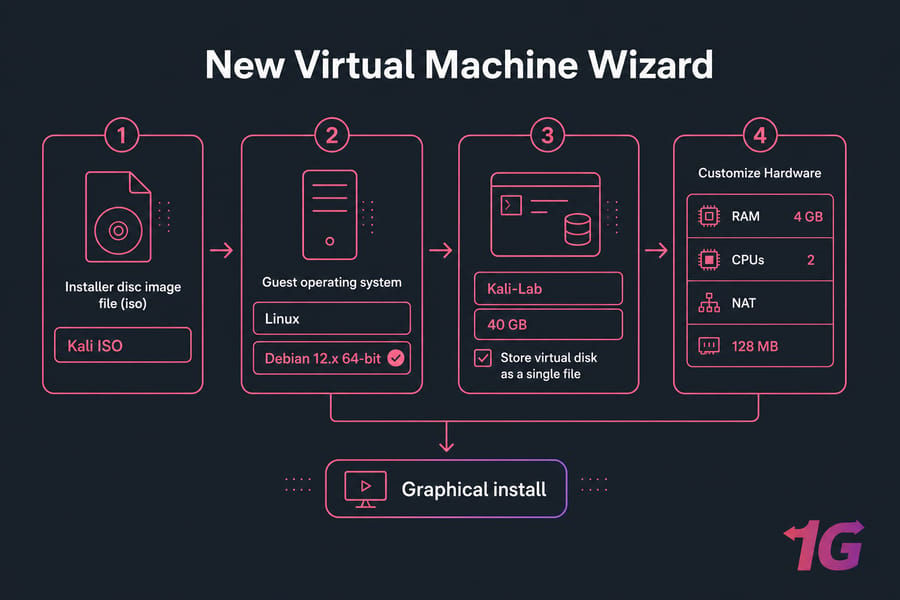
- In VMware, click File → New Virtual Machine. Choose Typical in Workstation, or just follow the Player wizard.
- Select Installer disc image file (iso) and browse to your Kali ISO.
- For guest OS, choose Linux and then Debian 12.x 64-bit (or whichever Debian release matches the current Kali base).
- Name the VM ("Kali-Lab" works) and pick a storage location — preferably on your SSD.
- Set disk size to 40 GB. Choose Store virtual disk as a single file for better performance.
- Click Customize Hardware. Set RAM to 4 GB, CPUs to 2, network adapter to NAT, and display memory to at least 128 MB.
- Finish and power on. The Kali installer boots — pick Graphical install.
Now the Debian-style installer takes over. Work through these screens:
- Language, location, keyboard layout
- Hostname (e.g.
kali) and domain (leave blank) - Create your user account and password
- Partitioning: pick Guided - use entire disk, then All files in one partition
- Choose desktop environment (Xfce is default and lightweight)
- Install GRUB to the primary drive (
/dev/sda)
Reboot when prompted, log in, and you're in. If you're comparing this to other Linux installs, the workflow is close to what you'd see in any Linux virtual machine setup.
Best VMware settings for Kali Linux performance
| Resource | Minimum | Recommended | Notes |
| RAM | 2 GB | 4–8 GB | More helps with browsers and heavy tools |
| vCPU | 1 | 2–4 cores | Don't allocate all host cores |
| Disk | 20 GB | 40+ GB | SSD strongly preferred |
| Display memory | 64 MB | 128–256 MB | Disable 3D acceleration if buggy |
| Firmware | BIOS | UEFI | Match what your ISO supports |
A few extras that matter: enable the shared clipboard under VM → Settings → Options → Guest Isolation, and take a snapshot the moment everything boots cleanly. Snapshots are free insurance.
VMware network settings: NAT vs Bridged vs Host-only
This trips up more new users than anything else. Pick the wrong adapter and either your internet doesn't work or your VM is exposed where you didn't expect it.
| Mode | Internet Access | Visible on LAN | Best Use Case |
| NAT | Yes (via host) | No | Default choice — updates, browsing, most labs |
| Bridged | Yes (own IP) | Yes | Testing against devices on your real LAN |
| Host-only | No | No | Fully isolated labs between host and VM |
Stick with NAT unless you have a specific reason not to. It uses your host's connection via network address translation, gets DHCP automatically, and keeps the VM hidden from your LAN. Use Host-only when you're spinning up a vulnerable VM (like a deliberately-broken target box) and you don't want it touching anything else. Switching modes later takes two clicks in the VM settings.
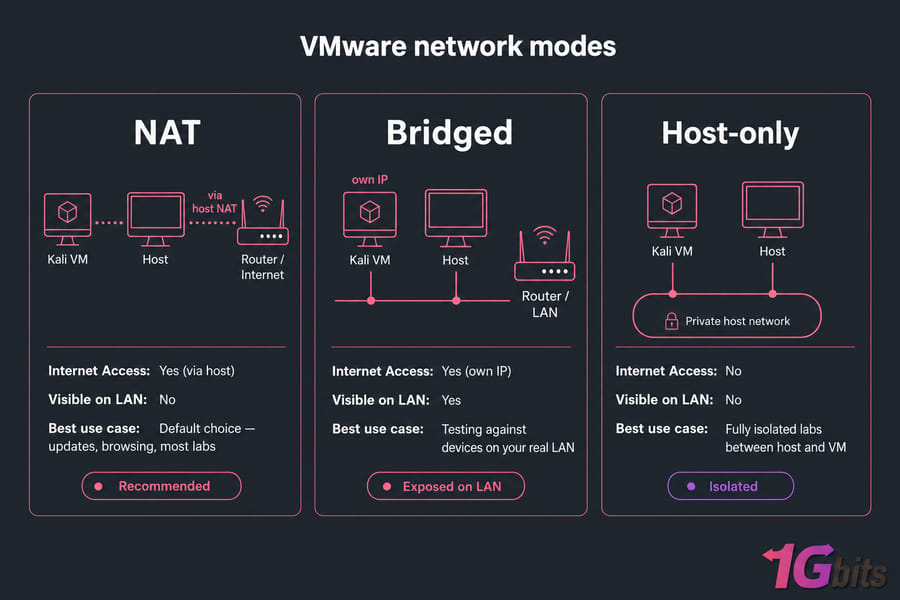
Warning: Bridged mode puts your Kali VM directly on your local network. Only use it when you understand what that means.
Install VMware Tools on Kali with open-vm-tools
The old "Install VMware Tools" menu option is deprecated for modern Linux guests. Use open-vm-tools instead — it's faster, maintained by the community, and already half-installed on most Kali builds.
Open a terminal in Kali and run:
sudo apt update
sudo apt install -y open-vm-tools open-vm-tools-desktop
sudo reboot
After reboot, you'll get auto-resize, shared clipboard, and smoother mouse integration. To verify, resize the VMware window — the desktop should follow. Try copy-pasting text between host and guest. Both should just work. If you need a refresher, the apt command guide covers the basics, and the update Kali Linux walkthrough explains what to run weekly.
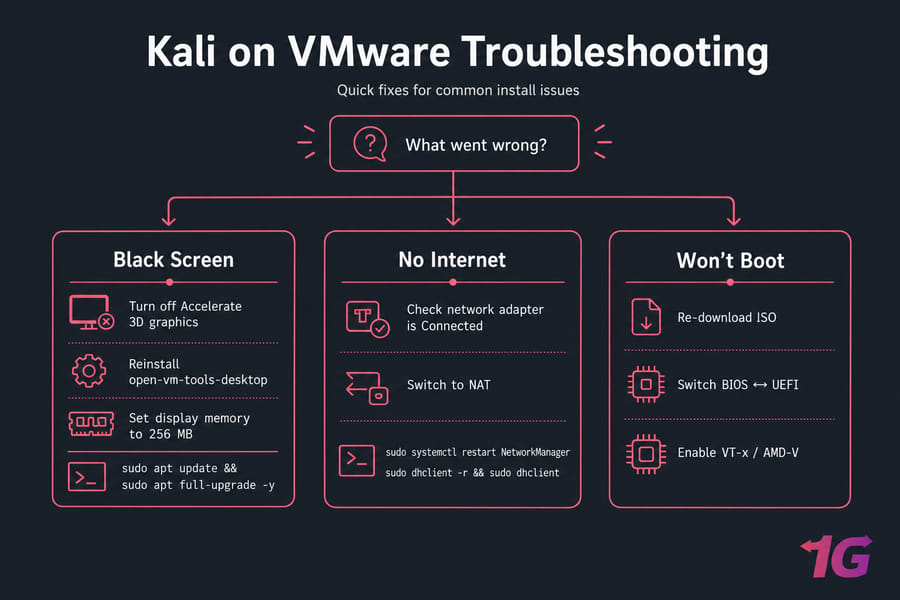
Troubleshooting: black screen, no internet, and boot failures
Black screen after login
Almost always a display or tools issue, not a broken install. Try these in order:
- Toggle Accelerate 3D graphics off in VM display settings
- Reinstall
open-vm-tools-desktopand reboot - Bump display memory to 256 MB
- Update Kali:
sudo apt update && sudo apt full-upgrade -y
Still stuck? The dedicated black screen fix guide walks through deeper recovery steps.
No internet inside Kali
Check the obvious first: is the network adapter Connected in VM settings? Then switch to NAT if you were on Bridged. Inside Kali, try:
sudo systemctl restart NetworkManager
sudo dhclient -r && sudo dhclient
Sluggish performance or freezes
Usually under-resourced. Give the VM more RAM, store the virtual disk on an SSD, and make sure VT-x is enabled in your host BIOS/UEFI. If the host itself is maxed out, close Chrome tabs before blaming VMware.
Boot failures
Re-download the ISO (checksum mismatches are common), switch between BIOS and UEFI firmware in VM options, and confirm virtualization extensions are on in your host firmware.
What to do right after installation
- Update everything:
sudo apt update && sudo apt full-upgrade -y - Take a clean snapshot in VMware. Name it "Fresh install — fully updated." You'll thank yourself.
- Confirm clipboard, resize, and internet are working
- Explore the essential Kali Linux commands if you're new
- Add tools as you need them for example, OpenVAS or SearchSploit
One more thought: a local VM is great for learning, but if you need always-on access, more resources, or a lab you can hit from anywhere, a Kali Linux VPS is a cleaner next step. You can also see how the workflow compares with installing Kali on a virtual server.

Leave A Comment