
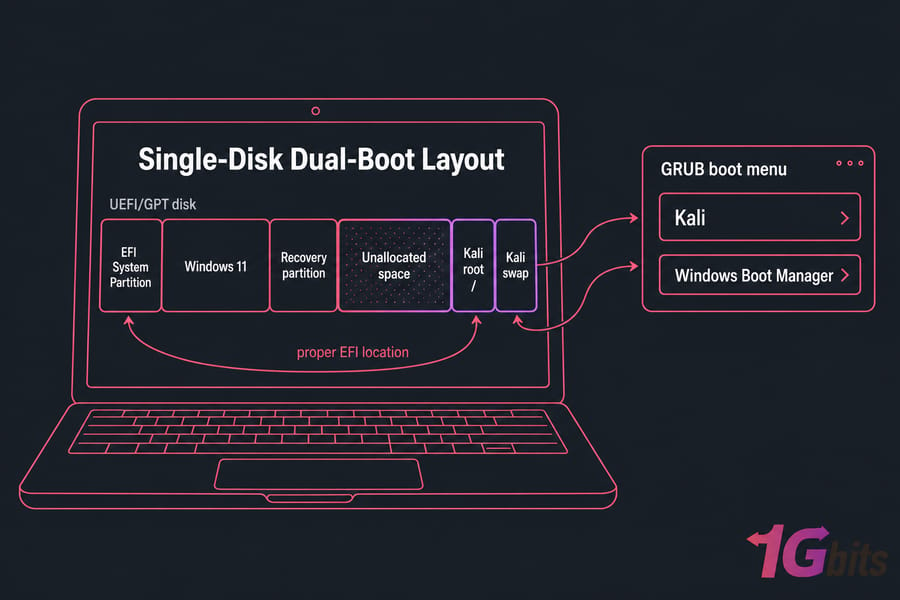
Yes, you can dual boot Kali Linux with Windows 10 or 11 safely by backing up your data, shrinking the Windows partition, booting the Kali USB in the correct UEFI mode, installing Kali into unallocated space, and making sure GRUB is installed to the proper EFI location so both systems remain bootable.
If you're here because you want native hardware access without wiping your PC, this is the path. I'll show you how to dual boot Kali Linux with Windows 10/11 safely, with the parts most guides rush past: BitLocker, Fast Startup, UEFI vs BIOS, EFI partition handling, GRUB, and how to back out cleanly if you change your mind later.
If you need a refresher on what is Kali Linux, read that first. And if you already suspect local partitioning isn't worth the hassle, you may be better off to install Kali Linux on a virtual server instead.
Is dual booting Kali Linux and Windows safe?
Usually, yes. But only if you're deliberate about it. Dual boot Kali Linux and Windows can work very well on the same machine, including Windows 10 and Windows 11 systems using UEFI and GPT, as long as you don't guess your way through partitioning.
The real risks aren't mysterious. They're very ordinary mistakes: deleting the wrong partition, booting the installer in the wrong firmware mode, letting GRUB land in the wrong place, or tripping BitLocker after changing boot settings. I've seen all four happen and none of them were caused by Kali being "dangerous." They were caused by rushing.
Who should dual boot Kali instead of using a VM?
Dual boot makes sense if you need direct access to hardware. That usually means Wi-Fi adapters, GPUs, USB devices, or performance that's closer to bare metal. If your goal is labs, driver testing, wireless work, or learning how Linux behaves on a real machine, dual boot is reasonable.
When dual booting is a bad idea
- If you don't have a full backup
- If BitLocker or Device Encryption is enabled and you haven't saved the recovery key
- If you're not sure whether your system uses UEFI or Legacy BIOS
- If you only need Kali for browser-based labs or occasional tools
- If this is your only work or school laptop and downtime would hurt

Before touching partitions, prepare Windows properly.
Before you install Kali Linux alongside Windows: backup and prep
The prep work is the boring part. It's also the part that saves you when something goes sideways. If you want to install Kali Linux alongside Windows safely, do this first and don't skip ahead.
| Task | Why it matters | Required or optional |
| Back up important files | Protects you from partitioning mistakes, failed boots, and accidental deletion | Required |
| Create Windows recovery media | Gives you a repair path if Windows Boot Manager breaks | Required |
| Save BitLocker recovery key | Boot changes can trigger a recovery prompt | Required if encryption is enabled |
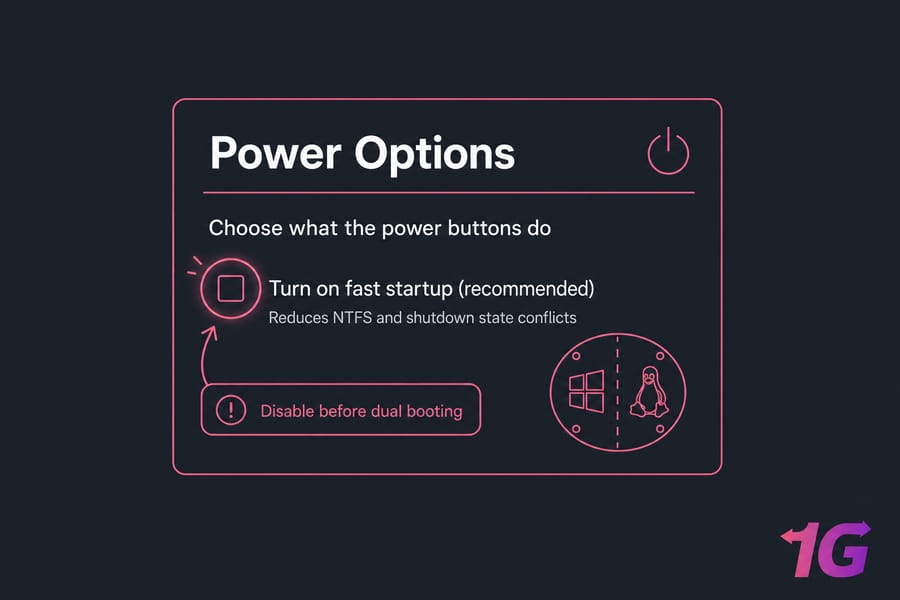
| Disable Fast Startup | Reduces NTFS and shutdown state conflicts between Windows and Linux | Strongly recommended |
| Check free space | You need room for Kali and updates | Required |
| Run a quick disk health check | Helps catch file system errors before resizing | Recommended |
| Disconnect extra external drives | Prevents selecting the wrong target disk during install | Recommended |
| Plug laptop into power | A power loss during partition changes is a mess you don't want | Required for laptops |
| Confirm current boot mode | Kali must be booted in the same mode as Windows | Required |
Back up your Windows files and create recovery media
At minimum, copy your important files off the machine. An external SSD, NAS, or cloud backup is fine. If you want extra caution, create a full system image or use a workflow similar to what you'd do for Windows server backup.
Create Windows recovery media too. Use the Recovery Drive tool or keep a Windows install USB handy. If Windows stops booting, Startup Repair from recovery media is often the fastest fix.
Disable Fast Startup in Windows
Fast Startup leaves Windows in a semi-hibernated state. That's good for boot speed, not so good for dual boot. It can lead to NTFS being marked unclean, odd mount behavior, or changes not being written the way you expect.
Go to Control Panel, open Power Options, choose what the power buttons do, then clear Fast Startup. Simple step. Big payoff.
Check BitLocker or device encryption before partitioning
This one matters more than people think. On many Windows 10 and Windows 11 laptops, BitLocker or Device Encryption is already active. If you change partitions or firmware settings, Windows may ask for the recovery key on next boot.
Save that key somewhere outside the PC. If you're being very cautious, suspend BitLocker before resizing partitions. Also make a quick check with Disk Management and, if needed, run a file system scan first the same general idea as using CHKDSK commands before making storage changes.
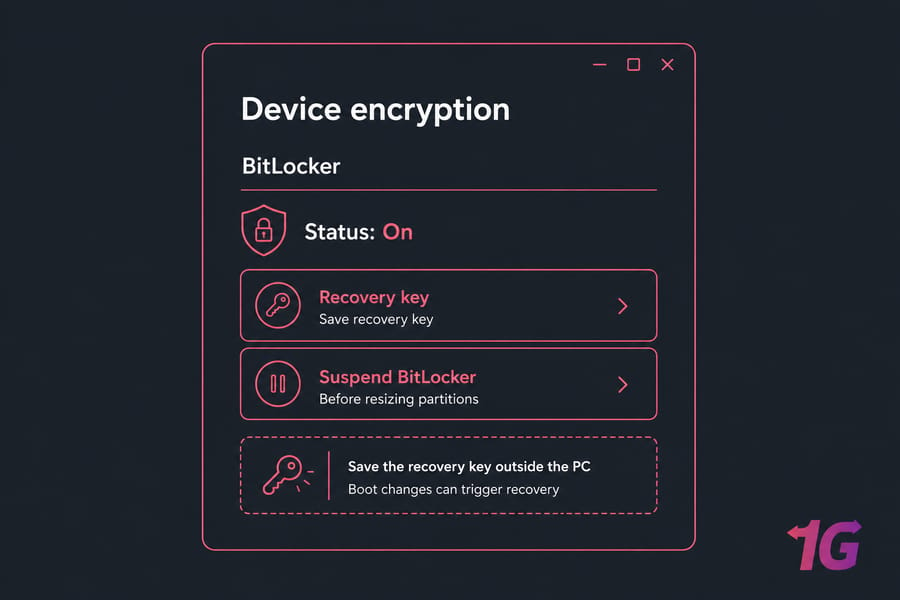
Warning: Suspend BitLocker or at least save the recovery key before changing partitions or boot settings. Many "my PC is locked" stories start right here.
Once your backups and recovery options are ready, verify your firmware and partition style.
Check UEFI, BIOS, GPT, and Secure Boot before dual booting Kali Linux
Most current systems should use UEFI with a GPT disk. That's the modern, sane path for a Kali Linux and Windows dual boot UEFI setup. The catch is that both operating systems need to be installed in the same boot mode. Mix UEFI and Legacy BIOS on one install and you invite boot headaches.
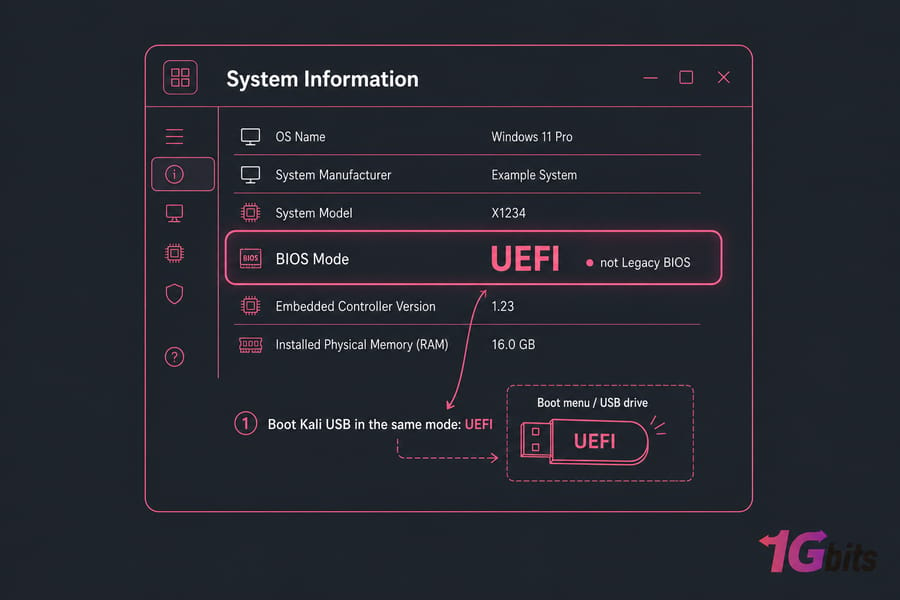
How to tell if Windows uses UEFI or Legacy BIOS
In Windows, press Start, type msinfo32, and open System Information. Look for BIOS Mode. If it says UEFI, boot the Kali USB from the boot menu entry labeled UEFI. If it says Legacy, then Kali needs to be installed in Legacy mode too.
If you want a deeper backgrounder, here's a clear explainer on UEFI vs BIOS. It helps if the terms still feel a little fuzzy.
GPT vs MBR: why it matters for Kali and Windows
Open Disk Management, right-click the disk, choose Properties, then Volumes. You'll see GPT or MBR there. Windows 11 almost always wants UEFI and GPT. Windows 10 can be either, but GPT is still the better fit on modern hardware.
GPT matters because it works with the EFI System Partition, which is where boot files live in a UEFI setup. That's also why you do not want to create random extra EFI partitions unless you know exactly why you're doing it.
Should you disable Secure Boot?
Not always. Some Kali installs can work with Secure Boot depending on the image, firmware, and boot chain involved. But in practice, if the USB won't boot properly or Kali fails after install, Secure Boot is one of the first things I check.
My advice? Leave it on at first if you want. If you hit boot or detection issues, disable it temporarily and test again. On some newer laptops, TPM and vendor firmware settings can complicate this, but usually the issue is still just boot mode or Secure Boot policy.
| Windows mode | Disk type | How to boot Kali USB | Recommended install style |
| UEFI | GPT | Boot the UEFI USB entry | UEFI install, reuse existing EFI System Partition |
| Legacy BIOS | MBR | Boot the non-UEFI USB entry | Legacy install only if system already uses it |
| UEFI | MBR | Possible but awkward on modern systems | Consider converting only if you know what you're doing |
| Legacy BIOS | GPT | Usually not ideal for beginners | Avoid mixed or unusual setups |
Pro tip: Boot the Kali USB in the same mode Windows already uses. If
msinfo32says UEFI, choose the UEFI boot entry. Don't improvise here.
After confirming firmware mode, create your Kali installer USB.
Create a Kali Linux bootable USB for Windows 10/11
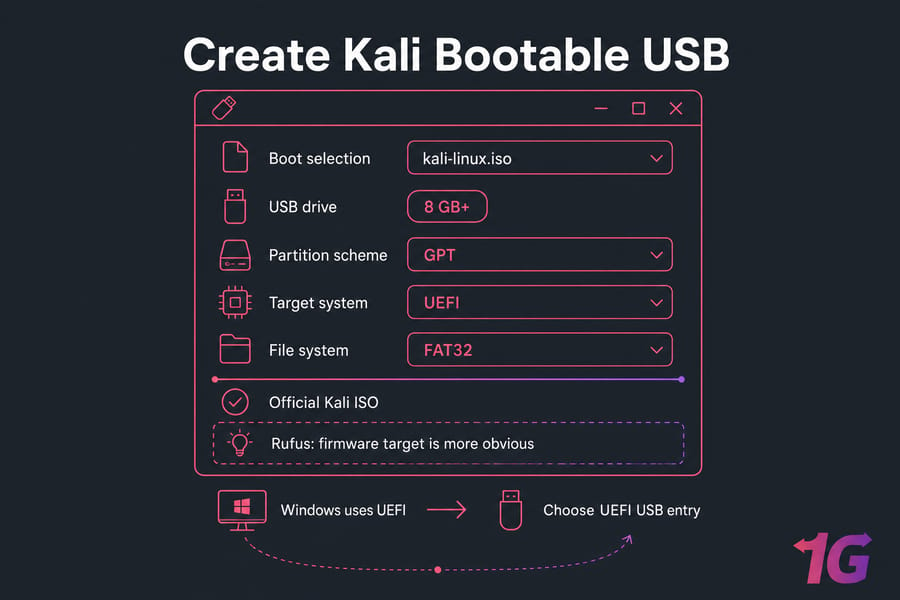
This part is straightforward. The main thing is to use the official Kali ISO and write it to a USB drive that's at least 8 GB.
Download the correct Kali ISO
Get the installer from the official Kali site, not a random mirror from a forum post. For most people, the 64-bit image is the right one. If you're running modern Windows 10 or Windows 11 on standard Intel or AMD hardware, that's almost certainly what you need.
Create the USB with Rufus or balenaEtcher
- Insert your USB drive.
- Open Rufus or balenaEtcher.
- Select the Kali ISO.
- In Rufus, use GPT for UEFI systems if that's what Windows uses.
- Keep FAT32 if the image and tool allow it for best UEFI compatibility.
- Write the image and wait for completion.
Rufus gives you more knobs to turn. balenaEtcher is simpler. I personally prefer Rufus on Windows because it makes the firmware target more obvious.
Boot the USB in the same firmware mode as Windows
Use your boot menu key often F12, F10, Esc, or Del, depending on the vendor. If Windows uses UEFI, choose the USB option that explicitly says UEFI. That's the detail many people miss, and then they wonder why the installer can't see the expected EFI path later.
If you need a general USB-boot walkthrough, this guide on install ubuntu from usb covers the same basic boot-media idea.
Next, free up safe unallocated space from Windows before launching the Kali installer.
Shrink the Windows partition for Kali Linux safely
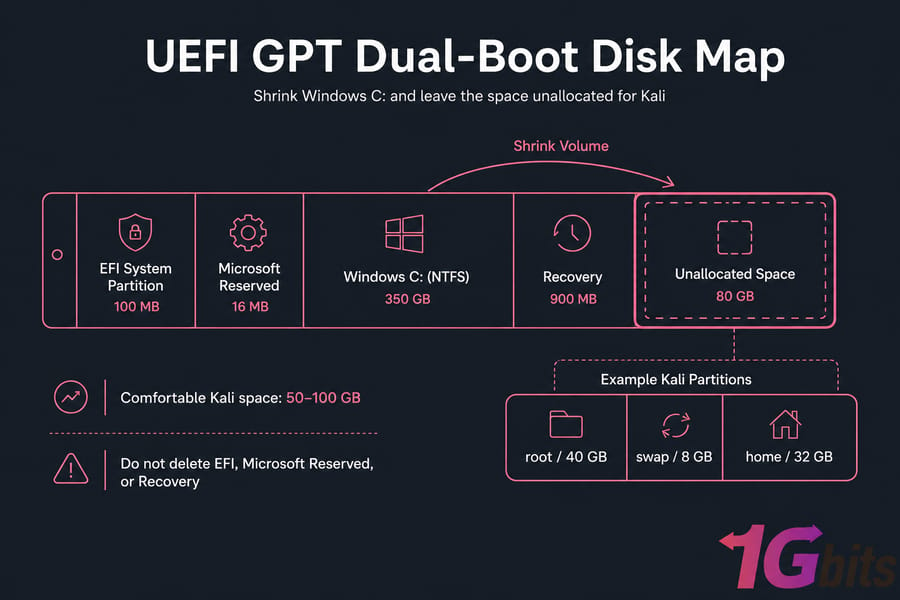
This is where you make room for Kali. Use Windows Disk Management, not the Kali installer, to shrink the Windows side first. It gives you a clearer view of what belongs to Windows and what absolutely should not be touched.
How much space Kali needs
Technically, you can get by with around 30 to 40 GB. Realistically, that's tight if you plan to install tools, save wordlists, keep captures, or just update the system without babysitting free space. I usually suggest 50 to 100 GB if the disk allows it.
On a 512 GB laptop, giving Kali 60 to 100 GB is a comfortable starting point. Not extravagant. Just enough that you won't regret it a week later.
How to create unallocated space in Disk Management
- In Windows, open Disk Management.
- Find the main Windows NTFS partition, usually C:.
- Right-click it and choose Shrink Volume.
- Enter the amount you want to free up for Kali.
- Complete the shrink and leave the result as unallocated space.
Do not create a new Windows volume in that freed space. Leave it unallocated so the Kali Installer can use it directly.
What not to delete in the Windows partition layout
This is the part beginners get nervous about — for good reason. In a normal Windows UEFI layout, you may see several small partitions in addition to C:. Leave these alone:
- EFI System Partition
- Microsoft Reserved partition
- Recovery partition
- Any Windows partition you are not specifically shrinking
If Windows won't shrink enough, hibernation, the page file, restore points, or immovable metadata may be limiting it. Fix that inside Windows first rather than forcing the issue with random third-party tools. If you later need to reclaim space after removal, this guide on how to extend a partition in Windows will help.
You can also review your storage layout if you're juggling multiple drives or secondary disks; this piece on secondary storage is useful for planning.
Warning: Never delete the EFI, Recovery, or Microsoft Reserved partitions to "make space" for Kali. That's how a normal afternoon turns into boot repair night.
With free unallocated space ready, you can install Kali using manual partitioning.
Install Kali Linux alongside Windows using manual partitioning
This is the core install. Take it slowly. Read each screen. The dangerous mistake here is choosing any guided option that erases the whole disk instead of using manual partitioning inside the unallocated space you prepared.
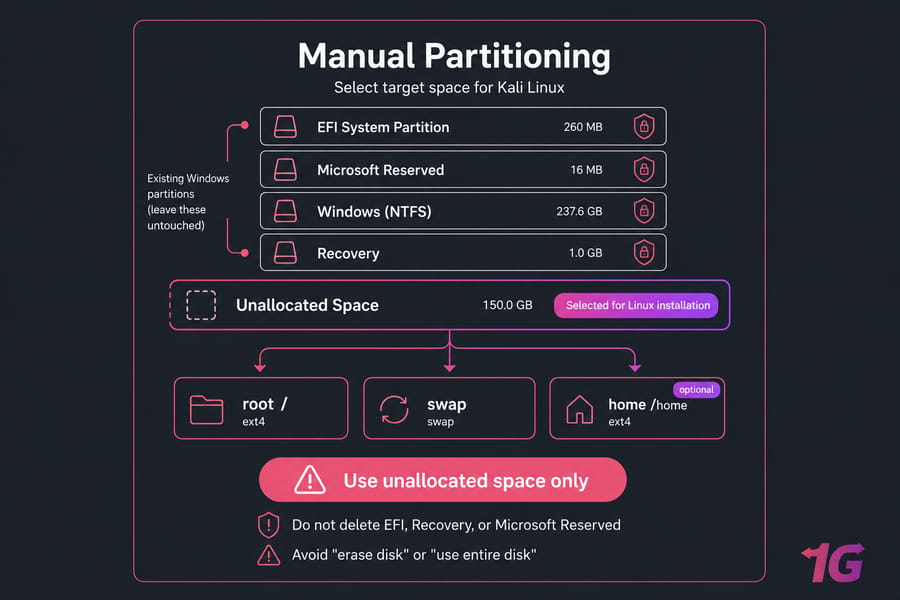
Key takeaway: Use unallocated space only. Do not choose any option that says "erase disk," "use entire disk," or anything similarly cheerful.
Choose the correct installer option
- Boot the Kali USB.
- Choose the graphical installer or standard installer.
- Set language, region, keyboard, hostname, and user details.
- When you reach partitioning, select manual partitioning.
You don't need to overthink the early screens. The partitioning section is the one that matters most. On single-disk systems, you'll usually see the Windows partitions first, followed by the unallocated space you created in Disk Management.
Create the Kali root, swap, and optional home partitions
Inside the unallocated space, create at least a root partition mounted at /. Use ext4. That's the essential piece.
| Partition | File system | Suggested size | Mount point | Notes |
| Root | ext4 | 30–40 GB minimum, 50+ GB preferred | / | Required; holds the OS and tools |
| Swap | swap area | 2–8 GB typical | None | Optional on modern systems; useful on low-RAM machines |
| Home | ext4 | Remainder of free space | /home | Optional; keeps user files separate |
A simple layout works well for most people:
- Root
/: 40 GB, ext4 - Swap: 4 GB
/home: rest of the available space
If your machine has 16 GB or 32 GB of RAM and you don't care about hibernation, swap is optional. I still like having a small one. It gives the system a little breathing room.
Reuse the existing EFI system partition correctly
In a UEFI install, Kali should reuse the existing EFI System Partition that's already being used by Windows. You do not need to create a new one in a normal single-disk setup, and you definitely should not format the existing EFI partition unless you're intentionally rebuilding the entire boot structure.
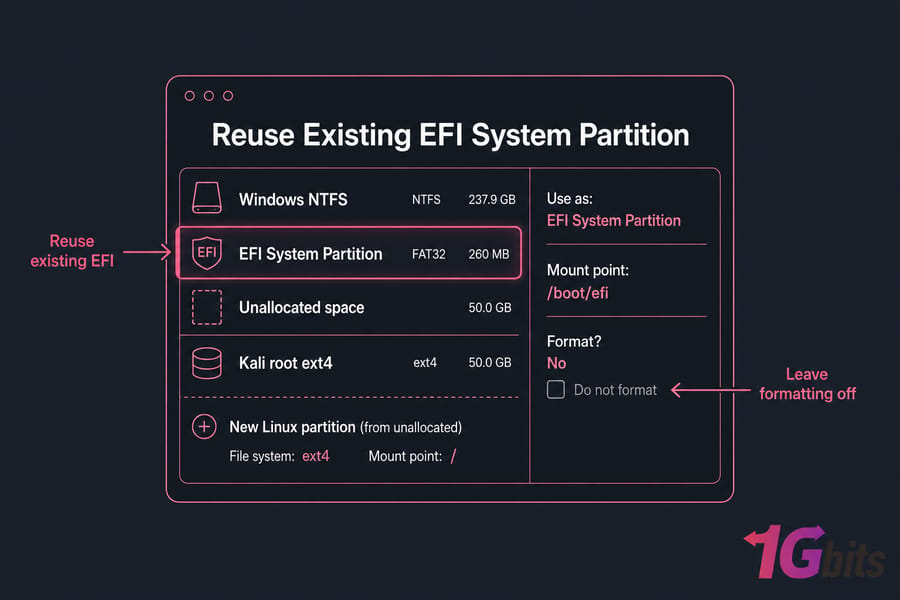
If the installer lets you specify it, select the existing EFI System Partition for bootloader use, but leave formatting off. That's the safe path. This is the step a lot of generic tutorials gloss over, which is why so many users end up with broken boot entries.
Single-disk and multi-disk considerations
On a single-disk laptop, this is usually clean: Windows partitions, unallocated space, Kali partitions, shared EFI partition. On a multi-disk desktop, be extra careful that you're installing to the intended drive. Read the disk sizes. Don't trust drive order alone.
If two drives are connected and one already has an EFI partition, installers can sometimes be less intuitive than you'd hope. I like to disconnect non-essential drives when possible. It removes temptation and ambiguity.
Confirm changes carefully
Eventually you'll hit the screen that summarizes pending partition changes. Stop there. Read it line by line. Make sure:
- Windows NTFS partitions are not marked for formatting
- The EFI System Partition is not marked for formatting
- Only the unallocated space is being turned into Linux partitions
- The root mount point
/is on the new ext4 partition
Once you're happy, continue the install, set your username and password, and let Kali finish copying files. If you want a better feel for Linux basics after setup, this intro on how to use Linux helps a lot. And if you're curious about the OS layer underneath, here's a good primer on the Linux kernel.
The final install step is making sure GRUB is set up correctly so Windows remains bootable.
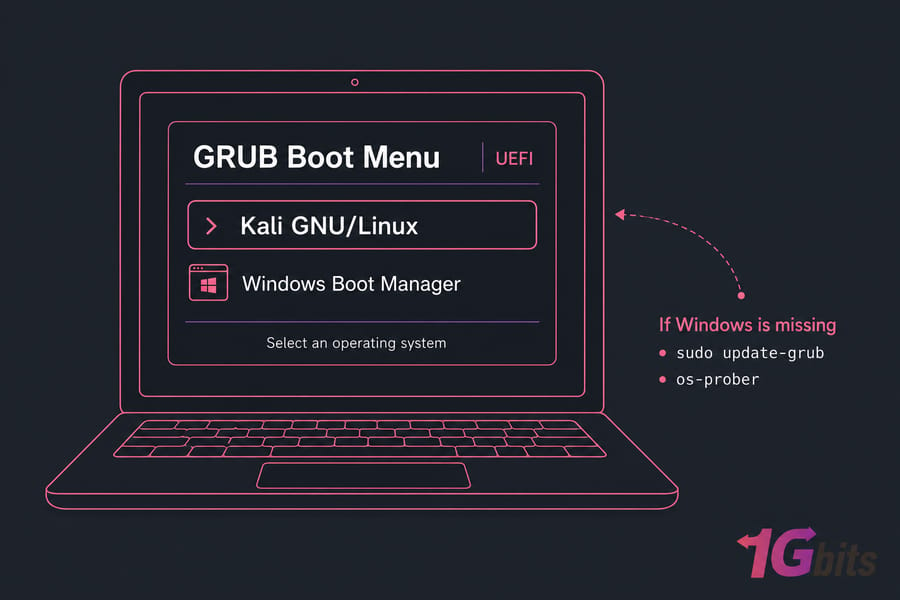
Set up GRUB so Kali Linux and Windows both appear at boot
GRUB is the bootloader that gives you the menu at startup. In a normal UEFI setup, the installer places Kali's GRUB files into the existing EFI structure and adds a boot entry that should coexist with Windows Boot Manager.
Where to install GRUB in a UEFI setup
On UEFI systems, GRUB should be installed using the EFI setup already on the disk. Don't try to force a legacy MBR-style target on a UEFI machine. That's one of the fastest ways to end up with a mismatched boot configuration.
What to do if Windows is not detected automatically
After installation, reboot. Ideally, you'll see both Kali and Windows Boot Manager in GRUB. If Windows is missing, boot into Kali and run:
sudo update-grubIf that still doesn't find Windows, check whether os-prober is available and enabled, then run the GRUB update again.
os-prober
sudo update-grub
That solves the problem more often than not. And yes, it really can be that simple.
First boot checks after installation
- Confirm Kali boots cleanly
- Confirm Windows Boot Manager appears in GRUB
- Boot Windows once to verify it still loads normally
- If the system skips GRUB and goes straight to Windows, check UEFI firmware boot order
If you later need maintenance steps, you'll probably also want to know how to update Kali Linux after the install is done.
Quick summary: If Windows is missing from GRUB, try
sudo update-grubfirst. Don't reinstall the whole system until you've tested the obvious fix.
If the system does not boot as expected, use the fixes below before reinstalling from scratch.
Fix common Kali Linux dual boot problems on Windows 10/11
Most dual-boot problems fall into a few predictable buckets. That's actually good news, because it means you can troubleshoot calmly instead of assuming the install is ruined.
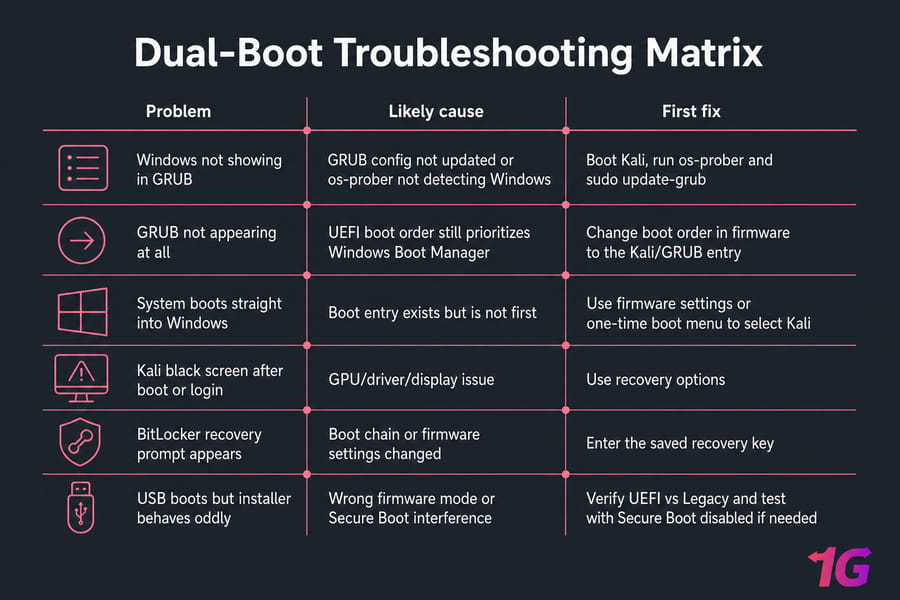
| Problem | Likely cause | Fix |
| Windows not showing in GRUB | GRUB config not updated or os-prober not detecting Windows | Boot Kali, run os-prober and sudo update-grub |
| GRUB not appearing at all | UEFI boot order still prioritizes Windows Boot Manager | Change boot order in firmware to the Kali/GRUB entry |
| System boots straight into Windows | Boot entry exists but is not first | Use firmware settings or one-time boot menu to select Kali |
| Kali black screen after boot or login | GPU/driver/display issue | Use recovery options and review this guide to fix Kali Linux black screen after login |
| BitLocker recovery prompt appears | Boot chain or firmware settings changed | Enter the saved recovery key, then review encryption and firmware settings |
| USB boots but installer behaves oddly | Wrong firmware mode or Secure Boot interference | Verify UEFI vs Legacy and test with Secure Boot disabled if needed |
| Windows boot breaks | Boot records or EFI entries need repair | Use Windows Recovery Environment and Startup Repair |
GRUB not showing Windows Boot Manager
Boot Kali and run the GRUB refresh commands. On many systems, os-prober will detect the Windows install and let GRUB add it back automatically. This is the classic "grub not showing windows dual boot kali" problem, and it's often fixable without drama.
System boots straight into Windows
This usually means the firmware boot order still points to Windows Boot Manager first. Enter UEFI settings and move the Kali or GRUB boot entry higher. If you're unsure what changed, reviewing the basics of UEFI vs BIOS can clarify why boot order matters so much here.
Kali black screen or boot failure after install
That tends to be a graphics or display stack issue rather than a partitioning one. Annoying, yes, but different. Check logs, boot options, and GPU-related fixes rather than redoing the whole install immediately.
Secure Boot interference
If the system refuses to load Kali properly, or the installer USB doesn't behave the way you'd expect, disable Secure Boot temporarily and test again. I wouldn't call it the first culprit every time, but it's high on the list.
BitLocker recovery and Windows repair
If Windows asks for the BitLocker recovery key after firmware or boot changes, use the key you saved earlier. That's normal enough. If Windows itself won't start, boot into the Windows Recovery Environment and try Startup Repair before making bigger changes. If the disk reports file system issues later, tools like the ones in this CHKDSK reference can help after you're back inside Windows.
One more practical point: if hardware drivers or firmware quirks make your dual boot unstable, a remote Kali environment avoids the whole local conflict. That's where a Kali Linux VPS can make life much easier.
Want Kali Linux without partitioning your Windows PC? If you only need Kali for labs, remote practice, or tool access, a hosted Kali Linux VPS can save you from dual-boot risks like GRUB issues, partition mistakes, and Secure Boot conflicts.
If you later decide Kali is no longer needed, remove it carefully and restore Windows-only boot.
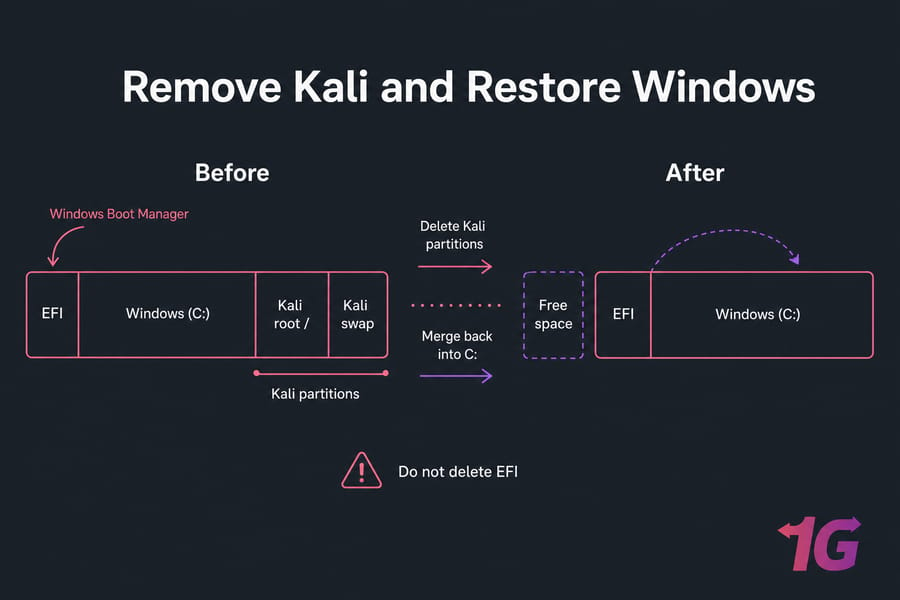
Remove Kali Linux dual boot and restore Windows bootloader
Yes, you can remove Kali later and keep Windows. Just do it in the right order. The main mistake here is deleting Linux partitions first and only then realizing GRUB still controls startup.
Back up Kali files before removal
If you stored scripts, notes, captures, or SSH keys in Kali, copy them elsewhere first. Once you delete those Linux partitions from Windows, that's generally it.
Delete Linux partitions safely
- Restore or confirm the Windows boot path first if GRUB currently controls startup.
- Boot into Windows.
- Open Disk Management.
- Identify the Linux partitions by their file system or unknown/unlettered status.
- Delete only the Kali Linux partitions.
- Do not delete the EFI partition or any Windows recovery partitions.
Restore Windows Boot Manager and reclaim disk space
If needed, use the Windows Recovery Environment and Startup Repair to restore Windows Boot Manager. After that, you can extend the Windows partition back into the freed space.
If you like belt-and-suspenders planning, keep a backup strategy in place here too same logic as any solid backup routine, even if your machine isn't a server.
Warning: Don't delete Linux partitions before restoring the Windows boot path if GRUB controls startup. Otherwise you can end up with a boot menu pointing to files that no longer exist.
Still deciding whether dual boot is worth it? Compare it with a VM or hosted Kali environment.
Dual boot vs virtual machine for Kali Linux: which is better?
Here's the honest answer: for many people, a VM is the better first move. Dual boot gives you native performance and direct hardware access, which is great for Wi-Fi adapters, GPUs, and device testing. But it also comes with partitioning risk, bootloader complexity, and more friction when something breaks.
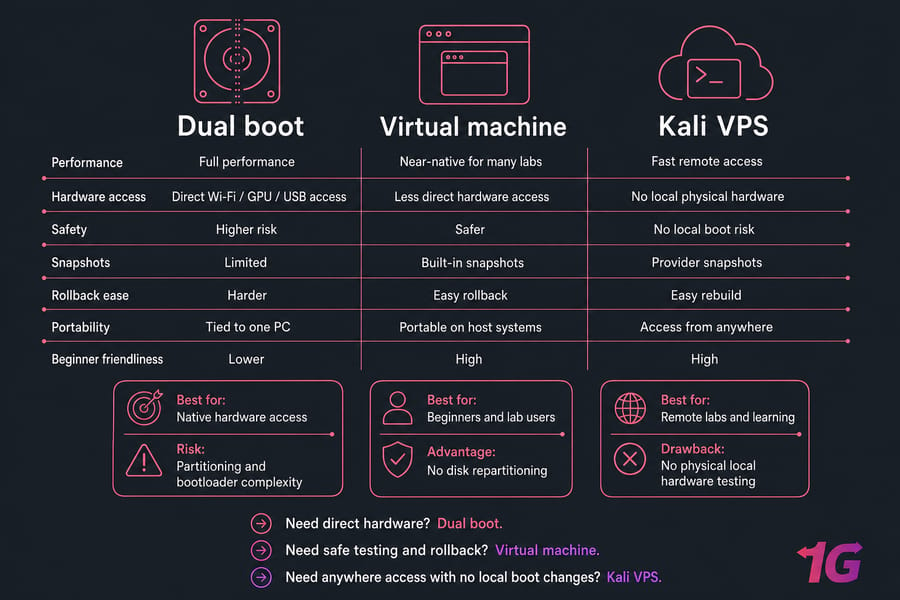
| Option | Best for | Main advantage | Main drawback |
| Dual boot | Users who need native hardware access | Full performance and direct device support | Partitioning and bootloader risk |
| Virtual machine | Beginners and lab users | Snapshots, easy rollback, no disk repartitioning | Less direct hardware access |
| Kali VPS | Remote labs, learning, tool access from anywhere | No local boot risk, fast access | No physical local hardware testing |
Native hardware access vs convenience
If you need your wireless chipset, USB devices, or GPU working directly, dual boot wins. If you mainly want to learn commands, run tools, and break things without consequences, a VM is usually smarter. And if you don't want to touch your personal laptop at all, a hosted environment is even cleaner.
When a Kali VPS or VM makes more sense
For casual learners, I usually recommend checking the best virtual machine software first. If you want remote access, full root access, fast deployment, and no local rollback risk, a Kali Linux VPS or broader Linux VPS hosting is a very practical alternative.
Not flashy. Just less fragile.
Final checklist before and after you dual boot Kali Linux and Windows
If you want the short version of how to dual boot Kali Linux and Windows safely, it's this checklist. Go through it once before the install, then once after the first reboot.
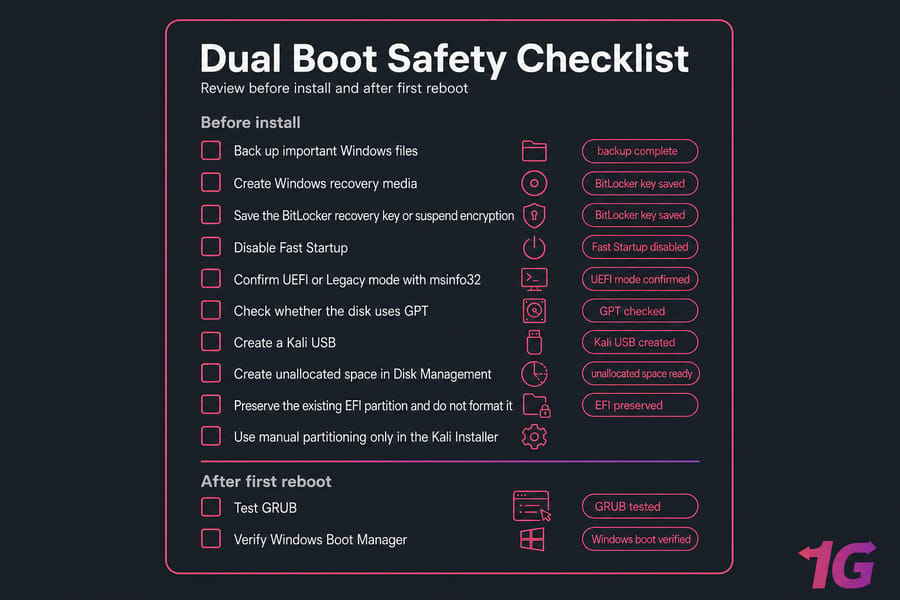
- Back up important Windows files
- Create Windows recovery media
- Save the BitLocker recovery key or suspend encryption
- Disable Fast Startup
- Confirm UEFI or Legacy mode with
msinfo32 - Check whether the disk uses GPT
- Create unallocated space in Disk Management
- Preserve the existing EFI partition and do not format it
- Use manual partitioning only in the Kali Installer
- Test both GRUB and Windows Boot Manager after install
If any of that still feels shaky, that's not failure — that's good judgment. Use a VM, or better yet, view Kali Linux VPS options or compare Linux VPS plans from 1Gbits for fast deployment, full root access, remote access from anywhere, and none of the bootloader headaches.

Leave A Comment