
It is a frequent issue to deal with the partition in Windows. A common way to tackle this is resizing them to adjust their size as desired. Few users also resize the partitions to make them smaller and leave space unoccupied for future ease. You might be wondering that various third-party tools are required to achieve this, but in reality, you don’t need any.
Windows itself is tailored with two ways through which an individual can easily resize the partitions. Whether it be Windows 7, Windows 10, or Vista, you’ll be encountered with robust Windows Disk Management that allows you to shrink and expand partitions. However, it will not be wrong to mention that using third-party utilities will add extra feature-rich functionalities, but you have to go through additional steps which also come with a price tag.
A Brief About Resizing Partitions in Windows
The process of modifying the partition's size either by extending or shrinking it is known as resizing partitions on Windows. Also, an individual can divide a partition into two and add free disk space to the continuous logical space on the hard disk.
However, hard drives can be separated into different partitions and dedicated spaces that can store various files. Users can separate Windows, installed applications, individual data, etc., with the help of partitions.
Majorly, it is observed that the default partitions lag in meeting the demands of users. Some partitions can get small enough to store all your data and make your system run out of space. This might lead to slower speeds or other issues with the system.
Luckily, all Windows users can use the system’s built-in tool to resize partitions and manage them without any data loss. To get started, an individual must open the Control Panel and search for “partition” in the search box; for Windows 8 or 8.1, users should run the Start Screen search. And you have the flexibility to use both the start menu and the control panel search if you’re using Windows 10.
How does partitioning in Windows help?
Partitioning in Windows will help you solve the following problems:
- Drive C is running out of space.
- Your Windows computer is getting slow.
- The frequent notifications about low space pop up on the screen.
Along with this, the following is the list of the most common issues that get eliminated with the help of partitioning:
-
Utilizing Disk Space to the Fullest
By default, it is likely to happen that a partition may get overloaded with data, whereas the other one is having tons of available space. Therefore, with the help of partitions, you can manage to utilize these spaces to the fullest without impacting several storage spaces.
-
Reduces Disk Space Issues
When the storage space runs out, Windows notifies users with the message like "You are running out of disk space on Windows (C:). To free space on this drive by deleting old or unnecessary files, click here" or "You are running out of disk space on Recovery (D:). Click here to see if you can free space on this drive."
But after you adjust the partitions and utilize the free spaces or even extend their sizes, you are more likely to receive lesser messages regarding disk space issues.
-
Dividing One Big Partition
Every new system comes with one big partition of the hard drive by default, leaving a lot of free space. This one big partition can be divided or shrank and can result in several new partitions in unallocated space.
Few Tips Regarding Resizing Hard Disk Partition
Indeed the process of partitioning is easy on hard data. But certain things are needed to be considered before resizing partition to enhance data security:
- Back up all the data you want to resize because there are minimal chances that users may lose their valuable data due to the interruption through certain causes.
- In the case of the larger partition capacity and big amount of data, computers generally take a lot of time. Therefore, ensure that your computer doesn’t go into hibernation or sleep mode.
- Ensure eliminating all the errors of the partitions you want to extend or shrink because they may block the partitioning process.
- To make the process ends successfully, do not shut down the computer and eliminate any sudden power failure chances.
Extending partition size using Disk Management Windows 10
-
Step:1
To get started with partition manager Windows 10, search for the same in the taskbar. But if you’re using Windows 7, search for the same in the Start Menu or write on the start screen on Windows 8.1. After this, click on the “Create and format hard disk partitions” option.
-
Step: 2
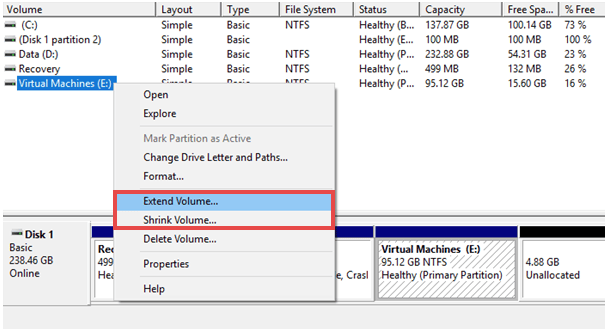
Right after this, redirect to the partition that you wish to resize and right-click on it. Now to resize it, a contextual menu will open in front of you:
- For increasing the partition size, click on the “Extend Volume” option.
- But if you wish to make the partition smaller, click the “Shrink Volume” option.
-
Step: 3
If no unallocated space is available near the partition, the Extend Volume option will be greyed out. Therefore, increasing the size may get nearly impossible. Similarly, if the partition you wish to reduce is flooded with data, you will not be able to make it smaller, and the Shrink Volume option will grey out.
-
Step: 4
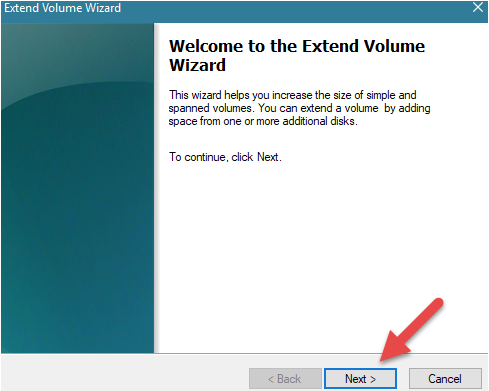
However, to increase the partition size even after experiencing lesser space, click on the “Extend Volume”. It will open the disk Management with a screen containing “Extend Volume Wizard.” Hit next to proceed.
-
Step: 5
Now select the total space you want to add to the partition. This can be dependent on the total free space available near the partition. By default, all the free space is selected by Wizard which one can check from the Selected list.
-
Step:6
You can specify the space you want in MB by selecting the option “Select the amount of space in MB”. Right after this, click on the Next to continue.
-
Step:7
At this step, the “Extend Volume Wizard” will summarize the settings you implemented. Check if they are suiting your needs and proceed accordingly.
-
Step: 8
Finally, the Wizard will close, and partitioning will be implemented.
What to do if Extended Volume Gets Grayed Out?
- Check whether or not the Disk Management is opened with administrator privileges and permissions.
- Ensure to have unallocated space near the partition you want to resize. You can opt to delete the volumes present in-between the unallocated space and the partition.
- In Windows, partitions can only be resized into NTFS or ReFS file systems. So, it is important to format files in these systems only.
- Make sure to use the partitioning scheme of GPT if your disk is larger than 2 TB.
If you are still facing issues regarding extending the partition volume, navigate directly to the Microsoft community. And if you don’t find an answer, post a question regarding your query where other professionals will help you.
Extending Partition Size with PowerShell or Command Prompt, and the DiskPart Tool
To attain the same results with the command lines’ help, run the Command Prompt or the PowerShell for resizing the partitions. Follow the steps mentioned below:
- To start disk partitioning tools, run the diskpart command.
- Now to list all the partitions, run the list volume command on your Windows computer. Search the Volume column to identify the partition’s volume number that you will resize.
- The next step is replacing the # with the partition’s volume number.
- To extend the partition, type extends size = custom size. After this, enter the customized value in MB (megabytes).
- However, for making the size smaller, you have to run the shrink desired = custom size command in MB.
Conclusion
The blog covers all the necessary information one needs for partitioning in Windows without using any third-party tools. As we've mentioned, it is surprisingly easy. In nearly all Windows versions (primarily 10/8/7/XP), these steps can help you either extend or shrink the partition as needed. Both Disk Management and using the command prompt will help you achieve the end goal without getting overwhelmed. However, if you are managing a server or need more advanced partitioning options, dedicated Windows server hosting might be the ideal solution. This hosting option provides you with full control over your server environment, allowing for more complex configurations and optimizations that go beyond basic partitioning tasks.
People also read:

Leave A Comment