
Have you ever seen the dreaded blue screen, along with a cryptic message concerning disk errors? Fear not, for your Windows contains a powerful tool known as chkdsk. This command-line application can analyze and repair an extensive number of disk errors, preventing crashes and keeping your system running smoothly. However, navigating chkdsk's functions can be difficult, particularly for beginners. This blog post will walk you through the chkdsk instructions! From basic scanning to advanced error correction. So, what are you waiting for?
What is CHKDSK?
CHKDSK stands for "Check Disk." It is a command-line tool for Microsoft Windows that checks the file system health of a drive and corrects any issues that are discovered. CHKDSK can detect and repair many kinds of errors, including bad sectors, file system issues, and logical file system errors. It's widely used when a disk looks to be acting unexpectedly such as frequent crashes or weak performance. Running CHKDSK can assist identify and potentially cure these issues, allowing the disk to run properly.
Why do I need to use CHKDSK?
If you`re asking “Why do I need to use CHKDSK?”, just look at the following reasons and then you`ll know why:
-
Maintaining system health: Just like a car needs tune-ups, your hard drive can accumulate errors over time due to unexpected shutdowns or power surges. CHKDSK can identify these issues before they snowball into bigger problems.
-
Troubleshooting system issues: Experiencing random crashes, slowdowns, or error messages mentioning the disk? CHKDSK can help pinpoint the culprit. By scanning for and fixing errors, it can potentially resolve these problems.
-
Suspected data corruption: If you suspect your files are corrupted or inaccessible, CHKDSK might be able to recover them. While not a guaranteed solution, it can attempt to salvage data from bad sectors on the drive.
-
Preparing for disk maintenance: Before performing a major disk operation like formatting or partitioning, using CHKDSK can ensure there are no underlying issues that could complicate the process.
You may want to know how to test Linux Disk Speed.
How to run CHKDSK in Windows
There are different ways to run CHKDSK, from a basic scan to a deep clean with error correction, so you can choose the way that's right for your situation. Let`s explore the ways:
Run CHKDSK from File Explorer
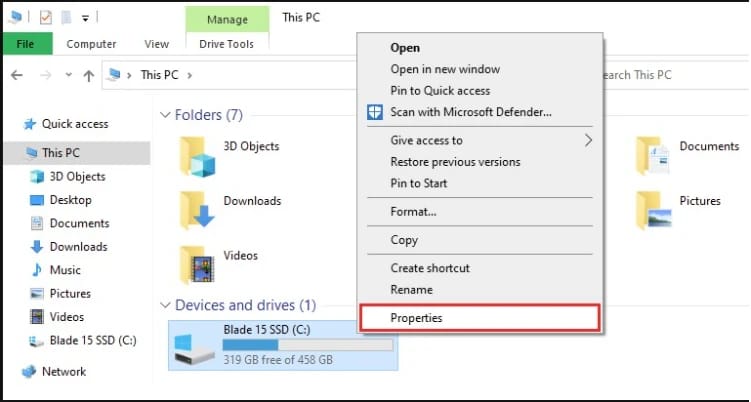
To run the CHKDSK from the File Explorer, use the following steps:
-
Open File Explorer and go to "This PC."
-
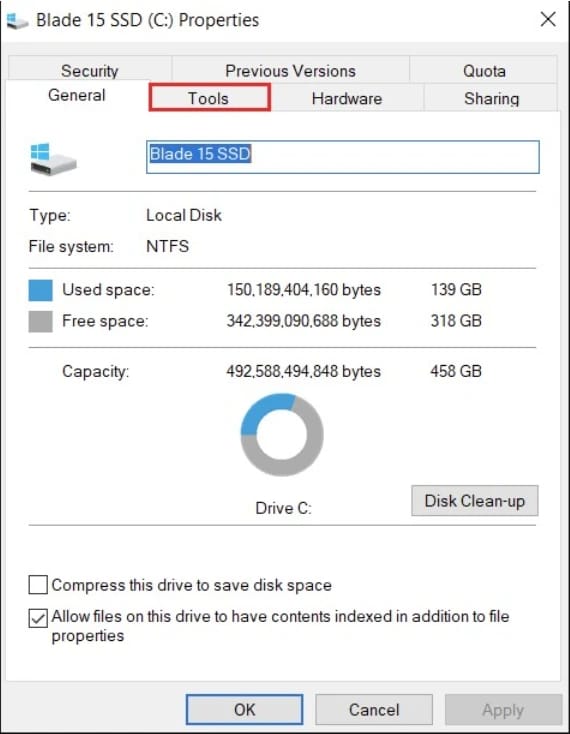
Right-click the drive you want to scan (like C: or D:) and select "Properties."
-
Switch to the "Tools" tab.
-
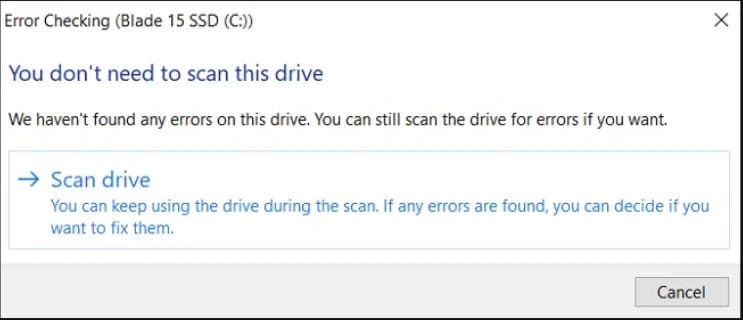
Click the "Check" button under "Error checking."
-

-
If it says "You don't need to scan this drive," you're good to go! Otherwise, click "Scan drive" to start the process.
-
You can click "Show Details" after the scan to see any errors that were fixed. Otherwise, just click "Close" to exit.
Run CHKDSK from command prompt
To run CHKDSK with Command Prompt, use the following instruction:
-
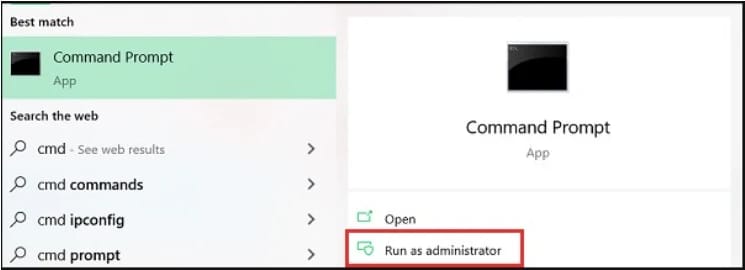
Search for "cmd" in the Start menu.
-
Right-click "Command Prompt" and select "Run as administrator." This gives CHKDSK the necessary permissions to fix errors.
-
At the command prompt, type your desired CHKDSK command and press Enter. Here are some options:
-
For a basic scan: Simply type `chkdsk` (no space after chkdsk) and press Enter.
-
To scan and fix errors: Type `chkdsk /f` (with a space after chkdsk and f) followed by the drive letter (e.g., `chkdsk /f C:`) and press Enter.
-
For a more thorough scan that includes checking for bad sectors and attempting data recovery: type `chkdsk /r` followed by the drive letter (e.g., `chkdsk /r C:`) and press Enter. )Note: This can take significantly longer.(
Run CHKDSK from an installation Media
To run CHKDSK from an installation media (USB or DVD), all you need is following the below steps:
-
Boot from installation media: Insert your Windows installation media and restart your computer. You might need to press a specific key (often F8 or F12) repeatedly before the Windows logo appears to access the boot menu and choose the installation media.
-
Go to advanced options: Once booted from the media, follow the on-screen prompts. You'll typically need to select "Repair your computer" followed by "Troubleshoot" and then "Advanced options."
-
Open command prompt: In the Advanced options menu, select "Command Prompt."
-
Identify drive letter: Once in the Command Prompt, you might need to identify the drive letter of your Windows installation. Type `C:` and press Enter. If you see familiar Windows folders, that's your drive letter. Otherwise, try `D:` or other letters until you find the correct one.
-
Run CHKDSK: Now that you know the drive letter, type `chkdsk [drive letter] /f` (replace `[drive letter]` with your actual drive letter, e.g., `chkdsk C: /f`) and press Enter. This command checks and attempts to fix errors on the specified drive.
CHKDSK commands list
CHKDSK command Windows 10 and later are instructions you give to the chkdsk tool in Windows to perform specific actions on your hard drive. We provide these CHKDSK commands list and their functions for you:
-
chkdsk: This is the basic command that simply scans the drive for errors but doesn't attempt to fix them.
-
chkdsk [drive letter]: This variation specifies the drive letter you want to scan. For example, chkdsk C: would scan your C drive.
-
chkdsk /f: The /f parameter tells chkdsk to fix any errors it encounters during the scan. This is a commonly used option for basic troubleshooting.
-
chkdsk /r: The /r parameter instructs chkdsk to locate bad sectors on the drive and attempt to recover readable data from them. It also includes the functionality of /f (fixing errors). This is a more thorough scan but can take significantly longer.
-
chkdsk /x: The /x parameter forces the volume (drive) to dismount first before the scan and fix process. This is useful if the drive is currently in use by Windows. It's often used in combination with /f for a forced scan and fix.
-
chkdsk /v: This one shows the all file names and the path while it`s running a check.
Now you have all chkdsk commands for external drive!
Note: We recommend to run chkdsk commands as administrator to ensure it has the necessary permissions to make repairs.
CHKDSK commands parameters
Now, you can see all CHKDSK command windows 10 and later parameters in the following table. We provide this CHKDSK commands cheat sheet for you:
|
Parameter |
Function |
Notes |
|
None |
Scans the drive for errors (no fix) |
Basic scan, reports errors but doesn't attempt to fix them. |
|
[drive letter] |
Scans the specified drive for errors (no fix) |
Specify the drive letter (e.g., C:, D:) after chkdsk with a space. |
|
/f |
Fixes errors found during the scan. |
Commonly used for basic troubleshooting. |
|
/r |
Locates bad sectors, recovers data (if possible), and fixes errors |
More thorough scan, includes functionality of `/f` but takes longer. |
|
/x |
Dismounts the volume (drive) before the scan and fix process |
Useful if the drive is currently in use by Windows. Often used with `/f` for a forced scan and fix. |
|
/v |
Displays the full path and name of every file on the drive |
Increases verbosity of the scan output, showing scanned files. |
|
/i |
Forces the chkdsk to only check the index entry of the volume |
Less thorough than a full scan, only checks the file system index. |
|
/c |
Skips checking for cycles inside the volume (only applies to NTFS) |
Not recommended for most users, focuses on specific NTFS file system checks. |
|
/l |
Allows chkdsk to bypass checking lost chains (only applies to NTFS) |
Not recommended for most users, focuses on specific NTFS file system checks. |
|
/b |
Re-evaluates bad clusters on the volume (only applies to NTFS) |
Used for advanced troubleshooting of bad sectors, can take a long time. |
|
/offlinescanandfix (Windows 10 & later) |
Performs an offline scan and attempts to fix errors |
Similar to `/r` but specifically designed for offline scans initiated from the recovery environment. |
|
/scan (Windows 10 & later) |
Performs an online scan and attempts to fix errors |
Similar to `/f` but specifically designed for online scans. |
That’s it! Now you have a Chkdsk commands cheat sheet.
Note 1: You can combine some parameters. For example, chkdsk C: /f /x would scan drive C, fix errors, and force the volume to dismount first.
Note 2: Not all parameters are available on all versions of Windows. The /offlinescanandfix and /scan parameters are only available in Windows 10 and chkdsk commands windows 11 and later.
CHKDSK troubleshooting tips
CHKDSK is a useful tool, but things don't always go as planned. Sometimes you face problems that need to be fixed. Here are some common troubleshooting tips for when CHKDSK encounters problems:
Problem 1: Stuck CHKDSK
-
Restart and retry: A simple restart can often clear temporary glitches that might be preventing CHKDSK from completing. Once your computer restarts, try running CHKDSK again.
-
Free up space: If your drive is nearing capacity, CHKDSK might struggle to complete the scan. Try freeing up some disk space by deleting unnecessary files or transferring them to another drive.
-
Identify conflicting processes: Certain programs might be accessing the drive you're trying to scan, causing CHKDSK to hang. Close any unnecessary applications before running CHKDSK.
Problem 2: "CHKDSK cannot run because the volume is in use by another process"
-
Schedule scan for restart: This message indicates the drive is currently in use. You can type `Y` and press Enter to schedule the scan to run during the next system restart.
-
Boot into safe mode: Safe mode loads Windows with only essential drivers. This can help isolate conflicts with other programs. Run CHKDSK from Safe Mode to bypass conflicting processes.
Problem 3: Data Recovery Concerns
-
CHKDSK isn't guaranteed data recovery: While CHKDSK can attempt to fix errors and recover data from bad sectors, it's not a foolproof solution. If you suspect significant data loss, consider specialized data recovery software.
-
Backup before running CHKDSK (Especially with /r): In rare cases, CHKDSK itself might cause data corruption. It's always a good practice to back up important files before running CHKDSK, especially if you're using the `/r` parameter for a more thorough scan.
Additional tips
-
Run CHKDSK as administrator: Ensure you have administrator privileges when running CHKDSK. This is important for the tool to make necessary repairs.
-
Consider alternative disk checking tools: If CHKDSK persistently fails, there might be underlying issues with your hard drive. Consider using alternative disk checking tools offered by your storage manufacturer or third-party software providers.
How to change a scheduled disk check
Don't let scheduled disk checks slow your Windows system down! While CHKDSK command Windows 11 is a useful tool for preserving your hard disk in good condition, it can be difficult, particularly on older PCs. Here we tell you how to control and postpone those automatic scans in Windows:
-
Search for "cmd" in the taskbar search bar.
-
Right-click on "Command Prompt" and select "Run as administrator." This is important to ensure you have the necessary permissions to modify system settings.
-
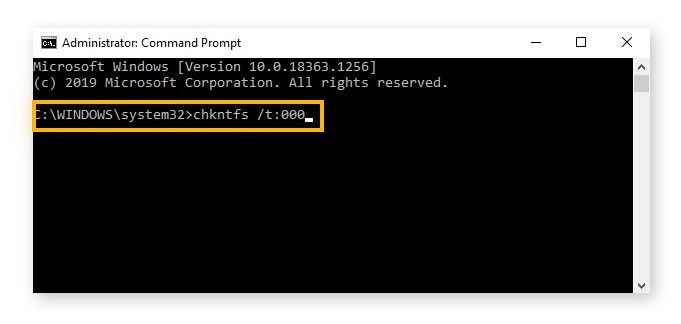
In the Command Prompt window, type the following command and press Enter:
chkntfs /t:[delay_in_seconds]
-
Replace [delay_in_seconds] with the desired number of seconds you want to postpone the scan. The maximum delay is 72 hours (259,200 seconds).
For example:
-
chkntfs /t:3600 delays the scan by 1 hour (3600 seconds).
-
chkntfs /t:86400 delays the scan by 24 hours (86400 seconds).
Note: This command only postpones the scheduled scan. It doesn't disable it permanently.

What to do when CHKDSK is frozen
If CHKDSK gets stuck, it's okay to hit pause. But it's time to play detective and figure out why it froze before starting a new scan pronto! It could be a sign that your hard drive needs some TLC. So, let's fix it up quick with these steps:
-
Wait! CHKDSK scans can take time. Give it a while, especially for large drives or if fixing errors.
-
Gather up all your precious data and tuck it safely into an external drive, like giving them a cozy nest.
-
Defrag your hard drive by typing "defrag" into the taskbar and then selecting Defragment and Optimize Drives.
-
Type "disk cleanup" into the taskbar and let Disk Cleanup do its magic.
-
Start Command Prompt as administrator and run sfc /scannow. Once completed, reboot the system. This replaces corrupted system files.
-
Back to the Command Prompt and open it as admin once more and type "dism.exe /online /cleanup-image /restorehealth" to mend any little cracks in your Windows.
Conclusion
While CHKDSK have so much benefits, occasional frozen scans can be nerve-wracking. We tried to help you to troubleshoot and resume scans in this guide. Also, we provided all CHKDSK commands for external drive. But don’t forget that balance is key! While delaying scans might improve performance temporarily, ignoring them completely can lead to more serious problems. Schedule regular scans and consider alternatives if CHKDSK struggles. The most important thing, remember to always back up your data before running any disk checks or repairs. By following these tips, you can ensure a healthy drive and a happy computer!

Leave A Comment