![How To Install XCache for PHP on CentOS [Step-by-step]](https://1gbits.com/cdn-cgi/image/width=1200,quality=80,format=auto/https://s3.1gbits.com/blog/2021/02/HOW-TO-ISNTALL-XCACHE-FOR-PHP-ON-CENTOS817-847xAuto.jpg "How To Install XCache for PHP on CentOS [Step-by-step]")
This article will go through the steps to install XCache for PHP on CentOS 7 and 8. XCache is an extension for PHP that caches its operational code. It is extremely fast, speeds up the page loading times that have already been visited and increases the website’s overall loading speeds.
This was developed by mOo, which runs on production servers under high loads. XCache optimizes the performance by caching PHP scripts’ compiled state into the RAM and using them directly from the RAM. This process has an increase in PHP execution five times than the default installation.
XCache optimizes performance by caching the compiled state of PHP scripts into the RAM and using the compiled version straight from the RAM. This may increase PHP execution by 1-5 times faster than default installation.
To install XCache on CentOS, we will need to install the EPEL repository.
For more information on the CentOS operating system, check out our detailed guide on What is CentOS?.
What is EPEL?
EPEL (Extra Package for Enterprise Linux) is an additional repository that provides easy access to install packages for commonly used software. It is an open-source and free community-based repository project from Fedora which offers high-quality software for all major Linux distributions like CentOS and Debian.
This consists of but is not limited to open-source package tools like networking tools, sysadmin tools, programming, etc. This repository’s primary goal is to provide great ease of access to software on Enterprise Linux-compatible distributions.
The main reason for using the EPEL repository is that:
- Provides plenty of open-source packages to install.
- Epel-repo is 100% free: Open-source.
- It does not provide any core duplicate packages and has no compatibility issues.
- All EPEL packages are maintained by the Fedora repo.
Install XCache for PHP on CentOS
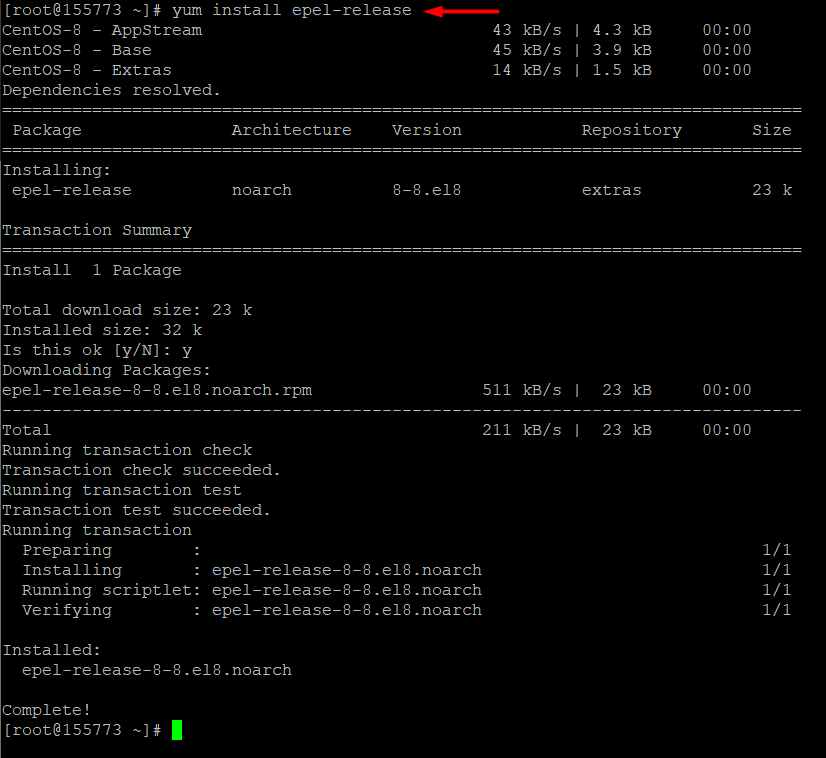
To start the installation process, we will need first to add the EPEL repository to the system. For CentOS 6, CentOS 7 and CentOS 8, use the following code.
yum install epel-release
Now let’s go ahead with the second instalment.
![Basic Linux Commands with Examples [Linux Cheat Sheet]](../../../cdn-cgi/image/width=827,quality=80,format=auto/https://s3.1gbits.com/blog/2021/01/linux-commands-basic-to-advanced271-847xAuto.jpg "Basic Linux Commands with Examples [Linux Cheat Sheet]")
Basic Linux Commands with Examples [Linux Cheat Sheet]
In this tutorial, we will go through the basic Linux commands that can help you get started with using the Linux terminal.
Install XCache for PHP
You can install XCache for PHP and use the yum command. It will take the
yum install php-xcache xcache-admin
Configuring of XCache for PHP
During the installation, XCache will create its default PHP configuration file. To open it, use the following nano command:
nano /etc/php.d/xcache.ini
The output will look something like this. This file contains a long list of parameters that can be changed depending on your requirements. To learn more, visit the official Xcache website.
[xcache-common]
extension = /usr/lib64/php/modules/xcache.so
[xcache]
xcache.shm_scheme = "mmap"
xcache.size = 32M
xcache.count = 1
xcache.slots = 8K
xcache.ttl = 3600
xcache.gc_interval = 300
; Same as aboves but for variable cache
; If you don't know for sure that you need this, you probably don't
xcache.var_size = 0M
xcache.var_count = 1
xcache.var_slots = 8K
xcache.var_ttl = 0
xcache.var_maxttl = 0
xcache.var_gc_interval = 300
; N/A for /dev/zero
xcache.readonly_protection = Off
xcache.mmap_path = "/dev/zero"
xcache.cacher = On
xcache.stat = On
Restart your Nginx webserver
You have added the custom configurations in your XCache file at this stage. To activate it fully, we will need to Restart your Nginx web server. Once the webserver is restarted, all made changes will be activated. TO restart the Nginx server:
For more information on checking your CentOS version to ensure compatibility with your configurations, refer to our guide on how to check the CentOS version.
service nginx restart
At this point, xCache should be successfully installed on your VPS. You can confirm that by executing the following command: For those looking to optimize their hosting experience, consider exploring our guide on how to buy VPS for a reliable and efficient setup.
php -v
Now when listing the PHP version, it will include information about XCache as well:
PHP 5.5.20 (cli) (built: Dec 31 2014 00:46:99)
Copyright (c) 1997-2013 The PHP Group
Zend Engine v2.4.0, Copyright (c) 1998-2013 Zend Technologies
with XCache v3.2.0, Copyright (c) 2005-2014, by mOo
with XCache Cacher v3.2.0, Copyright (c) 2005-2014, by mOo
Final Word
Congratulations! You have successfully installed XCache for PHP on your CentOS server (CentOS 7/8). If you encounter any issues during the installation or configuration process, feel free to let us know in the comments below, and we’ll be happy to assist you.
Additionally, don’t forget to check out some of our related articles that people often read along with this guide to enhance your experience managing a CentOS server. These resources can help you optimize performance, troubleshoot potential problems, and get the most out of your server.
For instance, if you ever find yourself locked out of your server, our guide on how to reset your forgotten root password on CentOS will help you regain access quickly and securely.
People also read:
- How To Install Nginx on Centos 7
- How To Install phpMyAdmin with Nginx on Centos
- How To Clear Cache from browsers
- How to install htop centos 7
- Install interworx centos
- Install cpanel centos 7
Leave A Comment