
This tutorial will teach you how to install and start Nginx on CentOS 7. The methods mentioned here will also be suitable for installing Nginx on CentOS 8.
Nginx is one of the most popular web servers in the world and is responsible for hosting some of the most popular websites on the planet. Nginx (pronounced as Engine-x) is used as an alternative to Apache, and it consumes fewer resources and improves overall server responsiveness.
The main factor that makes it resource-friendly is its event-driven design. Above all, it allows admins to set up advanced configurations and deal with a high load of concurrent connections. Besides being a good fit for an HTTP web server, Nginx works as a reverse proxy, load balancer, and standard mail server.
To further understand how Nginx operates within its environment, you can explore our posts on What is CentOS? and What is Nginx? for comprehensive insights into the platforms that support it.
Prerequisites
Before getting with the tutorial, you will need:
- A CentOS 7 server
- A root user or a user with root privileges
- Basic understanding of Linux commands
Step 1: Update repository package list
Let’s go ahead and update the package list so that we will get the most recent updated Nginx software installed on your server.
sudo yum -y update
Here –y is an optional parameter. When you include this in the command, you will not be prompted with confirmation of commands. You can omit this part; when prompted, you can always enter y and press ENTER.
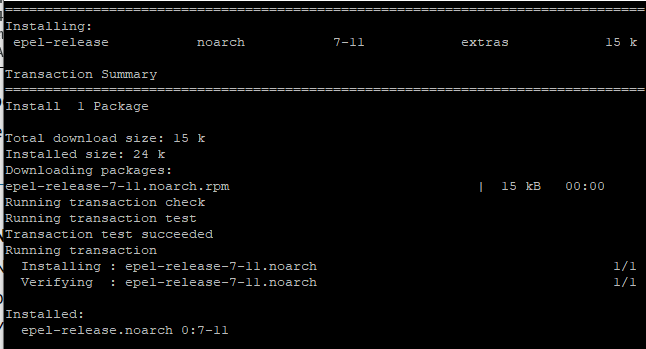
Step 2: Install the EPEL repository
With the default CentOS repositories, Nginx is not available. Therefore, we will install the EPEL repository (Extra Packages for Enterprise Linux) on the server. This is free to use repo with numerous open-source packages that can be installed using Yum.
Enter the following command:
sudo yum install -y epel-release
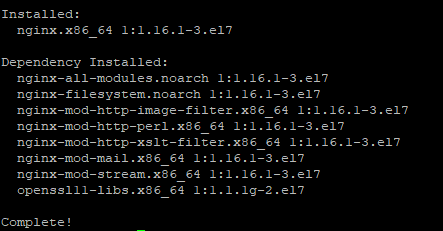
Step 3: Install Nginx
Now everything is set, let’s go ahead and install Nginx on your server using the yum command:
sudo yum –y install nginx
Step 4: Start the Nginx service
Installation is done, but Nginx won’t start automatically. Enter the following command to start Nginx:
sudo systemctl start nginx
Enter the following command to check if Nginx is active and running successfully. You will see an output similar to the one below.
sudo systemctl status nginx
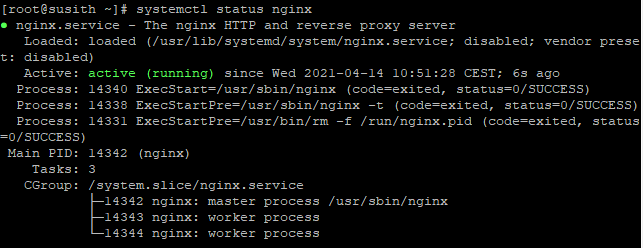
If you don’t see an “active” sign, then Nginx might not have started successfully. You should troubleshoot and try it again! One reason could be that you already have an Apache server running. You should disable it before starting Nginx.
sudo service httpd stop
Note: keep in mind that disabling Apache will bring down any currently running websites.
If Apache is still running automatically during the reboot, you can disable it using the following command:
sudo systemctl disable httpd
Step 5: make Nginx start on reboot
If you are going to use Nginx, most likely, you want it to be running during each reboot and not activate it manually. It’s simple, enter the following command to make Nginx start during reboot:
sudo systemctl enable nginx
Step 6: Configure the Firewall
This step will configure the CentOS firewall to allow incoming traffic. CentOS 7 enables firewalls and blocks access to ports 80 and 443. Any incoming HTTP and HTTPS packets for Nginx will be blocked.
To allow the Nginx traffic, enter the following commands:
firewall-cmd --zone=public --permanent --add-service=http
firewall-cmd --zone=public --permanent --add-service=https
firewall-cmd --reload
You should see a success message under each command if all the configurations were done.
To ensure proper functionality, you may also want to install the Ioncube Loader, which is essential for running certain PHP applications. For detailed instructions, refer to our guide on installing Ioncube Loader on CentOS.

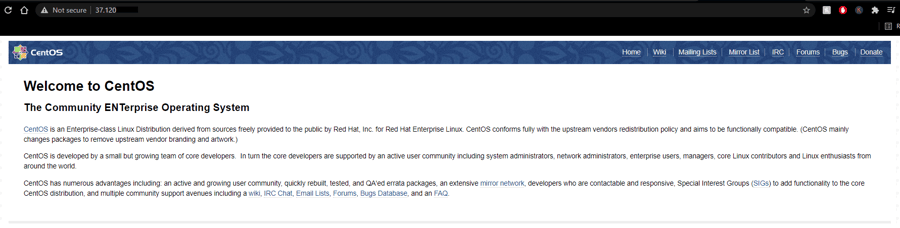
Step 7: verifying Nginx
Everything is set. Now we need to check whether Nginx is running properly. The easiest way is by entering your server’s public IP address on your browser.
http://server_IP_or_domain_name/
If you are unsure of your IP address, here’s how you can find the server’s IP address.
ip a
You will see your IP address under eth0. Once you get your IP address, enter it on your browser, and you will see a result similar to the one below.
Common error – ‘test failed’ solution.
If you will receive a test failed error message for the nginx.conf file, you might have a problem with the IP address. The default Nginx service listens to IPv4 and IPv6 addresses, and the test will fail if your server doesn’t support IPv6.
The solution is to modify the main Nginx configuration file. Open the file using the nano command:
nano /etc/nginx/nginx.conf
Find the following part and comment on it using a # symbol in front of it:
# listen [::]:80 default_server;

Save the changes by exiting the file. To save the file, press CTRL + X, press Y and then press ENTER.
How to manage Nginx Processes
If you want to stop your web server:
sudo systemctl stop nginx
Now to start the server once again, you can enter the following command:
sudo systemctl start nginx
If you would like to restart the server, enter the following command:
sudo systemctl restart nginx
If you would like to restart the server when you are making configuration changes without dropping the connection, enter the following command:
sudo systemctl reload nginx
By default, Nginx is configured to start automatically when the server boots. If this is not what you want, you can disable this behaviour by typing:
sudo systemctl disable nginx
To re-enable during start-up, enter:
sudo systemctl enable nginx
These commands are the most basic commands that you can use to manage the server!
Server root and configuration files
If you want to start serving your pages or application through Nginx, you will want to know the locations of the Nginx configuration files and default server root directory.
If you encounter any issues while configuring Nginx, such as forgetting your root password, check out our guide on how to reset the forgotten root password on CentOS for assistance.
Default Server Root
The default server root directory is /usr/share/nginx/html. Files placed in this folder will be shown on your web server. This location is specified in the default server block configuration file that ships with Nginx, located at /etc/nginx/conf.d/default.conf.
Server Block Configuration
Any additional server blocks commonly known as Virtual Hosts in Apache can be added by creating new configuration files in /etc/nginx/conf.d. Files that end with .conf in that directory will be loaded when Nginx is started.
The Nginx configuration directory is at /etc/nginx. All of the Nginx configuration files are here.
The main Nginx configuration file is here /etc/nginx/nginx.conf. To make changes to the Nginx global configuration, use this file.
Nginx Global Configuration
The main Nginx configuration file is located at /etc/nginx/nginx.conf. This is where you can change settings like the user that runs the Nginx daemon processes and the number of worker processes that get spawned when Nginx is running, among other things.
For a deeper understanding of Nginx's capabilities, including how to set up a reverse proxy, check out our guide on how to configure an Nginx reverse proxy.
Server Logs
Every request to your web server is recorded in this log file /var/log/nginx/access.log unless Nginx is configured to do otherwise.
Any Nginx errors that will be found will be recorded in this log: /var/log/nginx/error.log
Conclusion
Congratulations on having set up your very own Nginx server! You’ve taken all the necessary steps to configure and secure Nginx to run smoothly on your CentOS server. In this guide, we reviewed how to manage the Nginx service running on your CentOS server and explored the main directories used by Nginx to store configuration files, website content, and logs.
If you encounter any issues along the way, feel free to reach out to us through the dedicated comment section below. We're here to help you ensure that your CentOS server is optimized and running efficiently.
For further assistance with managing your CentOS server, check out our guide on how to install InterWorx on CentOS for more insights and tips.
People also read:
Leave A Comment