
In CentOS 7 and other Linux distributions, the default protocol for network configuration is DHCP. If your CentOS has a graphical user interface (GUI), changing the IP address from a dynamic state to static won't be difficult. However, if you only have the shell, it should be configured manually (get ready for some typing). Configuring the static IP address is reasonably straightforward if you know where and how to do it.
This tutorial will show you how to configure the static IP address on CentOS 7 using two different methods.
If you’re new to CentOS or want to learn more about its features and benefits, be sure to check out our article on What is CentOS. This will provide you with a solid foundation for understanding the operating system and its capabilities.
Prerequisites
- A VPS or dedicated server with CentOS 7 installed.(To optimize your CentOS experience, consider exploring our article on Linux VPS Hosting, where we discuss the benefits and features of using a VPS for your projects, including enhanced performance and flexibility.)
- Configuration details. For this tutorial, we will use the following details:
- IP address: 192.168.12.23
- Subnet mask: 255.255.255.0
- Gateway: 192.168.12.1
- DNS Server 1: 8.8.8.8
- DNS Server 2: 8.8.4.4
- Domain name: 1gbits.test
Configure Static IP in CentOS 7
Step 1
Verify your network adapter status using the following command:
systemctl status NetworkManager.service
This command will display whether your network adapter is on or off.

Step 2
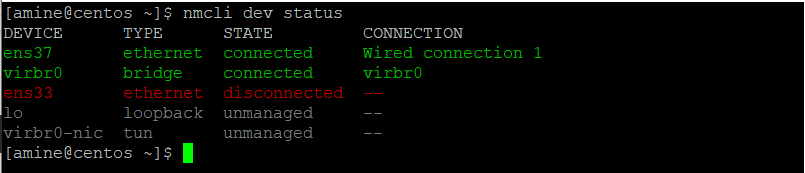
Now we need to find the names of network interfaces. Note these names down as they will be needed in the following steps.
nmcli dev status
We will show you two methods to configure the static IP on CentOS.
- First method: Using terminal commands.
- Second method: Using the Network Manager tool.
Configure Static IP on CentOS 7 Using Terminal Commands
Change directory to /etc/sysconfig/network-scripts.cd /etc/sysconfig/network-scripts
Issue the ls command to find your interface name. The interface name will start with ifcfg- prefix. For example, our interface name is ifcfg-eno16777984.
- Open the network interface configuration file using the nano command:
nano ifcfg-eno16777728
- You will see the following content in this file. Enter your IP details.
- Save and exit the file.
TYPE="Ethernet"
 BOOTPROTO="none"
 DEFROUTE="yes"
 IPV4_FAILURE_FATAL="yes"
 IPV6INIT="yes"
 IPV6_AUTOCONF="yes"
 IPV6_DEFROUTE="yes"
 IPV6_FAILURE_FATAL="no"
 NAME="eno16777728"
 UUID="6515e1f5ff46-410f97bc47d35c6d7bf8"
 ONBOOT="yes"
 IPADDR0="192.168.12.23"
 PREFIX0="24"
 GATEWAY0="192.168.12.1"
 DNS1=8.8.8.8
 DNS2=8.8.4.4
 HWADDR=00:50:56:AD:6D:41
 DOMAIN=1gbits.test
 IPV6_PEERDNS=yes
 IPV6_PEERROUTES=yes
- Now restart your network service using the following command:
systemctl restart network.service
- To verify your configuration, you can use the following command.
ip add
That is all! You can now use the newly configured static IP address on your system.
If you need to verify your new static IP address or learn more about finding your IP in Linux, check out our guide on How to Get IP Address in Linux. This article will help you understand different methods to retrieve IP information effectively.
Configure Static IP on CentOS 7 Using Network Manager
In this method, you can use the Network Manager package to simplify the network configuration tasks. Network Manager package is a default installation in CentOS 7. If, for some reason, you will not find it, you can install it using the following command:
To ensure that your static IP configuration is appropriate for your system version, you may want to first check your CentOS version. For detailed instructions, refer to our guide on how to check CentOS version.
yum install NetworkManager-tui
- To edit the network interface, use the following command:
nmtui edit eno16777728
- Enter your specific IP details in the appeared window. In this picture, we have entered our sample configurations:
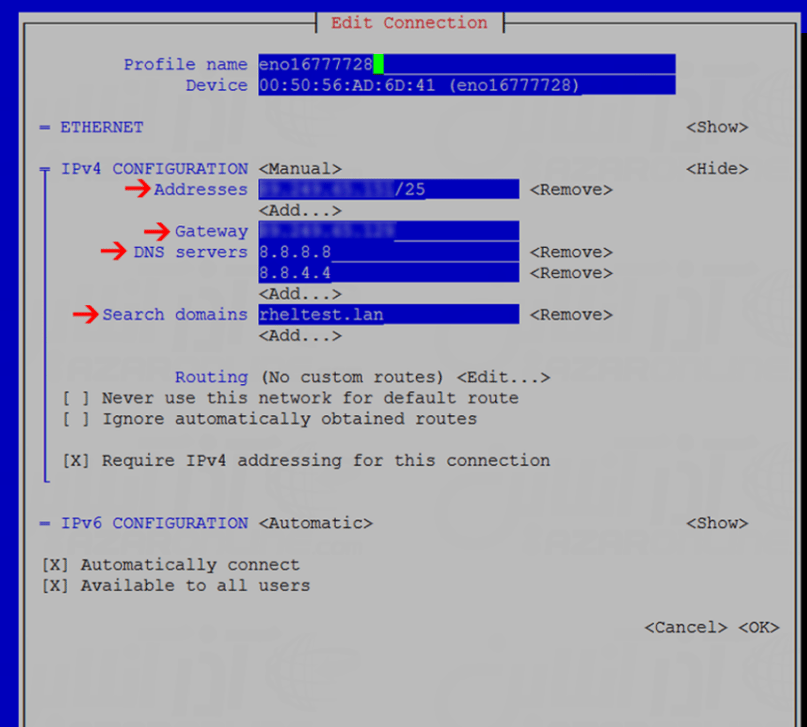
- Once the configs have been set in place, click OK at the end.
- Restart your network service using the following command:
systemctl restart network.service
Final Words
In this short tutorial, we went through setting the static IP address on CentOS 7. As we said in the beginning, it isn't a difficult task. Also, the above-mentioned methods will work for CentOS with a GUI.
Once you have your static IP configured, you might want to enhance your server's capabilities by installing a web server like Nginx. Check out our guide on How to Install Nginx on CentOS for a step-by-step process.
If you are managing a CentOS server, configuring a static IP is crucial for ensuring consistent network connectivity and accessibility. Properly setting the static IP address is an essential step in optimizing your server's performance and reliability. Whether you're working with an IPv6 VPS or a residential IP VPS, having a static IP configuration will help streamline your server operations.
Let us know in the comments below if you have any questions regarding the configuration of the static IP address on your CentOS server.
Additionally, if you are planning to manage your server using cPanel, check out our guide on Installing cPanel on CentOS 7 to get started with this powerful control panel.
People also read:
Leave A Comment