
MySQL is an open-source database management system commonly installed as part of the popular LEMP stack (Linux, Nginx, MySQL/MariaDB, and PHP). It uses a relational database and SQL (Structured Query Language) to manage its data.
If you're looking to set up a complete LEMP stack on your CentOS 7 server, check out our guide on How to Install LEMP on CentOS 7, which will walk you through the installation process step by step.
Note that: CentOS 7 prefers MariaDB, a fork of MySQL managed by the original MySQL developers and designed as a replacement for MySQL. If you run yum install MySQL on CentOS 7, MariaDB is installed rather than MySQL.
MySQL is one of the most widely used database management systems all over the internet for websites and server applications. This tutorial will go through the steps to install MySQL on CentOS 7.
To learn more about CentOS and its features, check out our article on What is CentOS. This guide will give you a comprehensive overview of the operating system, helping you understand the environment in which you're installing MySQL.
What you will need:
- A CentOS 7 server
- A root user or a user with root privileges
- Basic understanding of Linux commands
Step 1: Initial setup
Update the system by entering the following command:
sudo yum update
Once the system is updated, you can download the MySQL repositories.
sudo wget https://dev.mysql.com/get/mysql80-community-release-el7-3.noarch.rpm
The repository is added! To directly install MySQL from the repository, we need to prepare the repository by entering the following:
sudo rpm -Uvh mysql80-community-release-el7-3.noarch.rpm
Step 2: Install and start MySQL
To install MySQL, enter the following command:
sudo yum install mysql-server
Don’t forget to press y when prompted to continue.
Once the installation is completed, we will need to start it manually. To start the MySQL service:
sudo systemctl start mysqld
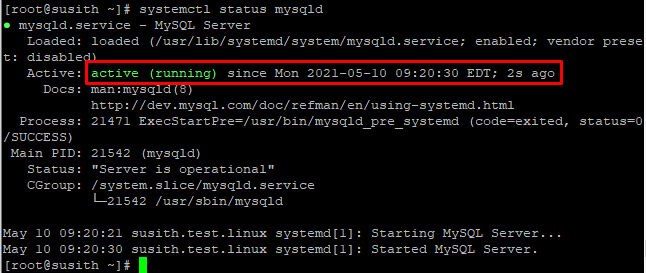
To check if the service is enabled, enter the following command:
sudo systemctl status mysqld
If you have an output similar to this, you have successfully enabled MySQL on your CentOS server.
Step 3: Configuring MySQL
A temporary password is generated for the MySQL root user during the installation process. Note this password for further steps. To see the password, enter the following grep command:
sudo grep 'temporary password' /var/log/mysqld.log

Now run the MySQL security script to change some of the fewer default options, like remote root logins.
sudo mysql_secure_installation
This will prompt you for the default root password (the password we note down earlier). You will be required to change it as soon as you enter it. The default password policy requires 12 characters, with at least one uppercase letter, one lowercase letter, one number and one special character.
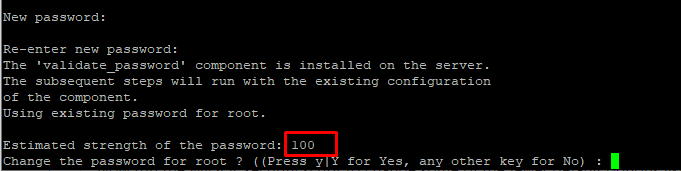
You’ll receive feedback on the strength of your new password, and you’ll be immediately prompted to change it again. Press any other key for No and continue.
For all the subsequent questions on the screen, press Y and continue till the end.
Step 4: Checking the MySQL version
The final step is to check if MySQL was installed successfully on your system. To do this, enter the following command:
mysql -u root –p
You will be treated with an output similar to the one below:
mysqladmin  Ver 8.42 Distrib 5.7.16, for Linux on x86_64
Copyright (c) 2000, 2016, Oracle and/or its affiliates. All rights reserved.

Oracle is a registered trademark of Oracle Corporation and/or its
affiliates. Other names may be trademarks of their respective
owners.

Server version          5.7.16
Protocol version        10
Connection              Localhost via UNIX socket
UNIX socket             /var/lib/mysql/mysql.sock
Uptime:                 2 min 17 sec

Threads: 1  Questions: 6  Slow queries: 0  Opens: 107  Flush tables: 1  Open tables: 100  Queries per second avg: 0.043
Bonus
Resetting the MySQL root password
If you would like to reset your root password, follow the steps mentioned below:
- Stop the MySQL server
sudo systemctl stop mysqld
- Restart MySQL in safe mode or without typing in a password
sudo mysqld_safe --skip-grant-tables
- Press ENTER if it started, but no output is shown
- Enter the following command
mysql -uroot
- Now use the following command to change the root password. Remember to replace testpassword with the new password:
USE MYSQL;
UPDATE USER SET PASSWORD=PASSWORD(“testpassword”) WHERE USER=’root’;
FLUSH PRIVILEGES;
EXIT
- Restart MySQL using this command:
sudo systemctl start mysqld
Now you can log in to MySQL using the newly changed root password!
Creating a new MySQL Database
As the root user in MySQL, you have full access to all databases. However, if you work with a team, there are cases where you might need to apply some restrictions. You’d either have to build a new database.
To create a new database, enter the following command:
For those looking to enhance their web server performance after installing MySQL, consider checking out our guide on Installing OpenLiteSpeed on CentOS. This will help you set up a high-performance web server alongside your database.
CREATE DATABASE newdb
Instead of newdb, be sure to change it with the name of the database.
Creating a new MySQL user
To create a new MySQL user, enter the following command:
CREATE USER 'username'@'localhost' IDENTIFIED BY 'password'
You should change both the username and password to match your user credentials.
Deleting user from MySQL
To delete a user from gaining access to MySQL, enter the following command:
DROP USER ‘username’@‘localhost’
Conclusion
You have learned how to install MySQL on a CentOS server. By installing MySQL, you can store your databases and manage them efficiently on your server. If you would like to get some help with MySQL commands, simply enter \h or help to view the list of commands.
Additionally, if you're looking to enhance your web server capabilities, consider installing Nginx alongside MySQL. Check out our guide on How to Install Nginx on CentOS for detailed instructions.
If you encounter any errors or troubles during installation, feel free to contact us through the dedicated comment section below. Additionally, if you're interested in optimizing your database management for more complex applications, consider exploring options for a robust SQL hosting server. This can greatly enhance your capabilities and improve performance for your projects.
For users looking for an alternative database solution, check out our guide on How to Install MariaDB on CentOS. MariaDB offers enhanced features and performance that may better suit your application needs.
People also read:


 🚀")

 🔐")
![What Is Cold Data Storage? ❄️ [2026 Guide]](https://1gbits.com/cdn-cgi/image//https://s3.1gbits.com/blog/2026/02/what-is-cold-data-storage-750xAuto.webp "What Is Cold Data Storage? ❄️ [2026 Guide]")
![Debian vs CentOS: Differences You Should Know [Comparison]](https://1gbits.com/cdn-cgi/image//https://s3.1gbits.com/blog/2021/02/debian-vs-centos-comparison993-750xAuto.jpg "Debian vs CentOS: Differences You Should Know [Comparison]")


