
This article will describe how to install cPanel and WHM on RHEL/CentOS 7 and cover initial configurations to manage cPanel and WHM. cPanel installation is an easy task without any complexity, and as long as you follow all steps one by one, you won't face any issues.
cPanel is a commercial web-based control panel for server systems. It can help ease the burden of common system administration tasks such as website creation, database deployment and management, and more. It is equipped with many features and can be used to manage the server via a graphical user interface. cPanel comes with a Web Host Manager (WHM), making the web hosting controls much easier for system admins.
WHM provides root and reseller-level access to the server, where users can manage server administration and account management settings. While cPanel offers a user-level access interface to control a web hosting account on the server.
Before installing cPanel, it's crucial to ensure that you are running the correct version of CentOS. For detailed instructions on checking your CentOS version, refer to our article on How to Check CentOS Version.
Some notable features of cPanel/WHM:
- Powerful GUI to control your server with WHM
- Supports EV Certificates.
- Supports API Authentication Tokens.
- Offers AutoSSL supporting Proxy Subdomains.
- Enables you to view SSL Status in cPanel.
- Supports operations such as Backups, Migrations and restorations without a hassle.
- Supports excellent DNS and mail server management for main server and client accounts.
- Supports management (start/stop/enable/disable) of services on server.
- It enables you to configure SSL/TLS for all server services and client domains.
- Easy integration with phpMyAdmin to manage your MySQL databases from the browser.
- Supports rebranding.
- Allows integration with WHMCS to automate billing management and so much more.
Minimum requirements
- A Linux VPS With CentOS 7 Operating System
- 1 GB RAM (2 GB recommended)
- One core CPU 1.1 GHz
- 20 GB Storage (40 GB recommended)
- Static IPv4
- A valid cPanel license
Before installing cPanel, read the following:
Once you have installed cPanel/WHM, it cannot be removed from your system.
cPanel is commercial software; hence you will need a proper license to work. That being said, there is a 15-day trial that you can use to install cPanel, and once it finishes, you can activate the software.
Step 1: Preparing the system
Before the installation of cPanel on CentOS 7, we will need to prepare the system. First, we will update the server:
yum update
Next, we will install Perl. cPanel was written using Perl language. Therefore we will need to set it up by using the following command:
yum install perl
To download the cPanel installation script, we will need to install Curl. To do this:
yum install curl
Your server needs to have a standard hostname in the FQDN format (Fully Qualified Domain Name). A hostname will be used to identify your server. For example, consider testserver.testdomain.com - this is an FQDN you can use as your hostname. Enter the following command but instead of testserver.testdomain.com, enter your hostname.
hostnamectl set-hostname testserver.testdomain.com
You should disable the Network Manager service during cPanel installation. If not, cPanel will not be installed, and the installation will prompt you to disable it beforehand.
service NetworkManager stop
chkconfig NetworkManager off
The last preparatory step is to disable SELinux. SELinux is the main security defender of the Linux Kernel, and it is better to disable it to prevent any access issues when installing cPanel. You can use the below command to disable it temporarily.
sudo setenforce 0
Step 2: Installing cPanel
To install cPanel, download the latest installer script using the curl command:
curl -o latest -L https://securedownloads.cpanel.net/latest
Now, run the auto-installer script. Note that the installation process takes 40-60 mins to complete the installation depending on your server resources and Internet connection speeds.
sh latest
During the installation, cPanel will modify your operating system tremendously. Here are some things that cPanel will do during the installation.
- It will check various packages to ensure that there will be no conflicts, and if found, then uninstall or make modifications to be compatible with cPanel.
- Downloads language and base files.
- Installs various Perl modules.
- Downloads and configures PHP and Apache with associated modules.
Once the installation is complete, you will see an output with information about the cPanel installation.
Step 3: Enable Network Manager service
Once the installation is complete, you should enable the network management services that were disabled in the previous step.
service NetworkManager start
chkconfig NetworkManager on
We highly recommend rebooting the system. This is not essential, but since we made many configuration changes, it's better to have a system reboot. Enter the following command to reboot your server:
Reboot
Step 4: Complete installation from the web
Now that we completed the installation from the server side, the next step will be to complete the rest of the process from the web browser.
To access WHM from the web browser, enter the following in your browser. Remember to enter your server IP address instead of server-ip.
http://server-ip:2087
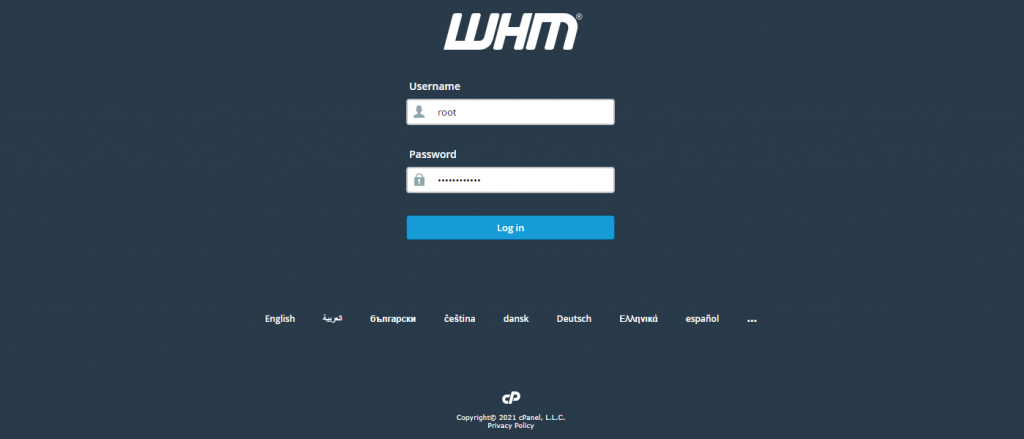
For username, you can enter 'root' or the username of the account you used during installation. The password will be the password used to log in to your server.
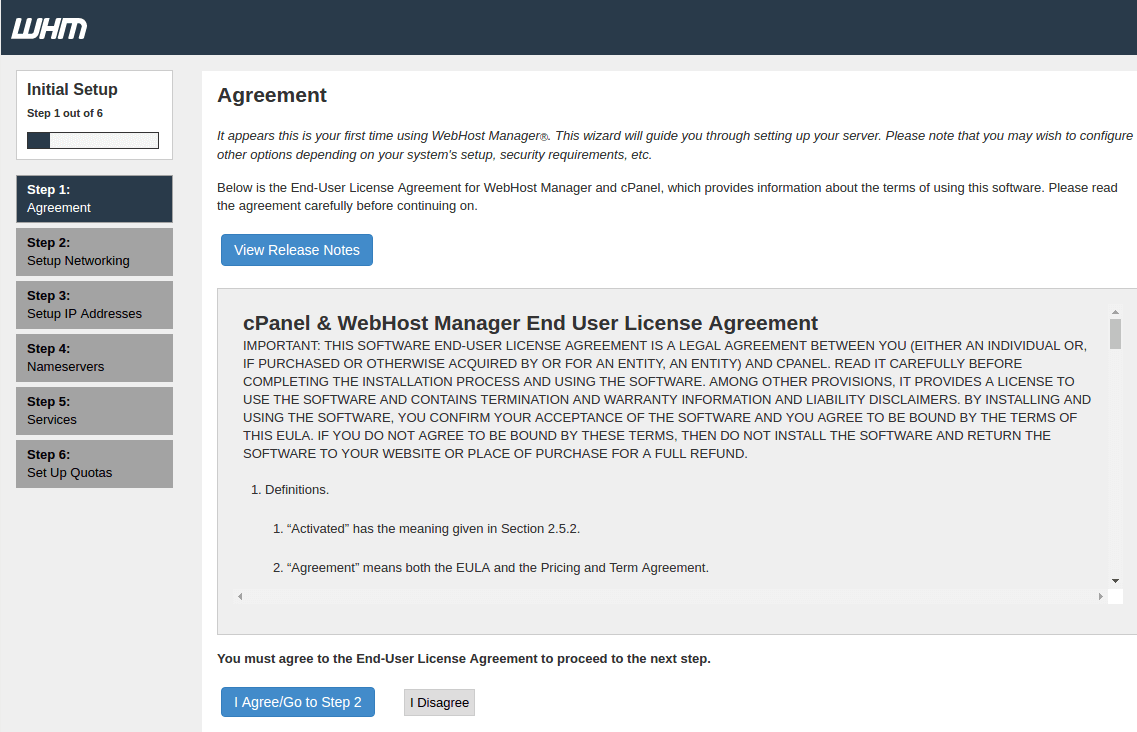
Next, read the End User License Agreement and accept the terms by clicking on the "I Agree/Go Step 2" button to proceed.
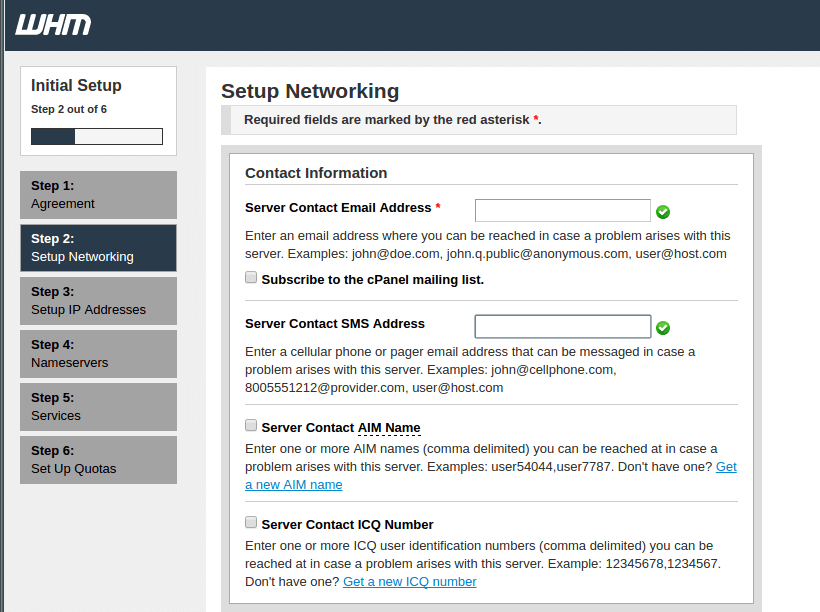
The next step is to provide the contact details under the Setup networking section. Enter your email address in the Server Contact Email Address and Server Contact SMS Address. Whenever there are important alerts or notifications from cPanel, it will send them to the provided email.
Fill in the rest of the form with the relevant information and continue to the next section.
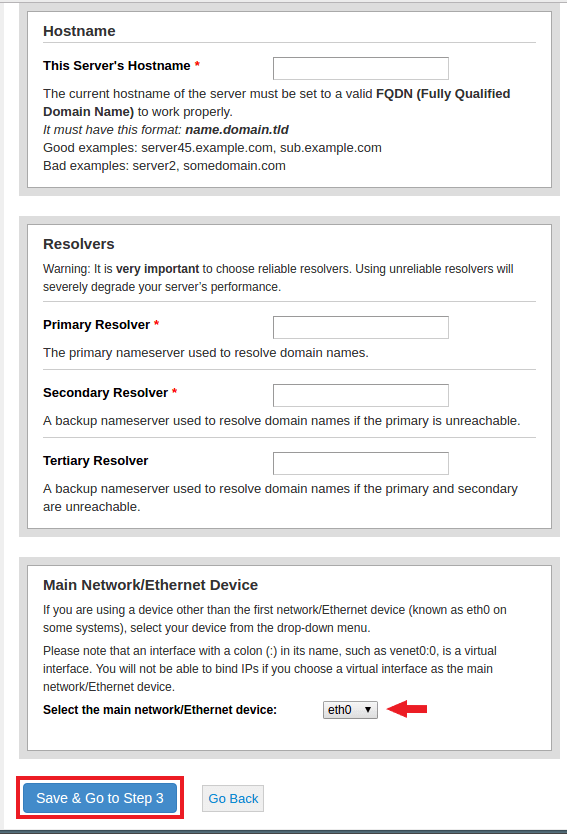
The next section is the Hostname section, where you must enter a valid FQDN hostname and resolver entries for your server. Resolvers will be used to fetch DNS entries of any website. If your service provider has DNS resolvers, then cPanel will automatically detect and fill them for you. If not, you can use Google's public DNS resolvers which are 8.8.8.8 and 8.8.4.4 or OpenDNS's public DNS resolvers which are 208.67.222.222 and 208.67.220.220.
The following section is to select the Main Network/Ethernet device. An available IP address will be your server's primary IP address. Once done, click on Save & Go to step 3.
In the following step, we will set up the static IP address of the server. If you have more than one IP attached to your NIC card and want to set up a specific IP for your server's main IP, you can do it from here. If you have more than one IP address assigned to your server and your interface, you can add them here.
Add a new IP address and enter the IP address in IP Address(es) to Add field. You can add multiple IP addresses using CIDR notations if you have an IP address pool. Enter the Subnet Mask and choose the network interface. Click on Add IP(s) button to add the IP address.
To understand more about IP addresses and their significance in networking, check out our article on What is an IP Address. This will help you gain a better grasp of how IP addresses function and their role in server configuration.
In the dropdown menu, you will see the list of current IP addresses available to your server. If you wish to use the default settings, click on Skip This Step and Use the Default Settings button on the top. Once done, click on Save & Go to Step 4.
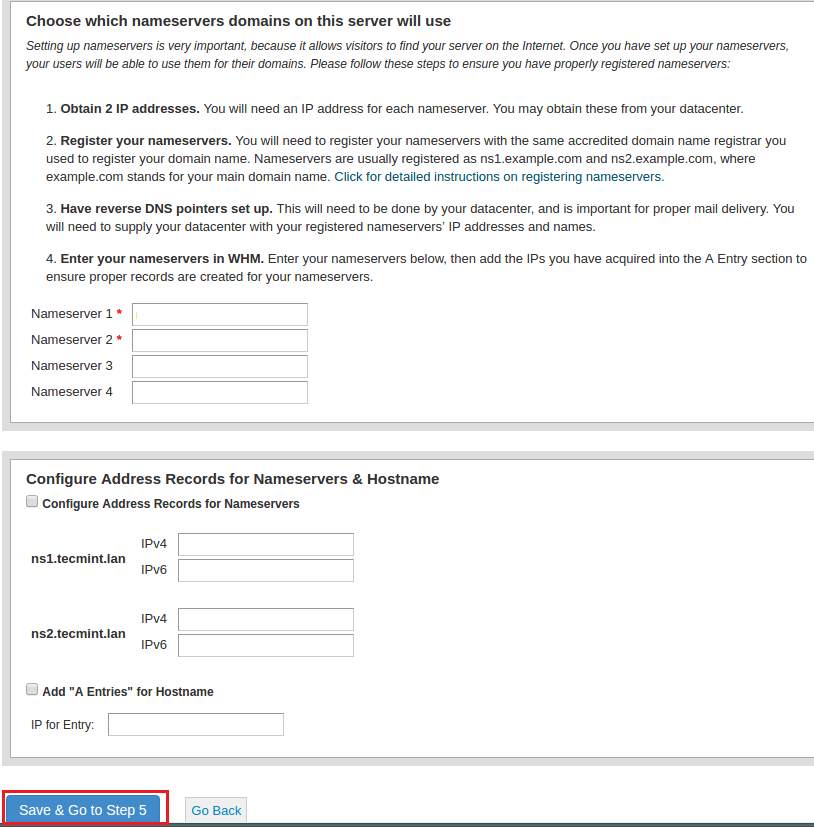
In Step 4, you will be taken to the Nameserver configuration. You will have three options to choose from; you can compare the advantage and disadvantages of using different Name server applications. Recommended is that you select BIND as it has the most benefits.
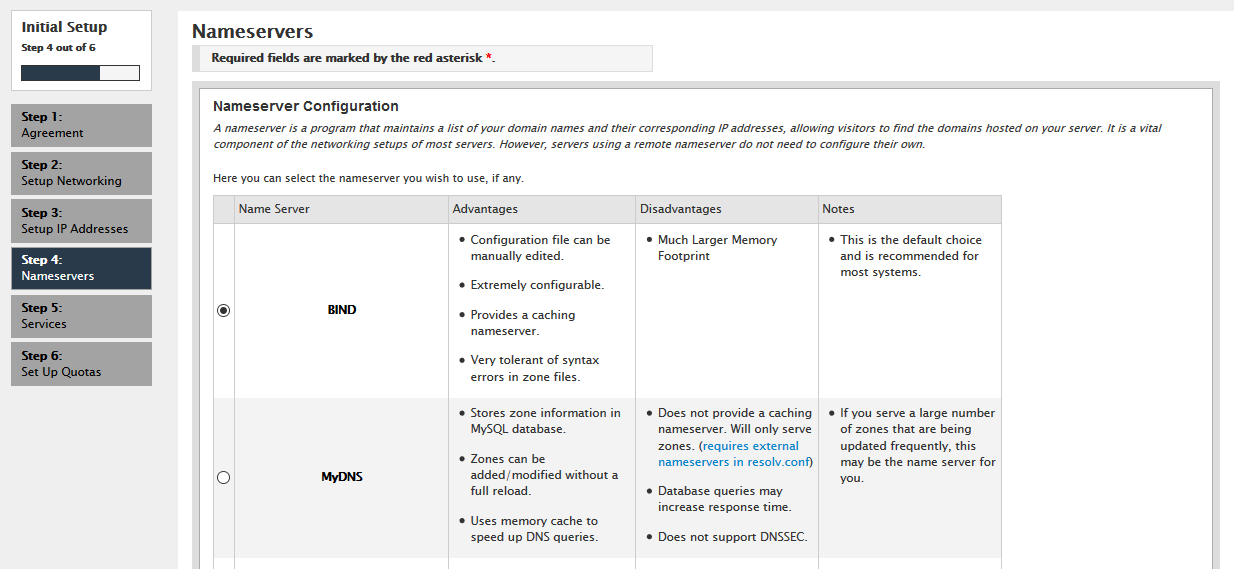
If you do not want to run a DNS server on your local machine, you can disable the nameserver by choosing the disable option. Next, choose the nameserver which your server will use. You will need to create hostnames in your domain control panel.
Now add 'A Entries' for your hostname by selecting the Add "A Entries" for the Hostname checkbox. You can read the instructions on the installation Wizard for more information on nameserver addresses. Enter your server details as requested and click on Save & Go to Step 5.
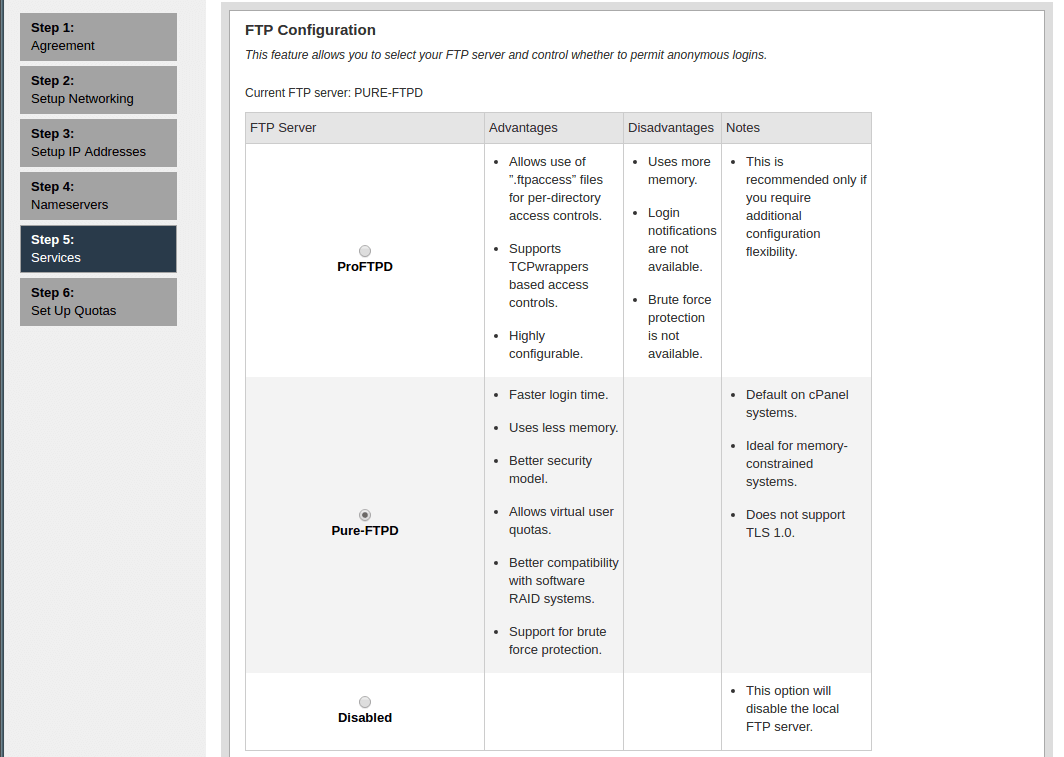
In Step 5, You will see the configuration page for your services. In FTP configuration, you can choose from two FTP applications; recommended is Pure-FTPD. Choose the disabled option if you want to disable the local FTP server.
In mail configuration, you can choose Dovecot, which is also recommended, or you can disable the mail server by choosing the disabled option.
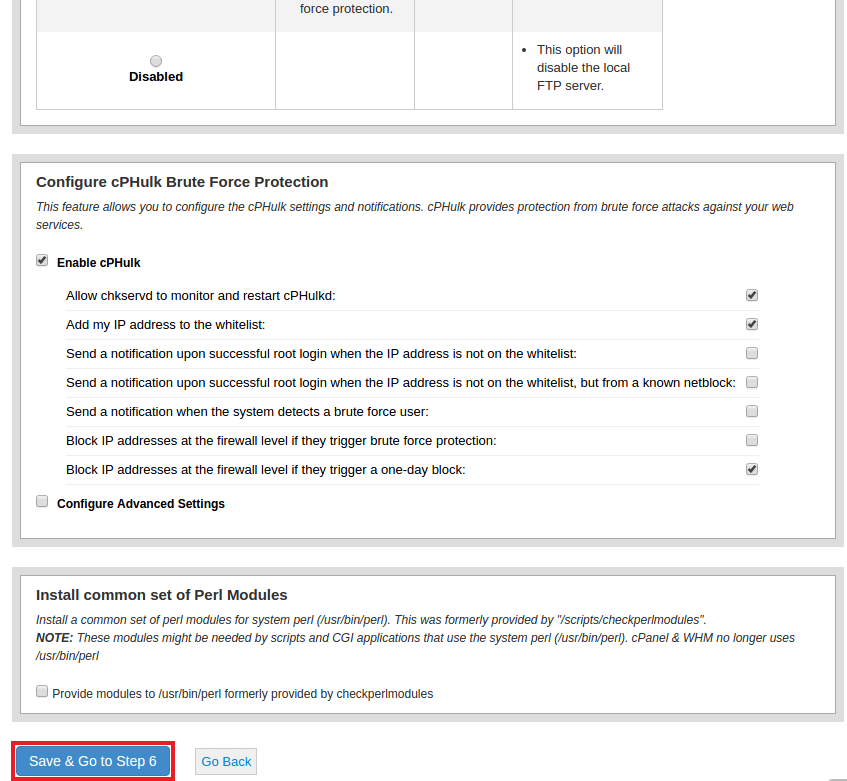
The last section is cPHulk brute force protection which detects and blocks false password attacks and those IPs from your server. In the Advanced setting of cPHulk, you can choose duration to block a user from logging in if it encounters certain failures by Accounts and IP addresses. You can also provide maximum failures before an IP address is blocked for a day. Choose the settings that are suitable for you and click on Save & Go to Step 6.
If you're looking to optimize your server environment further, consider checking our guide on Installing LEMP on CentOS 7, which will help you set up a robust web server configuration.
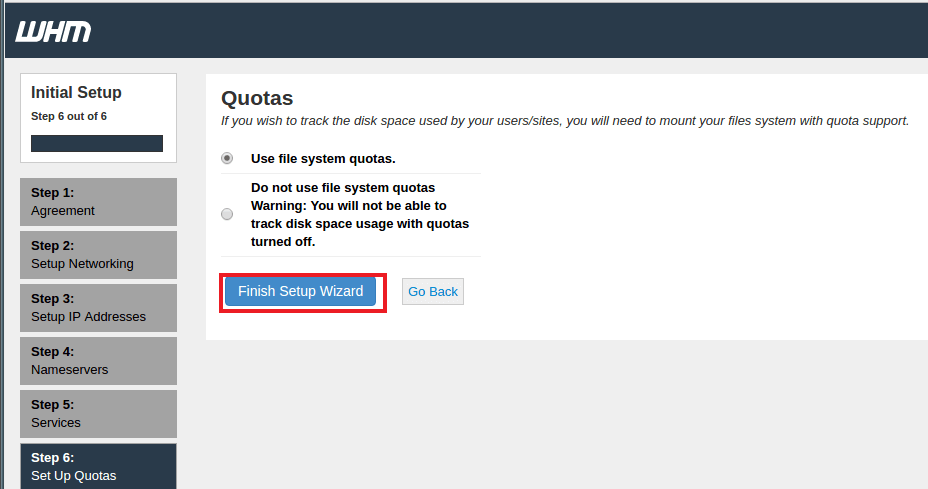
The final step lets you enable quotas which helps you to track down the disk space usage. Select Use file system quotas and click on the Finish setup wizard to complete the installation process.
If you don't use file system quotas, you will not be able to monitor the amount of disk space used by any user or website.
You will now see some new features of cPanel in its feature showcase. In recommended features, you will see cPanelID, which enables a user to log in to cPanel with his cPanelID. This feature enables users to log in to multiple cPanels with a single user ID. You can enable this feature by choosing the enable option. To disable this, select the "No, thank you" option.
Before diving into cPanel's features, ensure that you have MySQL installed on your CentOS 7 server. For detailed instructions on setting up MySQL, refer to our guide on Installing MySQL on CentOS 7. This will help you establish a solid foundation for managing databases within cPanel.
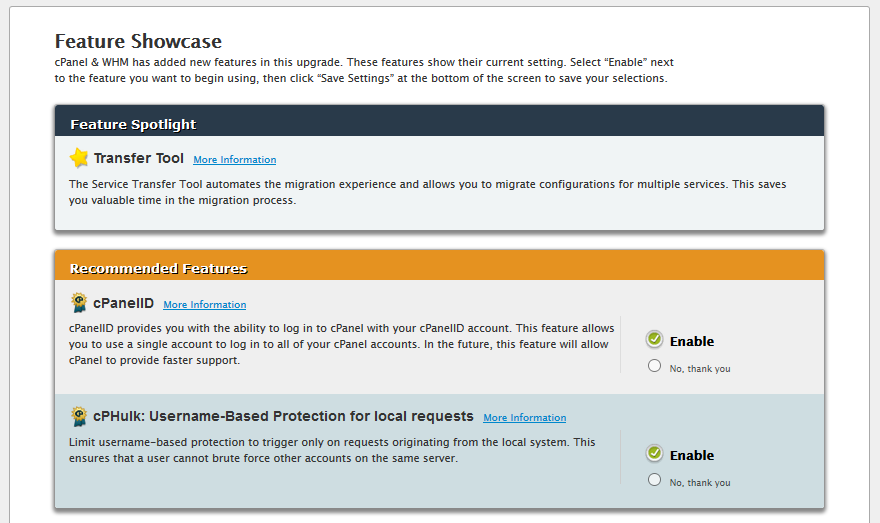
Next, you will see cPHulk's username-based protection feature, which only blocks a certain user instead of blocking the IP address so that other users may log in from the same IP. There are more new features like PHP-FPM, ModSecurity, cPanel Reset Password and more. You can choose to enable them or disable them by selecting the No, thank you option.
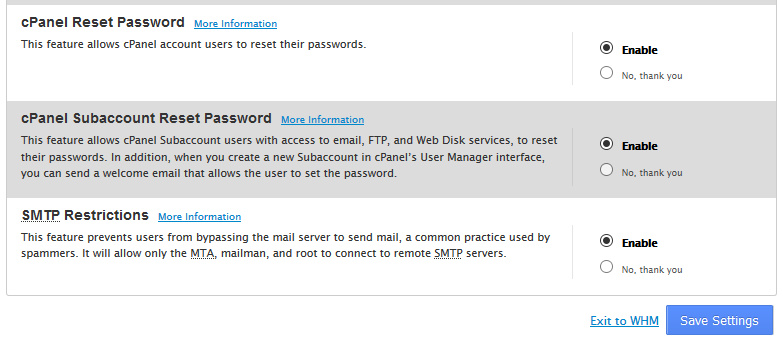
Once you have enabled or disable a feature, click on the Save Settings button to save the settings and go to WHM. You will now see the default home page of WHM.

Sometimes, the cPanel installer script cannot update the license because of firewall or resolvers entries, and you'll see the trial warning on the page. You can do it manually with the following command.
/usr/local/cpanel/cpkeyclt
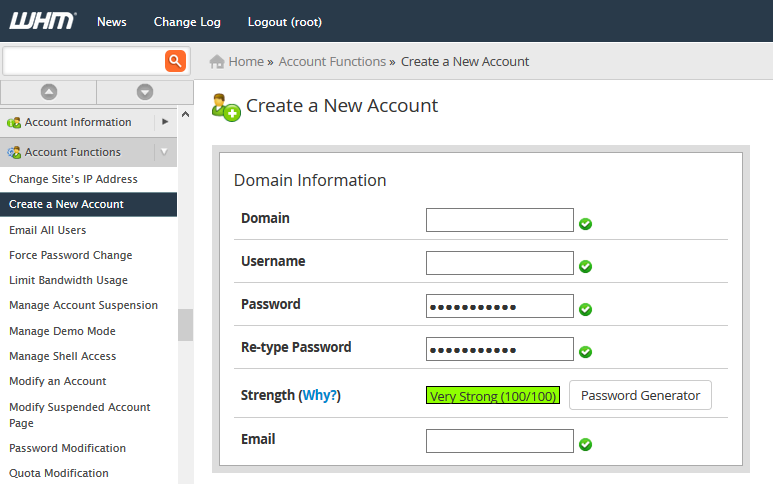
To see the user-level interface of cPanel/WHM, you must create a user account first. Go to Home > Account Functions > Create a New Account in WHM. In the "Create a New Account Interface", enter the main domain of the user. The username will automatically get filled according to the domain, and you can also use a different username if you want to.
Enter a password for your user; you may also use the password generator to generate a strong password. Enter a valid email for your user. You can choose a package from the dropdown, but as we have installed cPanel recently, there will not be any package. If you do not select any package, cPanel will provide unlimited resources to this account.
For those looking for an alternative control panel, consider checking out our guide on Installing Webuzo on CentOS 7, which offers a straightforward setup process and additional features that may suit your needs.
Next, in the settings options, select the default theme. You can choose paper_lantern, which is modern and responsive. If you want the old non-responsive theme, you can choose x3 or x3mail and select the locale setting's language.
In the reseller setting, you can make the account a reseller account. A reseller can create more accounts under it. In DNS settings, select the options to enable DKIM and SPF on the account. Unless required, leave the options as Local Mail Exchanger in the mail routing settings.
Click on the create button to create the user account. cPanel will now run the script to create the user account, and the output will be shown to you. Now you can go to https://your-server-ip:2083 to access cPanel; you will see the login prompt. Enter the username and password you recently created and click on the Login button.
For your convenience, we will list some of the most important configuration and backend files used in cPanel.
List of configuration files:
- Apache configuration file: /etc/httpd/conf/httpd.conf
- Exim mail server conf file: /etc/exim.conf
- Named conf file: /etc/named.conf
- ProFTP and Pureftpd conf file: /etc/proftpd.conf and /etc/pure-ftpd.conf
- cPanel user file: /var/cpanel/users/username
- cPanel configuration file (Tweak settings) : /var/cpanel/cpanel.config
- Networking configuration file: /etc/sysconfig/network
- Add-ons, parked and subdomain information: /etc/userdomains
- cPanel update config file: /etc/cpupdate.conf
- Clamav conf file: /etc/clamav.conf
- MySQL configuration file: /etc/my.cnf
- PHP ini conf file: /usr/local/lib/php.ini
List of backend files:
- cPanel directory: /usr/local/cpanel
- Third Party tools: /usr/local/cpanel/3rdparty/
- cPanel add-ons directory: /usr/local/cpanel/addons/
- Base files like phpMyAdmin, skins: /usr/local/cpanel/base/
- cPanel binaries: /usr/local/cpanel/bin/
- CGI files: /usr/local/cpanel/cgi-sys/
- cPanel access & error log files: /usr/local/cpanel/logs/
- WHM related files: /usr/local/cpanel/whostmgr/
Conclusion
Congratulations on making it to the end of the tutorial! We covered all the basic steps to install cPanel on your CentOS server. With cPanel, you can efficiently manage your entire server through a user-friendly web-based control panel, simplifying tasks like website management, email setup, and database administration. If you encounter any errors during the installation or have questions about using cPanel on your VPS, feel free to reach out in the comments below. We're here to help!
For an alternative control panel option, check out our guide on How to Install Kloxo-MR on CentOS. Kloxo-MR offers a different set of features that may suit your needs better, and the installation process is also straightforward.
People also read:


 🚀")

 🔐")
![What Is Cold Data Storage? ❄️ [2026 Guide]](https://1gbits.com/cdn-cgi/image//https://s3.1gbits.com/blog/2026/02/what-is-cold-data-storage-750xAuto.webp "What Is Cold Data Storage? ❄️ [2026 Guide]")
![Debian vs CentOS: Differences You Should Know [Comparison]](https://1gbits.com/cdn-cgi/image//https://s3.1gbits.com/blog/2021/02/debian-vs-centos-comparison993-750xAuto.jpg "Debian vs CentOS: Differences You Should Know [Comparison]")


