
This guide is all about how to install Apache on CentOS 7 VPS. Apache is the most widely used web server software in the world.
Developed and maintained by Apache Software Foundation, Apache is open-source software freely available to the public. It runs on over 40% of all web servers in the world.
It can be highly customized to meet the needs of many different environments by using extensions and modules. Most WordPress hosting providers use Apache as their web server software. Apache provides many powerful features, including dynamically loadable modules, robust media support, and extensive integration with other popular software.
To further optimize your CentOS server setup, it's essential to understand the operating system. Learn more about the key features and uses of CentOS by visiting our comprehensive guide on What is CentOS. This will provide deeper insights into why it's one of the most popular choices for servers like Apache.
We will go through:
- Installing Apache
- Configuring firewall
- Testing the webserver
- Setting virtual hosts
- Configuring SELinux permissions
- Testing virtual hosts
- Managing Apache processors
Let’s get started!
Prerequisites
For successfully installing Apache on your CentOS VPS, you will need:
- A root user account or an account with sudo privileges
- A CentOS 7 VPS server
- A basic understanding of Linux commands
Installing Apache on CentOS 7
Apache can be directly downloaded and installed from the CentOS default repository. However, before downloading, enter the following command to update the package index:
sudo yum update httpd
Install Apache package:
sudo yum install httpd
After confirming the installation, Apache will be installed on your system.
Once Apache is installed, you may also want to consider installing cPanel on CentOS 7 for an enhanced server management experience. Learn how to install cPanel on CentOS 7 here.
Configuring the firewall for Apache requests
Firewalls provide a basic level of security for your server. By entering the following command, you will install and set up your server with firewalld.
sudo yum install firewalld
The firewalld service can make modifications without dropping current connections, so we can turn it on before creating our exceptions:
sudo systemctl start firewalld
For Apache to work, you will need to allow port 80 to server requests over HTTP. To set this exception in the firewall, enter the following command:
sudo firewall-cmd --permanent --add-service=http
If you are using HTTPS to configure Apache, then you should also open the port number 443:
sudo firewall-cmd --permanent --add-service=https
Now that the basic rules are in place, we should restart the firewall.
sudo firewall-cmd --reload
After the firewall reloads, you are ready to start the Apache service and check the webserver.
Once Apache is running smoothly, you may also want to explore installing Plesk on CentOS 7 to streamline your server management. For a detailed guide, check out our Plesk installation on CentOS 7 tutorial.
Check the status of your web server.
Once the above steps are completed, we will activate the service. The following command will automatically start Apache on your VPS.
sudo systemctl start httpd
To verify if the service is running smoothly, enter the following:
sudo systemctl status httpd
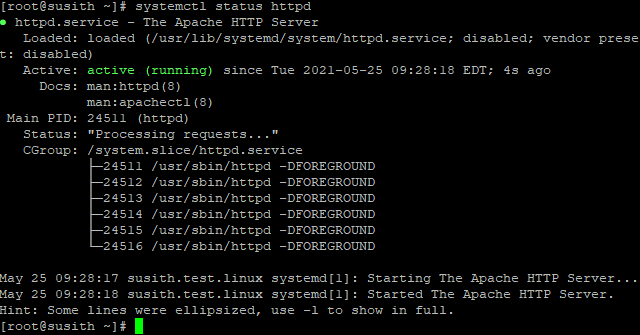
As you see in the picture, the service is running properly. However, another method to test the server is by requesting a page from Apache.
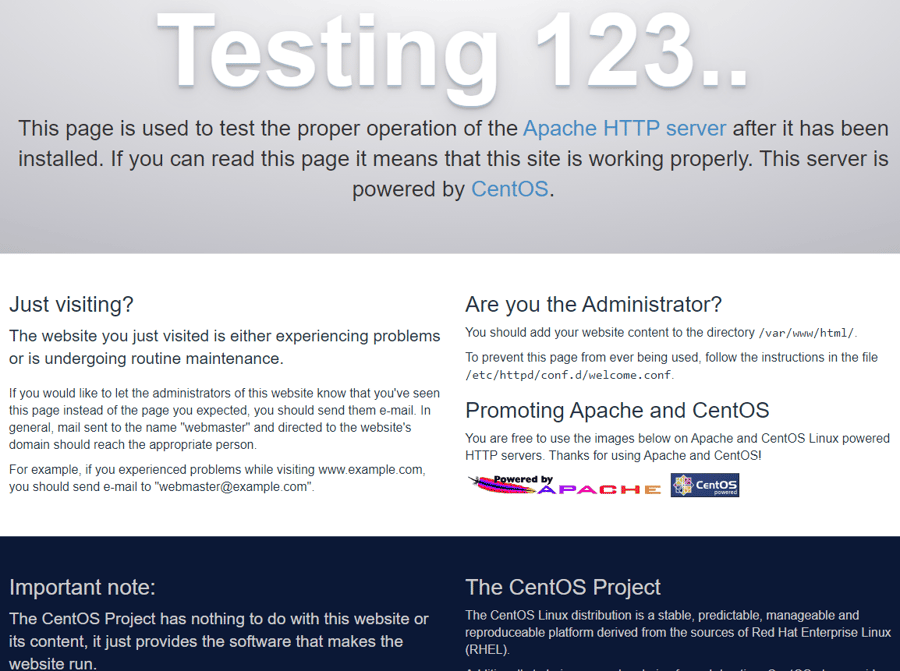
Go to your favourite web browser and enter the following in the URL bar:
http://your_server_ip
If you see an output similar to this, Apache is running successfully on your system.
Setting Virtual hosts
Apache's default configurations will let you host a single website. However, if you plan on having multiple websites on the server, you will need to configure virtual hosts. In this tutorial, we will use the 1gbitstest.com domain name, but you should replace that with the domain name of your choice.
Apache has one default server block which serves the web pages, but this is good only if you’re hosting one website. Instead of modifying the default directory (/var/www/html), let’s create a new directory using the following command:
sudo mkdir -p /var/www/1gbitstest.com/html
Note that the –p flag in the command is used to create any parent directories if needed.
Create an additional directory to store log files for the site:
sudo mkdir -p /var/www/1gbitstest.com/log
Now assign the ownership:
sudo chown -R $USER:$USER /var/www/1gbitstest.com/html
Set the default permission set for your webroot:
sudo chmod -R 755 /var/www
All the basic configurations are set in place. As the next step, we will create a sample index.html file using the nano command:
sudo nano /var/www/1gbitstest.com/html/index.html
Enter the following text:
<html>
  <head>
    <title>Your in 1gbitstest.com!</title>
  </head>
  <body>
    <h1>Congratz! The 1gbitstest.com virtual host is working!</h1>
  </body>
</html>
Save the file and exit it. Ctrl + x > y > Enter
Now we will focus on creating the virtual host files. Virtual host files specify the configuration of your separate sites and tell the Apache web server how to respond to various domain requests.
Before you create your virtual hosts, you must create a sites-available directory to store them in. You will also create the sites-enabled directory that tells Apache that a virtual host is ready to serve visitors.
To create both these files, enter the following command:
sudo mkdir /etc/httpd/sites-available /etc/httpd/sites-enabled
Next, we will tell Apache to look for virtual hosts by editing the configuration file.
sudo nano /etc/httpd/conf/httpd.conf
In the opened configurations file, head towards the end and add the following text. Save the file and exit afterwards.
IncludeOptional sites-enabled/*.conf

Now that you have your virtual host directories, you will create your virtual host file.
sudo nano /etc/httpd/sites-available/1gbitstest.com.conf
Add the following lines of text inside the newly created configurations file. Be sure to replace the domain name with your one:
<VirtualHost *:80>
    ServerName www. 1gbitstest.com
    ServerAlias 1gbitstest.com
    DocumentRoot /var/www/1gbitstest.com/html
    ErrorLog /var/www/1gbitstest.com/log/error.log
    CustomLog /var/www/1gbitstest.com/log/requests.log combined
</VirtualHost>
Save and close the file when you are finished.
Now the last step is to create a symbolic link between each virtual host using the following command:
sudo ln -s /etc/httpd/sites-available/example.com.conf /etc/httpd/sites-enabled/example.com.conf
Your virtual host is now configured and ready to serve content.
Configuring SELinux Permissions
SELinux is configured to work with the default Apache configuration. Since we set up a custom log directory in the virtual host's configuration file, we will receive an error if you attempt to start the Apache service.
To fix this issue, we will need to update the SELinux policies to allow Apache to write to the necessary files. There are different ways to set policies based on your environment’s needs, as SELinux allows you to customize your security level.
Setting the Apache policy universally will tell SELinux to treat all Apache processes identically. Run the following command to set a universal Apache policy:
sudo setsebool -P httpd_unified 1
Testing Virtual Hosts
Now that we made all the needed configurations to have Apache running successfully. For all the changes to take effect, restart the Apache service:
sudo systemctl restart httpd
Now that Apache is set up, you can enter the domain name on our web browser.
http://1gbitstest.com
This confirms that your virtual host is successfully configured and serving content. To create more virtual hosts, follow the same steps for additional domains.
How to manage Apache processes
Now that the Apache webserver is running successfully, here is a list of basic apache management commands.
To stop your web server, type:
sudo systemctl stop httpd
To start the web server when it is stopped, type:
sudo systemctl start httpd
To stop and then start the service again, type:
sudo systemctl restart httpd
Apache can often reload without dropping connections if you are simply making configuration changes. To do this, use this command:
sudo systemctl reload httpd
By default, Apache is configured to start automatically when the server boots. If this is not what you want, disable this behaviour by typing:
sudo systemctl disable httpd
To re-enable the service to start up at boot, type:
sudo systemctl enable httpd
Apache will now start automatically when the server boots again.
If you need to restart Apache after making changes, check out our detailed guide on how to restart Apache in Linux to ensure smooth operation.
Conclusions
Congratulations, you have successfully installed Apache on your CentOS 7 server. The basic installation and configurations of the Apache server are quite straightforward. If you're looking for more guides like this, check out our other tutorials on CentOS for server optimization and management. If you enjoyed this article, don’t forget to share it with your friends. Should you encounter any issues during the installation process, feel free to let us know in the comments below.
For remote desktop access to your CentOS server, check out our detailed guide on how to install XRDP on CentOS and enable graphical interface management.
People also read:
Leave A Comment