
This article will go through the steps to setting up a static IP address on Ubuntu 20.04. IP addresses are usually assigned by DHCP (Dynamic Host Configuration Protocol) servers on Linux systems. This type of IP address might change when you restart your Ubuntu system. It's not always so, but there is a possibility for that to happen.
Typically in most network configurations, the IP address is assigned dynamically by the router's DHCP server. However, you might need to set a static IP address that may be required in different situations. We will go through the steps to set a static IP address on Ubuntu Server and Ubuntu desktop versions.
For a deeper understanding of IP addresses and their types, check out our comprehensive guide on What is an IP Address.
Prerequisites
- A machine running Ubuntu 20.04 desktop version or server version
- A root user or a user with Sudo privileges
- Basic understanding of Linux commands
Network Configuration Commands
In Linux systems, there are a few commands that you can use to find out the current network configuration. The following commands will show the details of the available network interfaces in the system.
For a deeper understanding of Linux commands and utilities, check out our guide on how to use Linux, which covers essential skills and tips for Linux users.
One of these commands is the 'config command. Use the following command to see all network interfaces on your server:
ifconfig –a
You can also use the IP command:
ip addr
or
ip link
When dealing with networking on Linux, there are some crucial configuration files that you should be aware of. There are several files that you will have to edit in order to make your networking-related configuration. The most common and useful files are shown below:
- /etc/network/interfaces - describes the available network interfaces
- /etc/hostname - configures the name server for your server
- /etc/hosts - resolves IP addresses to hostnames
After the new configuration is set, the interface must be restarted.
Set static IP address using the router
The easiest and recommended way to assign a static IP address to your LAN device is to configure a Static DHCP through your router. Static DHCP or DHCP reservation is a standard feature found in most routers. This feature allows the DHCP server to assign the same IP address to a specific machine on the network each time the device requests an address from the DHCP server.
If you’re encountering issues with package installations while configuring your Ubuntu server, you may find our guide on How to Fix Ubuntu Broken Packages helpful for troubleshooting and resolving any related errors.
This is made possible by assigning a static IP address to the machine's unique MAC address. Depending on the router, the procedure change, so you should check your router's documentation.
Configure static IP on Ubuntu Server
Before going forward with the steps, you should be familiar with Netplan.
Netplan has been the default network management tool on Ubuntu since Ubuntu 17.10 release. Netplan configuration files are written in YAML syntax with a .yaml file extension. To configure a network interface with Netplan, you need to create a YAML description for the interface, and Netplan will generate the required configuration files for the chosen renderer tool.
Now we have the basic idea of Netplan, let's go ahead with the steps on configuring static Ip on Ubuntu 20.04:
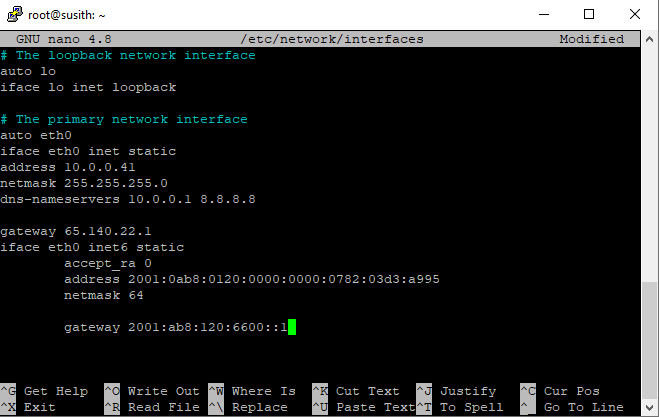
To change the Ubuntu server's network configuration, you must open the /etc/network/interfaces file. This section wants to set a static IP to a system with just one Ethernet interface named 'eth0'.
This tutorial will configure this interface with a 10.0.0.41/24 IP address. (This is just an example, instead of this IP, use your own)
You can open this file using the nano text editor.
nano /etc/network/interfaces
The opened file will contain a file similar to the one shown below:
# The loopback network interface
auto lo
iface lo inet loopback

# The primary network interface
auto eth0
iface eth0 inet static
address 65.140.22.3
netmask 255.255.255.128

gateway 65.140.22.1
dns-nameservers 10.0.0.1 8.8.8.8
iface eth0 inet6 static
        accept_ra 0
        address 2001:0ab8:0120:0000:0000:0782:03d3:a995
        netmask 64

        gateway 2001:ab8:120:6600::1
In this file, you can make the changes as described below:
- Find the line starting with "iface eth0 ..." and change the word "dynamic" to "static". If you see the picture or the text shown above, I already set my server to static.
- Find the line starting with "address" and change the address to your static IP address. For this tutorial, we will be using our IP address, 10.0.0.41.
- Find the line starting with "netmask" and write your correct subnet mask. Our subnet mask will be 255.255.255.0
- Find the line starting with "gateway" and write your correct gateway address in front of it.
- Find the line starting with "dns-nameservers" and add your name server information.
Please consult your hosting service provider or network administrator when you want to change the IP address. If possible, they will provide the needed information like the gateway, dns-nameservers, etc.
After configuration accomplishment, restart the interface with the command below.
ifdown eth0; ifup eth0
You will lose your connection if you are connected using SSH; connect again using your new IP address. Congratulations, you changed the static IP address of your server successfully.
Configure static IP on Ubuntu Desktop
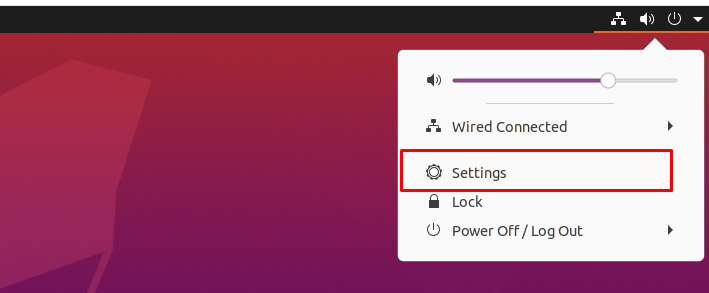
The easiest way to configure a static IP address is through the GNOME graphical user interface:
- Click on the top right network icon and select Settings
- Under Wired connections, click on the settings icon
![]()
- Select IPv4 from the top menu
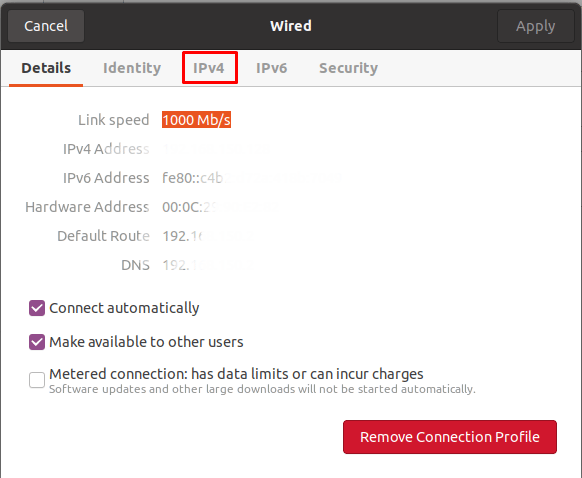
- Select manual and enter your desired static IP address, netmask, gateway and DNS settings.
- Once completed, click on the Apply button.

- Toggle the connected switch to apply your new network configuration settings.
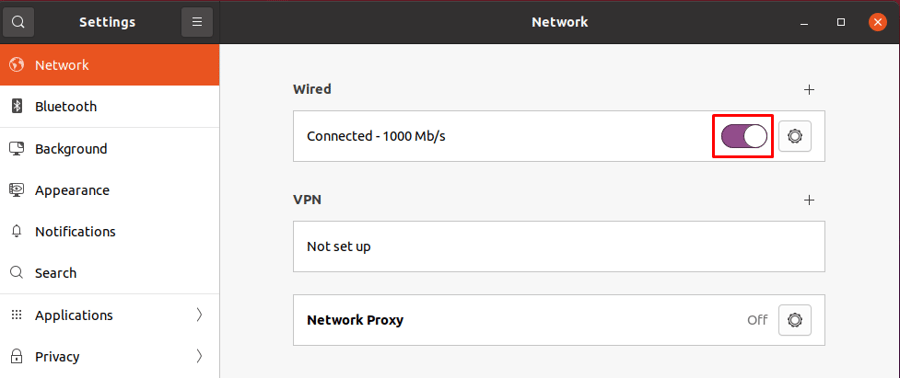
- To check if it was activated, click on the settings icon again and review the details.
Congratulations, you set the new static IP address on your Ubuntu 20.04 desktop.
If you're looking to expand your server management skills, you might also be interested in learning how to install Docker on Ubuntu for efficient application deployment on Ubuntu 16.04, 18.04, or 20.04.
Wrapping up
In this tutorial, we went through how to set up a static IP address on your Ubuntu server and desktop version. Whether you're managing a VPS Ubuntu environment or a local Ubuntu Server RDP setup, having a static IP address is crucial for consistent network connectivity. A static IP is particularly beneficial when using services like IPv6 VPS or when you require a residential IP VPS for specific applications that need reliable access without interruptions. We hope you enjoyed this short tutorial, and if any of the steps didn't work as expected, feel free to let us know in the comments below. We are here to help and will get back to you with the solution.
If you're setting up a server for web development, you may also be interested in learning how to install Django on Ubuntu. Django is a popular web framework that pairs well with a static IP setup for developing and deploying web applications.
People also read:
Leave A Comment