
This tutorial will explain how to install Tomcat on Ubuntu 18.04 server. The same instructions mentioned here can be used for Ubuntu 20.04 and other Ubuntu-based distributions. Let’s get started!
Apache Tomcat is an open-source web server and servlet container that serves Java applications. Apache Tomcat, often called Tomcat, is one of the most popular applications used to execute a Java servlet and render web pages with Java page coding. The Apache Software Foundation released Tomcat, which many developers favour and is widely used in web servers worldwide.
Tomcat generates JSP files (server-generated webpages similar to PHP and ASP files) into Java code, compiling to .class files by the server, and executed by the Java virtual machine. As of today, Tomcat is one of the more useable servlet containers available. There are some key features of using Apache Tomcat:
To further enhance your server's functionality, consider installing PostgreSQL on Ubuntu alongside Tomcat. Our detailed guide on how to install PostgreSQL on Ubuntu can help you set up a powerful database solution to complement your Tomcat server.
- Tomcat makes it fast and easy to run applications in Ubuntu
- It contains built-in customization choices which provide flexibility to its users
- It’s free and open-source
- It offers an extra layer of security to its users
- It's stable: even if something happens to Tomcat, the server will keep running without any interruptions
Prerequisites
- A Ubuntu 18.04 server
- A basic understanding of Linux commands
- A root user account or a user account with Sudo privileges
Step 1: Install Java (OpenJDK)
For Tomcat to work, you will need Java installed on your system. With Java installed, it’s possible to execute any Java web application code. OpenJDK is the default Java development and runtime for Ubuntu 18.04, and installing it is straightforward. Enter the following commands:
sudo apt-get update
Once the system is updated, go ahead and enter the following command:
sudo apt-get install default-jdk
Now that Java has been installed on your system let’s go ahead and create a new Tomcat user.
Step 2: Create a Tomcat user
For security reasons, using a unique Tomcat user without any root privileges is recommended. First, we will create a new tomcat group that will run the service:
sudo groupadd tomcat
Now we will create the Tomcat user. We will create a user in the tomcat group and with a home directory of /opt/tomcat (this is where we install Tomcat) to run the service.
sudo useradd -s /bin/false -g tomcat -d /opt/tomcat tomcat
PS: the /bin/false/ makes it so that nobody can log into the account.
Once you've set up your Tomcat user, it's a great time to explore other installation guides. For example, if you're looking to set up a web application framework, check out our guide on how to install Ruby on Rails in Ubuntu to get started with Rails on your server.
Step 3: Install Tomcat
The best way to install Tomcat 8 is to download the latest binary release and then configure it manually. You can find the latest download version from the Tomcat official webpage. We will install the latest version to the date of writing, Tomcat 10.0.5. If the version is not 10.0.5 or the latest version, follow the latest stable version. Just copy the link of the Core tar.gz file under the Binary Distributions section.
Let's go into the /tmp directory to download the items which you won’t need after extracting the Tomcat contents:
cd /tmp
Use curl to download the link that you copied from the Tomcat website:
curl -O https://apache.mirror.serveriai.lt/tomcat/tomcat-10/v10.0.5/bin/apache-tomcat-10.0.5.tar.gz
Step 4: Updating Permissions
The installation of Tomcat is finished, but we will need to set the Tomcat user to have full access to the Tomcat installation. To do this, follow the below commands:
sudo mkdir /opt/tomcat
cd /opt/tomcat
sudo tar xzvf /tmp/apache-tomcat-10.0.5.tar.gz -C /opt/tomcat --strip-components=1
You can check this article to learn more about the tar command!
Now we will provide tomcat with group ownership over the entire installation directory:
sudo chgrp -R tomcat /opt/tomcat
The newly created Tomcat user needs access to the conf directory to view and execute changes. This can be done using the following commands:
sudo chmod -R g+r conf
sudo chmod g+x conf
The last permission to set is to provide the Tomcat user with the owner of the web apps, work, temp and log directories:
sudo chown -R tomcat webapps/ work/ temp/ logs/
Now that the proper permissions are set up, we can create a systemd service file to manage the Tomcat process.
Step 5: Create a systemd Unit file
We must create a new system file to run Tomcat as a service. To do this, we will use the nano text editor to create the file tomcat.service in the /etc/systemd/system/ location.
sudo nano /etc/systemd/system/tomcat.service
Paste the following text into the file:
[Unit]
Description=Apache Tomcat Web Application Container
After=network.target

[Service]
Type=forking

Environment=JAVA_HOME=/usr/lib/jvm/java-1.11.0-openjdk-amd64/jre
Environment=CATALINA_PID=/opt/tomcat/temp/tomcat.pid
Environment=CATALINA_Home=/opt/tomcat
Environment=CATALINA_BASE=/opt/tomcat
Environment=’CATALINA_OPTS=-Xms512M -Xmx1024M -server -XX:+UseParallelGC’
Environment=’JAVA_OPTS.awt.headless=true -Djava.security.egd=file:/dev/v/urandom’

ExecStart=/opt/tomcat/bin/startup.sh
ExecStop=/opt/tomcat/bin/shutdown.sh

User=tomcat
Group=tomcat
UMask=0007
RestartSec=10
Restart=always

[Install]
WantedBy=multi-user.target
When you are finished, save and close the file by pressing Ctrl + x > y > Enter.
Note: In the above text next to JAVA_HOME might be different in your system. To check for the correct path, enter the following command.
sudo update-java-alternatives –l
The new system file is created! To notify the system that you have created a new file, enter this command:
sudo systemctl daemon-reload
Everything is set! Enter the following commands to start the Tomcat service:
sudo systemctl start tomcat
Double-check that it started without errors by typing:
sudo systemctl status tomcat
Step 6: firewall configurations
Tomcat uses port 8080, and it is essential to adjust the firewall to accept the requests coming to and from the server. To allow traffic, enter the following:
sudo ufw allow 8080
Now go to your favourite web browser and enter the following address. Don’t forget to enter your server IP address instead of IP:
http://IP:8080
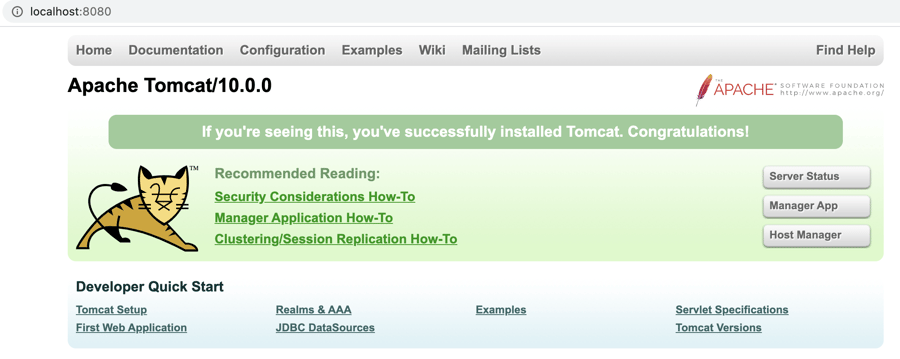
You will see the default Tomcat splash page (See the picture below).
Step 7: Configure the Tomcat Web management interface
To use the web app manager of Tomcat, we need to add a login to the Tomcat server. Enter the following command to edit the tomcat-users.xml file:
sudo nano /opt/tomcat/conf/tomcat-users.xml
Be sure to change the username and password to something secure:
<tomcat-users . . .>
    <user username="admin" password="password" roles="manager-gui,admin-gui"/>
</tomcat-users>
Save and close the file.
By default, newer versions of Tomcat restrict access to the Manager and Host Manager apps to connections from the server itself. Since we are installing it on a remote machine, you will probably want to remove or alter this restriction.
For the Manager app, type:
sudo nano /opt/tomcat/webapps/manager/META-INF/context.xml
For the Host Manager app, type:
sudo nano /opt/tomcat/webapps/host-manager/META-INF/context.xml
Inside, comment out the IP address restriction to allow connections from anywhere.
<Context antiResourceLocking="false" privileged="true" >
  <!--<Valve className="org.apache.catalina.valves.RemoteAddrValve"
         allow="127\.\d+\.\d+\.\d+|::1|0:0:0:0:0:0:0:1" />-->
</Context>
Don’t forget to save and close the files.
To apply the changes, restart the Tomcat service:
sudo systemctl restart tomcat
Step 8: Accessing the Tomcat web interface
To access the Tomcat web browser, enter the following address on your browser:
http://server_domain_or_IP:8080
It should be the same as the one you saw when testing it earlier.
Let’s take a look at the Manager App, accessible via the link or
http://server_domain_or_IP:8080/manager/html
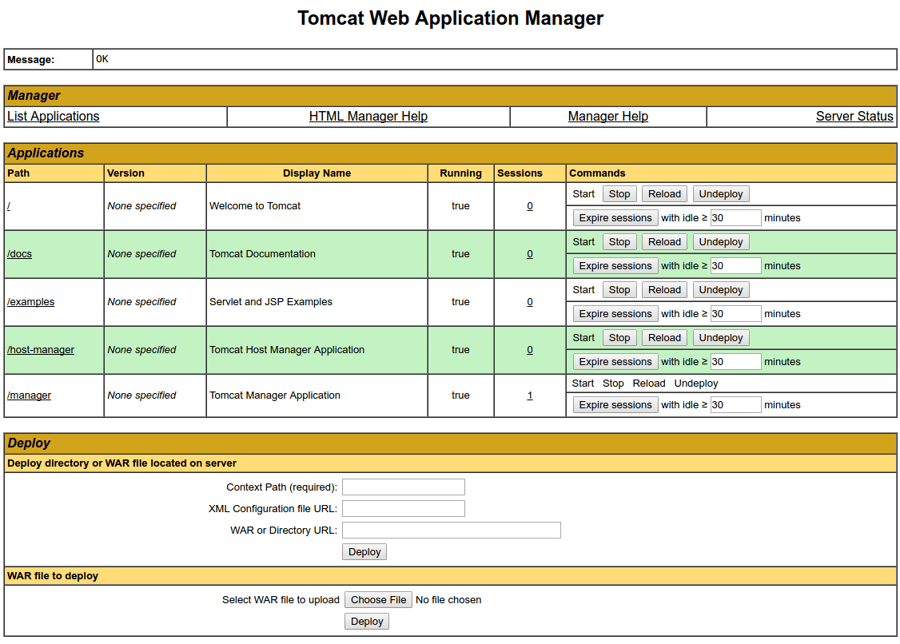
You must enter the account credentials you added to the tomcat-users.xml file.
The Web Application Manager is used to manage your Java applications. You can Start, Stop, Reload, Deploy, and Undeploy here. You can also run some diagnostics on your apps. Information about your server is available at the very bottom of this page.
Now let’s take a look at the Host Manager, accessible via the link or:
http://server_domain _or_IP:8080/host-manager/html/
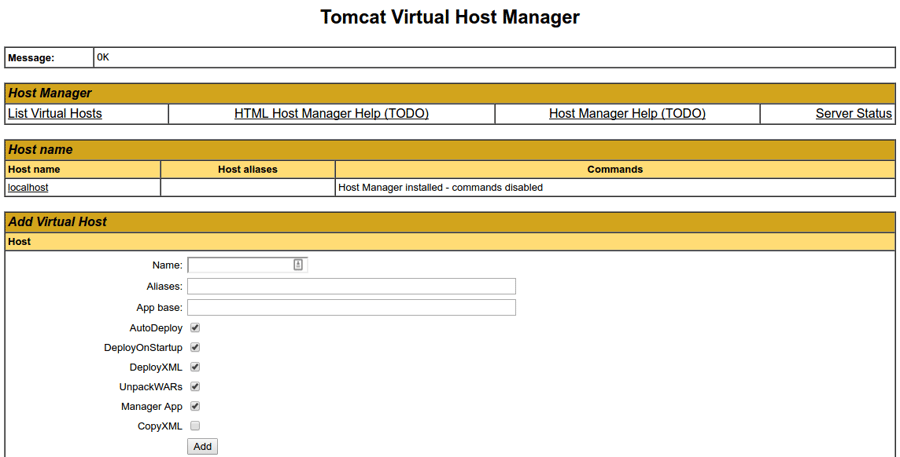
You can add virtual hosts to serve your applications from the Virtual Host Manager page. For optimal performance, consider using one of the best Ubuntu versions for your server. Check out our guide on the best Ubuntu versions to ensure you're using the most reliable and secure version for your Apache Tomcat installation.
Conclusions
If you're looking to expand your server's capabilities, consider setting up an Ubuntu VPS server for enhanced performance and flexibility. A VPS (Virtual Private Server) allows you to scale your applications and services while maintaining full control over your environment. Additionally, you might also want to configure an RDP server on Ubuntu to enable remote desktop access, which can be particularly useful for managing your server from any location with a graphical interface.
Currently, your Tomcat installation is functional but entirely unencrypted. This means that all data, including sensitive items like passwords, are sent in plain text that can be intercepted and read by other parties on the internet. We strongly recommend that you add an SSL certificate to encrypt your connection.
People also read:
Leave A Comment