
Ruby on Rails (RoR) is one of the most popular application stacks for developers looking to create websites and web applications. It is an open-source product with a combination of Ruby programming language and the Rails development framework, which is ideal for app development.
Rails framework provides default structures for databases, web services and web pages and developers are still contributing codes to the framework. Many notable applications are GitHub, Airbnb, Soundcloud etc. This tutorial will show you how to install Ruby on Rails on the Latest Ubuntu 20.04.
Before diving into the installation process, if you’re new to Ubuntu or want to learn more about this popular Linux distribution, check out our guide on What is Ubuntu? to understand its features and benefits.
This guide will cover the following topics:
- Install RVM Ruby Version Manager
- Install and Configure Ruby
- Install Nodejs and Yarn
- Update RubyGem Package Manager
- Install Ruby on Rails Latest Version
- Install and Configure PostgreSQL Database
- Start First Ruby on Rails Project with PostgreSQL Database
Let’s get started!
Prerequisites
- An Ubuntu 20.04 server
- Basic understanding of Linux commands
- A root user account or a user with root privileges
Install RVM (Ruby version manager)
RVM, or Ruby version manager, is a command-line tool based on Bash and Ruby to manage the Ruby installation process. With RVM you can install and configure multiple ruby versions in one system. We need to add the GPG keys to our system to start the installation process.
gpg --keyserver hkp://keys.gnupg.net --recv-keys 409B6B1796C275462A1703113804BB82D39DC0E3 \ 7D2BAF1CF37B13E2069D6956105BD0E739499BDB
Once the keys are added, you can install the ruby version manager using the following command:
curl -sSL https://get.rvm.io | bash -s stable --ruby
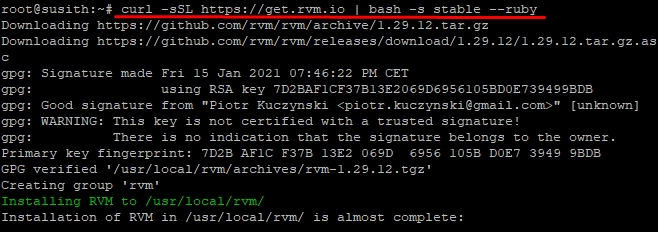
The command will automatically install the packages, and afterwards, you should load the RVM to the system using the following command:
source /usr/local/rvm/scripts/rvm
Now you can use the ‘rvm’ command. Next, update the RVM to the latest stable version and add the root user to the RVM group. You can also add the user with root privileges in this part.
rvm get stable --autolibs=enable
usermod -a -G rvm root
Now to check if all is installed correctly, enter the command below. It will show the installed RVM version.
rvm version

Install and configure Ruby
Now let’s install the latest Ruby version for Ruby on Rails installation. We will be installing Ruby 3.0.1 using the RVM command:
rvm install ruby-3.0.1
Don’t forget to make Ruby 3.0.1 the default Ruby version by:
rvm --default use ruby-3.0.1
To check the version, enter the following command:
ruby –version

Install Nodejs and Yarn
For Ruby on Rails to work properly, it needs the JavaScript Runtime for compiling the Ruby on rails asset pipeline. We will use Nodejs and Yarn package managers in this tutorial, but it can be replaced with any other alternative.
Additionally, if you need to manage your server more efficiently, consider setting up Webmin on Ubuntu, which provides a user-friendly web interface for server administration. You can follow this guide on how to install Webmin on Ubuntu for a seamless setup.
Install the needed package dependencies using the following command:
sudo apt install gcc g++ make
Now we will add Nodejs to the Nodesource repository:
curl -sL https://deb.nodesource.com/setup_14.x | sudo -E bash –
Add the GPG key and repository of the Yarn package manager.
curl -sL https://dl.yarnpkg.com/debian/pubkey.gpg | sudo apt-key add -
echo "deb https://dl.yarnpkg.com/debian/ stable main" | sudo tee /etc/apt/sources.list.d/yarn.list
Now all is set; all we need to do now is to update all the available repositories and install Yarn and Nodejs on the system.
sudo apt update
sudo apt install yarn nodejs
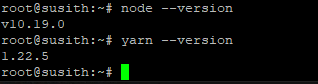
Once the installation is completed, let’s do a final check of the Nodejs and yarn versions by entering the following command:
node --version
yarn --version
As a result, the installation of Nodejs and Yarn package manager for Ruby on Rails has been completed.
Update the RubyGem Package manager
RubyGems is a Ruby Package Manager, which comes by default when installing Ruby on the system. It is a command-line tool used when using Ruby on Rails.
To update the RubyGem to the latest version, run the following command.
gem update --system
Once installed on your system, we will need to make some configurations. Create a new configuration for the RubyGem '~/.gemrc' and disable the installation of package documentation using the command below.
echo "gem: --no-document" >> ~/.gemrc
You can check the gem version using the gem command:
gem –v

Installing Ruby on Rails
We will install the latest version of Ruby on Rails through the RubyGem package manager. You can install Ruby on Rails using the gem command we installed in the previous step.
gem install rails
That’s it! To check if it was installed correctly, enter the following command:
rails -version
Install and configure PostgreSQL
For Ruby on Rails to work, we need to add a database. For this tutorial, we will use PostgreSQL as the database provided by the official Ubuntu repository.
If you're setting up a web server to host your Ruby on Rails application, consider installing LEMP (Linux, Nginx, MySQL, PHP) on Ubuntu. For a step-by-step guide on how to install and configure LEMP on Ubuntu, check out our tutorial on installing LEMP on Ubuntu.
You can install PostgreSQL using the apt command:
sudo apt install postgresql postgresql-contrib libpq-dev
Once the installation is completed, start the PostgreSQL service and enable it during the system's boot-up.
systemctl start postgresql
systemctl enable postgresql
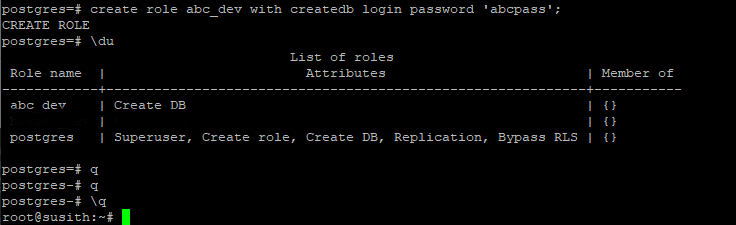
Once the service runs, log in to the PostgreSQL shell and create a new role 'abc_dev' with the password 'abcpass' and the privileges 'createdb' and 'login'.
sudo -i -u postgres psql
create role abc_dev with createdb login password 'abcpass';
You can list all the available users on PostgreSQL using this:
\du
You can quit back to the terminal by entering \q.
Start a new Ruby on Rails project.
We will go through an example of setting up a project. Note that RoR uses SQLite as the default database, but in this example, we will use the PostgreSQL database. Let’s go ahead and create a new project, “testapp” with the PostgreSQL database.
rails new testapp -d postgresql
Now you will get the project directory 'testapp', go to the project directory and edit the database configuration 'config/database.yml' using the nano text editor.
cd testapp/
nano config/database.yml
Now we will change some configurations. In the development section, add the database configurations:
host: localhost
port: 5432
username: abc_dev
password: abcpass
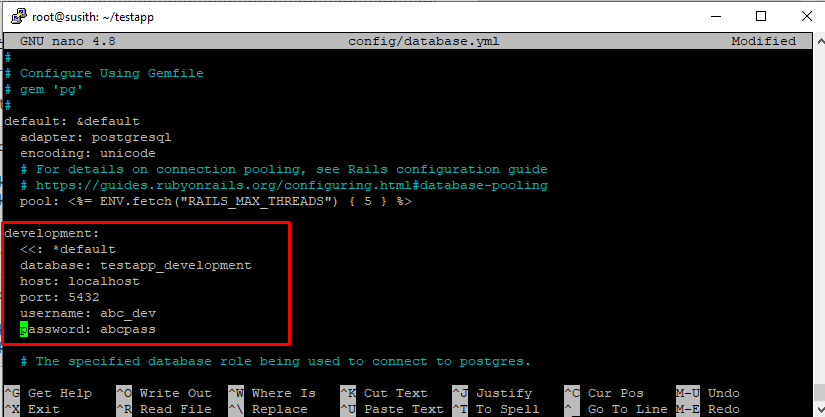
Head over to the testing section and add the PostgreSQL database configurations:
host: localhost
port: 5432
username: abc_dev
password: abcpass
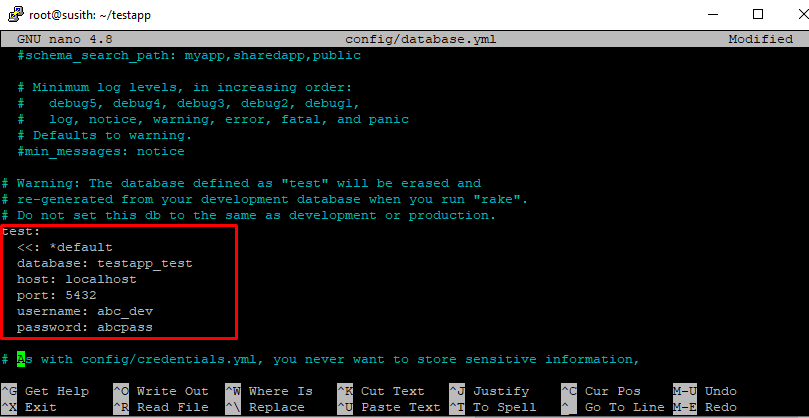
Save the file, and exit the text editor.
Next, run the rails command below to generate and migrate the database for our Rails project and ensure there is no error.
rails db:setup
rails db:migrate
Start the default puma rails web server when the setup is complete using the command below.
rails s -b 0.0.0.0 -p 8080
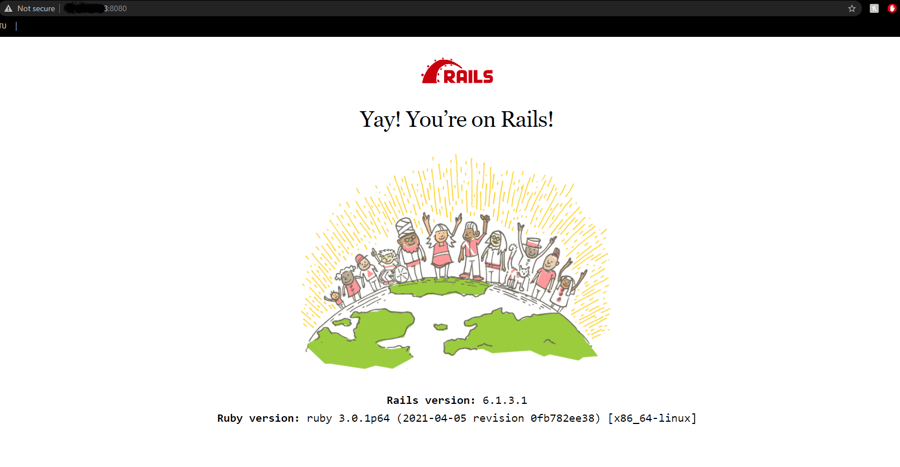
This will run the created application on your public IP address on port ‘8080’. Open your favourite web browser and type the server IP address with port ‘8080’.
http://xx.xx.xx.xx:8080/
If you see a result similar to the one below, you have successfully created the first project of Ruby on Rails.
Wrapping up
In this short tutorial, we went through installing and setting up our own Ruby on Rails project on Ubuntu. If you followed along using an Ubuntu VPS or an Ubuntu RDP server, we trust that the process was clear and informative. We hope that you enjoyed this article, and if you encounter any errors during the installation process, please let us know in the comments below. We’re here to help with any issues related to Ubuntu VPS and Ubuntu RDP server configurations, and we look forward to assisting you in getting everything up and running smoothly.
People also read:
Leave A Comment