
This tutorial will go through the steps to install MongoDB on Ubuntu 18.04 server. MongoDB is an open-source and free document database used in many modern web applications. It differs from traditional table-based databases like MySQL and PostgreSQL as it doesn’t rely on the table-based relational database structure.
It is classified as a NoSQL database. Instead of using the traditional method, the data is stored in flexible JSON-like documents where fields differ from document to document. MongoDB does not require a predefined schema before adding data to the database, and the data structure can be changed over time.
Now that we got the basics in place, let’s go ahead and start setting up the latest version of MongoDB on Ubuntu 20.04 and manage it as a systemd service. If you're new to Ubuntu, check out our comprehensive guide on What is Ubuntu to better understand this popular Linux distribution.
Prerequisites
Before going further with the tutorial, you will need the following:
- An Ubuntu 20.04 server
- A user with Sudo privileges
- General knowledge of using Linux commands
Instal MongoDB on Ubuntu 20.04
Ubuntu’s official package repositories include a stable version of MongoDB by default. At the writing of this article, the latest stable version is 4.4. To include the most recent version of MongoDB, you should include the MongoDB dedicated package repository to your APT sources. To check for the latest MongoDB version, click the link here.
To start, import the public GPG key for the latest stable version of MongoDB by running the following command.
curl -fsSL https://www.mongodb.org/static/pgp/server-4.4.asc | sudo apt-key add –
In the above code, cURL prints the content of the GPG key file and adds the key to your list of trusted keys. The –fsSL is used as a security measure. If, by any chance, cURL won’t be able to contact the GPG server, it won’t accidentally add the resulting error code to the trusted keys.
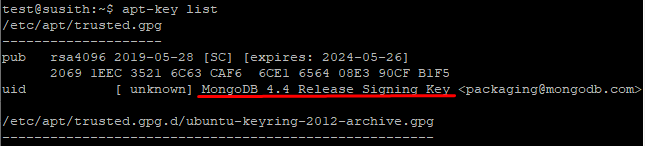
If the key were added successfully, you would see a result as OK. To double-check, enter the following code and see the MongoDB key in the output.
apt-key list
At this point, your APT installation still doesn’t know where to find the mongodb-org package you need to install the latest version of MongoDB. To fix this issue, we will create a file in the sources.list.d directory with the name mongodb-org-4.4.list.
echo "deb [ arch=amd64,arm64 ] https://repo.mongodb.org/apt/ubuntu focal/mongodb-org/4.4 multiverse" | sudo tee /etc/apt/sources.list.d/mongodb-org-4.4.list
If you're managing users on your server and need guidance on listing them, check out our guide on how to list users in Ubuntu Linux VPS.
Let me explain a bit of the following code and what it does:
- The deb part means that the source entry is a regular Debian architecture reference.
- The arch=amd64,arm64 specifies the architecture the APT data should be downloaded.
- The next part is the URL from which the APT data can be downloaded from.
- The next part specifies which version of MongoDB you want (4.4) and the package available for the focal release of Ubuntu - focal/mongodb-org/4.4
- The multiverse points to Ubuntu’s multiverse repository.
Once the command is run, update the server’s local package index.
sudo apt update
Now you can install MongoDB by:
sudo apt install mongodb-org
When the installation finishes, you will have MongoDB installed on your system. But this is not the end; we will need to configure it before we can use it.
Starting MongoDB and making the configurations
The previous steps made it possible to run MongoDB using systemd commands. To start the MongoDB service, enter the following command:
sudo systemctl start mongod.service
Now check the service status using the following command:
sudo systemctl status mongod
You will receive an output like this.
Output
mongod.service - MongoDB Database Server
     Loaded: loaded (/lib/systemd/system/mongod.service; disabled; vendor preset: enabled)
     Active: active (running) since Tue 2021-04-06 12:57:06 UTC; 2s ago
       Docs: https://docs.mongodb.org/manual
   Main PID: 37128 (mongod)
     Memory: 64.8M
     CGroup: /system.slice/mongod.service
             └─37128 /usr/bin/mongod --config /etc/mongod.conf
Now that we know all is in order, let's go ahead and enable MongoDB to start up at boot:
sudo systemctl enable mongod
Now let’s go ahead to the last part: Manage MongoDB service.
If you're working on managing packages for your applications, you might also find it helpful to learn how to install Yarn on Ubuntu, a popular package manager for JavaScript projects.
Managing the MongoDB service
As mentioned previously, the installation process described in the installation process configures MongoDB to run as a systemd service. This means you can manage it using standard systemctl commands as you would with other Ubuntu system services.
As seen in the above step, you can use the systemctl status command to check the status of the MongoDB service:
sudo systemctl status mongod
If you would like to stop the service, you can enter this command:
sudo systemctl stop mongod
To start it, type:
sudo systemctl start mongod
While the service is running, you can restart the server by:
sudo systemctl restart mongod
If you would like to disable the feature to start MongoDB automatically during start-up, you can enter the following command:
sudo systemctl disable mongod
In the same way, you can enable this feature:
sudo systemctl enable mongod
Conclusion
In this tutorial, we were able to add the official MongoDB repository to the APT instance and install MongoDB on an Ubuntu server. Whether you're running an Ubuntu VPS server or an Ubuntu RDP server, the installation process is straightforward and efficient. Now, for the next steps, we recommend hardening the MongoDB service's security to safely accept remote connections.
Be sure to check the official MongoDB documentation to dive deeper into advanced configurations and security practices. We hope you found this article helpful, and if so, let us know in the comments below.
People also read:
Leave A Comment