
The foremost concern is securing a client to a server securely. This is particularly true for Linux users. SSH is known as Secure Shell and is the default method for this purpose. This protocol allows them to access and manage a remote server from any location powerfully and efficiently. Are you planning to use SSH right now? Follow this article to learn how to enable SSH on Ubuntu and disable it when you don`t need it. But before we get started, let`s see what exactly SSH is.
Before diving in, if you're unfamiliar with SSH servers, check out our detailed guide on What is SSH Server to understand its fundamentals and importance for secure server connections.
What is SSH exactly?
SSH is a popular and free network protocol that establishes communication between two systems far apart. In addition to encrypting all traffic, SSH offers different authentication methods and configuration options to prevent hijacking and eavesdropping attacks.
SSH encrypts every piece of data to ensure that no sensitive information is compromised during the process. So, as a client-server, you can safely transfer sensitive information, run command lines, and use any other network services.
These functions are typically accomplished via insecure tools, including Telnet and RCP, but they transmit users' passwords in cleartext. That’s why OpenSSH is recommended for server and client purposes.
For developers aiming to set up a secure Ruby on Rails environment, learning to install Ruby on Rails on Ubuntu can complement your SSH-enabled server setup, enhancing both security and functionality for your application.
Prerequisites for enabling SSH on Ubuntu
Before you start to do the instructions to install and enable SSH on the Ubuntu system, you need to be aware of the prerequisites mentioned below:
- Permission to access the remote computer.
- Internet connection for downloading the required packages.
- There must be at least one other system in your network. (For instance, another computer on your local area network, a remote server connected via the Internet, or a virtual machine running locally.)
- Access to Terminal.
Before you proceed, you may want to explore the pros and cons of using Ubuntu to understand how it aligns with your requirements for remote management and security.
How to enable SSH on Ubuntu?
Some packages are required to be installed on your system before enabling SSH. All Ubuntu versions don`t have SSH protocol by default. So, follow these instructions to ensure you enable SSH correctly.
Check if it has already been installed.
The SSH server was already installed on your system based on your Ubuntu version. Before starting the installation process, ensure it has already been installed. To check this out, use the CTRL+ALT+T keyboard shortcut or click on the Terminal icon to open the Terminal. Then, use the following command:
ssh localhost
If the "Connection Refused" message appears on your display, you need to start the SSH installation process explained in the next steps.
Update your Ubuntu system.
Before anything, ensure that you`re using the latest Ubuntu version. You can update your system by running the command below:
sudo apt update && sudo apt upgrade
Install the OpenSSH client.
You can easily install the OpenSSH client applications and related support files on your Ubuntu system by entering this command at a terminal:
sudo apt install openssh-client
Installing OpenSSH-server on Ubuntu is necessary to accept an SSH connection. Follow the next step to do this.
Install the OpenSSH server.
After you run the instructions for installing the SSH client, you need to accept a connection for the SSH session. Type the following command to install the OpenSSH-server package on your Ubuntu system:
sudo apt install openssh-server
Enable SSH server on Ubuntu.
The command below will enable the SSH server on the Ubuntu system:
sudo systemctl enable ssh
During the next step, you need to enable UFW and open the SSH port, as the firewall blocks SSH. Use the UFW firewall to open SSH port 22 and run the following command:
sudo ufw allow ssh
Congratulations. You can use the SSH client to connect to your Ubuntu server now that you have installed and run an SSH server.
Log into a remote server using SSH.
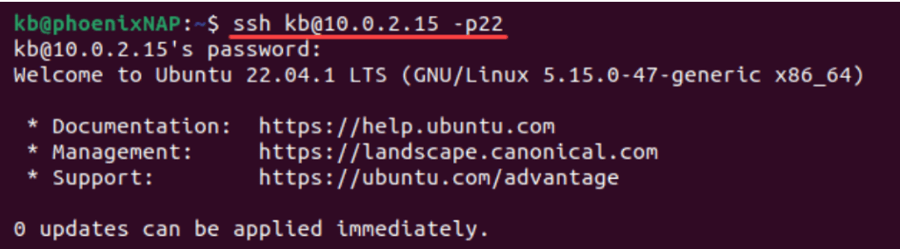
After you have enabled SSH on your Ubuntu system, you can go through the process of logging into the remote system. Use the “CTRL+ALT+T” keyboard shortcut to open the Terminal and use the following command:
ssh username@public_IP -p22
Note: Replace the username and IP address of the Ubuntu system on which you`ve installed SSH. The image below is an example of this:
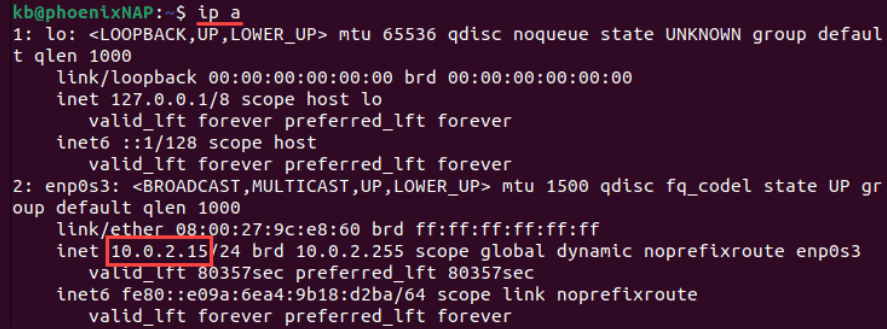
You may not know the IP address. Don`t worry! You can quickly identify it through the terminal by typing the command:
ip a
The public IP address of the computer that you installed SSH will be shown like this:
Once you have entered all the information, you will be officially logged into the server. You can safely manage it from the comfort of your workstation.
Configure Firewall
Decided to change the default port number, but you need to know how. It`s easy. You only need to run a command in Terminal that will configure your firewall and allow traffic via the specified port. UFW is the default firewall configuration tool. Use the syntax below to configure it with the example of port 2222:
sudo ufw allow from any to any port 2222 proto tcp
It may be necessary to allow traffic to SSH's public IP address if your firewall does not allow traffic to SSH's private IP address.
Note: If you use the default port, 22, the port number does not need to be changed. Port 2222 is defined in the Configure SSH section.
Start, Stop, or Restart SSH service on Ubuntu.
To Start SSH service on Ubuntu, type the following command in Terminal:
sudo systemctl start ssh
To stop, use this command:
sudo systemctl stop ssh
And if you need to restart, use the command below:
sudo systemctl restart ssh
To view the status, run this command:
sudo systemctl status ssh
disable and remove the SSH server on Ubuntu
You may not need the SSH server any more or want to remove or disable it for some reason. The following commands will help you with that:
Temporarily disable SSH on Ubuntu:
sudo systemctl stop ssh
Disable SSH after rebooting completely:
sudo systemctl disable ssh
Remove SSH from Ubuntu:
sudo apt-get remove opnessh-server
Ensure that the firewall rule that opened TCP port 22 for SSH has been removed using the following syntax:
sudo ufw delete allow ssh
Conclusion
You can secure a connection through SSH by using the steps listed above. We’ve addressed the most frequently asked questions about enabling SSH on Ubuntu VPS and Ubuntu RDP servers. Once you’ve completed these steps, you can work at the command prompt as an administrator on your Ubuntu VPS or Ubuntu RDP server by establishing a reliable and secure protocol named SSH.
This secure method ensures that your connections remain protected and your administrative tasks are carried out with the highest level of security. If you have any additional questions or need further assistance, feel free to reach out!
For users looking to expand their server's functionality, you may also want to learn how to install Node.js on Ubuntu to run JavaScript-based applications efficiently.
People also read:

Leave A Comment