
Before we get to the tutorial on How to Flush DNS on your system, we will first cover the basics. If you are here specifically for the how-to part, go ahead and skip to the tutorial!
Today everyone is relying on the internet for even the smallest bit of information. Thus, many websites get a lot of traffic every second, and users tend to leave their traces online. Many websites and applications use cookies or JavaScript applications to store users' or visitors' details and trace their behaviour. Such information may help websites, and visitors access the link quickly during a second attempt.
The data stored as a cache helps in optimizing the website without compromising visitor details. Many people habitually delete their cache and browsing history to ensure that their details are not stored on any website to protect their privacy. They are also known as web trackers.
While websites and browsers save data, the operating system also tends to store surfing behaviour. They are stored in the automatically generated DNS cache, which contains temporary details about all visited sites online. To manage security across your web application ecosystem, understanding how to clear cache from browsers along with your system DNS is highly beneficial.
This article will go through what a DNS is and how to manage and flush the DNS cache.

🔍 What is a DNS Cache?
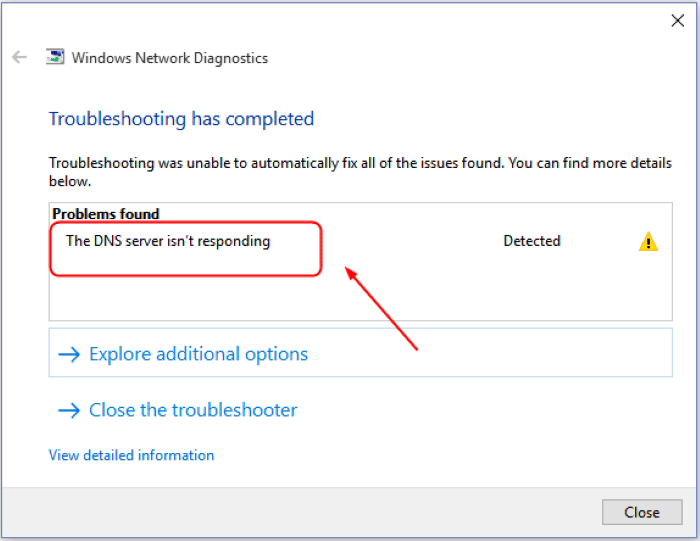
DNS servers help in converting the domain name into the numeric address processed by a computer system. The browser contacts the name server every time a call is made, leading to increased load time and DNS server overload. You might have seen an error like "DNS Server Not Responding", which is the consequence of many requests being made. Knowing how to map a what is an IP address system properly helps trace where these queries break down.
This is why the operating systems tend to store their cache, which is evidently known as the DNS cache. It holds the data which will be valid for a particular time. Until the cache is valid, all the requests will be made directly from the saved DNS cache rather than visiting the DNS server repeatedly. If you frequently encounter issues, learning how to solve DNS server not responding error can prevent localized downtime.
⚙️ Understanding the DNS Resolution Process
To comprehend why flushing the cache is so important, it helps to analyze how your local machine handles a standard request. When you type a URL into your browser bar, the operating system looks through your local DNS cache before asking the Internet Service Provider (ISP). If it finds a match, it resolves the destination instantly. This saves bandwidth and reduces latency, but it relies heavily on the data being 100% current.
📋 What information is stored inside the DNS Cache?
The entries created and contained within the DNS cache are called resource records (RR), stored in ASCII code to ensure data security. Also, it is quickly processed by your machine, where it is stored. When managing large-scale server networks or checking name resolution issues, network admins use diagnostic utilities like the nslookup command to query these specific parameters manually.
Below are the components of the data stored:
- Resource Data (RD) is used to describe the record, like its address or the hostname. It helps in identifying what type of resource you are connecting to.
- Record Type- this component will specify the type of record created. For example- the 'A' IPv4 address or the 'AAAA' IPv6 address. This information helps you understand what kind of connection is being used by your network to the outside. To understand the differences, check out the side by side comparison ipv4 vs ipv6 page.
- Record Name- this is the optional component; it may be created or not. If this data is created, it will specify the object's domain name for which the entry was created.
- Time to Live- this component is optional and used to specify the resource record's validity in seconds.
- Class- this component is optional and is used to specify the category to which the record belongs.
- Resource data length- this component is optional, specifying the resource data size.
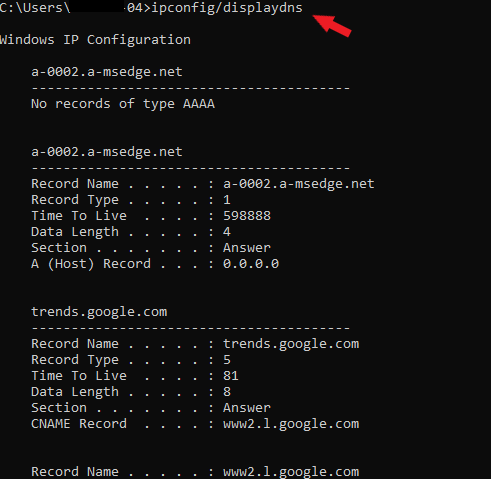
If you want to check for yourself, here's how to see DNS cache in Windows 10:
Open command prompt > Type "ipconfig/displaydns" > press Enter
Here's how to view DNS cache on Mac:
- Part 1: Open the Console app > select your device from left sidebar > Type
any:mdnsresponderin the search bar - Part 2: Open command line > enter the following
sudo killall -INFO mDNSResponder - Part 3: Check the Console app for the list of cached DNS records
If you are using a Linux system, here's how to use the cached DNS records:
Open terminal > Enter service nscd status or sudo service nscd status
Note that you will need to have an NSCD daemon!
🛡️ Why Should You Flush DNS Entries Regularly?
The operating system automatically creates the DNS entries to ease the process of making server calls. But this DNS cache entry is not going to be deleted automatically (even though it gets generated automatically); you have to do it manually. It is important and beneficial that you clear the DNS cache periodically or regularly. Reasons to flush DNS cache is necessary due to the following three main reasons:
- Protect Your Search Behavior - A user's surfing behaviour is usually tracked by cookies, JavaScript applications, and other possible ways. DNS cache, however, tends to increase the security vulnerability more than any other tracking method. This is because the DNS cache contains all the information and addresses the user has visited within their valid time (TTL). The information has a higher chance of reducing the server load times and revealing your browsing activities.
- Increase the Risk for Cybercrime - DNS entries may be useful to keep track of your activity, but they might be a threat if these entries fall into the wrong hands. If an attacker gains access, they can manipulate the entries and redirect them to different sites, leading to DNS-poisoning or DNS-spoofing. Most attackers use this to gain access to sensitive log-in details like your online banking details.
- Solving Technical Issues - Are you continually experiencing any technical issues while accessing any website on your system? This may be due to the DNS cache's outdated entries allowing you to open the website's wrong link. It is essential to clear DNS entries and revisit the site so the new entries will be created in the cache and can successfully access it. This issue frequently shows up on corporate deployment systems like windows server dns architectures where multiple clients match records through unified servers.
If the entries are not deleted manually, the entries will remain in the cache until their TTL expires. Sometimes using a corrupted cache can lead to security vulnerabilities, so it is strictly recommended to flush your DNS entry whenever you feel.
💻 How can you clear or flush DNS entries for different operating systems?
There is no golden rule saying when and why you should be clearing your DNS cache, but it is considered an excellent digital practice, especially if you are working on crucial projects. If you feel something is wrong with your website's redirection, it is high time to check the DNS caches. You should follow the exact instructions for clearing cache concerning the operating system you use.
If you have a Windows VPS, the flush DNS command will be precisely the same as mentioned here.
** Note: ADMIN rights are required to delete DNS cache from any operating system.
🖥️ Clear DNS cache in Windows XP, 2000, or Vista
If you are using Windows XP, 2000, or Vista, first, you should clear the DNS entry using the command prompt (flush DNS cmd).
- Click on the Start button.
- Type cmd in the search bar.
- The command prompt black screen will open.
- You can now enter the below command to clear the DNS cache.
Ipconfig /flushdns
Once you press the enter key, the entries will be cleared, and you will get a success message.
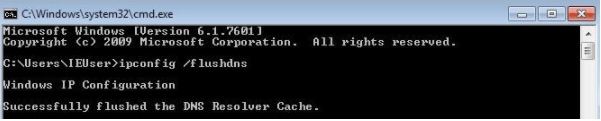
🖥️ Windows clear DNS cache (Windows 7)
If you are using Windows 7, you can clear the DNS entry via the command prompt command.
- Click on the start button.
- Type cmd in the search bar.
- The command prompt screen will open as below.
- Now you can enter the below command to clear the DNS cache.
Ipconfig /flushdns
The above Windows flush DNS command will come to effect as soon as you press Enter. You will be treated with a success message once you send the message.

🖥️ Windows flush DNS cache (Windows 8)
If you are using Windows 8, you can run commands via the command prompt tool to clear the DNS entry.
- Click on the start menu.
- Search for the cmd from the search bar.
- A black screen of the command prompt will open.
- Run the below command.
Ipconfig /flushdns
On pressing the enter key, you will get the below message as you get for Windows 7.
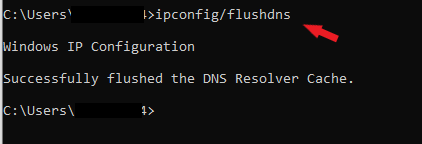
🖥️ How to Flush DNS Windows 10
To clear the DNS cache Windows 10, it will be the same steps as mentioned earlier in Windows 7 and Windows 8.
- You can search for the cmd from the search function.
- A black screen for the command prompt will appear where you can run the command.
- Clear the DNS cache via the below command.
Ipconfig /flushdns
On pressing the enter key, you will get a success message confirming the reset DNS.

🐧 Clear DNS cache in Linux Operating Systems
By default, the Linux operating system does not have the facility of DNS cache entries. They come with a function that stores the DNS information locally using some applications like nscd (name service caching daemon).
If you are using a Linux VPS, the Linux flush DNS command will be exactly the same as mentioned here.
If you are using caching services, you can control it from the terminal to clear the cache. Similar services are:
- pdnsd
- DNS-clean
- dnsmasq
Below are the different commands for Linux clear DNS cache. Note that, to work with these commands, you will need sudo privileges.
- For pdnsd, run the below command.
sudo pdnsd-ctl empty-cache
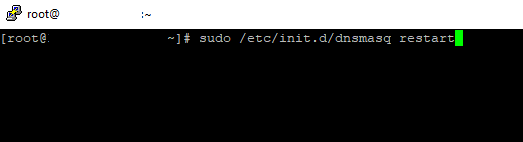
- To clear the DNS cache using dnsmasq command
sudo /etc/init.d/dnsmasq restart
- To clear the DNS cache using ncsd command
sudo /etc/init.d/nscd restart
- To clear the DNS cache using the dns-clean command
sudo /etc/init.d/dns-clean restart
🍏 How to flush DNS mac
macOS works the same as Windows for automatically collecting the DNS information. Therefore, you will have to manually clear DNS cache mac. But on macOS, resetting the cache may vary depending on the macOS version. You should set the DNS register to zero from the terminal. The procedure to do this highly depends on the version of your Mac system. Follow the steps below to access the terminal.
Go to Applications -> Utilities -> click Terminal.
Note: Before running the command, you must have admin privileges.
macOS 10.12.0 (Sierra) version
sudo killall -HUP mDNSResponder
OS X 10.10.4 (Yosemite) and 10.11.0 (El Capitan) versions run the below command.
sudo dscacheutil -flushcache;
sudo killall -HUP mDNSResponder
OS X 10.10.1 to 10.10.3 (Yosemite) version run the below command (macOS flush DNS)
sudo discoveryutil mdnsflushcache
sudo discoveryutil udnsflushcaches
OS X 10.9.0 (Mavericks) version runs the below command.
sudo dscacheutil -flushcache;
sudo killall -HUP mDNSResponder
⚠️ Common DNS Errors and How Flushing Fixes Them
When your operating system reads static information from an obsolete entry, specific error codes disrupt normal browsing parameters. Below are the most typical configuration mistakes or record inconsistencies that flushing addresses immediately:
| Error Code | Primary Root Cause | How Flushing Restores Service |
| DNS_PROBE_FINISHED_NXDOMAIN | The domain name target pointed to an unallocated configuration or has recently changed servers. | Wipes local data, forcing the browser to fetch the active IP configuration live from authoritative servers. |
| ERR_NAME_NOT_RESOLVED | The network stack fails to pull mapping sequences because local components clash with internal web proxies. | Clears system blockages by establishing pristine host connection chains upon the next request. |
| DNS_PROBE_FINISHED_BAD_CONFIG | Faulty network configuration adjustments or incorrect routing presets inside your computer's settings. | Resets the resolving sequence so that active nameserver attributes take immediate control. |
If you are working across customized staging environments or troubleshooting a platform, you can inspect further details inside our practical guide on solving dns probe finished nxdomain errors or read up on fixing the dns_probe_finished_bad_config issues directly.
💡 Conclusion
DNS cache is vital to lower your server load for many requests, but it is also essential to flush the DNS cache regularly to keep your system secure. This is one of the little technical details you might miss if you are a beginner, but making this a habit will help you in the long run. It will save you from vulnerabilities and protect your system from unexpected attacks. You can also make this a task or a batch job that will delete your DNS entries from time to time and save your manual effort.
We hope this article helped, and if it did, don't forget to share it with your peers! You can always let us know your thoughts in the comments below!
People also read:

Leave A Comment