
Are you a fervent explorer of the Linux realm, seeking to capture the essence of your digital adventures with precision and style? Look no further, for the Linux screenshot tool stands, linux screenshot arc as your faithful companion, ready to immortalize every moment of your journey in the virtual landscape.
Whether you tread the paths of arch linux screenshot, linux screenshot and edit tool, linux screenshot part of screen with its minimalist elegance, or delve into the depths of kali linux screenshot, brimming with potent tools for the cybersecurity adept, the Linux screenshot command is your trusty guide. With a swift invocation, it bestows upon you the power to freeze time, capturing the essence of your computing odyssey with a mere keystroke.
But why settle for the ordinary when the best Linux screenshot tool beckons, offering a plethora of features to elevate your capturing prowess? From seizing the entirety of your screen to pinpointing a specific area with finesse, the app for linux screenshot empowers you to curate your digital tapestry with unparalleled precision.
Harnessing the linux screenshot shortcut, linux screenshot select area you can swiftly focus on the essence of your display, ensuring that every pixel tells a story. Need to swiftly annotate or edit your captures? Fear not, for the Linux screenshot editor stands ready, offering a myriad of tools to sculpt your snapshots into masterpieces.
In the realm of Linux, linux screenshot area shortcut versatility reigns supreme, and the Linux screenshot to clipboard feature ensures seamless integration with your workflow. Simply snatch your captures and wield them as you see fit, whether it's for documentation, communication, or artistic expression.
But why stop there? Dive deeper into the realm of possibilities with the Linux screenshot area functionality, granting you the ability to sculpt your captures with surgical precision. Need to animate your exploits? Embrace the Linux screen capture animated GIF, breathing life into your digital chronicles.
So, fellow traveler of the Linux frontier, heed the call of the Linux screenshot command, and embark on a journey of visual storytelling unlike any other. With every capture, you etch your mark upon the digital canvas, weaving a tapestry of experiences that transcend the ordinary. Welcome to the realm where every moment is a masterpiece, and every screenshot a testament to your digital prowess.
For those eager to explore the foundation of the powerful system behind every Linux screenshot, take a deeper dive into the world of Linux servers by checking out our guide on What is a Linux Server?.
3 ways to take Linux screenshot
1. Create screenshots in Linux with the Print key
In the vibrant landscape of Linux, capturing the essence of your digital escapades is not just a task—it's an art form. And at the heart of this creative endeavor lies a humble yet mighty ally: the Print key. With a mere press of this button, a world of possibilities unfolds as you harness the power of the Linux screenshot feature.
Picture this: you're traversing the sleek corridors of Arch Linux, crafting your digital domain with finesse. Suddenly, a moment of inspiration strikes! Without hesitation, you reach for the Print key, invoking the timeless magic of the linux screenshot command. In an instant, your vision is immortalized, ready to be shared, cherished, or simply admired.
But why settle for ordinary captures when Linux offers a myriad of tools to elevate your screenshots to new heights? Behold the linux screenshot annotation tool, standing at the ready to add a personal touch to your snapshots. With intuitive features and seamless integration, it transforms each capture into a canvas waiting to be adorned.
And let's not forget the convenience of the linux screenshot area shortcut—a swift gesture to capture precisely what you desire, without the fuss. Efficiency meets precision, ensuring that every screenshot is a masterpiece in its own right.
But what if you crave automation in your screenshot endeavors? Fear not, for Linux has you covered with its automatic screenshot functionality. Simply set it and forget it, allowing your system to capture moments effortlessly, leaving you free to focus on what truly matters.
For those seeking to add a touch of dynamism to their captures, look no further than the linux screen capture animated GIF. With this innovative feature, your screenshots transcend the static realm, breathing life into your digital chronicles with every frame.
Of course, amidst the myriad of options, one may wonder: which is the linux best screenshot tool? The answer lies in your hands, dear explorer. Experiment, discover, and find the perfect tool or program that resonates with your creative vision. Whether it's a sleek interface, robust features, or seamless integration with your workflow, the linux best screenshot tool is the one that empowers you to capture your world with clarity and flair.
And for those who crave even more customization and control, delve into the realm of linux screenshot APIs. Unlock the full potential of your capturing endeavors, with access to a wealth of resources and possibilities waiting to be explored.
So, fellow adventurer in the Linux realm, heed the call of the Print key and embark on a journey of screenshot mastery. With every capture, you etch your mark upon the digital canvas, weaving a tapestry of experiences that transcend the ordinary. Welcome to a world where every moment is a screenshot-worthy gem, waiting to be captured and shared with the world.
If you ever find yourself searching for a specific screenshot or file in your Linux system, mastering the art of finding files in Linux is essential. You can explore effective methods for locating files quickly and easily in Linux by checking out our guide on how to find files in Linux.
2. Create screenshots in Linux with Deepin Scrot
Are you tired of navigating through complex commands just to capture what's on your Linux screen? Say goodbye to cumbersome processes and embrace the simplicity and efficiency of Deepin Scrot – your gateway to seamless screenshotting on Linux.
Deepin Scrot, a lightweight and intuitive screenshot tool, is here to revolutionize your Linux experience. Whether you're an avid Linux user or a newcomer to the platform, Deepin Scrot's user-friendly interface makes capturing your screen a breeze.
Imagine this scenario: You're working on your Linux machine, engrossed in a project, and suddenly you stumble upon a moment worth preserving. With Deepin Scrot, capturing that moment is as easy as a few clicks. Simply launch the application, and within seconds, you can capture the entirety of your screen with precision and clarity. Linux automatic screenshot functionality has never been smoother!
But that's not all – Deepin Scrot offers a plethora of features tailored to meet your screenshotting needs. Need to highlight a specific area of your screen? No problem. With Deepin Scrot's area shortcut, you can effortlessly select the desired portion of your screen and capture it with unparalleled accuracy. Whether you're showcasing a bug in your code or sharing a snippet of information with a colleague, Deepin Scrot empowers you to communicate with clarity.
And let's not forget about flexibility. Deepin Scrot is not just another run-of-the-mill screenshot arch. It's a powerhouse of versatility, allowing you to capture screenshots in various formats, including PNG and JPEG. Whether you're capturing images for documentation, presentations, or personal use, Deepin Scrot ensures that your screenshots are always delivered in the highest quality.
In a world inundated with options, Deepin Scrot rises above the rest as the Linux best screenshot program. Its seamless integration with the Linux ecosystem, coupled with its intuitive interface and robust feature set, makes it the go-to choice for users seeking efficiency and reliability.
So why settle for anything less? Experience the convenience of Deepin Scrot and elevate your screenshotting game on Linux today. With Deepin Scrot, capturing moments has never been more effortless. Try it out and discover the difference for yourself. Your Linux experience will never be the same again.
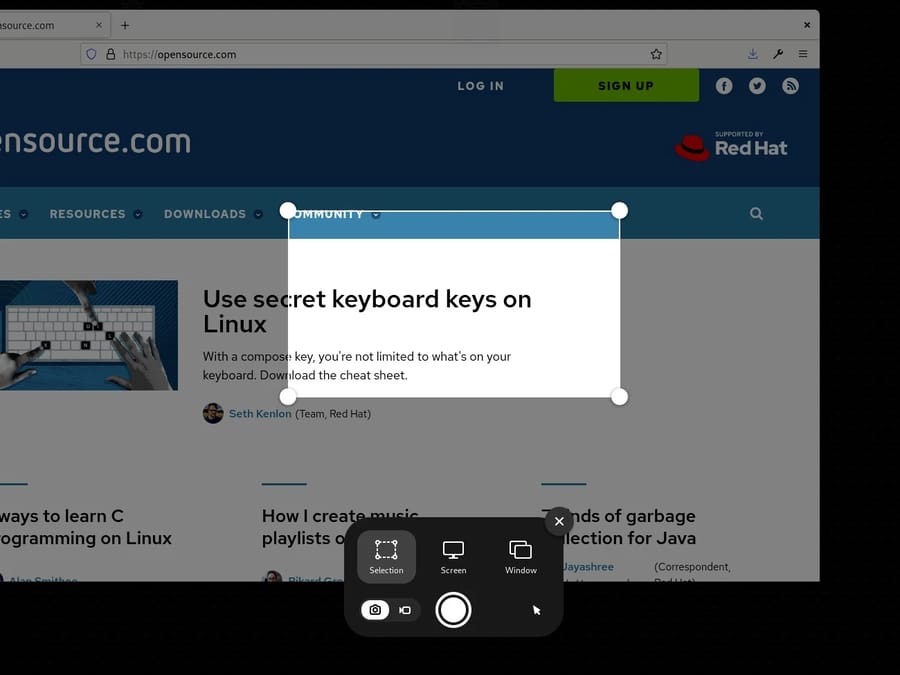
3. Create screenshots in Linux via the start menu
Are you ready to take your Linux screenshot game to the next level? Get ready to capture your screen with ease, right from your start menu! Say hello to the ultimate convenience with Linux screenshot functionality that's just a click away.
Picture this: You're navigating through your Linux desktop, immersed in your tasks, when suddenly, you stumble upon something worth sharing. Instead of fumbling through commands or searching for third-party tools, simply head to your start menu, where the power of Linux screenshot awaits you.

With just a few clicks, you can unleash the full potential of Linux screenshot capabilities. Need to capture your entire screen in all its glory? No problem! With the simplicity of the start menu, you can effortlessly snap a screenshot of your entire desktop, preserving every detail with precision.
But wait, there's more! Linux screenshot functionality isn't limited to just full-screen captures. Want to highlight a specific window or application? With the start menu at your fingertips, capturing individual windows has never been easier. Whether it's a browser tab showcasing your latest project or a dialogue box containing important information, Linux screenshot makes it a breeze to capture exactly what you need.
And let's not forget about versatility. Linux screenshot options are as diverse as they are powerful. Whether you prefer saving your screenshots in PNG, JPEG, or any other format, the start menu puts the choice in your hands. Customize your screenshot preferences to suit your needs and ensure that every capture is delivered in the perfect format.
But the benefits don't end there. Linux screenshot functionality via the start menu is not only convenient but also lightning-fast. Say goodbye to delays and hello to instant gratification as you capture and share your screen with seamless efficiency. Whether you're documenting a process, troubleshooting an issue, or simply sharing a moment with friends, Linux screenshot via the start menu ensures that you're always ready to capture the moment.
So why wait? Elevate your Linux experience today with the power of the start menu and unleash the full potential of Linux screenshot capabilities. With its simplicity, versatility, and lightning-fast performance, capturing your screen has never been more satisfying. Try it out and discover the magic of Linux screenshot for yourself – you won't be disappointed!
You can further enhance your Linux experience by exploring what Linux can be used for in various applications and environments. To learn more about the versatility of Linux and how it powers everything from servers to personal devices, check out our detailed guide on what Linux is used for.
linux screenshot app
1. Create screenshots in Linux with GNOME
GNOME, being one of the most popular desktop environments for Linux, offers built-in screenshot functionality that's both versatile and user-friendly. Let's explore the advantages and disadvantages of using GNOME for taking screenshots, along with a step-by-step guide on how to do it:
Advantages of Using GNOME for Screenshots:
-
Integration: GNOME's screenshot tool seamlessly integrates into the desktop environment, ensuring a smooth and cohesive user experience.
-
Ease of Use: GNOME's screenshot tool is intuitive and easy to access, making it suitable for users of all levels of experience.
-
Versatility: It offers various screenshot modes, including capturing the entire screen, specific windows, or custom areas, catering to diverse user needs.
-
Customization: Users can customize screenshot preferences, such as file format (PNG, JPEG, etc.), naming conventions, and delay timers, enhancing flexibility.
-
Accessibility: GNOME's screenshot tool is readily available without the need for additional installations, simplifying the process for users.
-
Integration with GNOME Shell: GNOME's screenshot tool seamlessly integrates with GNOME Shell, providing quick access to essential features directly from the desktop.
Disadvantages of Using GNOME for Screenshots:
-
Limited Advanced Features: While GNOME's built-in screenshot tool covers basic screenshotting needs effectively, it may lack some advanced features found in third-party screenshot applications.
-
Minimal Editing Options: GNOME's screenshot tool primarily focuses on capturing screenshots and lacks robust editing features that some users may require.
-
Dependence on GNOME Environment: As GNOME's screenshot tool is integrated into the GNOME desktop environment, users outside of GNOME may need to explore alternative screenshot solutions.
-
Potential Compatibility Issues: Users may encounter compatibility issues with certain desktop environments or Linux distributions that do not use GNOME.
-
Less Control Over Output: While GNOME's screenshot tool allows for customization, users may find themselves wanting more control over the output format and quality.
-
No Cloud Integration: Unlike some third-party screenshot tools, GNOME's built-in tool may not offer direct integration with cloud storage services for seamless sharing and backup.
Step-by-Step Guide to Taking Screenshots with GNOME
-
Access GNOME Screenshot Tool: Press the Print Screen key on your keyboard to launch the GNOME Screenshot tool.
-
Select Screenshot Mode: Choose the desired screenshot mode from the options provided:
-
Grab the whole screen: Capture the entire screen.
-
Grab the current window: Capture the active window.
-
Select area to grab: Capture a custom area by clicking and dragging the mouse cursor.
-
Adjust Preferences (Optional): Customize screenshot preferences by clicking on the gear icon:
-
Choose the file format (PNG, JPEG, etc.).
-
Set a delay timer if needed.
-
Configure other settings such as keyboard shortcuts.
-
Capture the Screenshot: Click on the "Take Screenshot" button or use the keyboard shortcut (Ctrl + Print Screen) to capture the screenshot.
-
Save or Discard the Screenshot: Choose whether to save or discard the screenshot.
-
Review and Access Screenshot: If saved, locate the screenshot in the specified directory or view it in the preview window.
With GNOME's built-in screenshot tool, capturing moments on your Linux system is a breeze, offering convenience, versatility, and integration within the GNOME desktop environment.
If you're looking to optimize your Linux system further, you might find it useful to extend partition sizes. Learn how to do this effectively in our guide on how to extend partition size in Linux.
2. Create screenshots in Linux with GIMP
Using GIMP (GNU Image Manipulation Program) for creating screenshots in Linux offers a wide range of advantages and disadvantages. Let's explore them, followed by a step-by-step guide on how to create screenshots using GIMP:
Advantages of Using GIMP for Screenshots
-
Powerful Editing Tools: GIMP provides extensive editing capabilities, allowing users to enhance, annotate, and manipulate screenshots with precision.
-
Flexibility: GIMP supports various file formats, enabling users to save screenshots in formats such as PNG, JPEG, GIF, and more.
-
Layer Support: Users can work with multiple layers in GIMP, facilitating complex editing tasks and enabling non-destructive editing of screenshots.
-
Advanced Features: GIMP offers advanced features like selection tools, filters, and brushes, empowering users to create professional-looking screenshots.
-
Customization: Users have full control over every aspect of the screenshot, including image size, resolution, and color depth.
-
Integration with Other Applications: GIMP seamlessly integrates with other Linux applications, allowing users to import screenshots for further editing or export them to other programs.
Disadvantages of Using GIMP for Screenshots
-
Learning Curve: GIMP has a steep learning curve, especially for beginners, due to its extensive feature set and complex interface.
-
Resource Intensive: GIMP can be resource-intensive, particularly for large or complex screenshots, potentially slowing down older or less powerful hardware.
-
Time-Consuming: Editing screenshots in GIMP requires time and effort, especially for users unfamiliar with image editing concepts and techniques.
-
Overwhelming for Basic Tasks: GIMP's extensive feature set may be overwhelming for users who only need basic screenshot capabilities, leading to unnecessary complexity.
-
Not Ideal for Quick Edits: For users seeking a quick and simple way to capture and share screenshots, GIMP may be overkill and inefficient.
-
Dependency on External Software: GIMP relies on external screenshot tools or manual methods to capture screenshots, adding an extra step to the process.
Step-by-Step Guide to Creating Screenshots with GIMP

-
Capture the Screenshot: Use a Linux screenshot tool (e.g., gnome-screenshot, scrot, or spectacle) to capture the desired screenshot. For example, you can use the gnome-screenshot command in the terminal to capture the entire screen:
gnome-screenshot
-
Open GIMP: Launch GIMP from the applications menu or by typing gimp in the terminal.
-
Import the Screenshot: Go to File > Open and navigate to the location where the screenshot is saved. Select the screenshot file and click Open.
-
Edit the Screenshot (Optional): Use GIMP's editing tools to enhance or annotate the screenshot. This may include cropping, resizing, adding text, drawing shapes, applying filters, etc.
-
Save the Edited Screenshot: Once you're satisfied with the edits, go to File > Export As to save the screenshot. Choose the desired file format (e.g., PNG or JPEG), specify the filename and location, and click Export.
-
Review and Access the Screenshot: Navigate to the location where you saved the edited screenshot to view and access it.
By following these steps, you can leverage GIMP's powerful editing capabilities to create and customize screenshots according to your preferences and requirements. While GIMP may have a learning curve, its feature-rich nature makes it a versatile tool for advanced screenshot editing on Linux.
3. Create screenshots in Linux with Firefox
Using Firefox for capturing screenshots in Linux offers its own set of advantages and disadvantages. Let's delve into them, followed by a step-by-step guide on how to capture screenshots using Firefox:
Advantages of Using Firefox for Screenshots
-
Cross-Platform Compatibility: Firefox is available on multiple platforms, making it convenient for users who switch between operating systems.
-
No Additional Software Required: Since Firefox has built-in screenshot functionality, users don't need to install any additional software to capture screenshots.
-
Integration with Browser: Firefox's screenshot tool seamlessly integrates with the browser interface, making it easily accessible during web browsing sessions.
-
Multiple Capture Options: Firefox offers various capture options, including capturing the visible portion of a webpage, the entire webpage, or a specific selected area.
-
Annotate and Edit: Firefox allows users to annotate and edit captured screenshots directly within the browser, eliminating the need for third-party editing tools.
-
Convenient Sharing Options: Users can quickly share captured screenshots via email, social media, or by copying the screenshot link, streamlining the sharing process.
Disadvantages of Using Firefox for Screenshots
-
Limited Editing Features: While Firefox allows basic annotation and editing of screenshots, it lacks the advanced editing capabilities of dedicated image editing software like GIMP.
-
Dependence on Browser: Users who prefer using a different web browser may find it inconvenient to switch to Firefox solely for screenshotting purposes.
-
Internet Connection Required: Firefox's screenshot tool relies on an internet connection to capture web pages, which may not be ideal for users in offline environments.
-
Privacy Concerns: Since Firefox's screenshot tool operates within the browser, users may have privacy concerns about capturing sensitive information or data.
-
Browser Performance Impact: Capturing screenshots within Firefox may impact browser performance, particularly on systems with limited resources or older hardware.
-
Limited Compatibility with Local Applications: Firefox's screenshot tool may not be suitable for capturing screenshots of local applications or desktop elements outside of the browser environment.
Step-by-Step Guide to Creating Screenshots with Firefox
-
Launch Firefox: Open Firefox web browser on your Linux system.
-
Navigate to the Desired Web Page: Go to the web page or content you want to capture as a screenshot.
-
Access the Screenshot Tool: Right-click anywhere on the webpage to open the context menu. Select "Take a Screenshot" from the menu options.
-
Choose Capture Option:
-
Save Full Page: Capture the entire webpage by clicking on the "Save full page" button. This captures the entire length of the webpage, including content not visible on the screen.
-
Save Visible: Capture only the visible portion of the webpage by clicking on the "Save visible" button. This captures the content currently displayed on the screen.
-
Select Area: Click and drag to select a specific area of the webpage you want to capture. Release the mouse button to capture the selected area.
-
Annotate and Edit (Optional): After capturing the screenshot, Firefox provides basic annotation tools such as drawing, highlighting, and adding text. Use these tools to annotate or edit the screenshot as needed.
-
Save or Share: Once you're satisfied with the screenshot, click on the "Download" button to save the screenshot to your local storage. Alternatively, use the "Copy" or "Share" options to share the screenshot via email, social media, or other platforms.
By following these steps, you can efficiently capture and manage screenshots using Firefox's built-in screenshot tool, leveraging its convenience and integration with the browser for seamless web-based screenshotting on Linux.
4. Create screenshots in Linux with ImageMagick
Using ImageMagick for creating screenshots in Linux offers a unique set of advantages and disadvantages. Let's explore them, followed by a step-by-step guide on how to create screenshots using ImageMagick:
Advantages of Using ImageMagick for Screenshots
-
Powerful Command-Line Tool: ImageMagick is a robust command-line tool for image manipulation, providing advanced capabilities for capturing and processing screenshots.
-
Extensive Format Support: ImageMagick supports a wide range of image formats, allowing users to save screenshots in various formats such as PNG, JPEG, GIF, and more.
-
Automation and Scripting: ImageMagick's command-line interface enables users to automate the screenshot capture process and integrate it into scripts or workflows.
-
Customization: Users have full control over screenshot parameters such as image size, resolution, quality, and compression settings.
-
No Graphical Environment Required: ImageMagick can capture screenshots in headless environments without the need for a graphical desktop, making it suitable for server environments or remote systems.
-
Open Source and Free: ImageMagick is open-source software distributed under the Apache License, making it freely available for anyone to use and modify.
Disadvantages of Using ImageMagick for Screenshots
-
Command-Line Interface Complexity: ImageMagick's command-line interface may be daunting for users unfamiliar with command-line tools, leading to a steep learning curve.
-
Lack of Graphical Interface: ImageMagick operates entirely through the command line, which may not be suitable for users who prefer a graphical user interface for screenshot capture.
-
Limited Built-In Editing Features: While ImageMagick offers powerful image manipulation capabilities, its built-in editing features for screenshots are relatively basic compared to dedicated image editing software.
-
Manual Selection Required: ImageMagick requires users to specify the exact coordinates or dimensions of the screenshot area, which may be cumbersome for capturing specific regions of the screen.
-
No Real-Time Preview: Unlike some graphical screenshot tools, ImageMagick does not provide real-time preview or feedback during the screenshot capture process, potentially leading to trial and error.
-
Potential Complexity for Basic Tasks: ImageMagick's versatility comes with a level of complexity that may be unnecessary for users who only need basic screenshot capture functionality.
Step-by-Step Guide to Creating Screenshots with ImageMagick:
-
Open Terminal: Launch the terminal on your Linux system.
-
Install ImageMagick: If ImageMagick is not already installed, install it using your distribution's package manager. For example, on Ubuntu, you can install it with the following command:
sudo apt-get install imagemagick
-
Capture Full Screen: To capture the entire screen, use the import command followed by the desired filename and file format. For example:
import screenshot.png
-
Capture Specific Window: To capture a specific window, use the import command with the -window option followed by the window ID and filename. You can use tools like xwininfo to get the window ID. For example:
import -window <window_id> window_screenshot.png
-
Capture Specific Area: To capture a specific area of the screen, use the import command with the -crop option followed by the dimensions of the area and the filename. For example:
import -crop 800x600+100+100 area_screenshot.png
-
Review and Access Screenshots: Once the screenshots are captured, you can find them in the current directory or the location specified in the command.
By following these steps, you can harness the power and flexibility of ImageMagick for capturing screenshots in Linux, leveraging its command-line interface to tailor the screenshot capture process to your specific needs.
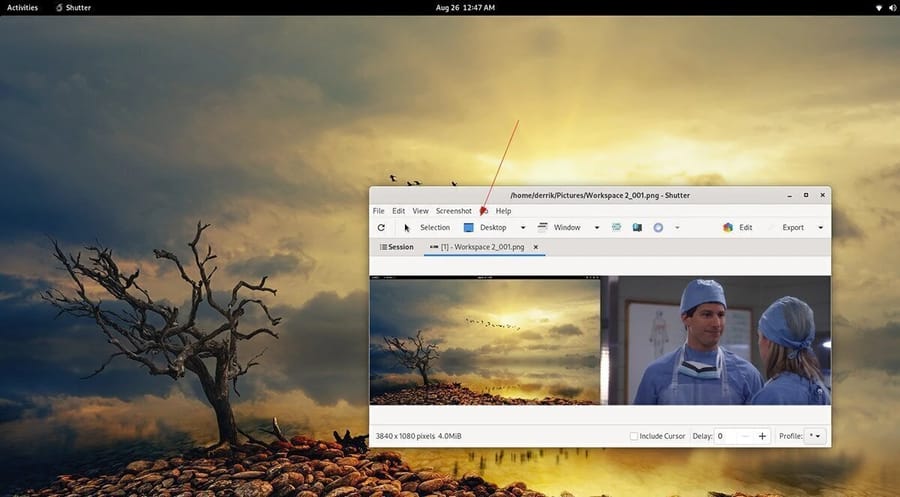
5. Create screenshots in Linux with Shutter
Using Shutter for creating screenshots in Linux offers several advantages and disadvantages. Let's explore them, followed by a step-by-step guide on how to create screenshots using Shutter:
Advantages of Using Shutter for Screenshots
-
Feature-Rich Interface: Shutter provides a comprehensive interface with a wide range of features for capturing, editing, and annotating screenshots.
-
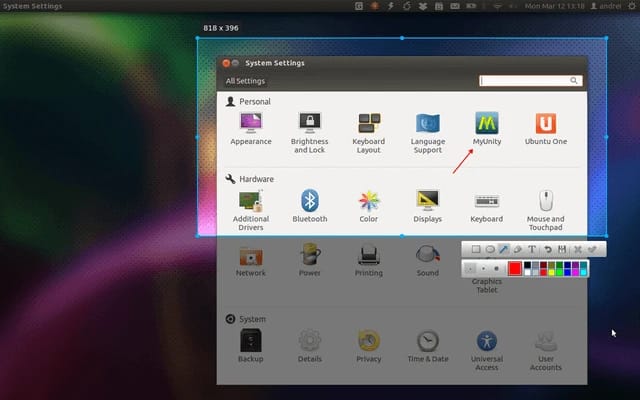
Versatile Capture Options: Shutter offers various capture modes, including capturing the entire screen, specific windows, selected areas, and even web pages.
-
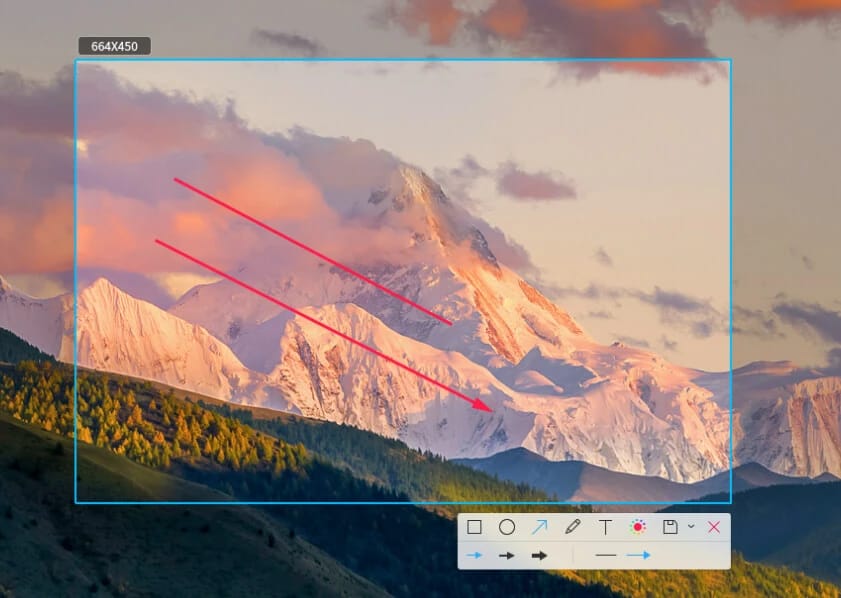
Annotation and Editing Tools: Shutter includes built-in tools for annotating and editing screenshots, such as adding text, arrows, shapes, highlights, blurring sensitive information, and more.
-
Integration with External Tools: Shutter seamlessly integrates with external tools such as image editors and cloud storage services, providing flexibility in editing and sharing screenshots.
-
Export Options: Shutter allows users to export screenshots in various formats (e.g., PNG, JPEG, GIF) and offers options for saving, printing, or sharing screenshots directly from the application.
-
Keyboard Shortcuts and Customization: Shutter supports customizable keyboard shortcuts for quick and efficient screenshot capture, enhancing productivity for frequent users.
Disadvantages of Using Shutter for Screenshots
-
Resource Intensive: Shutter can be resource-intensive, particularly when capturing large or complex screenshots, potentially impacting system performance on lower-end hardware.
-
Dependencies and Compatibility: Shutter may have dependencies on specific libraries or components, which could lead to compatibility issues or conflicts with other software on the system.
-
Lack of Active Development: As of my last update, Shutter's development has slowed down, and the software may not receive regular updates or maintenance, potentially leading to compatibility issues with newer Linux distributions.
-
Complexity for Basic Tasks: Shutter's extensive feature set may be overwhelming for users who only need basic screenshot functionality, leading to unnecessary complexity.
-
Graphical Interface Dependency: Shutter relies on a graphical user interface, which may not be suitable for users who prefer command-line tools or headless environments.
-
Limited Webpage Capture: While Shutter can capture web pages, its webpage capture feature may not always work perfectly with complex or dynamically generated web content.
Step-by-Step Guide to Creating Screenshots with Shutter
-
Launch Shutter: Open Shutter from the applications menu or by typing shutter in the terminal.
-
Select Capture Mode: Choose the desired capture mode from the toolbar options:
-
Capture Desktop: Capture the entire screen.
-
Capture Active Window: Capture the currently active window.
-
Capture Selection: Capture a specific area by clicking and dragging the mouse cursor.
-
Capture Web: Capture a webpage by entering the URL.
-
Capture the Screenshot: Once you've selected the desired capture mode, Shutter will prompt you to capture the screenshot. Follow the on-screen instructions to capture the screenshot.
-
Annotate and Edit (Optional): After capturing the screenshot, use the annotation and editing tools in Shutter to add text, arrows, highlights, or other annotations as needed.
-
Save or Export the Screenshot: Click on the "Save" or "Export" button to save the screenshot to your desired location. Choose the desired file format and specify any additional options.
-
Review and Access Screenshots: Once saved, you can access your screenshots from the specified location or within Shutter's interface for further editing or sharing.
By following these steps, you can leverage Shutter's feature-rich interface to capture, annotate, and customize screenshots according to your needs, making it a versatile tool for screenshotting in Linux.
If you're looking to manage multiple terminal sessions efficiently while working with Linux, you might also find it helpful to explore the Linux screen command. This powerful tool allows you to run multiple shell sessions within a single terminal window, enabling better multitasking and session management.
6. Create screenshots in Linux with Spectacle
Using Spectacle for creating screenshots in Linux offers several advantages and disadvantages. Let's explore them, followed by a step-by-step guide on how to create screenshots using Spectacle:
Advantages of Using Spectacle for Screenshots
-
Simplicity: Spectacle offers a straightforward and easy-to-use interface, making it accessible for users of all experience levels.
-
Integration with KDE Plasma: Spectacle is tightly integrated with KDE Plasma desktop environment, ensuring seamless performance and compatibility.
-
Multiple Capture Modes: Spectacle provides various capture modes, including full-screen, window, and region, catering to diverse screenshotting needs.
-
Keyboard Shortcuts: Spectacle supports customizable keyboard shortcuts, allowing users to capture screenshots quickly and efficiently.
-
Preview and Edit: Spectacle offers a preview window after capturing a screenshot, enabling users to review and make adjustments before saving.
-
Flexible Saving Options: Spectacle allows users to save screenshots in various formats (e.g., PNG, JPEG) and offers options for naming and organizing screenshots.
Disadvantages of Using Spectacle for Screenshots
-
Limited Platform Support: Spectacle is primarily designed for KDE Plasma desktop environment and may not be readily available or optimized for other Linux desktop environments.
-
Dependency on KDE Plasma: Spectacle relies on KDE Plasma libraries and components, which may lead to compatibility issues or performance limitations on non-KDE systems.
-
Lack of Advanced Editing Features: While Spectacle provides basic editing options like cropping and drawing, it lacks advanced editing features found in dedicated image editing software.
-
Minimal Integration with External Tools: Spectacle may have limited integration with external image editing or sharing tools, requiring additional steps for advanced editing or sharing.
-
Potential Resource Usage: Spectacle may consume system resources, particularly when capturing large or high-resolution screenshots, impacting system performance on lower-end hardware.
-
Limited Customization Options: While Spectacle offers some customization options like keyboard shortcuts, users may find it lacking in terms of advanced settings or preferences.
Step-by-Step Guide to Creating Screenshots with Spectacle
-
Launch Spectacle: Open the application menu and search for "Spectacle" or launch it from the terminal by typing spectacle.
-
Select Capture Mode: In Spectacle's interface, choose the desired capture mode from the options provided:
-
Full Screen: Capture the entire screen.
-
Current Screen: Capture the current screen (useful for multi-monitor setups).
-
Active Window: Capture the currently active window.
-
Rectangular Region: Capture a specific region of the screen by clicking and dragging the mouse cursor.
-
Capture the Screenshot: Once you've selected the capture mode, Spectacle will capture the screenshot according to your selection.
-
Review and Edit (Optional): After capturing the screenshot, Spectacle will display a preview window where you can review the screenshot and make adjustments if necessary.
-
Save the Screenshot: Click on the "Save" button to save the screenshot to your desired location. Choose the desired file format and enter a filename if prompted.
-
Access Screenshots: Once saved, you can access your screenshots from the specified location or within Spectacle's interface for further editing or sharing.
By following these steps, you can leverage Spectacle's simplicity and versatility to capture screenshots efficiently in Linux, making it a convenient tool for everyday screenshotting tasks within the KDE Plasma desktop environment.
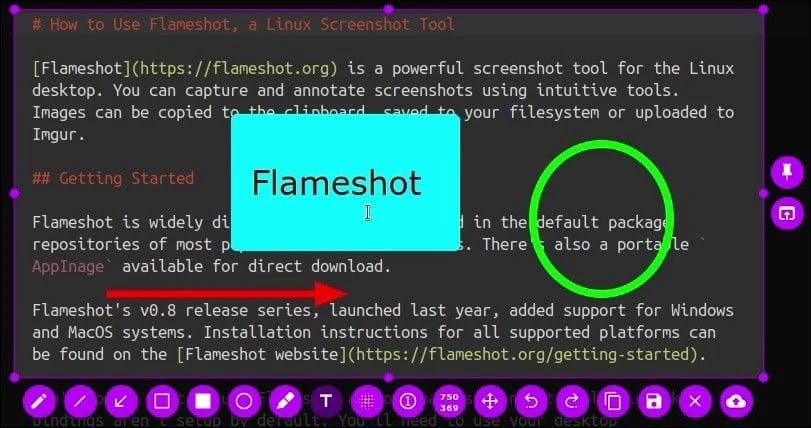
7. Create screenshots in Linux with Flameshot
Flameshot is a versatile screenshot tool for Linux that offers several advantages and disadvantages:
Advantages of Using Flameshot
-
Ease of Use: Flameshot provides a simple and intuitive interface, making it easy for users of all levels to capture and annotate screenshots.
-
Feature-Rich: Flameshot offers a wide range of features, including the ability to capture specific areas, annotate screenshots with arrows, text, and shapes, and blur sensitive information.
-
Customization Options: Flameshot allows users to customize various aspects of the screenshot capture and annotation process, such as keyboard shortcuts, output format, and annotation colors.
-
Fast and Lightweight: Flameshot is lightweight and fast, ensuring quick and efficient screenshot capture without slowing down the system.
-
Integration with Clipboard: Flameshot seamlessly integrates with the clipboard, allowing users to copy screenshots directly to the clipboard for easy sharing and pasting into other applications.
-
Active Development: Flameshot is actively maintained and updated, ensuring compatibility with the latest Linux distributions and desktop environments.
Disadvantages of Using Flameshot
-
Limited Platform Support: Flameshot may not be officially supported on all Linux distributions or desktop environments, potentially leading to compatibility issues on certain systems.
-
Dependency on GUI: Flameshot relies on a graphical user interface (GUI), which may not be suitable for users who prefer command-line tools or headless environments.
-
Lack of Advanced Editing Features: While Flameshot offers basic annotation features, it may lack some advanced editing capabilities found in dedicated image editing software.
-
Installation Requirements: Users may need to install Flameshot manually, as it may not be pre-installed or available in the default repositories of all Linux distributions.
-
Resource Usage: While Flameshot is lightweight, it still consumes system resources when running, which may be a concern for users with limited hardware resources.
-
Potential Stability Issues: As with any software, Flameshot may encounter occasional bugs or stability issues, although these are typically addressed in subsequent updates.
Step-by-Step Guide to Creating Screenshots with Flameshot
-
Install Flameshot: If Flameshot is not already installed on your Linux system, you can install it using your distribution's package manager. For example, on Ubuntu, you can install Flameshot with the following command:
sudo apt install flameshot
-
Launch Flameshot: Open Flameshot from the applications menu or by typing flameshot in the terminal.
-
Capture Full Screen: To capture the entire screen, click on the Flameshot icon in the system tray or panel, then select the "Full Screen" option.
-
Capture Specific Area: To capture a specific area of the screen, click on the Flameshot icon, then select the "Select Area" option. Click and drag to select the desired area, then release the mouse button to capture.
-
Annotate the Screenshot: After capturing the screenshot, Flameshot will open a new window with various annotation tools. Use the tools to add arrows, text, shapes, or blur effects to the screenshot as needed.
-
Save or Copy the Screenshot: Once you've finished annotating the screenshot, you can save it to your desired location by clicking the "Save" button. Alternatively, you can copy the screenshot to the clipboard for easy sharing by clicking the "Copy" button.
-
Repeat as Needed: You can repeat the above steps to capture and annotate additional screenshots as needed.
By following these steps, you can leverage Flameshot's user-friendly interface and feature-rich capabilities to capture and annotate screenshots with ease on your Linux system.
To further enhance your Linux skills, it's also essential to understand file management. If you ever need to delete a file in Linux, you can follow simple commands to safely remove files from your system. Check out our detailed guide on how to delete a file in Linux for step-by-step instructions.
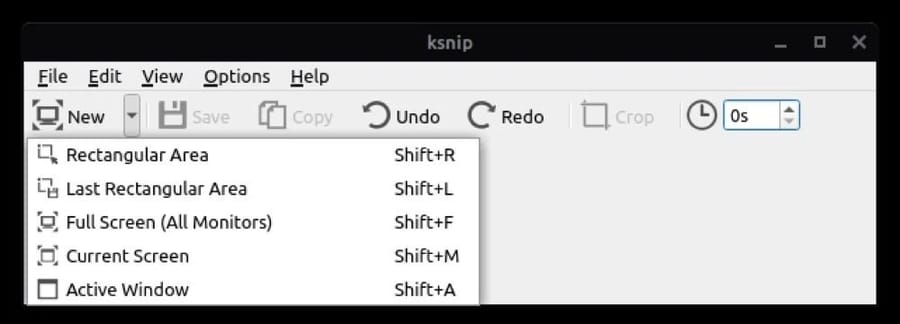
8. Create screenshots in Linux with Ksnip
Ksnip is a feature-rich and user-friendly screenshot tool for Linux that offers several advantages and disadvantages:
Advantages of Using Ksnip
-
Intuitive Interface: Ksnip provides a simple and intuitive user interface, making it easy for users of all levels to capture and annotate screenshots.
-
Versatile Capture Options: Ksnip offers various capture modes, including full-screen, window, region, and freehand, catering to diverse screenshotting needs.
-
Annotation Tools: Ksnip includes a wide range of annotation tools, such as arrows, text, shapes, blur, highlighter, and pen, allowing users to customize and enhance their screenshots.
-
Customization: Ksnip allows users to customize various aspects of the screenshot capture process, including keyboard shortcuts, output format, naming conventions, and annotation settings.
-
Integration with Clipboard: Ksnip seamlessly integrates with the clipboard, enabling users to copy screenshots directly to the clipboard for easy sharing and pasting into other applications.
-
Active Development: Ksnip is actively maintained and updated, with new features and improvements regularly added, ensuring compatibility with the latest Linux distributions and desktop environments.
Disadvantages of Using Ksnip
-
Limited Platform Support: While Ksnip is available on multiple platforms, including Linux, Windows, and macOS, it may not be officially supported or optimized for all Linux distributions or desktop environments.
-
Dependency on GUI: Ksnip relies on a graphical user interface (GUI), which may not be suitable for users who prefer command-line tools or headless environments.
-
Installation Requirements: Users may need to install Ksnip manually, as it may not be pre-installed or available in the default repositories of all Linux distributions.
-
Resource Usage: While Ksnip is lightweight, it still consumes system resources when running, which may be a concern for users with limited hardware resources.
-
Potential Stability Issues: As with any software, Ksnip may encounter occasional bugs or stability issues, although these are typically addressed in subsequent updates.
-
Dependency on Qt: Ksnip relies on the Qt framework, which may introduce additional dependencies and compatibility considerations for some users.
Step-by-Step Guide to Creating Screenshots with Ksnip
-
Install Ksnip: If Ksnip is not already installed on your Linux system, you can download and install it from the official website or repository for your distribution.
-
Launch Ksnip: Open Ksnip from the applications menu or by typing ksnip in the terminal.
-
Capture Full Screen: To capture the entire screen, click on the "Capture Full Screen" button in the Ksnip toolbar, or use the corresponding keyboard shortcut if configured.
-
Capture Specific Area: To capture a specific area of the screen, click on the "Capture Area" button in the Ksnip toolbar, then click and drag to select the desired area. Release the mouse button to capture.
-
Capture Window: To capture a specific window, click on the "Capture Window" button in the Ksnip toolbar, then click on the desired window to capture it.
-
Annotate the Screenshot: After capturing the screenshot, Ksnip will open a new window with various annotation tools. Use the tools to add arrows, text, shapes, blur effects, or other annotations to the screenshot as needed.
-
Save or Copy the Screenshot: Once you've finished annotating the screenshot, you can save it to your desired location by clicking the "Save" button. Alternatively, you can copy the screenshot to the clipboard for easy sharing by clicking the "Copy" button.
-
Repeat as Needed: You can repeat the above steps to capture and annotate additional screenshots as needed.
By following these steps, you can leverage Ksnip's user-friendly interface and extensive feature set to capture and annotate screenshots with ease on your Linux system.
9. Create screenshots in Linux with ScreenStudio
ScreenStudio is a powerful yet straightforward screen recording and screenshot tool for Linux. Let's explore its advantages and disadvantages, followed by a step-by-step guide on how to use ScreenStudio to create screenshots:
Advantages of Using ScreenStudio:
-
User-Friendly Interface: ScreenStudio offers an intuitive and easy-to-use interface, making it accessible for users of all levels.
-
Versatile Capture Options: ScreenStudio provides various capture modes, including full-screen, window, region, and webcam, catering to diverse screenshotting needs.
-
Annotation Tools: ScreenStudio includes basic annotation tools, such as text and shapes, allowing users to add simple annotations to their screenshots.
-
Live Preview: ScreenStudio offers a live preview of the screenshot before capture, enabling users to adjust the capture area and settings as needed.
-
Customization: ScreenStudio allows users to customize various aspects of the screenshot capture process, such as output format, quality, and filename.
-
Integration with Clipboard: ScreenStudio seamlessly integrates with the clipboard, enabling users to copy screenshots directly to the clipboard for easy sharing and pasting into other applications.
Disadvantages of Using ScreenStudio:
-
Limited Annotation Features: ScreenStudio's annotation tools are relatively basic compared to dedicated screenshot annotation software, lacking advanced features like arrows, highlights, and blur effects.
-
Dependency on GUI: ScreenStudio relies on a graphical user interface (GUI), which may not be suitable for users who prefer command-line tools or headless environments.
-
Installation Requirements: Users may need to install ScreenStudio manually, as it may not be pre-installed or available in the default repositories of all Linux distributions.
-
Resource Usage: While ScreenStudio is lightweight, it still consumes system resources when running, which may be a concern for users with limited hardware resources.
-
Limited Platform Support: ScreenStudio may not be officially supported or optimized for all Linux distributions or desktop environments, potentially leading to compatibility issues on certain systems.
-
Potential Stability Issues: As with any software, ScreenStudio may encounter occasional bugs or stability issues, although these are typically addressed in subsequent updates.
Step-by-Step Guide to Creating Screenshots with ScreenStudio:
-
Install ScreenStudio: If ScreenStudio is not already installed on your Linux system, you can download and install it from the official website or repository for your distribution.
-
Launch ScreenStudio: Open ScreenStudio from the applications menu or by typing screenstudio in the terminal.
-
Select Capture Mode: In the ScreenStudio interface, choose the desired capture mode from the options provided:
-
Full Screen: Capture the entire screen.
-
Window: Capture a specific window.
-
Region: Capture a specific region of the screen.
-
Webcam: Capture from a webcam (optional).
-
Annotate the Screenshot (Optional): After capturing the screenshot, use external image editing software or online tools to add annotations if needed.
-
Save or Copy the Screenshot: Once you've finished capturing and annotating the screenshot, you can save it to your desired location by clicking the "Save" button. Alternatively, you can copy the screenshot to the clipboard for easy sharing.
-
Repeat as Needed: You can repeat the above steps to capture additional screenshots as needed.
By following these steps, you can leverage ScreenStudio's user-friendly interface and capture options to create screenshots with ease on your Linux system.
10. Create screenshots in Linux with ScreenRec
ScreenRec is primarily known as a screen recording tool rather than a dedicated screenshot tool. However, it does offer basic screenshot functionality. Let's explore the advantages and disadvantages of using ScreenRec for creating screenshots, followed by a step-by-step guide on how to use ScreenRec to capture screenshots:
Advantages of Using ScreenRec for Screenshots
-
Easy to Use: ScreenRec provides a simple and straightforward interface for capturing screenshots, making it accessible for users of all levels.
-
Quick Capture: ScreenRec allows for quick capture of screenshots with just a few clicks, ideal for users who need to capture screenshots on-the-go.
-
Integration with Screen Recording: ScreenRec seamlessly integrates screenshot capture with its screen recording capabilities, offering a unified solution for capturing both screenshots and videos.
-
Cloud Storage Integration: ScreenRec offers options to save screenshots directly to cloud storage services, facilitating easy access and sharing of captured screenshots.
-
Cross-Platform Compatibility: ScreenRec is available on multiple platforms, including Linux, Windows, and macOS, ensuring compatibility and consistency across different operating systems.
-
Free Version Available: ScreenRec offers a free version with basic features, making it accessible to users with limited budgets.
Disadvantages of Using ScreenRec for Screenshots
-
Limited Annotation Features: ScreenRec's screenshot functionality may lack advanced annotation features compared to dedicated screenshot tools, limiting customization options.
-
Focused on Screen Recording: ScreenRec is primarily designed for screen recording rather than screenshot capture, so its screenshot capabilities may be somewhat basic or secondary.
-
Dependency on Cloud Storage: While cloud storage integration can be convenient, it may also introduce privacy and security concerns for users who prefer to store screenshots locally.
-
Resource Usage: ScreenRec may consume system resources, particularly when running in the background, which could impact system performance on lower-end hardware.
-
Limited Platform Support: ScreenRec may not be officially supported or optimized for all Linux distributions or desktop environments, potentially leading to compatibility issues on certain systems.
-
Lack of Advanced Editing Features: ScreenRec's screenshot editing capabilities may be limited compared to dedicated image editing software, making it less suitable for users who require extensive editing options.
Step-by-Step Guide to Creating Screenshots with ScreenRec
-
Install ScreenRec: If ScreenRec is not already installed on your Linux system, you can download and install it from the official website or repository for your distribution.
-
Launch ScreenRec: Open ScreenRec from the applications menu or by typing the appropriate command in the terminal.
-
Capture Screenshot: In the ScreenRec interface, look for the option to capture a screenshot. This may be a dedicated button or a menu option within the application.
-
Annotate the Screenshot (Optional): After capturing the screenshot, use external image editing software or online tools to add annotations if needed.
-
Save or Share the Screenshot: Once you've finished capturing and annotating the screenshot, you can save it to your desired location or share it using the options provided by ScreenRec.
-
Repeat as Needed: You can repeat the above steps to capture additional screenshots as needed.
By following these steps, you can utilize ScreenRec's basic screenshot functionality to capture screenshots on your Linux system. However, for more advanced screenshot editing and customization options, you may want to consider using dedicated screenshot tools.
11. Create screenshots in Linux with Kazam
Kazam is primarily a screen recording tool for Linux, but it also offers basic screenshot functionality. Let's explore the advantages and disadvantages of using Kazam for creating screenshots, followed by a step-by-step guide on how to use Kazam to capture screenshots:
Advantages of Using Kazam for Screenshots
-
User-Friendly Interface: Kazam provides a simple and intuitive interface for capturing screenshots, making it accessible for users of all levels.
-
Quick Capture: Kazam allows for quick capture of screenshots with just a few clicks, ideal for users who need to capture screenshots on-the-go.
-
Integration with Screen Recording: Kazam seamlessly integrates screenshot capture with its screen recording capabilities, offering a unified solution for capturing both screenshots and videos.
-
Customizable Capture Options:Kazam offers various capture options, including full-screen, window, and region, allowing users to capture screenshots according to their specific needs.
-
Basic Annotation Tools: Kazam includes basic annotation tools such as text and arrows, enabling users to add simple annotations to their screenshots.
-
Cross-Platform Compatibility: Kazam is available on multiple platforms, including Linux distributions, ensuring compatibility and consistency across different operating systems.
Disadvantages of Using Kazam for Screenshots
-
Limited Annotation Features: Kazam's screenshot annotation capabilities may be somewhat basic compared to dedicated screenshot tools, limiting customization options.
-
Focused on Screen Recording: Kazam is primarily designed for screen recording rather than screenshot capture, so its screenshot functionality may be secondary or less robust.
-
Dependency on Additional Packages: Some Linux distributions may require users to install additional packages or dependencies to use Kazam, which could complicate the installation process.
-
Resource Usage: Kazam may consume system resources, particularly when running in the background or capturing high-resolution screenshots, potentially impacting system performance on lower-end hardware.
-
Lack of Advanced Editing Features: Kazam's screenshot editing capabilities may be limited compared to dedicated image editing software, making it less suitable for users who require extensive editing options.
-
Potential Stability Issues: As with any software, Kazam may encounter occasional bugs or stability issues, although these are typically addressed in subsequent updates.
Step-by-Step Guide to Creating Screenshots with Kazam
-
Install Kazam: If Kazam is not already installed on your Linux system, you can download and install it from the official repositories or software center for your distribution.
-
Launch Kazam: Open Kazam from the applications menu or by typing the appropriate command in the terminal.
-
Configure Screenshot Settings: In the Kazam interface, navigate to the screenshot settings section and configure the desired capture options, such as full-screen, window, or region.
-
Capture Screenshot: Once the settings are configured, click the appropriate button to capture the screenshot. This may be a dedicated button or a menu option within the application.
-
Annotate the Screenshot (Optional): After capturing the screenshot, use external image editing software or online tools to add annotations if needed.
-
Save or Share the Screenshot: Once you've finished capturing and annotating the screenshot, you can save it to your desired location or share it using the options provided by Kazam.
-
Repeat as Needed: You can repeat the above steps to capture additional screenshots as needed.
By following these steps, you can utilize Kazam's basic screenshot functionality to capture screenshots on your Linux system. However, for more advanced screenshot editing and customization options, you may want to consider using dedicated screenshot tools.
For those interested in enhancing their Linux security knowledge, you can also explore tools like Searchsploit. Check out our guide on how to install Searchsploit on Kali Linux for an efficient way to search for vulnerabilities and exploits directly from your terminal.
How can screenshot tools enable better Linux use?
Screenshot tools serve as indispensable companions for maximizing the utility of Linux systems, fostering efficiency, clarity, and collaboration in various scenarios. Here's how these tools elevate the Linux experience:
Enhanced Communication
In the realm of Linux, clarity is paramount. Screenshot tools empower users to capture precise moments, whether it's showcasing intricate configurations or pinpointing perplexing errors. With just a click, Linux users can immortalize their desktop landscape, bringing clarity to conversations, troubleshooting sessions, or collaborative endeavors.
Streamlined Troubleshooting
When traversing the labyrinth of Linux troubleshooting, a well-timed screenshot can be a beacon of clarity. Whether it's capturing cryptic terminal outputs, inscrutable error messages, or complex configurations, a screenshot swiftly encapsulates the challenge at hand, enabling faster resolution and smoother navigation through technical terrain.
Efficient Documentation
Linux users thrive on knowledge sharing, and screenshot tools are their trusty scribes. Whether crafting comprehensive tutorials, documenting intricate processes, or compiling insightful guides, screenshots provide visual anchors, transforming abstract concepts into tangible, digestible insights that resonate deeply with learners and contributors alike.
Seamless Collaboration
Collaboration is the heartbeat of Linux communities. Screenshot tools infuse life into collaborative endeavors, effortlessly capturing fleeting moments, milestones, and breakthroughs. Whether it's sharing visual feedback, annotating design mockups, or highlighting code snippets, screenshots bridge the gap between ideas and execution, fostering camaraderie and synergy among Linux enthusiasts.
Visual Learning Aid
Linux is a realm of perpetual learning, and screenshots are its silent tutors. From deciphering intricate command-line incantations to unraveling the mysteries of system configurations, screenshots provide visual breadcrumbs, guiding Linux learners on their journey of discovery and enlightenment. With each screenshot, Linux users absorb knowledge like sponges, transforming complexity into clarity and uncertainty into understanding.
Personalized Reference Library
In the labyrinth of Linux commands, configurations, and customizations, screenshots become treasured artifacts—a personalized reference library at users' fingertips. Whether archiving terminal commands, preserving system configurations, or cataloging customizations, screenshots serve as visual memoirs, capturing Linux users' journeys, triumphs, and insights, one pixel at a time.
In the bustling ecosystem of Linux, where collaboration, troubleshooting, and knowledge sharing are the currency of the realm, screenshot tools emerge as indispensable allies, empowering users to navigate the digital landscape with clarity, confidence, and camaraderie. With each screenshot, Linux users illuminate the path forward, transforming complexity into clarity and opacity into understanding
For those looking to further enhance their Linux experience, especially when managing a VPS server, learning how to install Node.js on a Linux VPS can be a valuable skill. It enables users to run JavaScript applications and improve their server's capabilities, offering an essential tool for developers and system administrators alike. Check out our guide on how to install Node.js on a Linux VPS for a step-by-step walkthrough.
Linux screenshot command line
In the bustling ecosystem of Linux, where the command line is both a conduit and a canvas, the screenshot command emerges as a digital brushstroke, capturing the essence of the desktop realm in a single stroke. Let's delve into the command line magic that summons these pixelated marvels:
Initiating the Ritual
As the terminal window flickers to life, we invoke the screenshot command with a reverent keystroke, summoning forth the arcane incantations that bridge the realm of bits and bytes with the tangible world of pixels.
Navigating the Realm of Options
Within the command's cryptic syntax lies a labyrinth of options, each a portal to a different facet of the digital realm. From specifying capture regions to defining output formats, the screenshot command offers a cornucopia of choices to the intrepid wielder.
Seizing the Moment
With a deft command, we seize the ephemeral essence of the desktop realm, freezing it in time with the precision of a digital sorcerer. Whether capturing the entire screen or a specific window, the screenshot command grants us mastery over the visual tapestry of Linux.
Weaving Digital Tapestries
Armed with the screenshot command, we embark on a journey of creativity and expression, weaving digital tapestries that tell the story of our Linux adventure. From documenting system configurations to sharing moments of triumph, each screenshot is a pixelated testament to our journey.
Sharing the Bounty
With the screenshot command, we transcend the boundaries of space and time, sharing the bounty of our digital conquests with friends, colleagues, and fellow denizens of the Linux realm. Whether troubleshooting, collaborating, or simply marveling at the beauty of the Linux landscape, screenshots serve as our silent messengers.
Embracing the Command Line
In the symphony of Linux commands, the screenshot command is a timeless melody, resonating with the echoes of countless adventures and discoveries. As we navigate the command line, we unlock new dimensions of possibility, harnessing the power of technology to capture moments, share insights, and forge connections in the boundless expanse of the digital realm.
So, let us raise our digital wands and invoke the screenshot command with reverence and awe, for in its pixelated embrace, we find the essence of Linux captured in all its glory.
Preparing screenshot for uploading
Preparing screenshots for uploading is akin to preparing precious artifacts for display in a grand exhibition hall. Each Linux screenshot, a pixelated masterpiece, holds within it a story waiting to be shared with the world. Let's embark on a captivating journey into the realm of screenshot preparation:
Capturing the Essence
In the vast expanse of the Linux landscape, we wield our digital quill—the Linux screenshot command—capturing moments of inspiration, triumph, and discovery with the precision of a seasoned artisan. With each screenshot, we immortalize a fragment of our Linux journey, a pixelated testament to our exploration of the digital realm.
Curating the Collection
As we amass a treasure trove of screenshots, we become custodians of a visual tapestry woven from the fabric of our Linux adventures. From the serene vistas of desktop landscapes to the intricate configurations of terminal commands, each screenshot offers a glimpse into the rich tapestry of Linux.
Polishing the Gems
With our collection in hand, we embark on the meticulous task of polishing each screenshot to perfection. We adjust brightness and contrast, crop unnecessary elements, and enhance clarity, ensuring that each pixel shines with the brilliance of a diamond in the rough.
Crafting Context
A screenshot is more than just a visual artifact—it is a window into a moment frozen in time. As we prepare our screenshots for uploading, we craft contextual narratives that provide insight into the significance of each image. Whether troubleshooting a technical issue, showcasing a custom desktop setup, or documenting a step-by-step tutorial, we imbue our screenshots with meaning and purpose.
Organizing the Gallery
With our screenshots polished and narratives crafted, we organize our digital gallery with care and precision. We categorize our screenshots into folders, arrange them chronologically, and assign descriptive filenames, ensuring that each image is easily accessible and intuitively organized.
Sharing the Treasures
With our gallery prepared, we embark on the final leg of our journey—sharing our treasures with the world. Through online forums, social media platforms, and collaborative communities, we disseminate our screenshots far and wide, inviting others to join us on our Linux adventure.
Sparkling Conversations
As our screenshots make their way into the digital ether, they spark conversations, ignite curiosity, and foster connections among Linux enthusiasts. Each screenshot becomes a catalyst for discussion, a catalyst for exploration, and a catalyst for learning, propelling us ever forward on our quest for knowledge and discovery.
Inspiring Creativity
In the hands of fellow Linux enthusiasts, our screenshots become a source of inspiration and creativity. They inspire others to embark on their own Linux journey, to explore new horizons, and to push the boundaries of what is possible in the digital realm.
Celebrating Diversity
With each screenshot, we celebrate the diversity of the Linux community—the myriad desktop environments, the countless configurations, and the endless possibilities that Linux affords. Each screenshot is a testament to the creativity, ingenuity, and passion of Linux users around the world.
Embracing the Journey
As we reflect on our journey through the Linux landscape, we are reminded that the true beauty of Linux lies not in the pixels themselves, but in the stories they tell and the connections they forge. With each screenshot, we celebrate the spirit of exploration, collaboration, and discovery that defines the Linux community, transforming our digital adventures into a shared tapestry of knowledge, creativity, and camaraderie.
Arch linux screenshot
Delve into the realm of Arch Linuxlinux screenshot arch, where elegance meets efficiency and every keystroke feels purposeful. In this minimalist sanctuary, the art of capturing moments is not just a task but a craft, and at its heart lies the quintessential tool: the Linux screenshot feature. Let's embark on a journey through the corridors of Arch Linux and uncover the magic of screenshotting in this iconic environment.
Seizing the Essence
Within the pristine landscape of Arch Linux, the Linux screenshot feature stands as a beacon of possibility, ready to immortalize the essence of your digital endeavors with a simple command.
Crafting Digital Chronicles
With every keystroke, the Linux screenshot command transforms fleeting moments into tangible artifacts, allowing you to curate a visual narrative of your journey through Arch Linux's labyrinthine pathways.
Precision and Finesse
Navigate the expansive terrain of Arch Linux with precision, utilizing the Linux screenshot tool to capture every detail with finesse and clarity.
Efficiency Redefined
In the realm of Arch Linux, efficiency is paramount, and the Linux screenshot feature embodies this ethos, offering swift and seamless capture capabilities at your fingertips.
Immersive Exploration
Immerse yourself fully in the Arch Linux experience, knowing that the Linux screenshot command is your faithful companion, ready to document each twist and turn of your digital exploration.
Mastering the Art
As you traverse the digital landscape of Arch Linux, hone your screenshotting skills with the Linux screenshot command, mastering the art of capturing moments with precision and elegance.
A Symphony of Screenshots
With each invocation of the Linux screenshot command, you compose a symphony of screenshots, each frame capturing a unique facet of your Arch Linux journey.
From Concept to Creation
Transform your digital vision into reality with the Linux screenshot feature, bridging the gap between concept and creation as you bring your Arch Linux experience to life one screenshot at a time.
Sharing Your Story
Share your Arch Linux saga with the world, knowing that the Linux screenshot tool has empowered you to capture and convey the essence of your journey with unparalleled clarity and authenticity.
A Legacy Preserved
As you reflect on your adventures in Arch Linux, take solace in the knowledge that the Linux screenshot feature has preserved your legacy, immortalizing your experiences for future generations to admire and emulate.
kali linux screenshot
Welcome to the realm of Kali Linux, where cybersecurity prowess meets cutting-edge innovation, and every keystroke holds the potential to uncover digital mysteries. Amidst the intricate webs of code and the pulsating energy of digital warfare, the Linux screenshot feature emerges as a silent guardian, ready to capture and preserve moments of significance with unparalleled precision and efficiency.
To ensure your Kali Linux environment remains as powerful and secure as possible, it's essential to keep it up to date. For guidance on how to update Kali Linux efficiently and stay ahead of potential vulnerabilities, check out our comprehensive guide on how to update Kali Linux.
Unveiling Digital Secrets
In the labyrinthine corridors of Kali Linux, the Linux screenshot tool serves as your trusty companion, illuminating the darkness and unveiling the secrets hidden within the digital realm.
Harnessing Cyber Power
Empower your cybersecurity endeavors with the formidable capabilities of the Linux screenshot feature, allowing you to capture critical insights and vulnerabilities with a single command.
The Art of Reconnaissance
As you navigate the intricate landscape of Kali Linux, hone your reconnaissance skills with the Linux screenshot tool, capturing valuable intelligence with stealth and precision.
Silent Vigilance
In the realm of Kali Linux, where threats lurk around every corner, the Linux screenshot feature stands as a silent sentinel, vigilant and ever-ready to document the unfolding digital landscape.
Mastering Digital Domains
With the Linux screenshot tool at your disposal, master the complexities of Kali Linux with confidence, knowing that every capture brings you one step closer to understanding its intricacies.
A Visual Chronicle
Transform your Kali Linux journey into a visual chronicle with the Linux screenshot feature, crafting a tapestry of screenshots that capture the essence of your digital exploits.
From Hack to Capture
Transition seamlessly from hacking to capture mode with the Linux screenshot tool, effortlessly documenting your conquests and discoveries as you navigate the depths of Kali Linux.
Guarding Digital Footprints
Leave no digital footprint unchecked with the Linux screenshot feature, ensuring that every encounter, every exploit, is meticulously documented for analysis and review.
Sharing Cyber Wisdom
Share your cyber wisdom with peers and colleagues, utilizing the Linux screenshot tool to convey insights, techniques, and discoveries gleaned from your adventures in Kali Linux.
Preserving Cyber Legacies
As you chart new territories and conquer digital frontiers in Kali Linux, take solace in the knowledge that the Linux screenshot feature preserves your cyber legacy, immortalizing your contributions to the ever-evolving landscape of cybersecurity.
linux screen capture animated gif
Step into the dynamic world of Linux screenshotting, where each capture is not just a static image but a vibrant snapshot of digital life. Prepare to be dazzled as we explore the captivating realm of Linux screen capture animated GIFs—a fusion of creativity, innovation, and technical wizardry that breathes new life into your digital storytelling.
Unleashing Creativity
In the realm of Linux, the possibilities are endless, and the Linux screenshot tool serves as your gateway to unleashing your creative potential. With the ability to capture animated GIFs, you can transform mundane screenshots into captivating visual narratives that engage and inspire.
Elevating Visual Communication
Break free from the constraints of static images and embrace the power of animated GIFs for visual communication. With the Linux screenshot tool, you can convey complex ideas, demonstrate workflows, and captivate audiences with dynamic, animated content.
Capturing Motion
From the subtle movement of a cursor to the dynamic interactions of a software interface, the Linux screenshot tool allows you to capture every moment of motion with precision and clarity. With each frame, you paint a vivid picture of digital activity, immortalized in the form of an animated GIF.
Adding Depth and Dimension
Elevate your screenshots to new heights by adding depth and dimension with animated GIFs. Whether you're showcasing product features, demonstrating software functionality, or documenting digital processes, the Linux screenshot tool empowers you to capture and convey dynamic content with ease.
Enhancing User Experience
Engage users and enhance their experience with your digital content by incorporating animated GIFs into your presentations, tutorials, and documentation. With the Linux screenshot tool, you can create immersive, interactive experiences that resonate with your audience and leave a lasting impression.
Exploring Creative Possibilities
Dive deep into the realm of creative possibilities with the Linux screenshot tool, experimenting with different capture techniques, editing tools, and animation effects to bring your ideas to life. Whether you're a designer, developer, educator, or content creator, animated GIFs offer a versatile and expressive medium for showcasing your work.
Sharing Moments in Motion
Share your moments in motion with the world, using animated GIFs to capture and convey the essence of your digital experiences. Whether it's a funny reaction, a memorable interaction, or a fascinating discovery, the Linux screenshot tool empowers you to share your stories with clarity and flair.
Expressing Your Vision
Express your vision and creativity with animated GIFs, using the Linux screenshot tool to capture and animate your ideas in real-time. Whether you're illustrating a concept, demonstrating a process, or telling a story, animated GIFs offer a powerful and versatile medium for expressing yourself in the digital world.
Inspiring Collaboration
Spark creativity and collaboration among your peers and colleagues by sharing animated GIFs that showcase your ideas, projects, and achievements. With the Linux screenshot tool, you can inspire others to think creatively, experiment boldly, and push the boundaries of what's possible in the digital realm.
Embracing Innovation
Embrace the spirit of innovation and exploration with the Linux screenshot tool, harnessing the power of animated GIFs to capture, create, and share dynamic content that pushes the boundaries of visual storytelling. With each capture, you embark on a journey of discovery, creativity, and endless possibility in the dynamic world of Linux screenshotting.
How to take screenshot in linux ubuntu
In Ubuntu, capturing a screenshot is a straightforward process and can be done using various methods. Here's how you can take a screenshot in Ubuntu:
Using the Print Screen Key
The simplest method is to press the "PrtScn" (Print Screen) key on your keyboard. This captures the entire screen and saves the screenshot to your Pictures folder.
-
Using Keyboard Shortcuts: You can use keyboard shortcuts to capture specific areas of the screen:
-
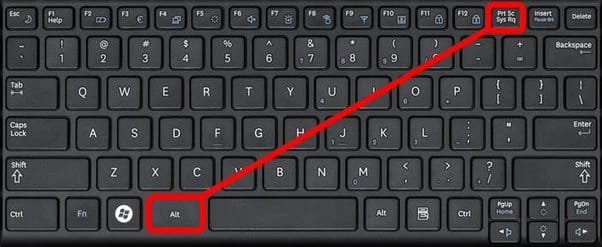
Press "Alt + PrtScn" to capture only the active window.
-
Press "Shift + PrtScn" to capture a selected area of the screen.
Using the Screenshot Tool
Ubuntu comes with a built-in Screenshot tool, which you can access by searching for "Screenshot" in the Applications menu or by pressing the Super key (Windows key) to open the Activities Overview and typing "Screenshot." Once launched, you can choose various capture options, including capturing the entire screen, a specific window, or a selected area.
Using Terminal Commands
For more advanced users, you can use terminal commands to capture screenshots. For example, you can use the "gnome-screenshot" command followed by options like "--window" to capture a specific window or "--area" to capture a selected area.
Choose the method that best suits your needs and preferences, and start capturing screenshots effortlessly in Ubuntu! To learn how to take Ubuntu, refer to the article How to take a screenshot in Ubuntu.
Linux snipping tool shortcut
Navigating the Linux Ubuntu ecosystem is an adventure in itself, and capturing those memorable moments along the way is essential for both productivity and creativity. Fortunately, the process of taking screenshots in Linux Ubuntu is simple and versatile, thanks to the powerful Linux screenshot tool at your disposal. Let's embark on a journey through the steps of capturing those cherished moments in the Linux Ubuntu environment.
Unveiling the Linux Screenshot Tool
At the heart of Linux Ubuntu lies a powerful utility known as the Linux screenshot tool. This versatile tool allows users to capture screenshots of their desktop, windows, or specific areas with ease.
Navigating to the Application Menu
To begin the screenshotting process, simply navigate to the application menu in Linux Ubuntu. Here, you'll find a plethora of useful tools and utilities, including the Linux screenshot tool, ready to be utilized at your convenience.
Selecting the Screenshot Option
Within the application menu, locate the Linux screenshot tool and select it to initiate the screenshotting process. With just a few clicks, you'll be well on your way to capturing those memorable moments in Linux Ubuntu.
Choosing the Capture Mode
Upon launching the Linux screenshot tool, you'll be presented with various capture modes to choose from. Whether you prefer to capture the entire desktop, a specific window, or a custom area, the Linux screenshot tool offers flexibility to suit your needs.
Capturing the Desired Content
Once you've selected your desired capture mode, simply click to capture the content you wish to immortalize. Whether it's a stunning desktop wallpaper, an insightful error message, or a captivating webpage, the Linux screenshot tool ensures that no moment goes uncaptured.
Exploring Additional Features
Beyond basic screenshotting capabilities, the Linux screenshot tool offers a range of additional features to enhance your experience. From annotating screenshots with text and shapes to saving images in various formats, the Linux screenshot tool empowers users to customize their captures to perfection.
Utilizing Keyboard Shortcuts
For those who prefer a more streamlined approach, Linux Ubuntu also offers convenient keyboard shortcuts for taking screenshots. With a simple combination of keys, users can capture screenshots quickly and efficiently, without the need to navigate through menus.
Saving and Sharing Screenshots
Once you've captured the perfect screenshot, the Linux screenshot tool makes it easy to save and share your images with others. Whether you're sending a quick message to a colleague or archiving important documentation, the Linux screenshot tool ensures that your images are readily accessible and shareable.
Integrating with Productivity Tools
For users who rely on productivity tools and workflows, the Linux screenshot tool seamlessly integrates with a variety of applications and services. Whether you're adding screenshots to presentations, documenting bugs in software, or creating tutorials for others, the Linux screenshot tool enhances your productivity and efficiency.
Embracing the Power of Linux Screenshotting
In conclusion, taking screenshots in Linux Ubuntu is a breeze with the powerful Linux screenshot tool. Whether you're a seasoned Linux user or a newcomer to the platform, the versatility and ease of use offered by the Linux screenshot tool make it a valuable asset for capturing and sharing your digital experiences in the Linux Ubuntu ecosystem.
Conclusion
In the vast and dynamic world of Linux, the simple act of taking a screenshot is far more than just a utilitarian task—it's an integral part of the digital experience. Whether you are managing a Linux VPS or using it as a desktop system, capturing the screen becomes essential for documenting issues, sharing progress, or creating tutorials. From the minimalist elegance of Arch Linux to the cutting-edge innovation of Kali Linux, the Linux screenshot tool stands as a universal companion, ready to capture and preserve moments of significance with precision and ease.
As users navigate the intricate landscapes of their chosen Linux distributions, the Linux screenshot tool serves as a silent witness, documenting each twist and turn of their digital journey. With its versatile functionality and intuitive interface, it empowers users to capture screenshots of their desktop, windows, or specific areas with unparalleled efficiency.
But the power of the Linux screenshot tool extends far beyond mere capture capabilities. With features like annotation, editing, and sharing, it becomes a gateway to creativity and collaboration, allowing users to enhance their screenshots with personalized touches and seamlessly integrate them into their workflows.
Moreover, the Linux screenshot tool embodies the ethos of open-source innovation, evolving alongside the Linux ecosystem itself. From keyboard shortcuts to command-line options, it offers a plethora of methods for users to tailor their screenshotting experience to their unique preferences and workflows.
As users harness the power of the Linux screenshot tool to capture and share their digital experiences, they become part of a vibrant community of creators, innovators, and collaborators. Whether it's sharing a tutorial, reporting a bug, or simply capturing a beautiful moment, the Linux screenshot tool enables users to make their mark on the digital landscape.
In essence, the Linux screenshot tool is more than just a utility—it's a testament to the versatility, creativity, and community spirit that define the Linux experience. With each screenshot captured, users contribute to a rich tapestry of digital moments, weaving together the diverse threads of the Linux ecosystem into a cohesive and vibrant whole. So, as we continue our journey through the ever-evolving world of Linux, let us remember the power and significance of the humble Linux screenshot tool, and the role it plays in shaping our digital experiences.
For users who are also familiar with Windows, taking screenshots is equally straightforward. If you're looking for a guide on how to take a screenshot on Windows, check out this comprehensive tutorial to expand your screenshot knowledge across operating systems.

Leave A Comment