")
Looking to optimize your network performance? Understanding how to change DNS in Windows is key to unlocking faster, more reliable internet access. Whether you're using Windows 7, 8, 10, 11, or even server editions like Windows Server 2012 or 2016, mastering the art of altering DNS settings can greatly enhance your online experience. In this guide, we'll explore how to change DNS in Windows 10, how to change dns in windows 10 from cmd, how to change dns in windows 8, how to change dns in windows server 2016, how to change dns in windows server 2012, how to change dns in windows 7, how to change dns in windows 11 through the graphical interface and the command line. Additionally, we'll delve into the process for how to change dns in windows xp, Windows 7, 8, Windows Server 2012, 2016, and even the now-classic Windows XP. Stick around to learn the step-by-step procedures, including using the command line for advanced users, and empower yourself to optimize your Windows DNS settings effortlessly.
🌐 What's DNS?
Imagine DNS (Domain Name System) as the internet's phonebook, translating user-friendly domain names into machine-friendly IP addresses. When you type a website's name into your browser, like "www.example.com," DNS works behind the scenes, directing your request to the correct IP address, much like a GPS guiding you to your destination. To deep dive into this core infrastructure, you can explore more about what is a DNS server and how it maintains internet records. Understanding how to change DNS in Windows, and change dns to automatic windows 10 can significantly impact your browsing experience.
To change DNS in Windows, it's a simple but powerful process. In Windows 10 and Windows 11, altering DNS addresses involves accessing your network settings. You can change DNS address in Windows 10 by navigating to Network and Internet settings, selecting your connection, and editing the properties to input your preferred DNS servers manually. If you are deploying projects on a remote desktop setup, acquiring a dedicated Windows 10 VPS allows you to safely configure these custom parameters on a dedicated remote environment.
For those who prefer command line operations, changing DNS in Windows using CMD is also straightforward. Utilizing commands like "netsh interface ipv4 set dns" allows you to modify DNS settings efficiently, whether it's to change DNS to automatic in Windows 10 or specify a custom DNS server. For massive or complex infrastructure configurations, administrators often evaluate structural options such as PowerShell vs CMD to execute administrative network overrides at scale.
The beauty of this process lies in its versatility across Windows versions. Whether you're on Windows 7, 8, 10, or managing servers with Windows Server 2012 or 2016, learning how to change DNS on Windows grants you control over your network's performance.
Additionally, understanding how to change DNS address Windows 10, and change dns address windows 11 also involves knowing how to locate your IP address. In Windows 10, you can find your IP address by accessing the Network and Internet settings or by using the command prompt and typing "ipconfig." Knowing your overall addressing parameters helps prevent common mistakes during modifications.
In essence, DNS serves as the internet's translator, and knowing how to change DNS in Windows puts the power in your hands, allowing you to fine-tune your online experience and optimize your network's performance effortlessly.In the following, we will teach you where do i change dns settings in windows 10.
🚀 Why you may want to change dns in windows Server settings?
changing your DNS server settings can be a game-changer for your online experience. Imagine DNS (Domain Name System) servers as the road signs of the internet—they direct your online traffic to its destination. Here's why tweaking these settings could significantly impact your browsing:
Firstly, changing DNS in Windows, whether it's Windows 10 or the latest Windows 11, can supercharge your internet speed. By opting for faster DNS servers, you'll experience quicker website loading times and smoother online streaming. This becomes incredibly vital if you run critical web resources on a robust platform like a dedicated Windows server, where name resolution latency impacts all inbound visitor workflows.
Moreover, security-conscious users often change DNS address in Windows to utilize servers with robust security features. These servers can help block malicious websites, preventing potential cyber threats and safeguarding your online activities.
For those facing issues like "can't change DNS Windows 10," understanding how to change DNS on Windows becomes essential. Exploring the command line to change DNS in Windows using CMD can often bypass such hurdles, ensuring you have control over your network settings. If a bad cache configuration breaks resolution altogether, discovering how to handle a dns_probe_finished_bad_config error is crucial to restoring connectivity.
Furthermore, changing DNS on Windows 10, or any other version, allows customization of content access. Some DNS servers enable access to region-locked content, giving you a broader spectrum of online entertainment and information.
Understanding how to change DNS on PC also means being able to enhance privacy. Certain DNS servers prioritize user privacy by not logging browsing history, providing a shield against invasive tracking practices.
Lastly, the versatility of changing DNS server in Windows isn't limited to specific versions; it's about tailoring your internet experience. Whether it's Windows 7, 8, 10, or even Windows Server editions, the ability to locate and change DNS settings in Windows grants you the power to optimize your online journey.
In essence, altering DNS settings in Windows isn't just about customization; it's about unlocking a world of possibilities. By mastering how to change DNS in Windows, you gain control over your internet speed, security, content access, privacy, and overall browsing experience—opening doors to a more efficient and personalized online realm.
🛠️ How to change DNS settings using Control Panel on Windows 11
change dns server windows through the Control Panel in Windows 11 is a straightforward process that empowers you to optimize your internet experience. Here's a step-by-step guide:
🔑 1. Accessing Control Panel
To start, click on the Start button, then select "Settings to start how to change my dns on pc.
🧭 2. Navigating to Network & Internet Settings
Within Settings, choose "Network & Internet."
🔌 3. Selecting Ethernet or Wi-Fi
Depending on your connection type, select either "Ethernet" or "Wi-Fi" from the left-hand menu.
⚙️ 4. Modifying Adapter Options
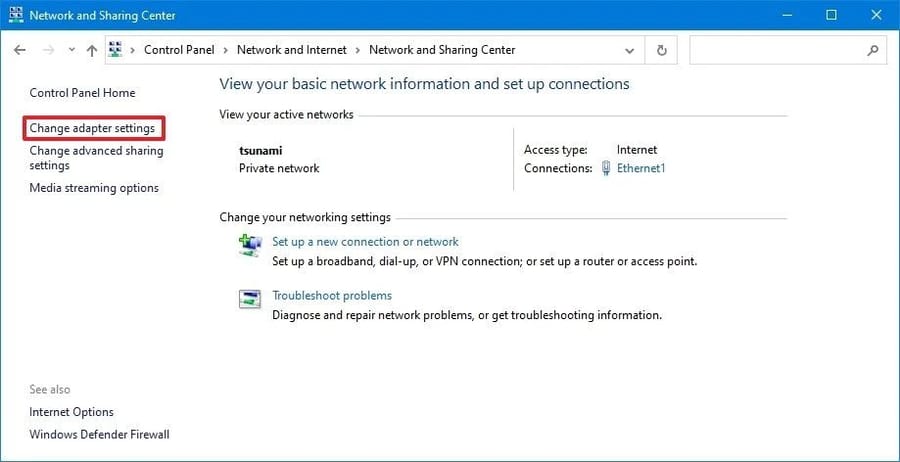
Under "Related settings," click on "Change adapter options."
🔓 5. Accessing Adapter Properties
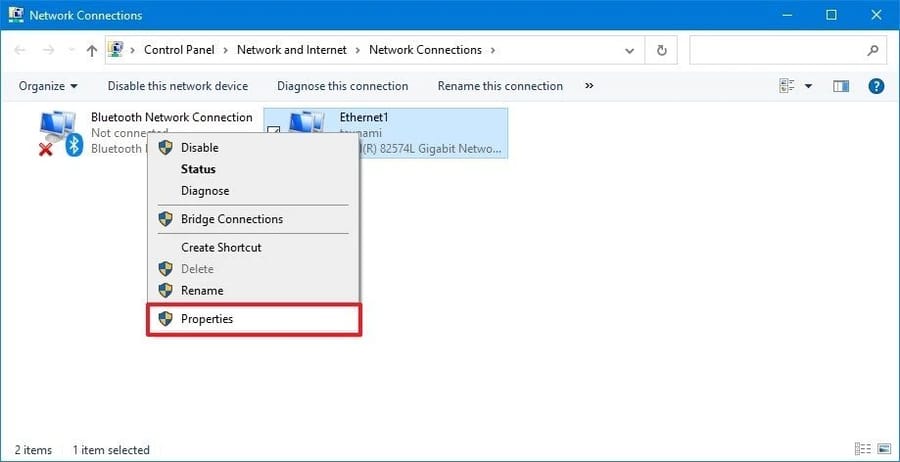
Right-click on your active network connection (Ethernet or Wi-Fi) and select "Properties."
📊 6. Adjusting DNS Settings
In the Properties window, scroll down and locate "Internet Protocol Version 4 (TCP/IPv4)" or "Internet Protocol Version 6 (TCP/IPv6)." Highlight the respective version and click on "Properties."
⌨️ 7. Entering DNS Information
Select "Use the following DNS server addresses" and input your preferred DNS server addresses. You can use public DNS servers like Google DNS (8.8.8.8 and 8.8.4.4) or others of your choice.
💾 8. Applying Changes
After entering the DNS server addresses, click "OK" to apply the changes.
🔎 9. Verification
To verify the changes, you can open the Command Prompt and type "ipconfig /all" to view your current DNS settings.
This method to change DNS in Windows via the Control Panel offers a user-friendly interface, allowing for swift customization of your network settings. Understanding how to change DNS on Windows 11 through Control Panel empowers you to tailor your internet connectivity effortlessly, enhancing speed, security, and customization according to your preferences.You can refer to How to Change Linux DNS to learn how to change DNS in Linux.
⚙️ How to change DNS settings using Settings on Windows 10
changing dns windows through the Settings app in Windows 10 is a breeze and grants you the power to fine-tune your internet experience. Here's a step-by-step guide:
🔑 1. Accessing Settings
Click on the Start button and select "Settings" (the gear-shaped icon) to start dns change windows 10.
🧭 2. Navigating to Network & Internet Settings
Within Settings, choose "Network & Internet."
📶 3. Selecting Wi-Fi or Ethernet
Depending on your connection type, select either "Wi-Fi" or "Ethernet" from the left-hand menu.

🔧 4. Modifying Adapter Options
Under "Advanced network settings," click on "Change adapter options."
🔓 5. Accessing Adapter Properties
Right-click on your active network connection (Wi-Fi or Ethernet) and select "Properties."
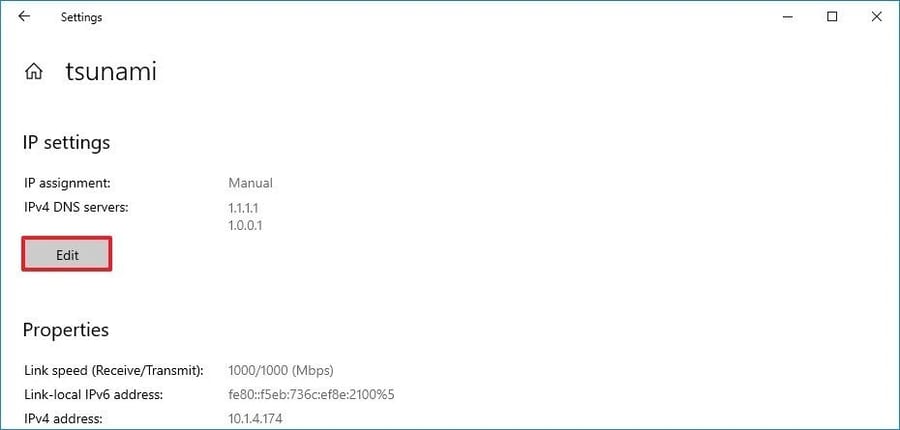
📊 6. Adjusting DNS Settings
In the Properties window, scroll down and locate "Internet Protocol Version 4 (TCP/IPv4)" or "Internet Protocol Version 6 (TCP/IPv6)." Highlight the respective version and click on "Properties."
⌨️ 7. Entering DNS Information
Choose "Use the following DNS server addresses" and input your preferred DNS server addresses. You can utilize popular public DNS servers like Google DNS (8.8.8.8 and 8.8.4.4) or any other of your choice.
💾 8. Applying Changes
After entering the DNS server addresses, click "OK" to apply the changes.
🔎 9. Verification
To verify the changes, you can open the Command Prompt and type "ipconfig /all" to view your current DNS settings.
This method to change DNS in Windows 10 through Settings provides a user-friendly approach, allowing you to swiftly customize your network settings. Mastering how to change DNS on Windows 10 via Settings empowers you to tailor your internet connectivity, enhancing speed, security, and customization according to your preferences and needs.
💻 How to change DNS settings using Command Prompt on Windows 10?
In this party we learn you change dns windows command line. Change dns windows 10 using Command Prompt in Windows 10 adds a touch of tech wizardry to your network customization. Here's a walkthrough:
🛡️ 1. Open Command Prompt as Administrator
Right-click on the Start button and select "Windows Terminal (Admin)" or "Command Prompt (Admin)" to access it with administrative privileges to start change dns cmd windows 10.
👁️ 2. View Current DNS Settings
Type "ipconfig /all" and hit Enter. This command displays your current network configurations, including DNS settings.
🏷️ 3. Identify Your Network Adapter
Look for your active network adapter, such as "Ethernet adapter" or "Wireless LAN adapter," and note its name (e.g., "Ethernet adapter Ethernet" or "Wireless LAN adapter Wi-Fi").
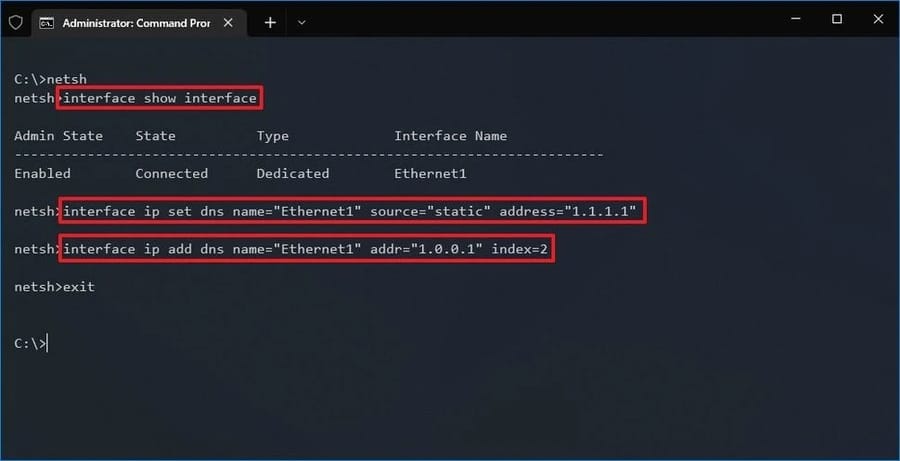
✏️ 4. Change DNS Server Address
To change DNS using Command Prompt, use the command:
netsh interface ipv4 set dns name="YOUR_NETWORK_ADAPTER_NAME" static DNS_SERVER_ADDRESS
Replace "YOUR_NETWORK_ADAPTER_NAME" with your adapter's name and "DNS_SERVER_ADDRESS" with the desired DNS server address. For instance:
netsh interface ipv4 set dns name="Ethernet adapter Ethernet" static 8.8.8.8
This example sets Google's DNS (8.8.8.8) as the primary DNS server.
✅ 5. Verify Changes
Confirm the changes by typing "ipconfig /all" again to see if the new DNS server address is reflected.
Using Command Prompt to change DNS in Windows 10 offers a direct, command-based approach for advanced users. Mastering how to change DNS on Windows using Command Prompt grants you greater control over network settings, enabling precise customization to suit your browsing preferences and needs.
💎 How to change dns in windows 8
When it comes to Windows 8, understanding how to change DNS settings opens a gateway to customizing your internet experience. Here's a guide:
🔌 1. Access Network Settings
To begin, navigate to the Control Panel. You can find it by right-clicking on the Start button or searching for it in the search bar.
🤝 2. Network and Sharing Center
Within the Control Panel, click on "Network and Sharing Center."
🔄 3. Change Adapter Settings
On the left-hand side, select "Change adapter settings."
🏷️ 4. Identify Network Connection
Right-click on your active network connection (Ethernet or Wi-Fi) and choose "Properties."
🛠️ 5. Adjust Network Properties
Locate and select "Internet Protocol Version 4 (TCP/IPv4)" or "Internet Protocol Version 6 (TCP/IPv6)" and click on "Properties."
📝 6. Modify DNS Settings
Choose "Use the following DNS server addresses" and input the preferred DNS server addresses. This could include well-known options like Google DNS (8.8.8.8 and 8.8.4.4) or other DNS servers of your choice.
💾 7. Save Changes
After entering the DNS server addresses, click "OK" to save the changes.
This process provides a user-friendly interface in Windows 8 to adjust DNS settings, giving you control over your internet connectivity and browsing experience. Mastering how to change DNS on Windows 8 allows you to fine-tune your network settings, ensuring faster speeds, improved security, and personalized content access according to your preferences.
🏛️ How to change dns in windows 7?
In Windows 7, mastering the process of changing DNS settings opens up a world of possibilities for tailoring your internet experience. Here's how you can do it:
🔌 1. Access Network Connections
Begin by clicking on the Start button and navigating to the Control Panel.
🤝 2. Network and Sharing Center
Within the Control Panel, select "Network and Sharing Center."
🔄 3. Change Adapter Settings
On the left-hand side, click on "Change adapter settings."
🏷️ 4. Identify Network Connection
Right-click on your active network connection (Ethernet or Wi-Fi) and select "Properties."
🛠️ 5. Adjust Network Properties
Locate and click on "Internet Protocol Version 4 (TCP/IPv4)" or "Internet Protocol Version 6 (TCP/IPv6)" and then click on "Properties."
📝 6. Modify DNS Settings
Choose "Use the following DNS server addresses" and input your preferred DNS server addresses. This might include popular options like Google DNS (8.8.8.8 and 8.8.4.4) or any other DNS servers you prefer.
💾 7. Save Changes
Once you've entered the DNS server addresses, click "OK" to save the changes.
Understanding how to change DNS on Windows 7 empowers you to take control of your internet connectivity and browsing experience. By customizing DNS settings, you can optimize your network for faster speeds, enhanced security, and personalized content access according to your preferences.
🖥️ How to change dns in windows server 2016
managing DNS settings in Windows Server 2016 is pivotal for network optimization and ensuring seamless connectivity. Here's a guide to navigate DNS changes in this server environment:
🚀 1. Access Server Manager
Launch Server Manager by clicking on the Start button and selecting "Server Manager."
🛠️ 2. Open DNS Manager
Within Server Manager, click on "Tools" and select "DNS" from the dropdown.
🧭 3. Navigating DNS Zones
In DNS Manager, expand the server name and then the "Forward Lookup Zones" or "Reverse Lookup Zones," depending on the type of DNS records you want to modify.
📝 4. Modify DNS Records
Right-click on the specific zone (e.g., your domain name) and select "Properties." Here, you can configure various DNS settings, including modifying DNS server addresses.
📥 5. Enter DNS Information
Input your preferred DNS server addresses or make necessary changes in the properties window. Ensure the changes are accurate for optimal network performance. Administrative teams operating enterprise platforms can significantly improve system administration by maintaining standardized Windows Server DNS configurations throughout their infrastructure layers.
💾 6. Save and Apply Changes
After making the required adjustments, click "OK" to save the changes.
Understanding how to change DNS settings in Windows Server 2016 allows for tailored network configurations, ensuring efficient resource allocation, security, and smooth network operations. Mastery over DNS management in a server environment empowers administrators to fine-tune network connectivity and ensure optimal performance for all connected devices and users.
🎛️ How to change dns in windows server 2012
managing DNS settings in Windows Server 2012 is crucial for maintaining a robust and efficient network infrastructure. Here's a guide on changing DNS settings in this server environment:
🚀 1. Access Server Manager
Start by launching Server Manager by clicking on the Start button and selecting "Server Manager."
🛠️ 2. Open DNS Manager
In Server Manager, navigate to "Tools" and select "DNS" from the dropdown.
🧭 3. Navigate DNS Zones
Within DNS Manager, expand the server name and then the "Forward Lookup Zones" or "Reverse Lookup Zones," depending on the type of DNS records you wish to modify.
📝 4. Modify DNS Records
Right-click on the specific zone (e.g., your domain name) and select "Properties." This is where you can configure various DNS settings, including modifying DNS server addresses.
📥 5. Enter DNS Information
Input your preferred DNS server addresses or make necessary changes in the properties window. Verify the accuracy of the changes for optimal network performance.
💾 6. Save and Apply Changes
Once you've made the adjustments, click "OK" to save the changes.
Understanding how to change DNS settings in Windows Server 2012 is pivotal for network customization, ensuring efficient resource allocation, security, and seamless network operations. Proficiency in DNS management within a server environment empowers administrators to optimize network connectivity and guarantee top-notch performance for all connected devices and users
Old school ⏳ How to change dns in windows xp
In Windows XP, managing DNS settings enables you to fine-tune your internet connectivity. Here's a guide on how to change DNS settings in this operating system:
🔌 1. Access Network Connections
Click on the Start button and navigate to the Control Panel.
🤝 2. Network Connections
Within the Control Panel, select "Network Connections."
🏷️ 3. Identify Network Adapter
Right-click on your active network connection (such as Local Area Connection or Wireless Network Connection) and choose "Properties."
🛠️ 4. Modify Network Properties
Look for "Internet Protocol (TCP/IP)" and click on "Properties."
📝 5. Adjust DNS Settings
Choose "Use the following DNS server addresses" and input your preferred DNS server addresses. This might include well-known options like Google DNS (8.8.8.8 and 8.8.4.4) or other DNS servers of your choice.
💾 6. Save Changes
Once you've entered the DNS server addresses, click "OK" to save the changes.
Understanding how to change DNS in Windows XP empowers you to take control of your internet connectivity, enhancing speed, security, and customization based on your preferences. By customizing DNS settings, you can optimize your network for improved performance and tailored browsing experiences.
⚡ How to set your DNS settings with PowerShell
PowerShell provides a powerful way to manage DNS settings in Windows. Here's how you can leverage PowerShell to set your DNS settings:
🛡️ 1. Open PowerShell as Administrator
Right-click on the Start button and select "Windows PowerShell (Admin)" to launch it with administrative privileges.
👁️ 2. View Current DNS Configuration
Enter the command Get-DnsClientServerAddress and press Enter. This displays your current DNS server configuration.
📝 3. Modify DNS Settings
To set DNS servers using PowerShell, you can use the following command:
Set-DnsClientServerAddress -InterfaceAlias "YOUR_INTERFACE_NAME" -ServerAddresses ("DNS_SERVER_ADDRESS_1", "DNS_SERVER_ADDRESS_2")
Replace "YOUR_INTERFACE_NAME" with the name of your network interface (such as Ethernet or Wi-Fi) and "DNS_SERVER_ADDRESS_1", "DNS_SERVER_ADDRESS_2" with the desired DNS server addresses.
📋 Example
Set-DnsClientServerAddress -InterfaceAlias "Ethernet" -ServerAddresses ("8.8.8.8", "8.8.4.4")
This command sets Google's DNS (8.8.8.8 and 8.8.4.4) for the specified interface.
✅ 4. Verify Changes
You can verify the changes by using the Get-DnsClientServerAddress command again.
Utilizing PowerShell to change DNS settings in Windows provides a robust and scriptable method for managing network configurations. It grants advanced users the flexibility to automate and customize DNS settings according to their requirements, ensuring optimal network performance and tailored browsing experiences.
📊 Popular Public DNS Providers Comparison
When setting custom DNS addresses, picking the right provider determines your baseline speeds and secondary security filter capabilities. Below is a structural comparison table listing the most reliable public infrastructure options globally:
| DNS Provider Name | Primary IPv4 Address | Secondary IPv4 Address | Core Optimization Focus |
|---|---|---|---|
| Google Public DNS | 8.8.8.8 | 8.8.4.4 | Global resolution speed and multi-node reliability |
| Cloudflare | 1.1.1.1 | 1.0.0.1 | Extreme privacy protections and minimal log recording |
| Cisco OpenDNS | 208.67.222.222 | 208.67.220.220 | Advanced content filtering and built-in malware blocks |
| Quad9 | 9.9.9.9 | 149.112.112.112 | Threat intelligence matching and malicious domain blocking |
⚠️ Common DNS Configuration Mistakes to Avoid
While altering parameters across your Windows setups is a safe administrative practice, minor oversight can drop local name tracking entirely. Avoid these frequent pitfalls:
- Forgetting Local Gateway Overrides: Overwriting DNS values inside configurations without noting the default system addresses may cause connection breakages in complex local area setups.
- Mismatched IPv4 and IPv6 Profiles: Manually saving custom IPv4 properties but letting old IPv6 values resolve automatically can create mixed resolution routing leaks.
- Neglecting Cached Resolution Flushes: Failing to clean out lingering records inside the operating system after saving a target DNS server changes leads to system delays.
- Typos in Server Quad Identifiers: Entering partial strings like "8.8.8" instead of structural quads yields system failures.
🎯 Conclusion
Understanding how to change DNS settings in Windows is a gateway to a more personalized and optimized internet experience. Whether you're tweaking settings on Windows 10, Windows 11, or even delving into server editions like Windows Server 2016, mastering this skill empowers you to tailor your network connectivity according to your preferences.
From the user-friendly interfaces of Control Panel and Settings to the command-line finesse offered by PowerShell or CMD, Windows provides versatile methods to modify DNS settings. By altering DNS addresses or setting them to automatic, you unlock the potential for faster speeds, enhanced security, and access to region-specific content, all while safeguarding your privacy.
The ability to manage DNS in Windows, and how to change dns ip address in windows 10 isn't just about changing numbers—it's about gaining control over your digital navigation, ensuring smoother browsing experiences across devices. Whether troubleshooting issues like being unable to change dns server address in windows 10 or seamlessly setting preferred DNS servers, your journey into DNS customization enhances your understanding of network configurations.
Remember, as you navigate the realms of changing DNS in Windows, you're embarking on a journey toward a more tailored, efficient, and secure online world. Whether you're configuring a home network or managing a dedicated Windows server the ability to customize DNS settings empowers you to enhance performance, bolster security, and ensure your network runs smoothly. So, explore, experiment, and fine-tune your DNS settings in Windows—it's your passport to a more personalized and optimized internet landscape.

Leave A Comment