
Ready to craft your own world for friends? Learn how to set up a Minecraft server on a VPS with our guide, then [buy VPS hosting] to get started!
Many players might already be enjoying building worlds in Minecraft and/or exploring the existing ones but might not know how to make a Minecraft server on a VPS, which allows them to have a private virtual space to enjoy with their gaming partners. Today, we are going to discuss just that.
Minecraft is a popular sandbox video game that has received unprecedented love from gamers all over the globe. The game builds fantastical infinite 3D worlds - by a technique known as a procedural generation - ready to be explored solo or in co-op.
Easy Steps on how to make a Minecraft Server
Step 1 - Get a VPS Hosting Service
For setting up your own Minecraft server, the foremost thing that you need is a Virtual Private Server (VPS). You need to buy a VPS hosting plan from a trustworthy web hosting service provider, like 1Gbits.
In general, there are several VPS hosting solutions that vary in terms of the OS system (Linux and Windows), hardware capacities like RAM and storage, etc. Check out the various VPS hosting options offered by 1Gbits for reference. If you prefer a Windows operating system for your server, you can easily buy Windows VPS hosting from 1Gbits, ensuring a smooth setup and reliable performance.
While buying VPS hosting for Minecraft, you need to consider the number of players that you want to host on your VPS. In general, for hosting 20 players, a VPS with 1 GB of RAM and 20 GB of storage is a good option.
After buying a VPS plan, the service provider will share with you the IP address of the VPS server along with the username and password to access the VPS through an SSH (Secure Shell). With all 1Gbits VPS, you will get a dedicated IP address..
Step 2 - Connect to the VPS using SSH (Secure Shell)
Connecting and accessing the VPS server might seem a little tricky but let me assure you that it’s an easy task. Even if you are not a tech-savvy person, you can proceed with this step with relative ease. All you need to get started is to download PuTTY, which is an SSH and telnet client.
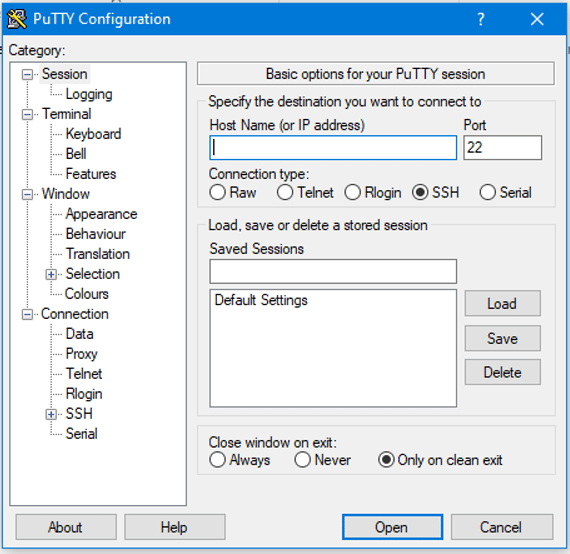
After downloading PuTTY, you need to run it on your system. After launching PuTTY, you will see various fields, which may seem a little overwhelming.
Worry not as the only field that should be of your interest is the Host Name (IP address). Just make sure that the Port is set to 22 (which is the default) and the Connection type is selected as SSH.
Once your server is up and running, you'll want to enhance your gameplay experience by utilizing some of the best Minecraft commands to manage and control your server efficiently.
The next thing that you need to do is to copy the IP address of your VPS (which is provided by your VPS hosting service provider) and paste it into the Host Name (or IP address) field. Hit open and you will see an SSH terminal popping onto your system screen. It looks like this:
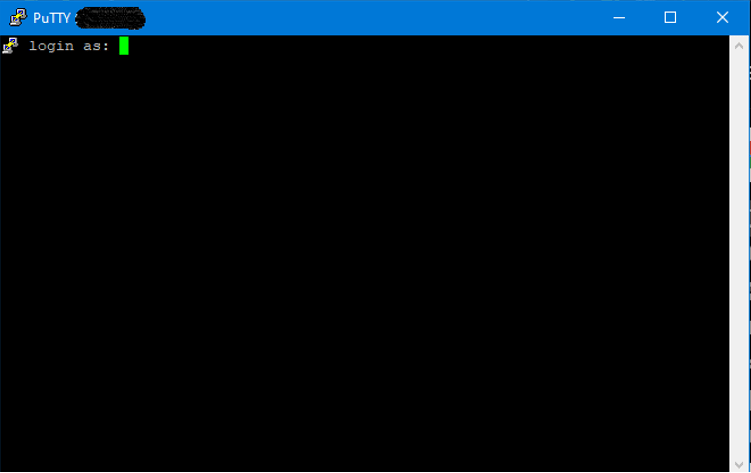
Note - If you are using a macOS, then you do not need to download PuTTY. Instead, you can leverage the native SSH terminal.
Now, input the username provided by your VPS hosting service provider in the SSH terminal, which is by default set as ‘root’.
After that, the terminal will ask you to enter the password to log into the VPS. While entering the password you will not see any character that you are typing. However, you need not worry as this is the standard security measure of PuTTY to protect your password.
If you're looking for the best VPS locations to optimize your Minecraft server’s performance, check out our detailed guide on VPS locations.
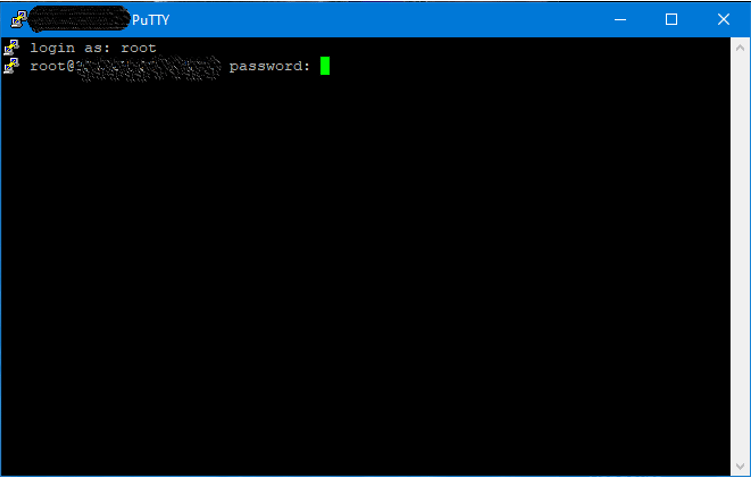
You can also paste the password into the terminal, but the conventional way of copy-pasting the text - Ctrl+C and Ctrl+V - won’t work. For doing that you need to access the menu having the paste option by pressing the Ctrl key and then hitting the right mouse button.
Once your Minecraft server is up and running on a VPS, it's important to choose a reliable hosting provider to ensure smooth gameplay and minimal downtime. If you're looking for top recommendations, check out our guide on the best Minecraft server hosting providers to find the perfect option for your needs.
Step 3 - Install All the System Updates On Your VPS
After successfully logging into the VPS server, you need to update its system by running the command apt full-upgrade in PuTTY’s SSH. All the packages will get updated automatically and this will ensure the smooth functioning of your VPS server. In this example, we are using an Ubuntu server. For other Linux distributions, the command will change. To find your Linux version, check this article.
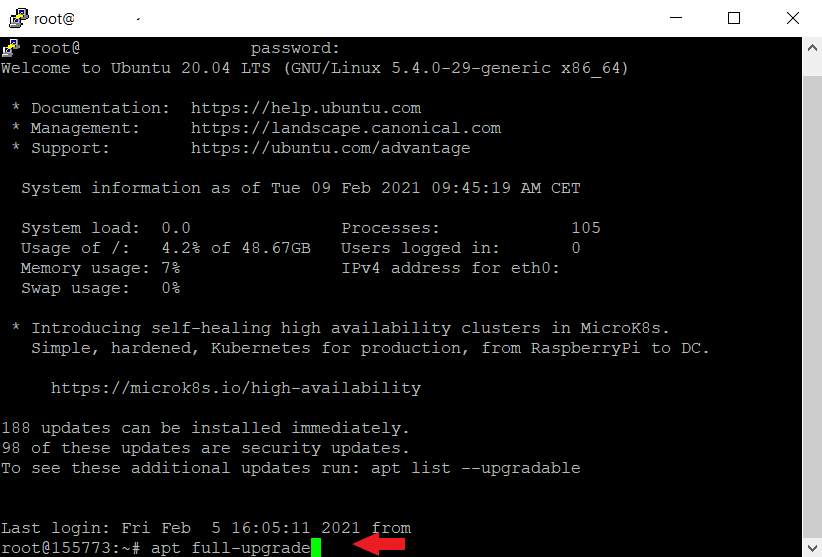
After running the command, packages that have available updates will be upgraded. The process looks something like this:

Step 4 - Install Java Development Kit (JDK)
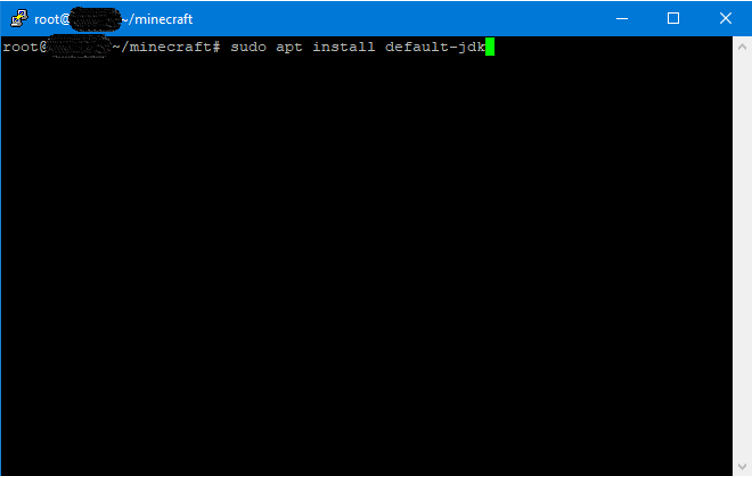
To create Minecraft server on the VPS, the most important thing that you are going to need is the Java Development Kit (JDK). To get the latest version of JDK installed on your VPS, you need to run the following command on PuTTY SSH:
sudo apt install default-jdk
Step 5 - Create a Separate Directory for Hosting Minecraft Game Server
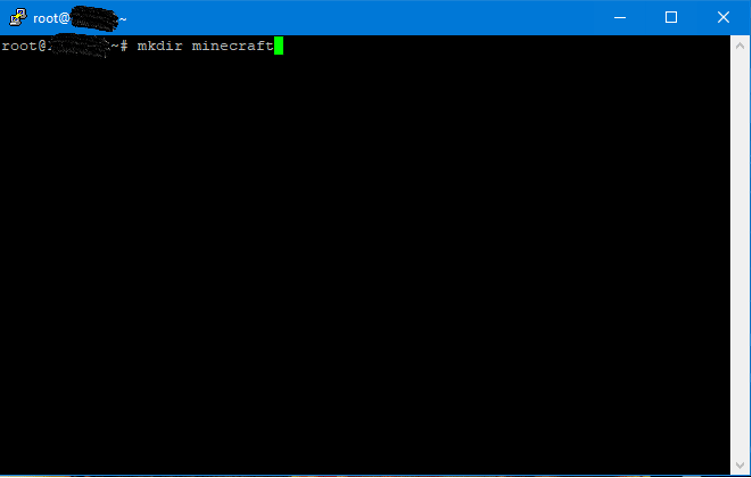
After downloading the JDK, you need to create a new directory in your VPS where you will install the Minecraft server setup. To create the new directory, you have to run the following command on the SSH terminal:
mkdir minecraft
Note - mkdir command means make directory while Minecraft is the name of the directory. You can use some other name for it too.
![Basic Linux Commands with Examples [Linux Cheat Sheet]](../../../cdn-cgi/image/width=827,quality=80,format=auto/https://s3.1gbits.com/blog/2021/01/linux-commands-basic-to-advanced271-847xAuto.jpg "Basic Linux Commands with Examples [Linux Cheat Sheet]")
Basic Linux Commands with Examples [Linux Cheat Sheet]
In this tutorial, we will go through the basic Linux commands that can help you get started with using the Linux terminal.
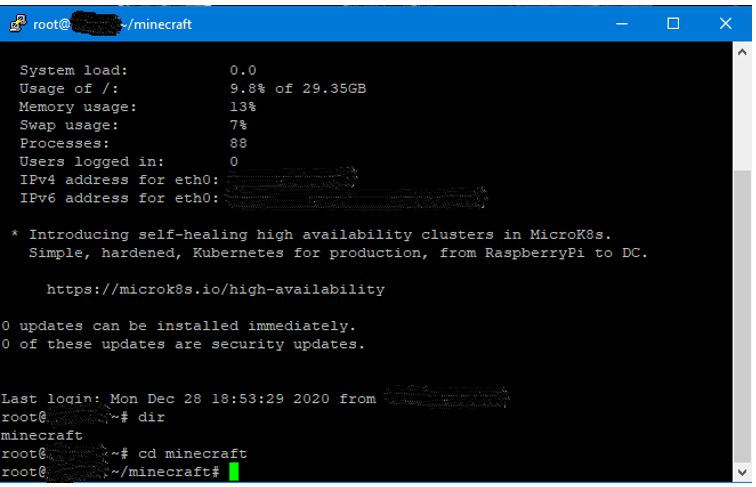
To check that your directory is created successfully, you can run the command dir, which will list the name of all the directories in the current directory.
Now to navigate to the newly created Minecraft directory, you need to run the command:
cd minecraft
You will also notice that in the SSH command line the /minecraft has been added next to the root@XXXXXX, which means that you are now inside the Minecraft directory (or you can consider it as the Minecraft folder created inside your VPS’s system).
Step 6 - Download Minecraft Server in Your VPS
Now, it’s time to download the Minecraft game server on your VPS. You can check the latest version of the Minecraft server by visiting the official website of Minecraft.
To download the server file, you will need the web address of the download file, which you can get by right-clicking on the hypertext and selecting the copy link address option.
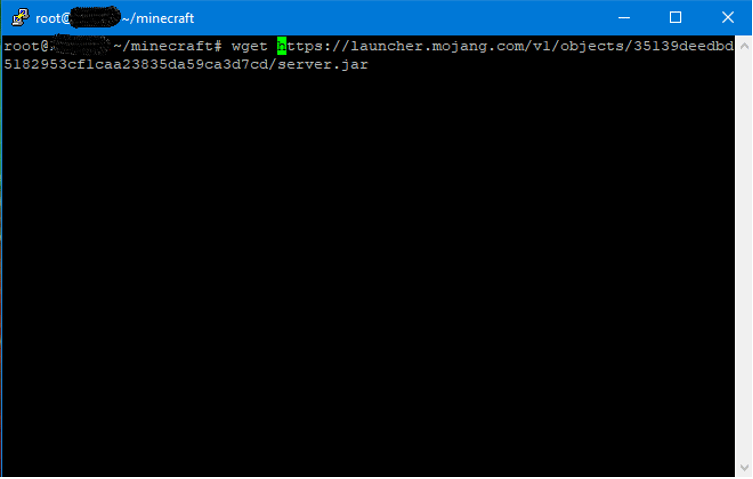
Now to download the server file, you will need to run the following command on the PuTTY’s SSH command line:
wget https://launcher.mojang.com/v1/objects/35139deedbd5182953cf1caa23835da59ca3d7cd/server.jar
[Penultimate Step] Step 7 - Agree to EULA Terms & Conditions
Before running the Minecraft server application, you need to agree to the EULA terms and conditions, which you can do manually with the help of a single command:
echo “eula=true” > eula.txt

This command will create the eula.txt file and by setting the value of EULA to true, you agree to the terms and conditions for using the Minecraft server application. If you're not ready to invest in a VPS, you can also explore free Minecraft server hosting options to get started without upfront costs.
[Final Step] Step 8 - Launch Minecraft Server
After setting up everything, it’s finally time to run the Minecraft server with the following command:
java -Xmx1024M -Xms1024M -jar server.jar nogui
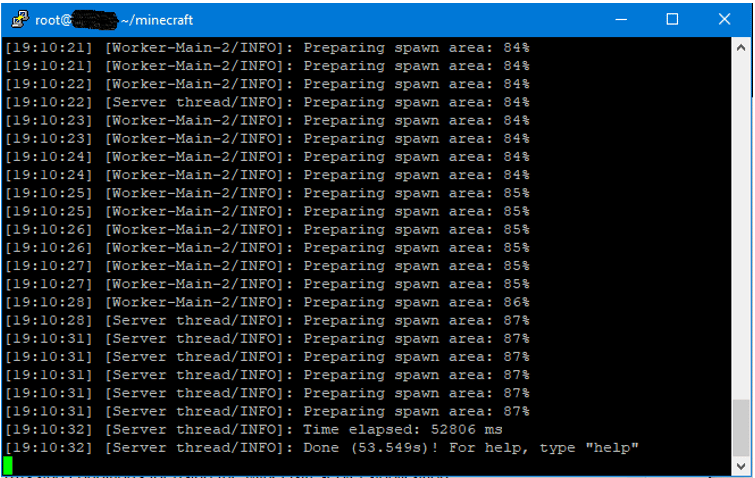
You will see a series of operations running on the SSH command line for a couple of minutes followed by an ending telling you that the process of loading the server is Done:
Bonus - Connecting Your Minecraft Game with the VPS Server
How to make your own Minecraft server active with your game? Once your VPS server is up and running, you can easily connect your Minecraft game with the server. For that, all you need to do is to follow the steps explained below:
Step 1 - Launch Minecraft Game
If you have already installed Minecraft on your system, then you need to start the game using the Minecraft launcher. You can always buy and download Minecraft from its official website.
Step 2 - Establish Connection to VPS Server in Multiplayer Mode
Once the game is started successfully, you need to navigate to its multiplayer game mode. On the multiplayer screen, you need to click on the add server button to link the game to your VPS.
If you’re looking for a reliable VPS for hosting your Minecraft server, check out our VPS rental options to find the best plan for your needs.
On the next screen, you will be asked to specify the server name and enter the server address. Now, you need to enter the IP address of your VPS server and hit the Done button.
After a few seconds, you will see that the signal strength in front of the server becomes green. This indicates that the VPS server is available. Finally, click on the server and hit the Join Server button placed below to connect with the VPS and initialize the Minecraft game.
To ensure smooth connection and gameplay, it's essential to know your Minecraft server IP address. This IP address allows you and your friends to access the server and play together on your VPS setup.
Step 3 - Bring Other Players to Your VPS by Sharing the IP Address
You can invite other Minecraft players to join your VPS server by sharing its IP address. Other players also need to follow Step 2 to get connected to your VPS.
For those who want to test a VPS before committing to a plan, check out our Trial VPS options to get started risk-free.
Conclusion
So now that you know how to make a Minecraft server on a VPS, what are you waiting for? Better get going and build your very own private space to enjoy Minecrafting with your gaming buddies. With the flexibility and power that a VPS offers, you can customize your server to fit your unique gameplay style. Whether you're looking to host a small group of friends or build a larger community, Minecraft VPS hosting is the perfect solution.
If you're looking for an affordable hosting option, check out our guide on cheap VPS to find budget-friendly plans that offer great performance for your Minecraft server.
If you're looking to enhance your gameplay experience, check out our guide on the best Minecraft seeds to discover unique and exciting worlds that you can explore and build on your new server.
We hope that this article helped you with the steps on how to create a Minecraft server. If you’re still exploring your options, consider different Minecraft hosting servers that provide excellent performance and reliability. Choose a service that fits your needs, and soon you'll be adventuring in your very own Minecraft world!
If you're looking for reliable hosting in specific locations, we recommend checking out VPS hosting solutions tailored to different regions. Whether you're interested in hosting your Minecraft server in Moscow, Russia VPS, USA VPS, Vienna, Austria VPS, or Romania VPS, you can find a solution that ensures low latency and fast performance. For those based in Stockholm, Sweden VPS, France VPS, or Dubai, UAE VPS, our regional VPS services offer great options. Additionally, if you're targeting a broader region, consider our Europe VPS or Germany VPS hosting for optimal coverage. And for those across the Atlantic, our Canada VPS is an excellent choice for Minecraft server hosting with powerful resources.

Leave A Comment