
Configuring OpenVPN on MikroTik routers unlocks powerful, secure connectivity for remote access and mikrotik openvpn site to site communications. This guide explores MikroTik OpenVPN in detail, offering a step-by-step approach to help you implement both server and client setups. Whether you're creating a MikroTik OpenVPN client or a robust MikroTik OpenVPN server, understanding the nuances of OpenVPN MikroTik is essential.
From generating the necessary certificates to configuring the MikroTik OVPN server, you'll learn how to navigate every aspect of the process. Discover best practices for MikroTik OpenVPN server setup, including TLS settings and authentication protocols, and follow a streamlined approach to MikroTik OpenVPN client setup using an OVPN file. Whether you're integrating the MikroTik OpenVPN client OVPN file for remote devices or ensuring seamless connections with a solid MikroTik OpenVPN setup, this guide is your ultimate resource for mastering OVPN MikroTik configurations. If You need OpenVPN VPS or MikroTik VPS, visit MikroTik VPS or OpenVPN VPS. For those deploying premium enterprise environments, getting a high-performance VPS for VPN ensures unmatched isolation and structural stability.
⚙️ OpenVPN Configuration on MikroTik Routers
🔄 1. Updating RouterOS to the latest stable version
Updating your MikroTik RouterOS to the latest stable version is crucial for ensuring optimal performance and compatibility with advanced features like MikroTik OpenVPN. This process not only enhances your router's stability but also prepares it for implementing configurations like MikroTik OpenVPN server setup or configuring a MikroTik OpenVPN client. Here's a step-by-step guide to updating your RouterOS. If You need to know definition of VPN, read What is a VPN. also, if you know How to install OPenVPn, read How To Install OpenVPN.
🔍 Check for Updates
Log in to your MikroTik router using Winbox or the web interface. Navigate to System > Packages, then click Check for Updates. Select the Stable branch to ensure you're installing a reliable version for features such as MikroTik OpenVPN client setup or configuring a MikroTik OpenVPN server step by step.
💾 Download and Install Updates
Click Download & Install to update your RouterOS. Ensure your router reboots after the process to apply the changes. This update is critical when using tools like the MikroTik OpenVPN config generator or configuring MikroTik OpenVPN push routes.
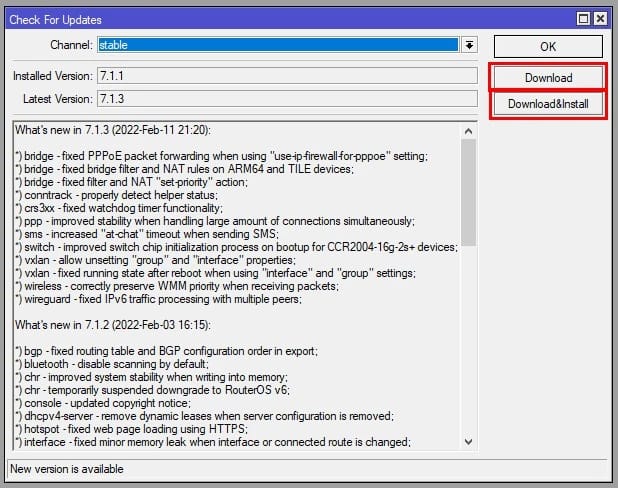
✅ Verify the Update
After rebooting, verify the installed version under System > Resources. A fully updated system is essential for advanced setups like MikroTik OpenVPN site-to-site connections and generating a MikroTik OpenVPN certificate.
🛠️ Configure MikroTik OpenVPN
With your RouterOS updated, proceed to configure OpenVPN. Start by setting up a MikroTik OpenVPN server step by step for secure remote access or MikroTik OpenVPN site-to-site communication. Use the MikroTik OpenVPN client setup for devices like the MikroTik OpenVPN Android client, ensuring seamless integration using an MikroTik OpenVPN client OVPN file.
🚀 Optimize Your Configuration
Leverage the latest features, such as MikroTik OpenVPN configuration with route pushing and certificate-based authentication. The update enables smoother setups, whether you’re using OpenVPN MikroTik for mobile clients or deploying a robust OVPN MikroTik server.
By keeping your RouterOS updated, you ensure compatibility with the latest MikroTik OpenVPN setup techniques, streamlining the integration of MikroTik OpenVPN client devices into your network. If you are virtualization-focused and deploying an instance on your own virtual environment, understanding how to install MikroTik CHR on an SSD VPS can optimize hardware performance drastically.
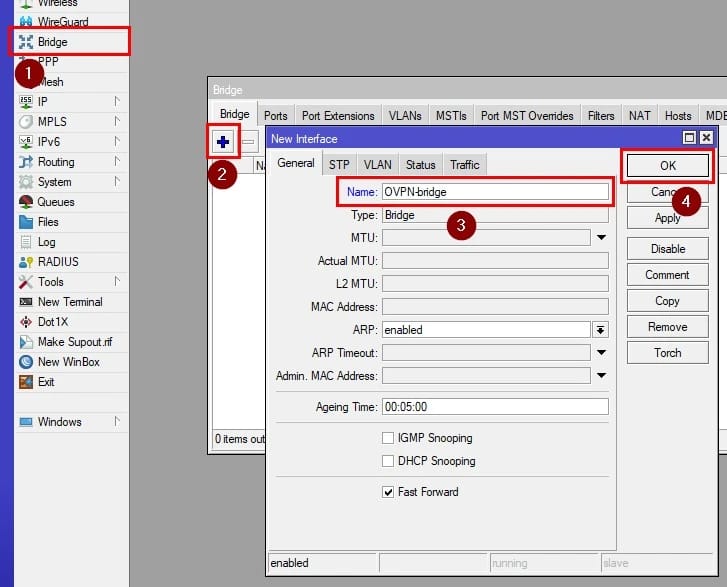
🌐 2. Creating a bridge for the OpenVPN network
Setting up a bridge for your OpenVPN network on MikroTik routers ensures seamless integration between your OpenVPN clients and your LAN. This is essential for configurations like MikroTik OpenVPN server setup, configuring MikroTik OpenVPN client, and enabling advanced features such as MikroTik OpenVPN push routes. Below is a step-by-step guide:
🪜 Step 1: Create a Bridge Interface
-
Go to Bridge > Add New in your MikroTik interface.
-
Name the bridge (e.g., OpenVPN-Bridge) for easier identification.
-
This bridge will serve as the link between your MikroTik OpenVPN configuration and your local network. Bridging acts as the structural foundation of your local link context; you can read more details in our technical analysis about what is LAN to maximize your topology knowledge.
🪜 Step 2: Add Ports to the Bridge
-
Under the Ports tab in the Bridge settings, add your LAN interface.
-
Include the OpenVPN interface that will be created after completing the MikroTik OpenVPN server setup.
-
This step ensures that OpenVPN clients are bridged with the LAN, enabling features like MikroTik OpenVPN site-to-site communication.
🪜 Step 3: Configure OpenVPN Server
-
Follow the MikroTik OpenVPN server step-by-step process, ensuring the OpenVPN interface is active.
-
Add a MikroTik OpenVPN certificate to secure the connection.
-
Use the MikroTik OpenVPN config generator to streamline the configuration.
🪜 Step 4: Configure OpenVPN Client
-
Set up the MikroTik OpenVPN client for remote devices using an MikroTik OpenVPN client OVPN file.
-
Ensure the MikroTik OpenVPN client setup includes the bridge IP range for proper routing.
🪜 Step 5: Test the Network
-
Verify that the OpenVPN clients, including the MikroTik OpenVPN Android client, can access LAN resources.
-
Ensure routes are pushed correctly using MikroTik OpenVPN push routes.
🛡️ Benefits of Bridging
-
Enables LAN-level access for OpenVPN MikroTik clients.
-
Supports both remote access and MikroTik OpenVPN site-to-site configurations.
-
Enhances flexibility in your MikroTik OpenVPN setup for seamless connectivity.
By bridging the OpenVPN network, your OVPN MikroTik implementation becomes more robust, allowing both local and remote clients to interact effortlessly.
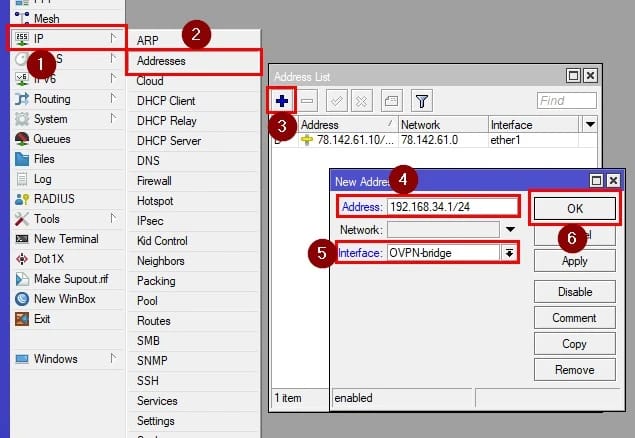
🔢 3. Setting an IP address for your VPN Network
Assigning an IP address to your VPN network is a critical step in setting up MikroTik OpenVPN. It ensures that your OpenVPN clients can communicate effectively with the server and other network devices. This guide will walk you through configuring an IP address for your VPN network, making it suitable for setups like MikroTik OpenVPN client setup or MikroTik OpenVPN site-to-site communication.
🪜 Step 1: Plan Your VPN Network Subnet
-
Decide on a subnet for your VPN network (e.g., 192.168.100.0/24).
-
Ensure this subnet does not overlap with existing LAN or WAN subnets to avoid conflicts in MikroTik OpenVPN configuration.
🪜 Step 2: Assign an IP Address to the OpenVPN Interface
-
Go to IP > Addresses in the MikroTik interface.
-
Click Add New and assign an IP address (e.g., 192.168.100.1/24) to the OpenVPN interface.
-
This IP will act as the gateway for all MikroTik OpenVPN clients connecting to the server.
🪜 Step 3: Configure the OpenVPN Server
-
Follow the MikroTik OpenVPN tutorial to enable the OpenVPN server.
-
Assign the same subnet (192.168.100.0/24) to the server for consistent addressing.
-
Generate and upload the MikroTik OpenVPN client certificate to ensure secure connections.
🪜 Step 4: Configure OpenVPN Clients
-
Use a MikroTik OpenVPN client OVPN file to configure remote clients.
-
Ensure the client setup uses an IP address within the VPN subnet (e.g., 192.168.100.2).
-
When you configure MikroTik OpenVPN client, verify routing rules to avoid connectivity issues. Fully understanding structural definitions of internet routing requires grasping basics; read what is an IP address to establish a fundamental configuration model.
🪜 Step 5: Enable Routing for Site-to-Site Connections
-
For MikroTik OpenVPN site-to-site setups, configure static routes on both ends.
-
Use MikroTik OpenVPN UDP for better performance if supported by your configuration.
🪜 Step 6: Test Connectivity
-
Verify that the MikroTik OpenVPN client setup can access the VPN server and other devices in the network.
-
Check for proper route pushing and ensure no conflicts exist in the MikroTik OpenVPN configuration.
By correctly setting an IP address for your VPN network, you ensure seamless communication between the MikroTik OpenVPN server and its clients, enabling reliable remote access and site-to-site connectivity.
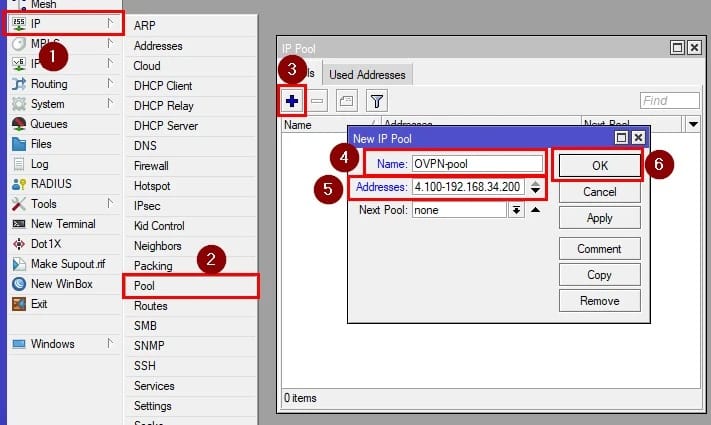
📦 4. Creating an IP pool for your OpenVPN network
Setting up an IP pool for your MikroTik OpenVPN network allows dynamic allocation of IP addresses to connected clients. This ensures seamless connectivity and simplifies client configuration. Below is a step-by-step guide, with considerations for setups like MikroTik OpenVPN site-to-site.
🪜 Step 1: Understand the Purpose of an IP Pool
-
An IP pool assigns IP addresses dynamically to MikroTik OpenVPN clients, removing the need for manual configuration.
-
It is particularly useful for MikroTik OpenVPN site-to-site configurations, where multiple remote devices need unique IPs.
🪜 Step 2: Define the IP Pool
-
Go to IP > Pool in the MikroTik web interface.
-
Click Add New and define a pool range (e.g., 192.168.101.2-192.168.101.254).
-
Ensure the range is within the subnet defined for your VPN network and does not overlap with other pools. While pools allocate addresses, understanding automated mechanisms like DHCP is critical. For broader knowledge, read what is DHCP server infrastructure to see how pool components operate dynamically.
🪜 Step 3: Configure the OpenVPN Server to Use the IP Pool
-
Access PPP > Profiles and open the profile associated with your OpenVPN server.
-
Under the Local Address field, specify the IP address of the server (e.g., 192.168.101.1).
-
In the Remote Address field, select the IP pool you created. This enables dynamic IP assignment to OpenVPN clients.
🪜 Step 4: Apply the Configuration to the OpenVPN Server
-
Ensure the OpenVPN server is correctly set up with the IP pool linked in its PPP > Secrets settings.
-
Test the configuration by connecting a client and verifying the assigned IP from the pool.
🪜 Step 5: Enable Routing for Site-to-Site Connectivity
-
For MikroTik OpenVPN site-to-site setups, configure static routes to direct traffic between subnets.
-
Verify that both ends of the connection can communicate through their respective IP addresses from the pool.
⚡ Benefits of Using an IP Pool
-
Simplifies MikroTik OpenVPN configuration by automating IP assignment.
-
Ensures efficient use of available IPs, particularly in site-to-site deployments.
-
Reduces errors caused by manual configuration.
By implementing an IP pool, your MikroTik OpenVPN site-to-site and remote access network gains flexibility and reliability, ensuring smooth client management.
🧱 5. Creating a firewall filter rule
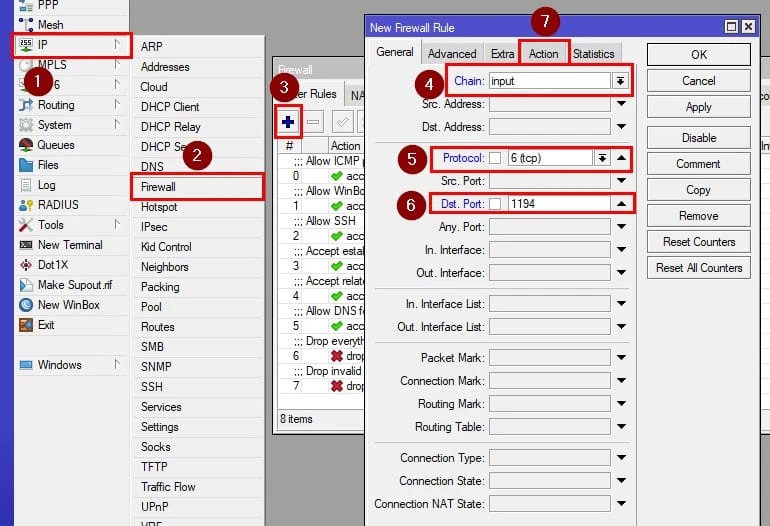
Firewall filter rules are essential to secure and manage traffic in your MikroTik OpenVPN network. These rules ensure only authorized traffic flows through the VPN, protecting your network from unauthorized access or misuse. Below is a step-by-step guide to creating an effective firewall filter rule for your OpenVPN setup.
🪜 Step 1: Understand the Purpose of Firewall Filter Rules
-
Firewall rules control traffic entering, exiting, or traversing your router.
-
For MikroTik OpenVPN, firewall rules can allow or block specific connections, enhance security, and optimize performance.
🪜 Step 2: Identify Your OpenVPN Interface
-
Open Interfaces and locate the OpenVPN interface (e.g., ovpn-in1).
-
Knowing the interface name is crucial for creating targeted firewall rules.
🪜 Step 3: Create a Firewall Rule for Incoming Traffic
-
Go to IP > Firewall > Filter Rules.
-
Click Add New and configure the rule:
-
Chain: Select input (for traffic to the router).
-
In Interface: Choose your OpenVPN interface.
-
Action: Set to accept to allow traffic or drop to block it.
-
This rule ensures only authorized traffic is allowed to the router via OpenVPN.
🪜 Step 4: Create a Firewall Rule for Forwarded Traffic
-
Add another rule for forwarded traffic:
-
Chain: Select forward (for traffic passing through the router).
-
In Interface: Choose your OpenVPN interface.
-
Action: Set to accept.
-
This allows OpenVPN clients to communicate with devices in the LAN or other networks.
🪜 Step 5: Add Logging and Testing Rules
-
Enable logging on test rules to monitor traffic.
-
Verify traffic is being accepted or dropped as per your rules.
🪜 Step 6: Fine-Tune for Site-to-Site Connections
-
For MikroTik OpenVPN site-to-site, create specific rules to allow traffic between subnets.
-
Use additional filters to restrict unnecessary traffic for enhanced security.
💎 Benefits of Firewall Rules
-
Prevents unauthorized access to your MikroTik OpenVPN network.
-
Controls and secures traffic flow in site-to-site and remote access scenarios.
Properly configured firewall rules are critical for a robust and secure MikroTik OpenVPN setup. If you run your gateway setups inside enterprise cloud parameters, checking details about how to configure a firewall on your VPS provides an overarching blueprint for broad platform defenses.
🔄 6. Enabling the NAT for the OpenVPN
Network Address Translation (NAT) is crucial when configuring MikroTik OpenVPN to allow traffic from connected clients to access external networks, such as the internet or other subnets. Below is a step-by-step guide to enabling NAT for your OpenVPN setup.
🪜 Step 1: Understand Why NAT is Needed
-
NAT is essential for routing traffic between private VPN clients and public or other network interfaces.
-
Without NAT, OpenVPN clients cannot access external resources or communicate outside the VPN network
🪜 Step 2: Locate the OpenVPN Interface
-
Go to Interfaces in the MikroTik web interface.
-
Identify the OpenVPN interface (e.g., ovpn-in1), as this will be referenced in the NAT rule.
🪜 Step 3: Create a NAT Rule
-
Navigate to IP > Firewall > NAT and click Add New.
-
Configure the NAT rule as follows:
-
Chain: Select srcnat (Source NAT).
-
Out Interface: Choose the interface used for internet access (e.g., ether1).
-
Action: Set to masquerade.
-
This rule ensures outgoing traffic from OpenVPN clients is properly routed through the internet-facing interface.
🪜 Step 4: Verify NAT Configuration
-
Ensure the OpenVPN server and client settings are correctly configured to route traffic.
-
Test the setup by accessing external resources from a connected OpenVPN client
🪜 Step 5: Consider Advanced Routing for Site-to-Site
-
For MikroTik OpenVPN site-to-site, create specific routing rules to avoid unnecessary NAT within the VPN tunnel.
-
Use NAT selectively to translate addresses only where needed. For deeper theoretical fundamentals, read our specialized breakdown regarding what is NAT translation mechanisms.
🪜 Step 6: Enable Logging for Troubleshooting
-
Add logging to your NAT rules during testing to ensure traffic flows as expected.
-
Analyze logs to identify and resolve potential issues.
🔑 Benefits of NAT in OpenVPN
-
Ensures seamless access to external networks for OpenVPN clients.
-
Simplifies routing in MikroTik OpenVPN site-to-site setups.
-
Enhances connectivity by properly handling private-to-public IP translation.
Enabling NAT is a vital step in creating a functional and secure MikroTik OpenVPN environment.
📜 7. Making and signing the certificates
Certificates are a fundamental part of securing your MikroTik OpenVPN setup. They authenticate and encrypt communications between the server and clients, ensuring secure data transmission. Below is a step-by-step guide to creating and signing certificates for your OpenVPN network.
🪜 Step 1: Understand the Role of Certificates
-
Certificates establish trust between the MikroTik OpenVPN server and its clients.
-
They provide encryption, ensuring secure communication.
🪜 Step 2: Create the Certificate Authority (CA)
-
On your MikroTik router:
-
Go to System > Certificates.
-
Click Add New Certificate and set the name (e.g., CA).
-
Configure the Key Usage to include certify and crl-sign.
-
Click Apply and then Sign to create the CA certificate.
🪜 Step 3: Generate Server Certificate
-
Create a new certificate for the server:
-
Set the name (e.g., Server).
-
Configure the Key Usage to include tls-server.
-
Set Common Name to match the server hostname or IP.
-
Sign the certificate with the CA created earlier.
🪜 Step 4: Generate Client Certificates
-
For each client:
-
Add a new certificate and set the name (e.g., Client1).
-
Configure the Key Usage to include tls-client.
-
Set the Common Name to the client’s unique identifier.
-
Sign the certificate with the CA.
🪜 Step 5: Export Certificates and Keys
-
Export the CA, server, and client certificates:
-
Right-click the certificates and select Export.
-
Save the private key and certificate files securely.
🪜 Step 6: Distribute Client Certificates
-
Provide the MikroTik OpenVPN client certificates and private keys to respective users.
-
These will be imported into the OpenVPN client configuration.
🪜 Step 7: Verify and Test
-
Import and verify the certificates on the MikroTik OpenVPN server and clients.
-
Test connections to ensure proper authentication and encryption.
✨ Benefits
-
Certificates enhance security for MikroTik OpenVPN configuration.
-
Enable robust authentication for both site-to-site and remote client setups.
🔓 8. Enabling the OVPN Server
To establish a secure and functional MikroTik OpenVPN setup, enabling the OVPN server is essential. This step ensures the server is ready to accept incoming OpenVPN client connections. Below is a step-by-step explanation using bullet points.
🪜 Step 1: Navigate to PPP Menu
-
Open your MikroTik RouterOS interface.
-
Go to PPP > Interface > OVPN Server to access the OpenVPN server settings.
🪜 Step 2: Configure Basic Server Settings
-
Enable the server by checking Enable OVPN Server.
-
Configure the following parameters:
-
Port: Default is 1194, but you can choose a custom port if needed.
-
Mode: Set to ip.
-
Certificate: Select the server certificate you created earlier (e.g., Server).
-
Auth: Choose the preferred authentication method, such as sha1.
-
Cipher: Use a secure encryption algorithm like aes-256-cbc.
🪜 Step 3: Assign the IP Pool
-
Under PPP > Profiles, create or modify a profile for OpenVPN.
-
Assign an IP pool to dynamically allocate IPs to connected clients.
-
Bind this profile to the OpenVPN server.
🪜 Step 4: Configure User Authentication
-
Go to PPP > Secrets and add user credentials:
-
Enter a Username and Password for each client.
-
Link the client to the OpenVPN profile created earlier.
🪜 Step 5: Test the OpenVPN Server
-
Connect using a configured MikroTik OpenVPN client.
-
Ensure that the server accepts the connection and assigns an IP.
🪜 Step 6: Fine-Tune Firewall Rules
-
Add firewall rules to allow OpenVPN traffic on the specified port (e.g., 1194).
-
Ensure NAT and routing rules are properly configured for external access. To evaluate data transmission properties between TCP and UDP modes during deployment, you may check our technical manual comparing the difference between TCP and UDP.
⚙️ Benefits of Enabling OVPN Server
-
Establishes a central point for MikroTik OpenVPN configuration.
-
Supports both site-to-site and remote client setups.
-
Works seamlessly with various clients, including MikroTik OpenVPN client setups and third-party tools like OpenVPN GUI.
By enabling the MikroTik OpenVPN server, you create a secure gateway for private communication across networks.
🔐 9. Editing the default-encryption PPP profile
The default-encryption PPP profile in MikroTik is critical for managing encryption settings and network behavior for VPN clients. Editing this profile ensures proper configuration for your MikroTik OpenVPN setup, including security settings and IP assignments. Follow these steps to make necessary adjustments.
🪜 Step 1: Access the PPP Profile Settings
-
Open the MikroTik RouterOS interface.
-
Navigate to PPP > Profiles to view available profiles.
-
Locate the default-encryption profile and double-click it to edit.
🪜 Step 2: Adjust the Local and Remote Address
-
Configure the Local Address to specify the router's IP for the VPN connection.
-
Set the Remote Address to the IP pool you created for OpenVPN clients.
-
This ensures clients receive IPs from the designated range.
🪜 Step 3: Modify the DNS Settings
-
Under the DNS section:
-
Specify primary and secondary DNS servers for connected clients.
-
Use reliable public DNS servers (e.g., Google DNS: 8.8.8.8) or internal DNS if applicable.
🪜 Step 4: Set the Use Encryption Option
-
Ensure the Use Encryption checkbox is enabled.
-
This enforces secure communication between the MikroTik OpenVPN server and its clients.
🪜 Step 5: Apply Routing Parameters
-
Use the Route setting to specify static routes if necessary.
-
This step is crucial for advanced setups like MikroTik OpenVPN site-to-site configurations.
🪜 Step 6: Verify Profile Binding
-
Check that the default-encryption profile is correctly assigned to your OpenVPN configuration:
-
Go to PPP > Secrets and verify the profile is linked to each VPN user.
🛡️ Benefits of Editing the Default-Encryption Profile
-
Ensures seamless integration with MikroTik OpenVPN client setups.
-
Provides secure, encrypted communication for all VPN clients.
-
Supports flexible configurations for site-to-site VPNs or remote access. For users contrasting security suites across distinct operational layers, reading our comparison on OpenVPN vs L2TP/IPSec offers critical design insights.
Editing the default-encryption profile is a key step in optimizing your MikroTik OpenVPN configuration for security and functionality.
👥 10. Creating a PPP account for the OpenVPN network
Creating a PPP account for your OpenVPN network is a crucial step in configuring user access. The PPP account is used to authenticate clients that connect to the MikroTik OpenVPN server, and it provides each user with their own set of credentials. Below is a detailed step-by-step explanation of how to create and configure a PPP account for your OpenVPN network.
🪜 Step 1: Navigate to the PPP Menu
-
Open your MikroTik RouterOS interface.
-
In the left menu, navigate to PPP > Secrets. This section is where you manage all user accounts that are used for PPP (Point-to-Point Protocol) connections, including OpenVPN.
🪜 Step 2: Add a New User Account
-
Click on the + button to add a new account.
-
Fill in the following details for the new PPP account:
-
Name: Enter a username for the client (e.g., vpn_user1). This is the identifier used to authenticate the client.
-
Password: Enter a strong password. This will be required when the client connects to the MikroTik OpenVPN server.
-
Profile: Select the PPP profile you want to use for this client. The default profile is usually default-encryption, which applies encryption settings for secure communication. You can create custom profiles if needed.
🪜 Step 3: Assign the PPP Profile
-
Ensure the client’s profile has the correct settings:
-
Local Address: This is the IP address that will be assigned to the MikroTik OpenVPN server for the connection.
-
Remote Address: This should be an IP address from the pool you created earlier for OpenVPN clients. This step ensures that the client gets a unique IP from the pool.
-
DNS Servers: You can specify DNS addresses to be assigned to the client when they connect. This is especially useful if you want to use internal DNS or public DNS servers.
🪜 Step 4: Configure PPP Secret Settings
-
Additional settings that can be configured:
-
Service: Select ovpn to link the account to MikroTik OpenVPN specifically.
-
Limit: Set any limits on the user account, such as bandwidth limits or session limits. This step is optional but useful for managing network resources.
-
Disabled: If you don’t want the account to be active immediately, you can leave it unchecked. Otherwise, ensure the account is enabled.
🪜 Step 5: Bind the User to the OpenVPN Server
-
Ensure that the MikroTik OpenVPN server is configured to accept incoming connections from clients using PPP accounts.
-
Under PPP > Interface, check that the OVPN server is enabled and running.
-
The user account you created will now be able to connect using OpenVPN.
🪜 Step 6: Test the PPP Account Configuration
-
After creating the account, attempt to connect to the MikroTik OpenVPN server using the OpenVPN client with the username and password you just created.
-
Verify that the client successfully authenticates and is assigned an IP from the correct IP pool.
🪜 Step 7: Monitor and Troubleshoot
-
Use the PPP > Active Connections menu to monitor client connections and troubleshoot if any issues arise.
-
If the connection fails, check for common issues such as incorrect credentials, IP pool assignment, or server misconfiguration.
🛡️ Benefits of Creating a PPP Account for OpenVPN
-
Authentication: Each client gets unique credentials for secure access to the VPN.
-
IP Assignment: Clients are dynamically assigned IP addresses from your configured IP pool.
-
Bandwidth Control: You can set limits on the bandwidth or session time for each user.
-
Custom Profiles: You can assign specific profiles to control encryption, DNS, and routing settings.
-
Granular Control: The ability to configure PPP settings gives you fine-grained control over VPN user access and network security.
Creating a PPP account for your MikroTik OpenVPN network ensures that each client has the necessary credentials to securely authenticate and connect to the VPN, while also providing flexibility in managing users.
📊 11. Comparison of VPN Implementations on RouterOS
To provide a clearer view of structural network selections, this table contrasts common operational attributes among standard remote methods built natively within MikroTik environments:
| VPN Protocol | Security Layer | Performance Index | Primary Use Case |
|---|---|---|---|
| OpenVPN (OVPN) | High (SSL/TLS & Custom Ciphers) | Stable & Adaptable | Cross-Platform Remote Access & Firewalled Topologies |
| L2TP/IPSec | High (Double Encapsulation) | Moderate | Legacy Corporate Infrastructure & Mobile Clients |
| PPTP | Low (Basic MPPE) | Fast (Low Overhead) | Basic Legacy Routing Where Security Isn't Critical |
💡 12. Expert Tips and Common Deployment Mistakes
When working with MikroTik RouterOS and OpenVPN configurations, minor infrastructure omissions can prevent successful connectivity or create latent vulnerabilities. Review these professional guidelines to ensure production readiness:
- Mistake 1: Forgetting DNS settings inside the profile. Remote clients may connect perfectly but fail to resolve any domain names because the DNS pushes were omitted. Always explicitly define active servers like
8.8.8.8inside your PPP Profile parameters. - Mistake 2: Failing to update System Clock/NTP. If your MikroTik router has an incorrect date and time settings, newly generated SSL certificates will instantaneously become invalid, leading to mysterious TLS handshake errors on client systems. Always synchronize your router via cloud NTP pools before making keys.
- Pro Tip: Set explicit MTU settings. To eliminate packet fragmentation across varying ISP channels, consider tuning your OVPN maximum transmission unit (MTU) fields between
1400and1450to yield optimized stability over complex public WAN paths.
🎯 Conclusion
In conclusion, configuring OpenVPN on MikroTik routers is an essential process for creating secure, reliable VPN connections, whether for remote access or site-to-site networking. By following the necessary steps, such as updating RouterOS, creating PPP accounts, configuring IP pools, and enabling NAT, you ensure seamless connectivity and robust security for your network. Key tasks, like setting up firewall rules, managing certificates, and creating a bridge for the OpenVPN network, provide additional layers of protection and functionality. Properly configuring the MikroTik OpenVPN client and server setup ensures that both sides of the connection communicate securely. Moreover, enabling features like OpenVPN UDP and pushing routes further enhance network routing flexibility. Whether you're configuring a basic VPN or a more complex MikroTik OpenVPN site-to-site setup, following these best practices will help ensure your network remains secure, stable, and performant.
People also read:

Leave A Comment