
FTP or File Transfer Protocol is a network protocol widely used to move files between a client and a server. To transfer files, much faster and more secure modes are being used. FTP is similar to HTTP (HyperText Transfer Protocol) in that it specifies a language for transferring data over a network.
FTP is unencrypted by default, so using it alone is not a good choice for secure data transmission. However, there is a new and improved version of FTP vsftpd, which is an excellent choice for usage. It is optimized for performance, security and stability and is used by default in many Linux distributions.
In this guide, we will install and configure an FTP server with vsftpd on Ubuntu.
For a deeper understanding of Ubuntu, check out our detailed guide on What is Ubuntu.
Prerequisites
Before we get started, we will need the following:
- An Ubuntu 18.04 server (or higher version)
- Access to a root user account or an account with sudo privileges.
- Basic understanding of Linux commands
Step 1: Install vsftpd server on Ubuntu
Start by updating your repository by entering the following code:
sudo apt update
Once the system is updated, we can go ahead and install vsftpd. This is a common open-source FTP utility that is used in Ubuntu.
sudo apt install vsftpd
When prompted to continue, don’t forget to press y and Enter.
Once the vsftpd is installed and set up on your server, it will not start automatically. Enter the following commands to start the service and for the service to start during the boot-up of the server.
sudo systemctl start vsftpd
sudo systemctl enable vsftpd
Step 2: Make a backup of the configuration files.
Before we will go-ahead to change some configurations, it's best to take a backup of the default configuration files. To create a backup, enter the following:
sudo cp /etc/vsftpd.conf /etc/vsftpd.conf_default
Step 3: Create an FTP User
To use vsftpd, we will create a dedicated FTP user. A new user is created as a security measure to limit server access to all other system users. We will be creating a user named sushi (be sure to change the name of the user to something relevant to you):
sudo useradd -m sushi
sudo passwd sushi
When prompted to enter the user account's password, enter it and confirm it. If you're setting up a web server alongside VSFTPD, you might find our guide on how to install OpenLiteSpeed web server on Ubuntu helpful for creating a robust hosting environment.
Step 4: Firewall Configurations
Ubuntu 18.04 comes with the UFW firewall and is usually active by default. The firewall will block FTP traffic as a security measure, but the FTP ports are needed for vsftpd to function properly. The FTP ports are port 20 and port 21, which can be opened by using the following command:
sudo ufw allow 20/tcp
sudo ufw allow 21/tcp
Step 5: connecting to the FTP server
Now that everything is set in place, you can connect to the FTP server. Open a new terminal window and enter the following command:
sudo ftp 23.222.34.6
Be sure to change the IP address with your server's IP address. You can log in to the FTP server using the user account you created earlier (step 3).
Additional Configurations
Authenticate FTP Users
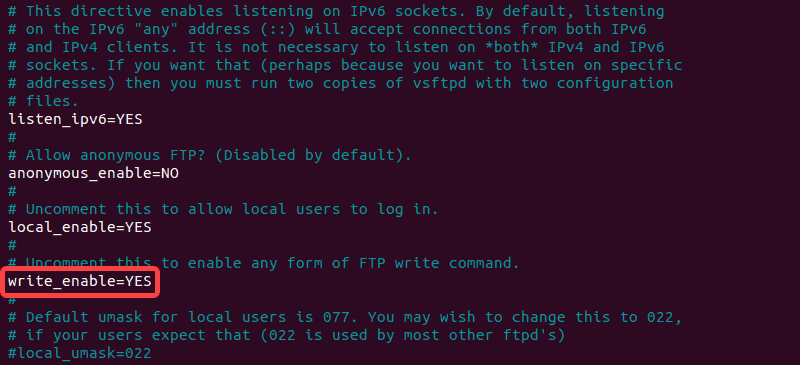
If you want to let the authenticated users upload files, you should make changes to the vsftpd.conf file. To make the changes, open the configuration file using the nano command:
sudo nano /etc/vsftpd.conf
Scroll through the file and find the entry write_enable=NO and change the value to YES, as shown in the picture below.
Save the file and exit the nano text editor. Now for the changes to come into effect, restart the FTP service:
sudo systemctl restart vsftpd.service
Now the users will be able to make changes through their home directory.
Change the default directory.
By default, the FTP server uses the /srv/ftp directory as the default directory. You can change this by creating a new directory and changing the FTP user home directory. This security measure keeps the FTP files separate from the default location.
To change the FTP home directory, enter the following:
sudo mkdir /srv/ftp/new_location
sudo usermod -d /srv/ftp/new_ftp ftp
Restart the vsftpd service to apply the changes:
sudo systemctl restart vsftpd.service
Now, you can put any files you want to share via FTP into the /srv/ftp folder (if you left it as the default), or the /srv/ftp/new_ftp/ directory (if you changed it).
If you're also working with web applications, you might be interested in learning how to install Django on Ubuntu to streamline your development process.
Limit User Access
Many security threats come across unsecured FTP servers. Therefore, limiting user access to the home directory is one of the key measures to take.
You can access the file by using the nano command:
sudo nano /etc/vsftpd.conf
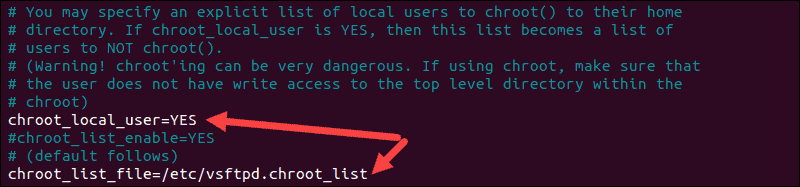
Uncomment the following command in the vsftpd.conf file.
chroot_local_user=YES
Create a user list file
To create a user list with access to the FTP server, you must make changes in the /etc/vsftpd.chroot_list file. Here you should add one user per line, and the list will be made accordingly.
For users managing web servers, you may also want to learn how to install Nginx on Ubuntu to handle web traffic efficiently alongside your FTP setup.
Once the changes are done, instruct your FTP server to limit this list of users to their home directories by editing vsftpd.conf:
chroot_local_user=YES
chroot_list_file=/etc/vsftpd.chroot_list
For the changes to come into effect, you should restart the vsftpd service:
sudo systemctl restart vsftpd.service
The list of blocked users from FTP access is stored in /etc/ftpusers. In this file, you can edit the list of blocked users. Edit this file and add one user per line. Don’t forget to save your changes when exiting the file.
Conclusions
In this tutorial, we went through the steps to set up an FTP server in Ubuntu 18.04 using vsftpd Ubuntu. We also covered configuration changes to make the server more secure and avoid security breaches.
Additionally, if you're looking to manage your server remotely, you might also be interested in setting up an RDP server on your Ubuntu VPS. This can be particularly useful for those who prefer a graphical interface for managing their server tasks. We recommend exploring guides on configuring an Ubuntu VPS server and RDP server for Ubuntu to enhance your remote management capabilities.
We hope that this article helped you set up the FTP server. If you have any feedback or questions, please let us know in the comments below.
People also read:
Leave A Comment