
Docker has revolutionized the way developers build, ship, and deploy applications. With containerization, you can create isolated environments that work consistently across different machines. However, learning how to install Docker on Mac can be a bit tricky, especially with the differences between Docker Desktop Mac, Docker CLI, and Apple Silicon compatibility.
In this guide, we'll walk you through multiple methods to install Docker on Mac, including:
-
Installing Docker using Homebrew
-
Setting up Docker without Docker Desktop
-
Docker Installation via the command line (CLI)
-
Running Docker on Mac M1, M2, and M3
-
Using and Install Docker Compose Mac
By the end of this article, you'll have a working Docker setup on macOS, whether you're a beginner or an advanced user.
📌 Want to install Docker on a Windows machine instead? Check out our How to Install Docker on Windows guide.
Choose the Best Way to Install Docker on Mac
So you want Docker on your Mac. Good call. But before you run a single command, let's talk about which path actually fits your situation — because picking wrong here means you'll be uninstalling and reinstalling in 30 minutes.
You've got three real options on macOS: Docker Desktop (the easy GUI route), Docker CLI paired with Colima (the lightweight, terminal-only route), or a fully manual setup (only if you really know what you're doing). Most folks should grab Docker Desktop and call it a day. It's the path of least resistance and it Just Works for 90% of use cases.
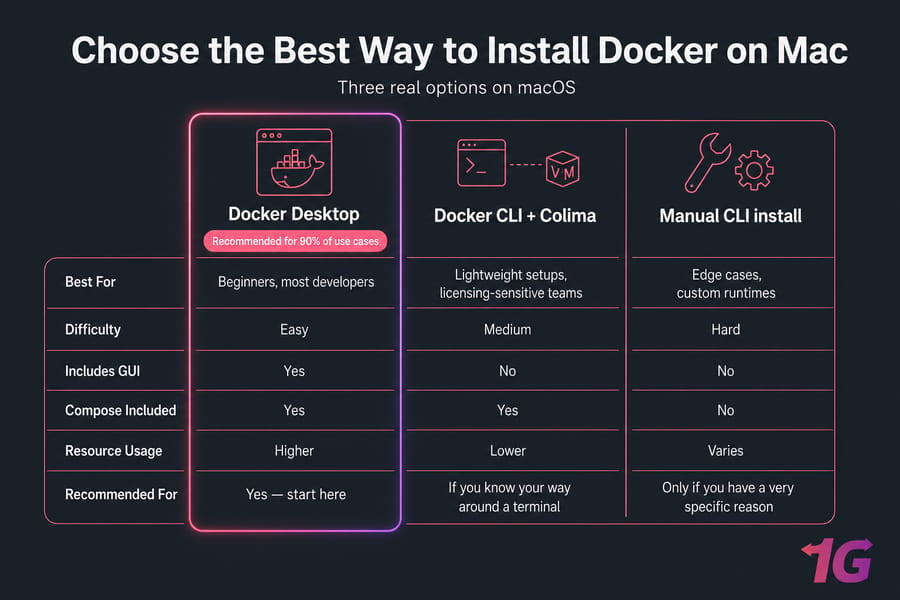
| Method | Best For | Difficulty | GUI? | Recommended? |
| Docker Desktop | Beginners, most developers | Easy | Yes | Yes — start here |
| Docker CLI + Colima | Lightweight setups, licensing-sensitive teams | Medium | No | If you know your way around a terminal |
| Manual CLI install | Edge cases, custom runtimes | Hard | No | Only if you have a very specific reason |
Use Docker Desktop if you want the easiest setup
One installer, a tray icon, Compose included, Kubernetes optional. You'll be running containers in five minutes.
Use Docker CLI + Colima if you want Docker without Docker Desktop
Lighter on RAM, no licensing concerns for larger orgs, and zero GUI overhead. Colima spins up a small Linux VM behind the scenes that the Docker CLI talks to. It's slick once it's set up.
Use manual CLI installation only for advanced setups
Honestly, skip this unless you're integrating with a custom virtualization stack. The "just install dockerd on macOS" advice you'll see floating around the web is misleading — the Docker daemon doesn't run natively on macOS. It always runs inside a Linux VM. Always.
Docker System Requirements for Mac
Before you start downloading, make sure your machine actually qualifies. Docker isn't fussy, but it has limits.
Supported macOS versions
Docker Desktop officially supports macOS Monterey (12), Ventura (13), Sonoma (14), and Sequoia (15) at the time of writing. If you're running anything older than Monterey, update first or you'll hit cryptic errors. Colima is a bit more forgiving but still expects a reasonably recent macOS.
Intel vs Apple Silicon Macs
Both work. Apple Silicon (M1, M2, M3, M4) Macs run Docker natively on ARM64, which is fast and efficient. Intel Macs use AMD64 by default. The architecture matters when you start pulling images — more on that later.
Do you need Homebrew?
Nope. Homebrew is optional. You can grab Docker Desktop straight from docker.com as a DMG. But if you're already a brew user, installing Docker through Homebrew keeps your tools in one place and makes upgrades trivial. If you don't have Homebrew yet and you only need Docker, skip it.
Method 1: How to Install Docker on Mac Using Homebrew
Homebrew is the easiest way to install Docker on macOS.
If you've got Homebrew, this is a one-liner:
brew install --cask docker
The --cask flag matters here. Without it, Homebrew installs only the CLI binary (which is a different thing — confusing, I know). With --cask, you get the full Docker Desktop application bundle dropped into /Applications.
Expected result: Homebrew downloads a few hundred megabytes, drags the app to Applications, and exits cleanly. No error output.
Launch Docker Desktop and complete first-time setup
Open Docker from Applications or Spotlight. macOS will throw a permission prompt — Docker needs privileged access to set up its networking helper and virtualization. Click through and enter your admin password when asked.
The whale icon will appear in your menu bar. It animates while the engine starts up. Give it 30–60 seconds the first time.
Sign in or skip sign-in
Docker Desktop will ask you to sign in to a Docker Hub account. You can skip this. Sign-in only matters if you're pushing images to private repos or hitting the unauthenticated pull rate limit.
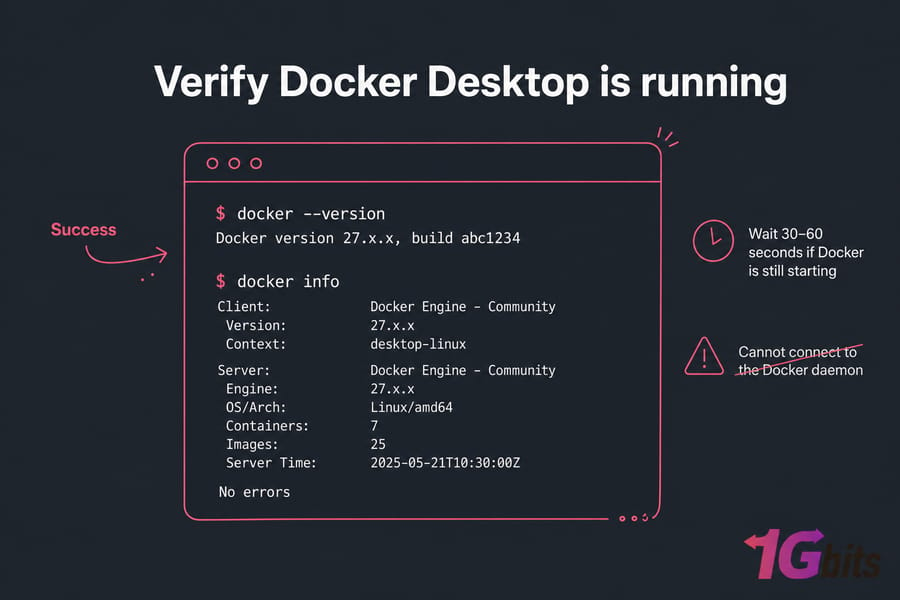
Verify Docker Desktop is running
Open a terminal and run:
docker --version
docker info
Expected result: docker --version prints something like Docker version 27.x.x, build abc1234, and docker info dumps a long block ending without errors. If docker info shows "Cannot connect to the Docker daemon," the app isn't fully started yet wait another 20 seconds.
Method 2: How to Install Docker on Mac Without Docker Desktop
Maybe Docker Desktop's licensing rubs you the wrong way. Maybe you want to keep your dev machine lean. Either way, the CLI + Colima combo is a legit alternative — and honestly, once you've used it, you might not go back.
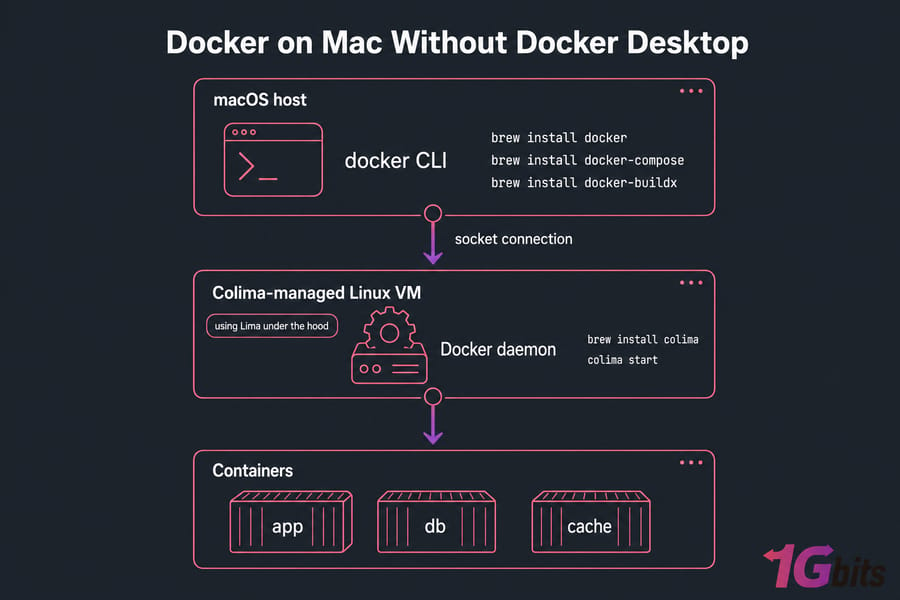
Install Docker CLI with Homebrew
This installs just the docker command, not the engine:
brew install docker
brew install docker-compose
brew install docker-buildx
At this point if you run docker version, you'll see the client version but the server section will fail. That's normal — there's no daemon yet. We're about to fix that.
Install and start Colima
Colima provisions a tiny Linux VM (using Lima under the hood) and runs the Docker daemon inside it. Two commands:
brew install colimacolima start
First boot takes a minute or two — it downloads a VM image and provisions networking. On Apple Silicon, Colima defaults to ARM64. You can override CPU, memory, and disk:
colima start --cpu 4 --memory 8 --disk 60
Expected result: Output ends with something like INFO[0042] done and the VM is running.
Set Docker context if needed
Colima automatically registers itself as a Docker context and sets it active. If for some reason your CLI is pointing at the wrong context (you'll know — commands will hang or fail), force it:
docker context lsdocker context use colima
Verify the Docker daemon connection
docker version
docker run hello-world
If the daemon section of docker version prints engine details and hello-world spits out the familiar "Hello from Docker!" message, you're done. Real Docker. No Desktop.
Method 3: How to Install Docker on Mac Using Command Line
If you prefer a manual installation, follow these steps:
curl -fsSL https://get.docker.com | sh
Verify installation:
docker --version
Start Docker:
dockerd
This method installs Docker CLI without requiring Homebrew. Honestly, skip this unless you're integrating with a custom virtualization stack. The Docker daemon doesn't run natively on macOS — it always runs inside a Linux VM.
How to Install Docker Compose on Mac
Compose comes up constantly, and the V1 vs V2 confusion still trips people up. Let's clear it up.
Docker Compose with Docker Desktop
Compose V2 ships with Docker Desktop. You don't install anything extra. Just use:
docker compose version
Note the space that's V2. It's a Docker CLI plugin, not a separate binary.
Docker Compose with CLI-based setups
If you went the Colima route, install Compose explicitly:
brew install docker-compose
Homebrew now installs Compose V2 as a Docker plugin by default.
docker compose vs docker-compose
Here's the deal. docker-compose (with a hyphen) is the legacy V1 binary, written in Python. It's deprecated. docker compose (with a space) is V2, written in Go, and shipped as a CLI plugin. Use the space version. Always.
Old tutorials on the internet still use the hyphen. If you copy-paste a command and it errors out with "command not found," try replacing the hyphen with a space.
Docker on Apple Silicon Macs (M1, M2, M3)
Apple Silicon Macs are excellent for Docker work — but there's one gotcha that keeps catching people.
Native ARM support
Both Docker Desktop and Colima run Docker natively on ARM64. Performance is great. Most popular images (nginx, postgres, redis, node, python) publish multi-arch builds on Docker Hub, so docker pull grabs the ARM variant automatically.
Running AMD64 images on Apple Silicon
Some images usually older or vendor-specific ones — only ship AMD64 (x86_64) builds. You'll see warnings like The requested image's platform (linux/amd64) does not match the detected host platform (linux/arm64/v8).
You can still run them. Docker Desktop uses Rosetta 2 or QEMU to emulate. Force the platform explicitly:
docker run --platform linux/amd64 some-old-image
Apple Silicon note: Emulated containers run noticeably slower than native ones — sometimes 3–5x slower for CPU-heavy workloads. For development this is usually fine. For benchmarking or production-like testing, it's not.
Common compatibility tips
- When building images, use docker buildx to produce multi-arch builds: docker buildx build --platform linux/amd64,linux/arm64 -t myimage .
- Enable Rosetta in Docker Desktop's settings (Features in development → Use Rosetta) for faster x86 emulation.
- If a specific tool only exists for AMD64, consider running it in a VM or remote box instead of fighting emulation locally.
What Is Docker Hub?
Docker Hub is a cloud-based registry where developers can store, share, and manage Docker container images. It acts as a central repository for pre-built container images, allowing users to pull official images like Ubuntu, Nginx, or MySQL, and push their own custom-built images.
Key Features of Docker Hub:
✅ Public & Private Repositories – Store container images securely.
✅ Automated Builds – Automatically build and update images from GitHub or Bitbucket.
✅ Docker Official Images – Access trusted, verified images from software vendors.
✅ Collaboration & Sharing – Share images with teams or the public.
To use Docker Hub, sign in and pull an image using:
docker login
docker pull ubuntu
This downloads the Ubuntu image to your local system.
Common Docker Installation Errors on Mac and How to Fix Them
This is where most tutorials drop the ball. Real installations break in real ways. Here's what you'll actually run into.
Cannot connect to the Docker daemon
Cause: The engine isn't running. Either Docker Desktop hasn't finished starting, or Colima is stopped.
Fix (Docker Desktop): Open the app from Applications. Wait for the menu bar icon to stop animating. Then retry.
Fix (Colima):
colima status
colima start
docker: command not found
Cause: The Docker binary isn't on your PATH. Common after a fresh Homebrew install on a new shell.
Fix: Make sure Homebrew's bin directory is in your PATH. For Apple Silicon:
echo 'eval "$(/opt/homebrew/bin/brew shellenv)"' >> ~/.zshrcsource ~/.zshrc
For Intel Macs, the path is /usr/local/bin/brew. Restart your terminal and try docker --version again.
Docker Desktop won't start
Cause: Usually a stale virtualization framework state, or a macOS permission prompt was denied earlier.
Fix: Quit Docker fully (menu bar → Quit Docker Desktop), then in Terminal:
killall Dockeropen /Applications/Docker.app
Still stuck? Reset to factory defaults from Docker Desktop's troubleshoot menu. You'll lose containers and images, but configs survive.
Docker Compose command not working
Cause: You're using docker-compose (hyphen) but only V2 is installed.
Fix: Use docker compose (space). If you genuinely need the legacy binary for an old project, install it separately, but you almost never do.
Permission prompts blocked by macOS
Cause: You denied a privileged helper prompt during install.
Fix: System Settings → Privacy & Security → look for blocked items related to Docker, click "Allow." Reopen Docker Desktop.
Port conflicts
Cause: Something else (Apache, another container, an IDE) is already on port 80, 8080, or 5432.
Fix: Find the offender: lsof -i :8080. Either kill it or map your container to a different host port: -p 8081:80.
How to Uninstall Docker on Mac Completely
Maybe you're switching methods. Maybe you're freeing up disk. Either way, a clean uninstall takes a couple of steps because Docker scatters files in a few places.
Warning: The cleanup steps below delete all your local images, volumes, and container data. If you have anything important — databases, config volumes, custom images — back them up first.
Remove Docker Desktop
Easiest way: open Docker Desktop, click the bug icon, choose Uninstall. Or from the command line:
/Applications/Docker.app/Contents/MacOS/uninstall
Then drag Docker.app from Applications to Trash. If you installed via Homebrew:
brew uninstall --cask docker
Remove Docker CLI, Compose, and Colima
colima stop
colima delete
brew uninstall colima
brew uninstall docker docker-compose docker-buildx
Delete local Docker data, images, and config
This wipes everything Docker stored under your home directory:
rm -rf ~/.docker
rm -rf ~/Library/Containers/com.docker.docker
rm -rf ~/Library/Application\ Support/Docker\ Desktop
rm -rf ~/Library/Group\ Containers/group.com.docker
rm -rf ~/.colima
That's the full nuke. Your Mac is Docker-free.
What to Do After Installing Docker on Mac
You've got Docker running. Now what? Here's the smallest practical next step.
If you're planning to deploy what you build locally, take a look at Docker VPS Hosting running containers on a real Linux host is a different (and faster) experience than running them inside a Mac VM.
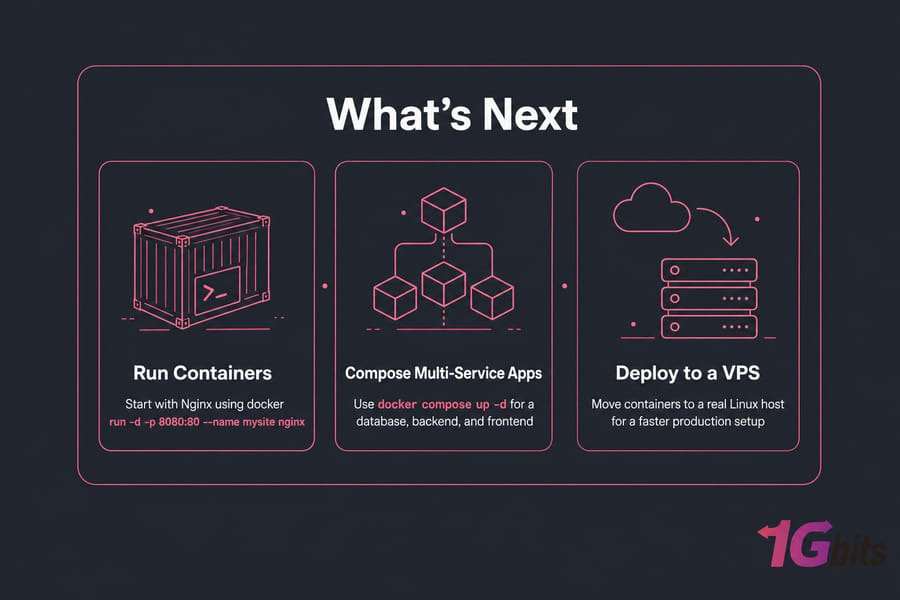
Run Nginx in a container
docker run -d -p 8080:80 --name mysite nginxopen http://localhost:8080
You just ran a production-grade web server in two lines. That's the magic.
Build your first image
Create a Dockerfile in any folder:
FROM node:20-alpine
WORKDIR /app
COPY . .
CMD ["node", "index.js"]
Then build and run:
docker build -t myapp .docker run --rm myapp
Learn Docker Compose and containers
Once you've got single-container basics down, Compose is your next step — it lets you describe multi-container apps in a single YAML file. Spin up a database, a backend, and a frontend with one docker compose up -d. From there, look at networking between containers, persistent volumes, and eventually orchestration if your project grows.
Conclusion
Installing Docker on Mac is simple, whether you use Homebrew, the command line, or prefer a Docker Desktop-free setup. Choose the best method based on your needs and start building containerized applications today!
For more detailed guides, check out:
🔗 How to Install Docker
🔗 How to Install Docker on Windows
🔗 What Is Docker Compose?

Leave A Comment