
This tutorial will go through the process of enabling audio on your Windows server machines. It can be a VPS, a dedicated server, or even a server at your home. A virtual private server (VPS) is a virtual machine that is used typically to upload and downloads large files.
If you are using a Windows dedicated server the process is similar but may involve additional configurations to optimize the server's performance and security. Dedicated servers offer more control and power, making them ideal for resource-intensive tasks and large-scale operations.
Virtual Server is suitable for running the web-based applications that need to be kept running always. In specific situations, we need to enable an Audio card that is not enabled by default. The following instructions will help you to enable an Audio card on a Windows VPS Server.
In this tutorial, we will cover the steps on how to enable Audio in:
- Windows Server 2003
- Windows Server 2008
- Windows Server 2012, 2016 and 2019
Enable Audio on a Windows Server 2003
You can Enable Audio on a Windows Server 2003 in easy five steps.
- Click Start, point to Administrative Tools and then click Terminal Services Configuration.
- Double-click on “RDP-TCP.”
- Select the “Client Settings” tab
- Clear the “Audio Mapping” check box and hit ok
- Reboot the server
Enable Audio on a Windows Server 2008
One of the benefits of using Windows Server 2008 is that you can use it as an upload and download server. In this case, you need to use neither an Audio card nor a Graphic card. But, in certain situations, we need to enable an Audio card. Here’s how to enable audio on your Windows server 2008:
- First login to your Windows Server 2008
- Move the mouse pointer to the lower left-hand corner of the screen until the Windows Start button appears, then right-click on it and choose Run.
- Type services.msc and hit Enter.
- Scroll down through the list of services until you see Windows Audio.
- Right-click on Windows Audio and then click on start
- Right-click Windows Audio and select Properties
- In the General tab, Startup type section, select Automatic
- Click Control Panel in the Start menu
- If using the Modern View, click Sound in the Hardware and Sound category.
- If you are using the Classic View, double-click the Sound icon.
- Select your default playback device and click Properties.
- Now go to the advanced tab and uncheck Give exclusive mode application priority.
- Save the settings by clicking OK twice!
Enable Audio on a Windows Server 2012 and upwards
The following steps can be used to:
- enable audio Windows Server 2012
- enable audio Windows Server 2012 R2
- enable audio Windows Server 2016
- enable audio Windows Server 2019
Let’s get started!
- First login to your Windows Server (2012, 2012 R2, 2016 or 2019)
- Move the mouse pointer to the lower left-hand corner of the screen until the Windows Start button appears, then right-click on it and choose Run.
- Type services.msc and hit Enter.
- Scroll down through the list of services until you see Windows Audio.
- Right-click on Windows Audio and then click on start
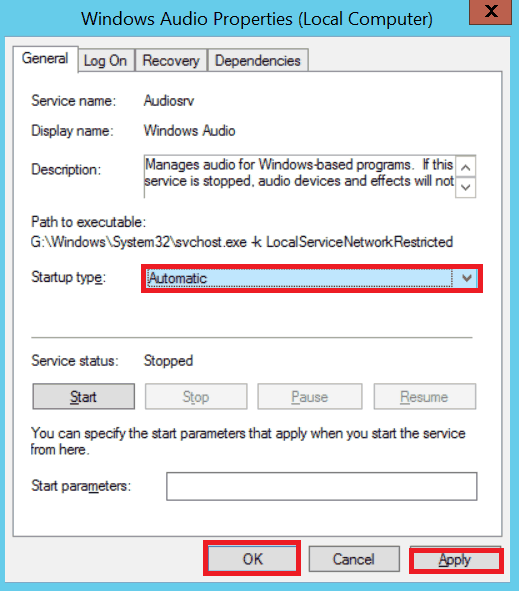
- Right-click Windows Audio and select Properties
- In the General tab, Startup type section, select Automatic
- Click Ok to finish the setup.
Now you have audio enabled!
Wrapping up
This tutorial taught us how to enable audio on Windows Server VPS and dedicated servers. We covered the different steps for all the Windows server versions from 2003 to 2019. We hope this tutorial helped you, and if so, let us know in the comment section below.
If you will come across any difficulties, be sure to let us know! We will get back to you as soon as possible.
People also read:
Leave A Comment