
In this tutorial, we will go through the easy steps to install VNC server on Ubuntu 18.04 and 20.04. The steps to install and configure the VNC server on both versions will be the same. In this guide, we will be using screenshots from Ubuntu 18.04.
What is VNC?
VNC, or Virtual Network Computing, is a graphical desktop sharing system that allows users to remotely control a computer's desktop interface through another computer or mobile device. With VNC, you can interact with a remote server using your keyboard and mouse.
The user will have complete access to operate a full desktop environment making it easier to manage files, software, and configuration settings on the server. When you have access to a GUI of a server than the command line, it’s always much easier for developers who are not yet comfortable with the commands.
If you're looking to set up other essential tools on your Ubuntu server, check out our guide on how to install Node.js on Ubuntu to get started with development seamlessly.
Note: The Ubuntu server and Ubuntu cloud editions do not contain a graphical user interface (GUI). Therefore we will first install a GUI before heading to the VNC server installation. However, due to the installation of the GUI, the server will utilize more resources than the original version.
Prerequisites
- An Ubuntu 18.04 server with a user with Sudo privileges (not root user).
- A local computer with a VNC client installed:
Step 1: Installing the desktop environment
As mentioned earlier, Ubuntu does not have a graphical desktop environment or a VNC server installed by default. To go forward with the installation process, we will install a desktop environment (DE) that is lightweight and ideal for a remote server.
Our choice of DE will be the Xfce, as it is available from the official Ubuntu repository. Since it is lightweight and fast, the connection will be smooth and stable even on slower internet connections.
- Once you connect to the server, you should first update your list of packages:
sudo apt update
- The next step is to install the Xfce along with some enhancements for the desktop environment:
sudo apt install xfce4 xfce4-goodies
During installation, you will be prompted to choose a default display manager. In this tutorial, the choice does not play a big role, so you can pick whichever one you prefer.
Depending on your system, it may take a couple of minutes.
Step 2: Install VNC server on Ubuntu
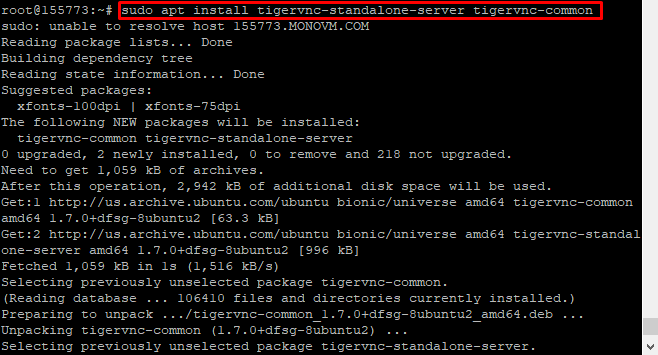
There are a different number of VNC server packages available in Ubuntu repositories. To name a few, we have TightVNC viewer, TigerVNC viewer, and x11vnc. Each server has its strengths and weaknesses however, for this tutorial, we will install TigerVNC as it is an actively maintained VNC server.
TigerVNC adds encryption for all supported operating systems and focuses on performance and remote display functionalities.
- You can install the TigerVNC server by entering the following command:
sudo apt install tigervnc-standalone-server tigervnc-common
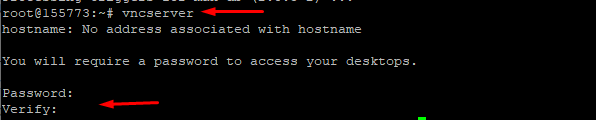
- Once the server is installed, you should add a VNC access password and create the initial configuration file. To set the password, enter the following:
Note: Do not use the sudo command when running the vncserver command!
vncserver
You will be prompted to add and verify a password to access the machine remotely. The required password must be between six and eight characters long. Anything longer than eight characters will be shortened automatically.
- You will be prompted with “Would you like to enter a view-only password (y/n)?” Here enter n and press enter.
The reason is that users who log in with the view-only password will not be able to control the VNC instances with the keyboard and mouse. Since you need to interact with the server, we will choose n.
Once you go forward from this step, the system will create the server's default configuration file and connection information. Now let me go through the configuration file details.
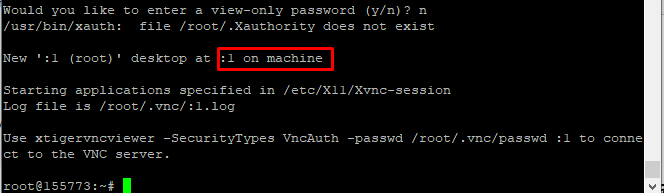
It launches a default server instance on port 5901 (5900 +1), the display VNC port. VNC refers to this as :1. You can see this after the hostname (pay attention to the red box). If you create a second instance with vncserver it will run on the next free port :2, which is 5902 (5900 +2). VNC can create multiple instances on other display ports with :3 referring to 5903, :4 referring to 5904, and so on. The main thing to note here is that when working with VNC servers :X is a display port that refers to the 5900 + X.
Your VNC server has been installed and running successfully. Now we will need to configure the server to launch Xfce and provide access to the server via the graphical interface.
You can also create a new user on Ubuntu to manage access to the VNC server. Learn how to easily add a user on Ubuntu by following our detailed guide on how to create a user on Ubuntu.
Step 3: Configure the VNC server
Even though the VNC server Linux is running, it needs to know which commands to execute when it starts. Since we will connect remotely, VNC Linux needs to know which graphical environment it should connect to.
During the initial startup, the Ubuntu VNC server runs the commands in a configuration file called xstartup in the .vnc folder (in your home directory). The startup script was created when we entered the vncserver command, but now we will create our own to launch the Xfce desktop environment.
Before we go ahead to change the VNC server configurations, we should stop any VNC server instances. We can stop the previous VNC instance that is running on port 5901 (:1) using the following command:
vncserver –kill :1
You will see an output as follows, however, with a different PID:

- Now let’s go ahead and configure TigerVNC to use Xfce. First, create the following file using the nano command:
nano ~/.vnc/xstartup
Enter the following in the text editor:
#!/bin/sh
unset SESSION_MANAGER
unset DBUS_SESSION_BUS_ADDRESS
exec startxfce4
- Save and close the file (Ctrl + x, y, Enter). The commands above will be automatically executed whenever the TigerVNC server is started or restarted.
- Now we need to provide the file with execute permissions. To make sure that the VNC server will be able to use this new startup file properly, enter the following command:
chmod u+x ~/.vnc/xstartup
Step 4: Run VNC as a system service
We’re almost done! In this step, we will set the VNC server to run as a system service. By setting the VNC server to run as a system service, you can start, stop and restart the VNC service as needed, just like other system services.
First, we need to create a new unit file as follows:
sudo nano /etc/systemd/system/vncserver@.service
Now copy-paste the following text into the text editor. Make sure to change the username to match your username.
[Unit]
Description=Remote desktop service (VNC)
After=syslog.target network.target

[Service]
Type=simple
User=test
PAMName=login
PIDFile=/home/%u/.vnc/%H%i.pid
ExecStartPre=/bin/sh –c ‘/usr/bin/vncserver –kill :%i > /dev/null 2>&1 || :’
ExecStart=/usr/bin/vncserver :%i –geometry 1440x900 –alwaysshared –fg
ExecStop=/usr/bin/vncserver –kill :%i

[Install]
WantedBy=multi-user.target
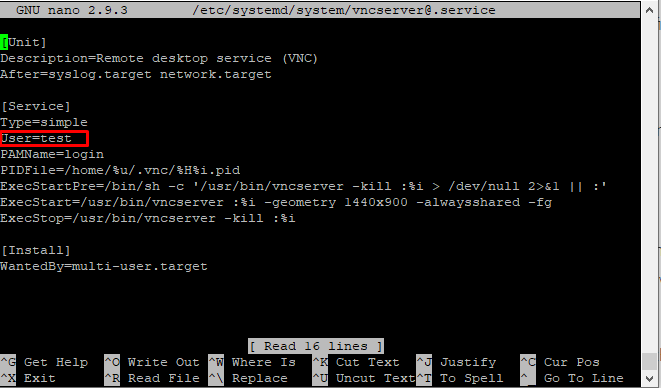
- Save and close the file.
- Notify systemd that we created a new unit file by entering:
sudo systemctl daemon-reload
- Now we can enable the unit file using the following command:
sudo systemctl enable vncserver@1.service
The number 1 after the @ sign defines the display port on which the VNC service will run. The VNC server will listen on port 5901, as discussed in the previous section.
- Stop the current instance of the VNC server if it is still running:
vncserver -kill :1
- Start the VNC service by executing:
sudo systemctl start vncserver@1.service
- Verify if it is running successfully by:
sudo systemctl status vncserver@1.service
If you get an output as follows, then the service is running perfectly.
vncserver@1.service - Remote desktop service (VNC)
   Loaded: loaded (/etc/systemd/system/vncserver@.service; indirect; vendor preset: enabled)
   Active: active (running) since Thu 2021-02-22 19:05:54 UTC; 4s ago
  Process: 9893 ExecStartPre=/bin/sh -c /usr/bin/vncserver -kill :1 > /dev/null 2>&1 || : (code=exited, status=0/SUCCESS)
 Main PID: 28968 (vncserver)
    Tasks: 0 (limit: 507)
   CGroup: /system.slice/system-vncserver.slice/vncserver@1.service
           ‣ 28968 /usr/bin/perl /usr/bin/vncserver :1 -geometry 1440x900 -alwaysshared –fg
Step 5: Connecting to the VNC server
VNC does not provide any security protocols when connecting, which can lead to packet sniffing and other cyber-attacks. To avoid any security breach, we will create an SSH tunnel that will securely forward the traffic from the local machine to the server using port 5901.
Set up SSH tunnelling on Linux and macOS
Enter the following command to create an SSH tunnel:
ssh -L 5901:127.0.0.1:5901 -N -f -l username server_ip_address
Don’t forget to change the username and server_ip_address with your username and the IP address of your server.
At this point, you will be prompted to enter the user password. Enter the password and press enter.
Set up SSH tunnelling on Windows
You can set the SSH tunnel in Windows using the PuTTY SSH client. When you open PuTTY, enter the server IP address in the Host Name (or IP address) section:
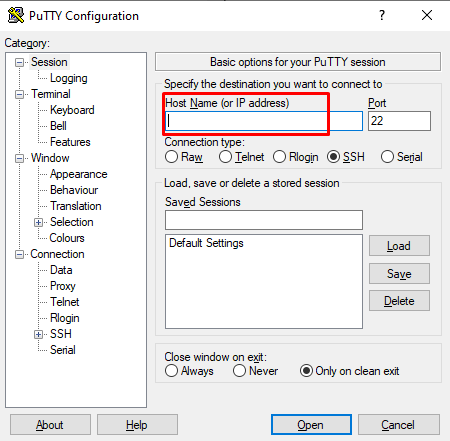
On the left-hand menu, you will see SSH under Connections. Expand it and select Tunnels.
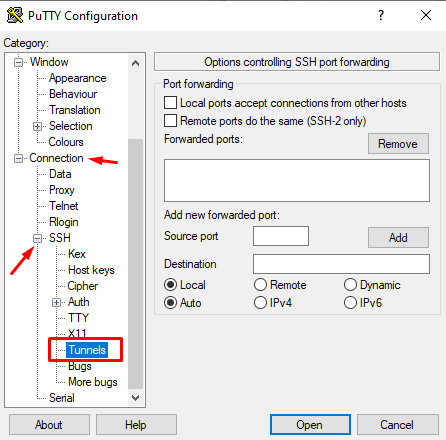
- Enter the source port as 5901
- Enter the destination as follows - server_ip_address:5901
- Click on Add
Now go back to the Session page to save the data and click on the Open button. This will open the connection where you will be prompted to enter the VNC password.
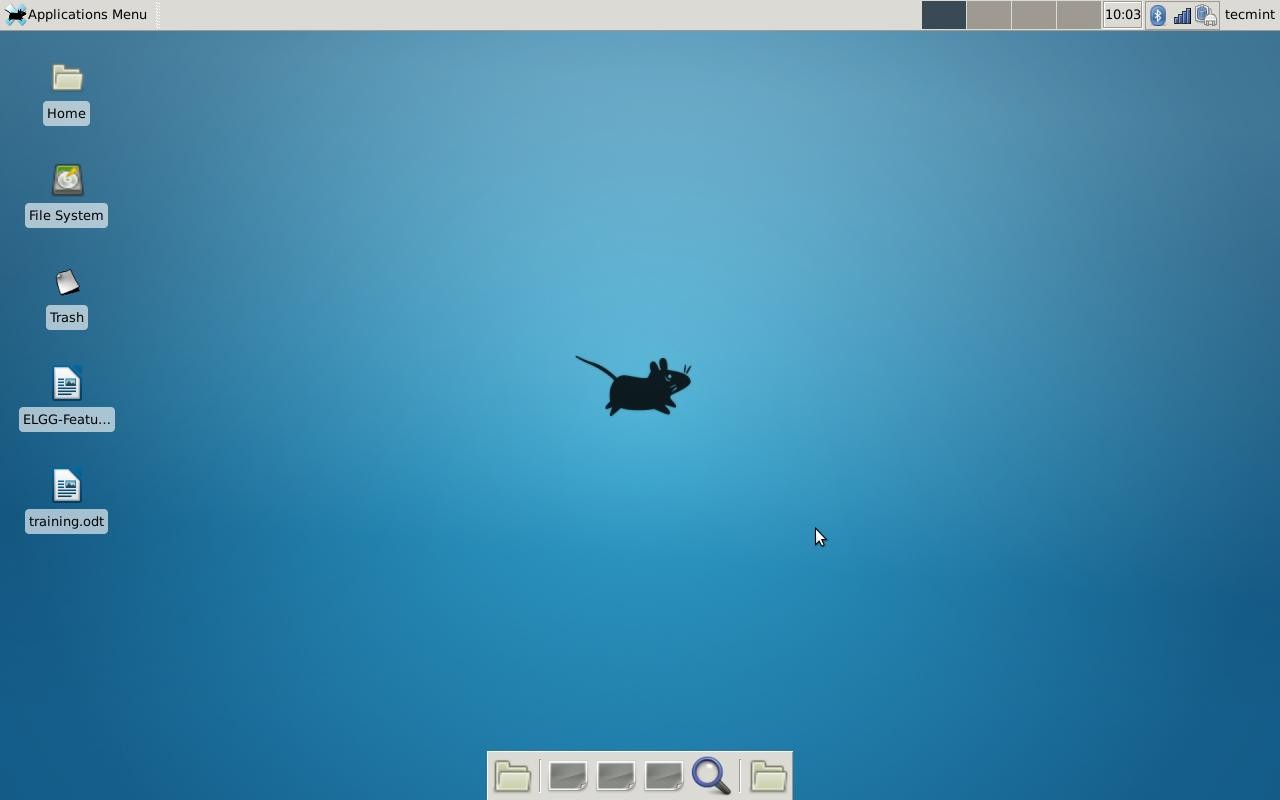
Once you are connected, you will see the default Xfce desktop interface.
To enhance your experience, you may want to install Chrome on your Ubuntu system. Check out our guide on how to install Chrome on Ubuntu for a smoother browsing experience while using the VNC server.
Conclusion
You have successfully installed and configured a VNC server that is up and running on your Ubuntu 18.04 (or 20.04) server. You can now easily manage your server files, software, and configurations from the comfort of your local desktop machine.
If you want to get your hands on a high-performing server, check our VPS solutions. With 1Gbits VPS servers, we provide VNC access by default, ensuring a smooth and secure connection. Whether you're setting up an Ubuntu VPS server for your development needs or configuring an RDP server on Ubuntu for remote access, our solutions are designed to meet your requirements efficiently. Your server will be provisioned in less than 30 seconds, allowing you to start working on your projects without delay. Experience the reliability and speed of our VPS servers today!
If you have any questions, feel free to leave a comment below.
People also read:
- How To Install VSFTPD on Ubuntu 18
- How to Check Ubuntu Version
- What is Git and how to install Git on Ubuntu
- RDP clients for Ubuntu systems
- How to install MariaDB on Ubuntu 18.04


")

