![How to Add Swap space on Ubuntu 16.04, 18.04 and 20.04 [Step-by-step]](https://1gbits.com/cdn-cgi/image//https://s3.1gbits.com/blog/2021/02/how-to-enable-swap-on-ubuntu259-847xAuto.jpg "How to Add Swap space on Ubuntu 16.04, 18.04 and 20.04 [Step-by-step]")
Are you running out of RAM on your Ubuntu system? Have you considered adding swap space to the system? One of the easiest ways to avoid out-of-memory errors is to add some swap space to your server. This article will go through what is swap and how to add swap space on Ubuntu 16.04, 18.04, and 20.04 systems!
What is a swap?
Swap is a specific area on the hard drive that has been designed to temporarily store data that can no longer be held in the RAM. When the RAM becomes full, inactive pages are moved from the RAM to the swap space.
This allows you to increase the amount of information that your Linux server can keep in its working “memory”. The speed will significantly decrease when written on the disk compared to the RAM, but it will provide the RAM to hold more in-use application data.
For more insights into the operating system powering your server, check out our guide on What is Ubuntu to better understand its features and benefits.
Having a swap space is a useful safety net when your system runs out of RAM. In general terms, a swap is a part of the hard disk that is used as the RAM. So let’s go ahead and set up the swap space on your Ubuntu server.
Note: Swap is recommended for system utilization in traditional spinning hard drives. Using swap on SSDs can cause hardware degradation over time. We do not recommend using swap on VPS servers or any other providers that utilize SSD storage.
How to add swap space on Ubuntu 16.04, 18.04 and 20.04
Note that the following steps will be suitable in all the mentioned Ubuntu versions.
Step 1: Check the system for swap
Before starting creating the swap file, make sure that the system has any swap space enabled. It is possible to have multiple swap partitions, but generally, one should be enough.
Once the command is run, your system does not have any swap space available if you don’t get any output. If you get something shown in the picture below, you already have a swap enabled on your machine.
sudo swapon –show

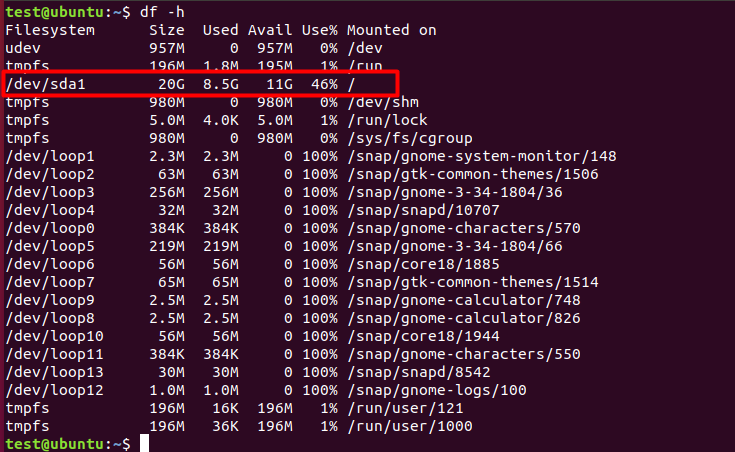
Step 2: Check if there is enough free space.
The user should have sudo privileges to activate swap. Make sure you have enough free space on your hard disk. You can do that by entering:
df –h
Step 3: Create a swap file
Now that we know there is enough space, we will create a 1G swap. If you want more swap space, you can replace the 1G with the size of the swap space needed.
sudo fallocate –l 1G / swapfile
This will create a 1 GB swap file. If fallocate is not installed or you get an error message, use the following command to create the swap file:
sudo dd if=/dev/zero of=/swapfile bs=1024 count=1048576
Step 4: Grant the right permissions
Only the root user should be able to write and read the swap file. This prevents standard users from being able to access the file, which can have significant security implications. You can set the correct permissions by typing in:
sudo chmod 600 /swapfile
If you're an Ubuntu enthusiast, you may also want to explore the best Ubuntu-based distros for alternative options tailored to different use cases.
Step 5: make it swap
By using the mkswap utility, set up a Linux swap area on the file.
sudo mkswap /swapfile
Step 6: Activate the swap file
To activate the swap file use the following command:
sudo swapon /swapfile
Check if the swap is enabled, you will see a result similar to this:
sudo swapon –show
Filename Type Size Used Priority
/ swapfile file 4194300 0 -1
Step 7: Setup swap permanent
Make the following changes in the /etc/fstab file to enable swap on system reboot using the nano command.
sudo nano /etc/fstab
Copy and paste the following line on the editor:
/ swapfile no swap sw 0 0
Step 8: Setup Kernel parameters
To set up the Kernel parameters, we will be using the swappiness kernel property. This defines how often the system will use the swap space. Swappiness can have a value between 0 and 100 where a low value will make the kernel avoid swapping whenever possible, and a higher value will make the kernel swap space more frequently.
If you're new to Ubuntu and want to explore essential commands for managing your system effectively, check out our guide on Ubuntu basic commands. It covers fundamental commands that will help you navigate and operate your system with ease.
The default swappiness value is 60. While this value is OK for most Linux systems, for servers you should set a lower value.
sudo vim /etc/sysctl.conf
vm.swappiness = 10
The optimal swappiness value depends on the system workload and how the memory is being utilized. Adjust the parameters in small increments to find the optimal value.
Now reload the sysctl configuration file by entering:
sudo sysctl -p
Congratulations! You have successfully enabled the swap on your Ubuntu system. For it to come into effect, restart your system.
Conclusion
By following the steps mentioned above, you will have some breathing room when the RAM is under pressure. Swap space is incredibly useful in avoiding some of the most common out-of-memory problems, especially when running resource-intensive applications on your Ubuntu VPS. This extra virtual memory can be a lifesaver in preventing system crashes and ensuring that your Ubuntu VPS remains stable and responsive even under heavy load.
If you come across any errors when attempting this tutorial, whether you're setting up swap space or configuring your Ubuntu RDP server let us know in the comments below, and we will take immediate action and help you out.
Also, people read:


")

