
This tutorial will explain the process to instal phpMyAdmin on Ubuntu 18.04. The method mentioned in this article will be the same for newer Ubuntu versions (like Ubuntu 20.04).
PHPMyAdmin is a web-based GUI (graphical user interface) that allows administrators to create, store and edit databases created with MySQL. While you can interact directly with the system console from the MySQL prompt, having a GUI is preferred by some database administrators.
Before we start with the installation process, we will need some basic steps completed:
To ensure your system is ready for installation, you may want to first learn how to install Ubuntu from a USB drive, which is a crucial step for setting up your server environment.
Prerequisites
- Connect to the server via SSH
- A root user or a user with root privileges
- MySQL database server up and running
- A complete installation of the LAMP stack on Ubuntu
Installing phpMyAdmin
phpMyAdmin is available through the official Ubuntu repository. However, updating the repository to the latest version is recommended before installing phpMyadmin. To update the system:
sudo apt update
Now, enter the following code to install phpMyAdmin on your system. When prompted to continue, don’t forget to press y.
sudo apt install phpmyadmin php-mbstring php-gettext
You will be presented with the following screen. Be sure to select apache2 and press enter.
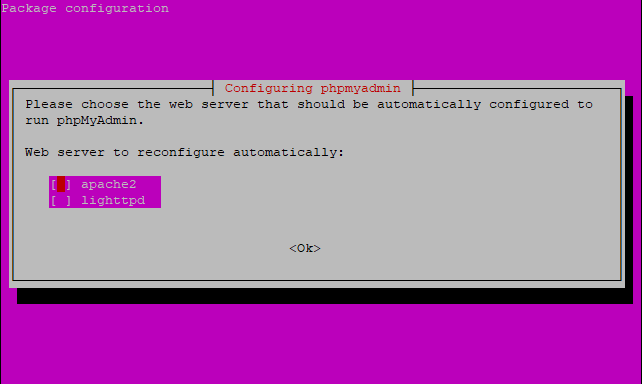
Note that the red highlighter does not select apache 2; you will need to press Spacebar and Enter. If you miss this step, the files needed for installation will not be transferred properly.
The next part of the installation will be presented with a screen, as seen below. Select Yes and press Enter.

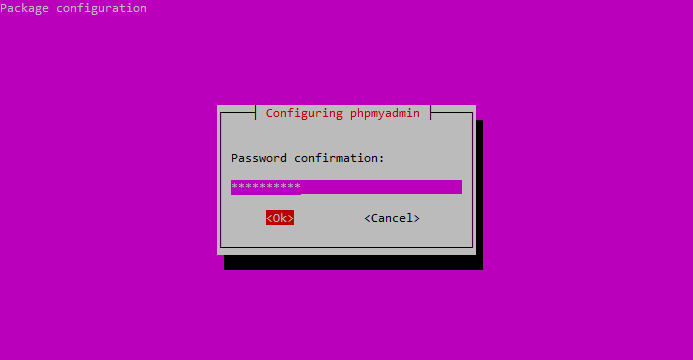
You will be prompted to enter a new password. Enter the password and confirm the password in the next window and press Enter.
Once the installation is finished, it will automatically add a phpMyAdmin configuration file in this location /etc/apache2/conf-enabled/phpmyadmin.conf.
Now, everything is set, and all that is left is to activate the PHP mbstring extension. You can do this by:
sudo phpenmod mbstring
Don’t forget to restart the service so that all the changes made will be properly applied to the system.
sudo systemctl restart apache2
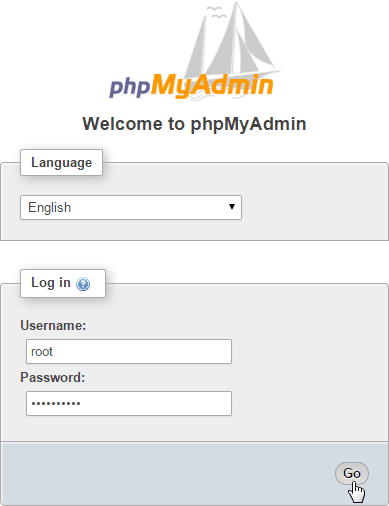
Once the installation completes, you should be able to point your browser to http://SERVER_IP/phpmyadmin (where SERVER_IP is the IP address of your hosting server) and log in.
Additionally, if you need to change the password for your MySQL or phpMyAdmin user, you can follow the steps in our guide on how to change your password in Ubuntu.
Managing user access privileges
During the installation process, a database user known as phpmyadmin was created. However, instead of logging in using this user with the administrative password set during installation, logging in using a different user is recommended. You can log in as either your root MySQL user or a user dedicated to managing databases through the phpMyAdmin web interface.
You can configure both these users, which will be covered in the coming steps starting from the root account.
Configure the MySQL root account for phpMyAdmin
The root MySQL user is set to authenticate using the auth_socket plugin by default rather than with a password. This is a good security practice, but it complicates things when allowing external programs to access the user (like phpMyAdmin).
To log in to phpMyAdmin as your root MySQL user, you will need to switch its authentication method from auth_socket to mysql_native_password if you haven’t already done it so.
Enter the following commands:
sudo mysql
Now check the current authentication method of your MySQL user accounts:
SELECT user,authentication_string,plugin,host FROM mysql.user;
+------------------+-------------------------------------------+-----------------------+-----------+
| user             | authentication_string                     | plugin                | host      |
+------------------+-------------------------------------------+-----------------------+-----------+
| root             |                                           | auth_socket           | localhost |
| mysql.session    | *THISISNOTAVALIDPASSWORDTHATCANBEUSEDHERE | mysql_native_password | localhost |
| mysql.sys        | *THISISNOTAVALIDPASSWORDTHATCANBEUSEDHERE | mysql_native_password | localhost |
| debian-sys-maint | *8486437DE5F65ADC4A4B001CA591363B64746D4C | mysql_native_password | localhost |
| phpmyadmin       | *5FD2B7524254B7F81B32873B1EA6D681503A5CA9 | mysql_native_password | localhost |
+------------------+-------------------------------------------+-----------------------+-----------+
5 rows in set (0.00 sec)
As seen above, the root user has the authentication type as auth_socket. To change it enter the following command:
ALTER USER 'root'@'localhost' IDENTIFIED WITH mysql_native_password BY 'password';
Note that, instead of the password, you should enter a password that you will remember. Once this command is run, confirm the changes using the flush command.
FLUSH PRIVILEGES;
Check the authentication methods again:
SELECT user,authentication_string,plugin,host FROM mysql.user;
You will see the root user's output with the authentication method changed.
+------------------+-------------------------------------------+-----------------------+-----------+
| user             | authentication_string                     | plugin                | host      |
+------------------+-------------------------------------------+-----------------------+-----------+
| root             | *DE06E242B88EFB1FE4B5083587C260BACB2A6158 | mysql_native_password | localhost |
| mysql.session    | *THISISNOTAVALIDPASSWORDTHATCANBEUSEDHERE | mysql_native_password | localhost |
| mysql.sys        | *THISISNOTAVALIDPASSWORDTHATCANBEUSEDHERE | mysql_native_password | localhost |
| debian-sys-maint | *8486437DE5F65ADC4A4B001CA591363B64746D4C | mysql_native_password | localhost |
| phpmyadmin       | *5FD2B7524254B7F81B32873B1EA6D681503A5CA9 | mysql_native_password | localhost |
+------------------+-------------------------------------------+-----------------------+-----------+
5 rows in set (0.00 sec)
Configure the MySQL user account for phpMyAdmin
If you don’t want to use the root account, we will need to create a user account specifically for this purpose. We will need to login into the MySQL shell once again.
sudo mysql
NOTE: If password authentication is enabled, as described in the previous section, you will need to use a different command to access the MySQL shell.
mysql -u root -p
Create a new user with a unique password (remember to replace your username and password with your new user password).
CREATE USER 'username' @ 'localhost' IDENTIFIED BY 'password';
Now to grant the permissions, enter the following command:
GRANT ALL PRIVILEGES ON *. * TO 'username' @ 'localhost' WITH GRANT OPTION;
That’s all. You can exit the MySQL prompt by entering:
exit
Access phpMyAdmin
Once the installation completes, you should now be able to point your browser to:
http://SERVER_IP/phpmyadmin
Here SERVER_IP is the IP address of your hosting server. You can log in using the root user or the newly created user. If the server were set up correctly, you would see a web page like the one below.
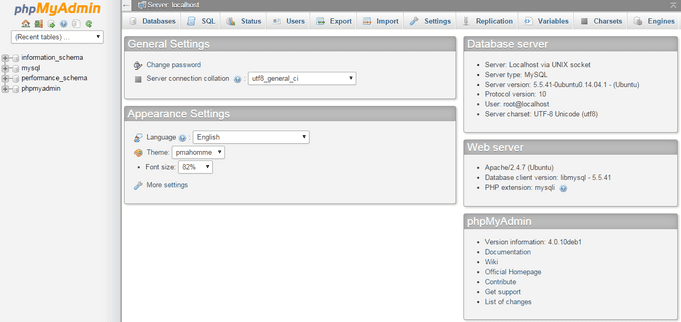
Once you click on Go, you will be redirected to the phpMyAdmin dashboard, as seen below.
Adding the proper security configurations
phpMyAdmin is a popular target for attackers, and you should take extra care to prevent unauthorized access. One of the easiest ways to do this is to place a gateway in front of the entire application using Apache’s built-in .htaccess authentication and authorization functionalities.
The easiest way to prevent these attacks is to add an access port to the entire application using an integrated Apache function.
To do this, we will need to access the configuration file using the nano command:
sudo nano /etc/apache2/conf-available/phpmyadmin.conf
You will need to scroll down to this section < Directory / usr / share / phpmyadmin> and add the following text afterwards:
AllowOverride All
Save and close the file. To implement all the changes, restart Apache:
sudo systemctl restart apache2
Now you have successfully enabled .htaccess for your application. The next step is to create it and implement the additional security measure.
You can create the file by entering the following.
sudo nano /usr/share/phpmyadmin/.htaccess
Enter the following data inside the file. Once done, don’t forget to save the file and exit the text editor.
AuthType Basic
AuthName "Confined Files"
AuthUserFile /etc/phpmyadmin/.htpasswd
Require valid-user
A brief explanation of the above text:
- AuthType Basic: This will implement password authentication using a password file.
- AuthName: This sets the message for the authentication dialogue box.
- AuthUserFile: This sets the location of the password file used for authentication.
- Require valid-user: This specifies that only authenticated users should be given access to this resource. This is what stops unauthorized users from entering.
Now let’s create a password file:
sudo htpasswd -c /etc/phpmyadmin/.htpasswd username
Replace the username with a name of your choice. You will need to add a password for the user you are creating, and then the file will be created.
Now when you log in to the server, an additional username and password will be set in place as a security measure.
Enter the credentials, and then you will be greeted with the normal phpMyAdmin login window.
If you're also looking to install Java on your Ubuntu system, check out our guide on how to install Java on Ubuntu for a seamless setup.
Wrapping up
This tutorial covered the steps to install phpMyAdmin on the Ubuntu 18.04 server. By adding this, the system administrator will have a web-based interface to work directly with the MySQL databases instead of using the console.
Additionally, we incorporated. htaccess as an additional security measure for our server to enhance its protection. For those managing an Ubuntu VPS server or setting up an RDP server on Ubuntu, these steps can also be adapted to fit those environments. These configurations ensure that whether you're administering a virtual private server or a remote desktop setup, your database management and security practices remain robust.
If you encounter any issues or have questions about the setup process, please feel free to contact us through the dedicated comment section below. We're here to assist with any challenges you might face with your server configurations.
People also read:
Leave A Comment