
Almost every modern Linux distribution comes with the standard repositories with a wide range of software required to run the Linux server or the desktop. Suppose the repository has a missing software or package. In that case, you will likely find a suitable repository where you can install packages and the package manager will efficiently manage the installation of the missing package.
Most developers follow this procedure, but why?
It is considered the best method to ensure the complete integrity of the platform that will make sure that the package manager is aware of the software installed on the Linux system. This makes updating the packages easier and fixes the potential bugs.
Ensure you install the desired software from the repositories as you can easily find all the dependencies. If you look for another source for installing the software, you might find yourself in incompatible dependencies.
But, today, there is very little chance that you might not be able to find any software there and need to install a package from any other source. But, somehow, you might find yourself installing the packages in Linux from any other source.
Some of the reasons can be the packages are not available in the repository, the package has been developed in-house, or you want a Linux package with customized dependencies that might not be available in the standard repository.
If you want to install the package from any other sources, then there are many things that you might need to consider. In this article, we are considering an example of installing the Audacity software from the source on Ubuntu 16.10. However, you can get this installed from the repository easily.
Considerable point
Installing any software or package from any other source is a simple process. You only need to download the source file, unpack it using zip or tar and then change it into the newly-created directory. After this, you need to run the following commands.
./configure
make
make install
These commands will work efficiently for the applications built with the autoconf/automake if the distribution meets the required dependencies mentioned in the README file in the source. This way, you can install the package and use it. But things are getting complicated.
Another loop in the modern system is that you will not get all the necessary tools in Ubuntu for building from the source. For resolving this issue, you first need to install the autoconf with the following command.
sudo apt-get install autoconf
You can install the build-essentials and the build-dep packages as per the available version of Ubuntu from the Ubuntu software center. You can install both packages using the following command.
sudo apt-get install build-essential build-dep
If you are working on Fedora, you can use this command to install the yum-builddep package.
sudo yum install yum-utils
Installing a package from source with build-dep
If you want to install a package from the source and avoid the dependency problem, use the build-dep tool. Suppose you want to install the Audacity with the help of the build-dep. Your first move should be uncommenting the deb-scr listing that is available in the /etc/apt/sources.list.
If you're working with network configurations during your package installations, it might be helpful to ensure that your DNS settings are correctly configured. For guidance on how to change DNS settings in Linux, check out our detailed guide on how to change Linux DNS.
Go to the file, open it in the editor of your choice, and then uncomment out the two deb-src listings. You can uncomment the deb-src listings from the file by removing the leading, which is a comment in Linux. You can learn more about comments from our basic Linux commands article.
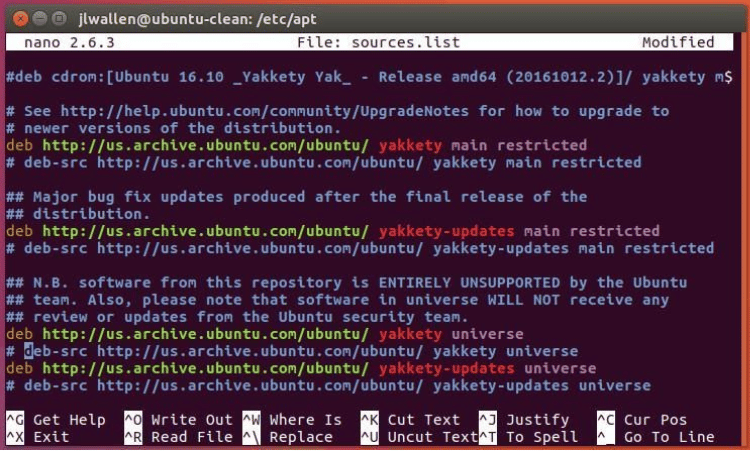
Save the desired changes and then close the specific file. After this, you need to run the sudo apt-get update (sudo apt update) for updating the apt. Once the installation procedure has been completed successfully, you must start building the Audacity package from the source.
Now, you need to use the updated apt for installing the required dependencies for the Audacity. You can achieve this by running the following command.
sudo apt-get build-dep audacity
Once the command stops running, you can start with the download of the source package using the following command.
sudo apt-get source audacity
Go to your current directory; you will see a newly-created directory with “audacity-XXX”, where XXX specifies the release number. Go to the installed package’s specific directory and run the following commands.
./configure
make
sudo make install
The above command will successfully install the Audacity and is ready to use. If there is any failure during the installation, you need to revert to using the dpkg tool as shown below.
sudo dpkg-buildpackage -b -uc -us
Where
- b will determine the built binary
- uc will choose not to sign the changes file.
But what could be the reason for installing a source package rather than having problems regarding the dependencies? The answer might be related to the ./configure command.
The working of the configure command
Mostly, you can run the ./configure command without passing any arguments. Sometimes, you might run the configure command for configuring the software to meet specific requirements.
Thus, you can use the “make” tool for this purpose. For getting the various options that can be used with the configure command, you can run the ./configure -help command.
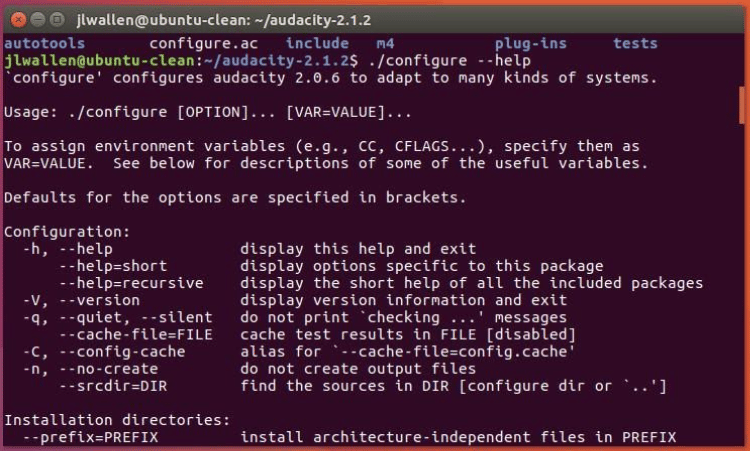
These options will work differently and can mean the difference between if the application is installed or not. Every application will display different options for the ./configure command, so make sure you use the correct command before issuing the ./config.
Below are the available options-
- –prefix= it will help you for installing the architecture-independent files within a non-standard location such as –prefix=/opt)
- –build=it will help you configure for a specific system architecture
- –host=it will host the system’s architecture where you will be running the desired file and compile that specific application on one machine and run it on another without any compatibility issue.
- –disable-FEATURE for disabling the specific features of an application
- –enable-FEATURE for enabling the specific features of an application
- –with-PACKAGE=yes it will allow you to use a specific PACKAGE
- –without-PACKAGE it will not allow you to use a specific PACKAGE)
Using Git
Here we will consider another example where we will use the git command for installing the package. As Ubuntu does not come with git installed, we first need to install the git using the following command from the Ubuntu packages list.
sudo apt-get install git
Once you install the git package successfully, you can download the necessary sources for the Clementine audio player using the following command.
git clone https://github.com/clementine-player/Clementine.git
After you download the desired git package, go to the specific directory with the help of the cd command. Run the following simple commands for building the player from the source.
cd bin
cmake ..
make -j8
sudo make install
After the above command, the clementine will be installed. If you have some dependencies issues, you can check and install the required dependencies. For installing dependencies for clementine, run the following command.
sudo apt-get build-
Conclusion
Now, you have a complete understanding of how to install packages from repositories and sources. Now you must know how to handle the installation. So go through the article to understand various options available for installing packages. Once you decide which option to use, you can easily install with the right option. You can also buy linux vps server to practice it on a routine basis.
People are also reading:

Leave A Comment