
PowerShell is a powerful Windows, Mac, Linux, and other operating systems tool. It allows users to automate their recurring tasks with ease and save time. However, to use the tool, you must first be familiar with commands and how to use them to manage operations in PowerShell.
In this tutorial, we’ll go over all the necessary PowerShell commands when creating or managing files. If you want to know how to create, delete, copy, or move files using PowerShell, you’re in the right place. Moreover, we’ll teach you how to create multiple files with different formats simultaneously!
Keep reading to find out more!
How can I create different types of files using PowerShell?
Suppose your computer’s OS doesn’t operate as it should, and you must use PowerShell to manage your files and folders. Or, you are more comfortable using simple commands to back up and access your files instead of going through many actions and wasting time.
In these cases, you can create and manage any files using the commands below. However, if you want to do more than that, stay tuned through the rest of this guide!
1. Creating a text file
The most frequently asked question on Google on this topic is, “How do I create an empty text file in PowerShell?”
So, let’s first answer this question and then move on to other commands. You can use either of the commands below to create an empty text file in your desired path:
New-Item -Path ‘path\filename.txt’ -ItemType File
New-Item path\filename.txt

For instance, you may want to create a file named ‘NewFile’ in the Users’ folder on your PC's ‘C drive’. In that case, change the above commands as mentioned below:
New-Item -Path ‘C:\Users\NewFile.txt’ -ItemType File
New-Item C:\Users\NewFile.txt
As you can see, you need to replace ‘path’ with your desired direction and ‘filename’ with the file’s title.
PS: run PowerShell as administrator to make changes on your PC, like creating files or folders.
2. Creating other file types
Creating any file you want in any path on your computer is possible. All you have to do is to use the previous command and only change the file extension. For instance, as you may know, a Word document comes with the “.docx” or “.doc” extension.
As a result, to create a Word document, key in the following commands:
New-Item -Path ‘path\filename.docx’ -ItemType File
New-Item path\filename.docx
Similarly, the file format in PDF is “.pdf” or in PowerPoint is “.pptx”
Here’s a list of the most popular file extensions:
- .doc and .docx
- .html and .htm
- .odt
- .xls and .xlsx
- .ods
- .ppt and .pptx
- .txt
3. Creating multiple files at the same time
If you want to not only create multiple files but also create files with different formats, use the following command:
New-Item -Path ‘path\filename.txt’ , ‘path\filename.docx’ -ItemType File
Just as you can see, creating as many files as you want is possible. All you have to do is to add a comma between each file and include the path and file name in apostrophes. If you know a bit of coding, it all gets much easier to understand.
As an instance, you can create two different file types simultaneously by entering the below command:
New-Item -Path ‘C:\Users\NewFile.txt’ , ‘C:\Users\NewFile.docx’ -ItemType File
4. Checking for already existing files
Sometimes, you may need to check if a specific file name exists in your computer’s drive. Suppose you want to ensure the files have been successfully created, or maybe the file creation has failed because another file exists with the same name.
In those conditions, type the following command and press enter:
$fileToCheck = "C:\Users\NewFile.txt"
if (Test-Path $fileToCheck -PathType leaf)
{
exit
}
else {
New-Item -Path 'C:\Users\NewFile.txt' -ItemType File
}
Replace your file’s name and path in the necessary parts before hitting Enter. This command will search for the specific file name and create a file if there’s no match. Otherwise, it’ll exit before taking any action.
?? Level up your Windows experience with our Windows VPS! ?? Unleash the magic of virtualization for unparalleled performance and flexibility. ??
5. Removing a file
After searching for a file, you may find a file with a similar name in the desired directory. So, you may want to remove it and add another empty file. In that case, execute the following command:
$fileToCheck = "C:\Users\NewFile.txt"
if (Test-Path $fileToCheck -PathType leaf)
{
Remove-Item $fileToCheck
}
else
{
Exit
}
6. Adding content to a text file
In addition to creating files with PowerShell, you can add any content to the file without opening it on your computer. All you have to do is to run PowerShell as administrator and use the following syntax:
Set-Content path\filename.txt ‘content’
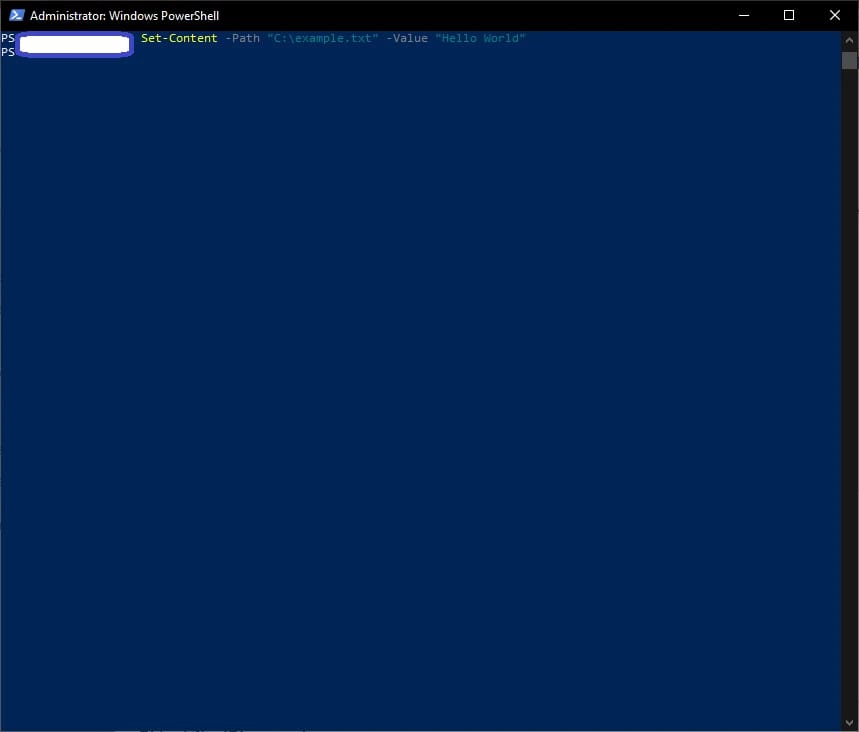
For example, you can execute the following command to add “Hello World” to the file you have already created:
Set-Content C:\Users\NewFile.txt ‘Hello World’
To go beyond and make sure the right content is added to your file, run the following command to read your file:
Get-Content C:\Users\NewFile.txt
After pressing the Enter key, you should get the following output:
Hello World
7. Creating a folder
Last, you can create a folder using PowerShell by reviewing one simple command. All you have to do is to use the same syntax as creating a file and only change the value of the item type:
New-Item -Path ‘path\foldername’ -ItemType Directory
In this example, change the path with your desired directory and foldername with your folder's title. Such as:
New-Item -Path ‘C:\Users\NewFolder’ -ItemType Directory
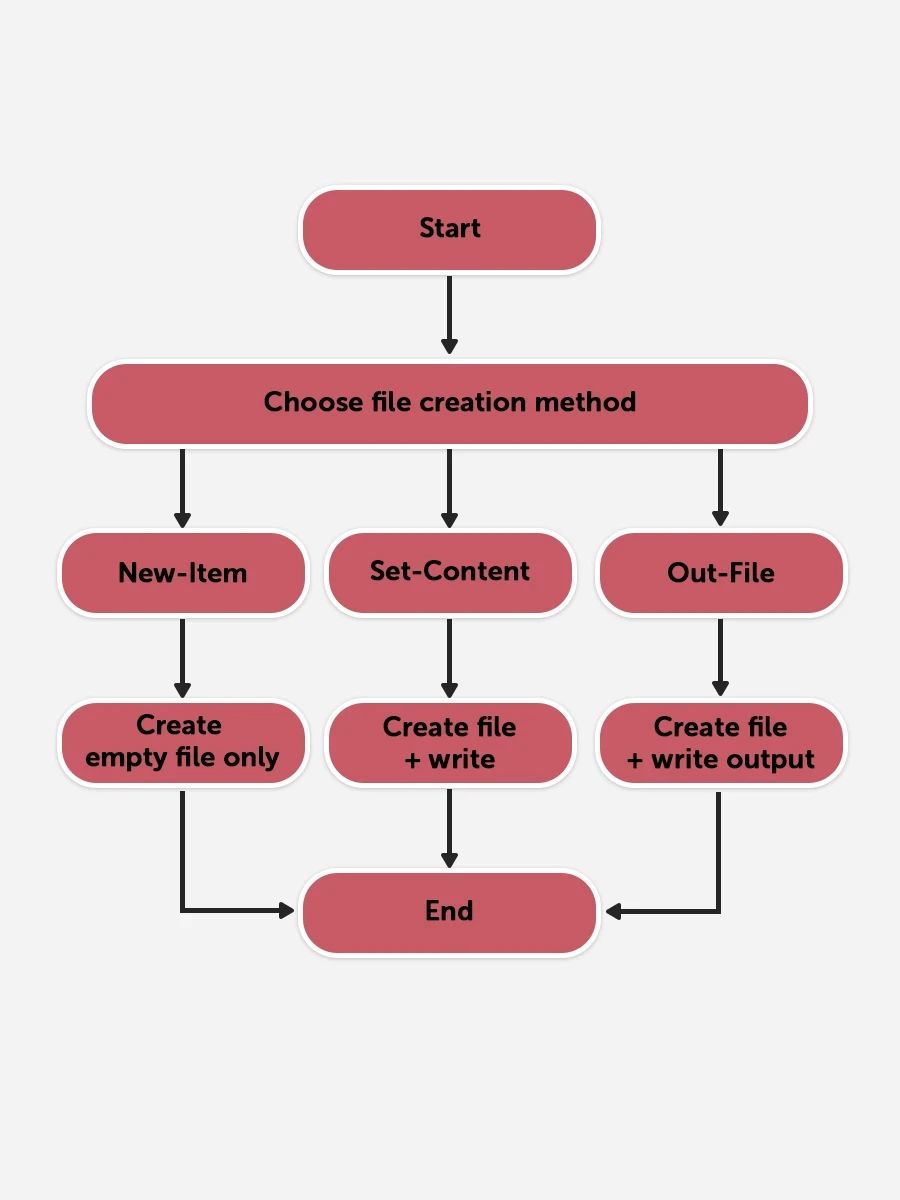
|
Method |
Command Example |
Creates Empty File? |
Writes Content? |
Use Case |
Pros |
Cons |
|
New-Item |
New-Item -Path "file.txt" -ItemType File |
Yes |
No |
Quickly create empty file |
Simple and fast |
Does not write content |
|
Set-Content |
Set-Content -Path "file.txt" -Value "Hello World" |
Yes |
Yes |
Create and write content |
Good for initial text write |
Overwrites full content |
|
Out-File |
"Hello World" | Out-File -FilePath "file.txt" |
Yes |
Yes |
Create file with command output |
Flexible for command output |
May overwrite file |
Bottom line
You can use or expand many different commands to create different file types. It all depends on your coding needs and preferences. In this guide, we reviewed some of the simplest syntaxes of commands that are understandable to a general audience.
But feel free to change the commands as you need and be more creative to expand the number of actions you can do by executing fewer commands.
People also read:

Leave A Comment