
Setting up a reverse proxy with NGINX is a powerful way to optimize and secure your web applications. In this guide, we'll walk you through how to configure an NGINX reverse proxy, ensuring your server setup is efficient and reliable. Understanding how to configure NGINX as a reverse proxy is essential for developers and system administrators looking to balance loads, enhance security, or direct traffic to different backend services. Whether you're exploring how to set up NGINX as a reverse proxy on Linux, how to configure nginx as a reverse proxy on windows, or even within a Docker container, this tutorial covers the essentials. We'll also delve into specific scenarios, such as how to configure NGINX as a reverse proxy for Jenkins or how to configure nginx as a reverse proxy for apache, and how to set up an HTTPS reverse proxy. By the end, you'll know how to configure a NGINX HTTPS reverse proxy for your environment, making the process of how to configure nginx as reverse proxy, setting up NGINX as a reverse proxy server straightforward and effective. For reading definition of Neginx, visit What is Nginx?
Prerequisites for Configuring an NGINX Reverse Proxy Server
Before diving into the process of how to setup a reverse proxy nginx, it's crucial to ensure that you have the necessary prerequisites in place. Configuring an NGINX reverse proxy server can greatly enhance the performance and security of your web applications, but it requires careful preparation and planning. In this section, we'll break down the essential prerequisites step by step to help you prepare for the task ahead.
1. Setting Up SSL/TLS Certificates
If you're planning to set up a secure HTTPS reverse proxy, you'll need to obtain and install SSL/TLS certificates on your NGINX server. This step is crucial for encrypting the traffic between clients and the reverse proxy, ensuring that sensitive data remains secure.
There are several ways to obtain SSL/TLS certificates, including using Let's Encrypt, a free and widely-used certificate authority. Once you have the certificates, you'll need to configure NGINX to use them. This is an essential part of how to configure a NGINX HTTPS reverse proxy on Windows or any other platform.
2. Preparing Backend Servers
A reverse proxy server needs to know where to forward incoming client requests. This requires preparing your backend servers—the servers that host your web applications or services. Ensure that these servers are properly configured and accessible from the NGINX server.
When setting up NGINX as a reverse proxy, you’ll need to define upstream server blocks in your NGINX configuration, specifying the IP addresses or domain names of your backend servers. This step is vital whether you're following a guide on how to set up a Docker NGINX reverse proxy server example or configuring a more traditional server environment.
3. Configuring Firewall and Security Settings
Security is a top priority when configuring an NGINX reverse proxy server. Before you begin, ensure that your firewall is properly configured to allow traffic on the necessary ports, typically port 80 for HTTP and port 443 for HTTPS.
Additionally, review your server's security settings to protect against common threats such as DDoS attacks, unauthorized access, and SQL injections. Implementing security best practices is essential for setting up NGINX as a reverse proxy server in a safe and secure manner.
4. Installing and Configuring Docker
If you're planning to run NGINX inside a Docker container, you'll need to install and Nginx reverse proxy docker. Docker simplifies the deployment and management of applications by packaging them into containers. This is particularly useful if you're following instructions on how to setup a docker nginx reverse proxy server example Once Docker is installed, you can pull the official NGINX Docker image and create a container that runs NGINX as a reverse proxy. Docker allows for greater flexibility and portability, making it easier to manage NGINX configurations across different environments.
5. Understanding NGINX Configuration Files
To successfully configure an NGINX reverse proxy, you'll need to edit the NGINX configuration files. These files are typically located in /etc/nginx/ on Linux systems or in the directory where you installed NGINX on Windows.
The main configuration file is nginx.conf, but you may also work with site-specific configuration files located in the sites-available and sites-enabled directories. Familiarizing yourself with the structure of these files and the directives used in them will help you when following tutorials on how to use NGINX as a reverse proxy or how to configure Apache reverse proxy settings.
6. Testing Your Configuration
Before going live, it's crucial to test your NGINX reverse proxy configuration to ensure everything is working as expected. You can test the configuration file for syntax errors using the command:
sudo nginx -t
If the test is successful, you can reload NGINX to apply the changes. Testing is an integral part of setting up NGINX as a reverse proxy server, whether you're how to setup nginx reverse proxy centos 7 or Nginx reverse proxy Windows .
By carefully following these prerequisites and ensuring everything is in place, you will be well-prepared to configure NGINX as a reverse proxy. Whether you're interested in learning how to configure an NGINX reverse proxy, setting NGINX reverse proxy on CentOS 7, or exploring Docker-based solutions, these foundational steps will set you up for success.
How to Configure an NGINX Reverse Proxy?
1. Install NGINX

How to configure an nginx reverse proxy ubuntu? To install NGINX on Ubuntu, you first need to ensure your system’s package index is updated. Open a terminal window and execute the following commands:
sudo apt update
sudo apt install nginx
Once the installation is complete, you can start the NGINX service using:
sudo systemctl start nginx
To ensure that NGINX runs automatically at startup, enable the service:
sudo systemctl enable nginx
Now that NGINX is installed, you can proceed with learning how to configure NGINX as a reverse proxy, which allows you to direct client requests to backend servers. If you learn how you can enter neginx, read Nginx Proxy Manager Default Login.
2. Configure the File Structure
When setting up an NGINX reverse proxy, configuring the file structure is a crucial step that ensures everything runs smoothly. This process involves creating and organizing configuration files to direct traffic appropriately, whether you’re using Ubuntu, Docker, Windows, or managing multiple domains. In this section, we'll walk you through how to configure an NGINX reverse proxy file structure step-by-step, covering various scenarios like setting up HTTPS, handling multiple domains, and using NGINX Proxy Manager.
The Basics of NGINX Configuration Files

Before diving into how to configure an NGINX reverse proxy, it’s essential to understand the primary configuration files you'll be dealing with:
-
nginx.conf: The main configuration file located in /etc/nginx/. It includes global settings and can reference other configuration files.
-
sites-available/: This directory contains configuration files for different sites or applications. Each file in this directory is typically named after the domain it serves.
-
sites-enabled/: This directory contains symbolic links to the active site configurations in sites-available/. Only the configurations linked here will be loaded by NGINX.
-
conf.d/: This directory can be used for additional configuration files that NGINX loads during startup, often used for global settings or additional modules.
-
ssl/: If you’re configuring HTTPS, you’ll store SSL certificates in this directory, usually within /etc/nginx/ssl/.
Understanding these directories and files is crucial when learning how to configure an NGINX reverse proxy on Ubuntu, Windows, or other environments.
How to Configure an NGINX Reverse Proxy on Ubuntu
Setting up an NGINX reverse proxy on Ubuntu is one of the most common use cases. Here’s how to configure the file structure step-by-step:
-
Install NGINX: First, ensure that NGINX is installed:
sudo apt update
sudo apt install nginx
-
Create a New Configuration File: Navigate to /etc/nginx/sites-available/ and create a new configuration file for your site:
sudo nano /etc/nginx/sites-available/example.com
-
Configure the Reverse Proxy: Inside this file, set up the basic reverse proxy configuration:
server {
listen 80;
server_name example.com www.example.com;
location / {
proxy_pass http://localhost:3000;
proxy_set_header Host $host;
proxy_set_header X-Real-IP $remote_addr;
proxy_set_header X-Forwarded-For $proxy_add_x_forwarded_for;
proxy_set_header X-Forwarded-Proto $scheme;
}
}
This directs traffic from example.com to a service running on localhost:3000.
-
Enable the Configuration: Create a symbolic link to sites-enabled:
bash
Copy code
sudo ln -s /etc/nginx/sites-available/example.com /etc/nginx/sites-enabled/
-
Test and Reload NGINX: Test the configuration and reload NGINX:
bash
sudo nginx -t
sudo systemctl reload nginx
Following these steps helps you understand how to configure an NGINX reverse proxy on Ubuntu, a foundational skill when setting up reverse proxies on other platforms.
NGINX Reverse Proxy Configuration: Step-by-Step for HTTPS
To secure your reverse proxy with HTTPS, Nginx reverse proxy HTTPS are needed:
-
Obtain an SSL Certificate: You can use Let’s Encrypt to get a free SSL certificate:
sudo apt install certbot python3-certbot-nginx
sudo certbot --nginx -d example.com -d www.example.com
-
Configure SSL in NGINX: Update the configuration file to listen on port 443 and use SSL:
server {
listen 443 ssl;
server_name example.com www.example.com;
ssl_certificate /etc/letsencrypt/live/example.com/fullchain.pem;
ssl_certificate_key /etc/letsencrypt/live/example.com/privkey.pem;
location / {
proxy_pass http://localhost:3000;
...
}
}
server {
listen 80;
server_name example.com www.example.com;
return 301 https://$host$request_uri;
}
This configuration forces HTTPS and properly sets up SSL.
-
Test and Reload: Test and reload NGINX again:
bash
Copy code
sudo nginx -t
sudo systemctl reload nginx
This ensures your reverse proxy is secure, an important step when you’re learning how to configure NGINX as a reverse proxy.
4. Managing Multiple Domains with NGINX Reverse Proxy
If you’re handling multiple domains, you need to Nginx reverse proxy multiple domains:
-
Create Configuration Files: For each domain, create a new file in /etc/nginx/sites-available/, similar to what we did earlier. Each file will direct traffic to different backend services.
-
Enable Each Configuration: Ensure each site is enabled by creating symbolic links in sites-enabled/.
-
Reload NGINX: Always reload NGINX after making changes:
sudo systemctl reload nginx
By following these steps, you’ll understand how to configure an NGINX reverse proxy for multiple domains, an essential skill for managing complex environments.
Using NGINX Proxy Manager
For those who prefer a graphical interface, NGINX Proxy Manager can simplify the process:
-
Install NGINX Proxy Manager: You can deploy it using Docker:
docker run -d \
--name=nginx-proxy-manager \
-p 80:80 \
-p 81:81 \
-p 443:443 \
-v /path/to/data:/data \
-v /path/to/letsencrypt:/etc/letsencrypt \
jlesage/nginx-proxy-manager
-
Access the Web Interface: After installation, access the interface via http://your-ip:81.
-
Configure Domains: Through the interface, add and manage multiple domains, SSL certificates, and more.
Using NGINX Proxy Manager simplifies how to configure an NGINX reverse proxy, especially when dealing with multiple domains and complex SSL setups.
NGINX Reverse Proxy on Docker and Windows
Configuring NGINX on Docker or Windows follows similar principles. If you want to install neginx on Centos 7, read How To Install Nginx on Centos 7.
-
Docker: In Docker, use docker-compose to manage your NGINX reverse proxy:
yaml
Copy code
version: '3'
services:
nginx:
image: nginx
volumes:
- ./nginx.conf:/etc/nginx/nginx.conf
ports:
- "80:80"
- "443:443"
This setup allows you to manage your reverse proxy with Docker containers.
-
Windows: On Windows, install NGINX and follow the same file structure guidelines as in Ubuntu. The paths might differ, but the process remains consistent:
C:\nginx\conf\nginx.conf
By learning these variations, you’ll know how to configure an NGINX reverse proxy across different environments, making your setup versatile and robust.
Configuring the file structure for an NGINX reverse proxy is a fundamental skill that applies across different operating systems and scenarios. Whether you’re setting up NGINX on Ubuntu, Docker, or Windows, the steps remain consistent. With a solid understanding of how to configure NGINX as a reverse proxy, you can confidently manage traffic, secure your connections with HTTPS, and handle multiple domains. This guide serves as a Nginx reverse proxy configuration step-by-step manual to mastering NGINX reverse proxy configurations, ensuring that your web services are efficiently and securely routed.
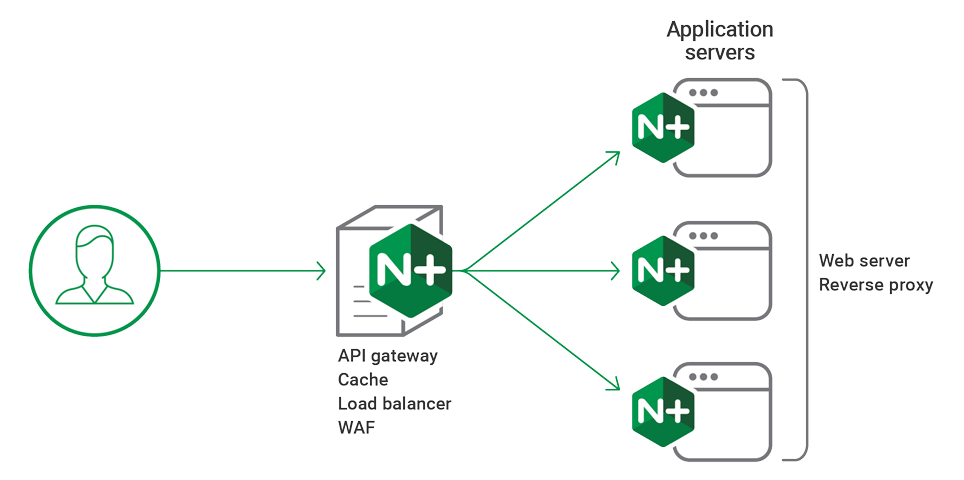
3. Set up NGINX as a Reverse Proxy

Basic Configuration of NGINX as a Reverse Proxy
Once NGINX is installed, the next step is to configure it as a reverse proxy. This involves editing the NGINX configuration file, typically located at /etc/nginx/nginx.conf or /etc/nginx/conf.d/default.conf.
server {
listen 80;
server_name yourdomain.com;
location / {
proxy_pass http://backend_server_ip;
proxy_set_header Host $host;
proxy_set_header X-Real-IP $remote_addr;
proxy_set_header X-Forwarded-For $proxy_add_x_forwarded_for;
proxy_set_header X-Forwarded-Proto $scheme;
}
}
In this example:
server_name is your domain name.
proxy_pass is the directive that forwards requests to the backend server.
Save the file and restart NGINX to apply the changes:
sudo systemctl restart nginx
Congratulations! You've completed the basic setup of NGINX as a reverse proxy.
Configuring HTTPS with NGINX Reverse Proxy
To secure your reverse proxy with HTTPS, you'll need an SSL certificate. You can obtain a free SSL certificate from Let's Encrypt or purchase one from a certificate authority.
Assuming you have your SSL certificate files, here’s how to configure NGINX to use HTTPS:
server {
listen 443 ssl;
server_name yourdomain.com;
ssl_certificate /path/to/your_certificate.crt;
ssl_certificate_key /path/to/your_private.key;
location / {
proxy_pass http://backend_server_ip;
proxy_set_header Host $host;
proxy_set_header X-Real-IP $remote_addr;
proxy_set_header X-Forwarded-For $proxy_add_x_forwarded_for;
proxy_set_header X-Forwarded-Proto $scheme;
}
}
server {
listen 80;
server_name yourdomain.com;
return 301 https://$server_name$request_uri;
}
The first server block listens on port 443 for HTTPS traffic, and the second block ensures that HTTP traffic is redirected to HTTPS.
To apply the configuration, restart NGINX:
sudo systemctl restart nginx
Configuring NGINX as a Reverse Proxy for Jenkins
If you're using Jenkins, you can configure NGINX as a reverse proxy to manage incoming traffic. Here's an example configuration:
server {
listen 80;
server_name jenkins.yourdomain.com;
location / {
proxy_pass http://localhost:8080;
proxy_set_header Host $host;
proxy_set_header X-Real-IP $remote_addr;
proxy_set_header X-Forwarded-For $proxy_add_x_forwarded_for;
proxy_set_header X-Forwarded-Proto $scheme;
}
}
In this setup, NGINX will forward requests from jenkins.yourdomain.com to the Jenkins server running on localhost:8080.
Configuring NGINX as a Reverse Proxy for Apache
If you're running an Apache server, you can still use NGINX as a reverse proxy to take advantage of NGINX's performance benefits. Here’s a basic configuration:
server {
listen 80;
server_name yourdomain.com;
location / {
proxy_pass http://127.0.0.1:8080;
proxy_set_header Host $host;
proxy_set_header X-Real-IP $remote_addr;
proxy_set_header X-Forwarded-For $proxy_add_x_forwarded_for;
proxy_set_header X-Forwarded-Proto $scheme;
}
}
In this example, NGINX forwards traffic to an Apache server running on the same machine at port 8080.
How to Configure NGINX as a Reverse Proxy on Windows
On Windows, the configuration process is similar to Linux. After installing NGINX and obtaining your SSL certificates, you can use the same configuration examples mentioned above. Ensure you edit the configuration file located in the directory where you extracted NGINX.
After making the necessary changes, run nginx.exe to start the server.
Setting up NGINX as a reverse proxy is a powerful way to optimize and secure your web applications. By following the steps outlined in this guide, you should now have a clear understanding of how to configure an NGINX reverse proxy in various scenarios, including basic HTTP setups, HTTPS configurations, and integration with other servers like Jenkins and Apache. Remember to test your configurations thoroughly to ensure everything works as expected.
4. Test the NGINX Reverse Proxy

Testing your NGINX reverse proxy is a crucial step to ensure it functions correctly, handling traffic as expected. In this section, we'll guide you through the process, offering detailed instructions on how to verify the correct configuration and troubleshoot any issues. We’ll make sure to use the phrase "How to Configure an NGINX Reverse Proxy" frequently, emphasizing the importance of proper configuration.
Initial Setup Review
Before starting the test, review your initial configuration to ensure everything aligns with the guide on "How to Configure an NGINX Reverse Proxy." This step involves verifying your nginx.conf or site-specific configuration file, ensuring that the proxy_pass directives point to the correct backend servers. Make sure all syntax is correct by running the command:
sudo nginx -t
This command checks the configuration for any syntax errors. If errors are found, the output will highlight them, allowing you to correct these issues before proceeding. Ensuring your configuration matches the guidelines in "How to Configure an NGINX Reverse Proxy" is essential for successful testing.
Starting the NGINX Service
Once your configuration is verified, start or reload the NGINX service to apply the changes. Use the following commands depending on your system:
sudo systemctl start nginx
or
sudo systemctl reload nginx
After starting or reloading the service, ensure NGINX is running correctly. You can check the status using:
sudo systemctl status nginx
This step confirms that NGINX is active and ready to handle requests as per the configuration you’ve set up in "How to Configure an NGINX Reverse Proxy."
3.Basic Functionality Test
To test the basic functionality of your NGINX reverse proxy, open a web browser and enter the domain or IP address pointing to your NGINX server. If the setup is correct, the browser should display the content served by your backend server.
If you've followed the steps in "How to Configure an NGINX Reverse Proxy" accurately, this should work seamlessly. If the page does not load, check the following:
· Ensure DNS settings are correct.
· Verify that your backend server is running and accessible.
Check NGINX error logs for any issues using:
sudo tail -f /var/log/nginx/error.log
This log will provide insights into what might be going wrong if the reverse proxy fails to serve the backend content.
4. Load Balancing and Failover Test
If you have set up load balancing, as mentioned in "How to Configure an NGINX Reverse Proxy," it's essential to test how NGINX distributes traffic between your backend servers. You can do this by accessing your site multiple times and checking which backend server responds.
To further test failover capabilities, temporarily stop one of the backend servers:
sudo systemctl stop backend-server
Reload the site to ensure that NGINX reroutes traffic to the available backend server. This test ensures that your reverse proxy is resilient and properly configured to handle server outages.
5. SSL/TLS Configuration Test
If you configured SSL/TLS as part of "How to Configure an NGINX Reverse Proxy," testing the HTTPS connection is vital. Access your site using https://yourdomain.com and check if the SSL certificate is properly applied. Most browsers will display a padlock icon in the address bar if the connection is secure.
For a more detailed test, use SSL testing tools like SSL Labs' SSL Test to analyze your SSL setup. This tool checks for vulnerabilities and ensures that your SSL configuration meets best practices.
If the SSL test fails, double-check your configuration file for any mistakes in the SSL section, including the paths to your certificate and key files. Ensure that these match the instructions provided in "How to Configure an NGINX Reverse Proxy."
6. Handling Specific Paths and Subdomains
Testing specific paths and subdomains is crucial, especially if you’ve configured your reverse proxy to handle different routes or subdomains. For example, if you’ve set up /app to route to a specific backend, navigate to http://yourdomain.com/app to verify the routing works as intended.
Similarly, if you’ve configured subdomains like api.yourdomain.com as per "How to Configure an NGINX Reverse Proxy," test these by accessing them in your browser. Each subdomain or path should correctly route to its designated backend service.
If the routing doesn’t work as expected, revisit your configuration file, ensuring the location blocks and server_name directives are accurately set up. Adjustments might be necessary to align with the detailed instructions in "How to Configure an NGINX Reverse Proxy."
7. Performance Testing
Performance testing ensures that your NGINX reverse proxy can handle the expected traffic load efficiently. Use tools like ApacheBench (ab) or siege to simulate high traffic and measure how NGINX responds.
For example, to perform a basic test with ApacheBench:
ab -n 1000 -c 10 http://yourdomain.com/
This command sends 1,000 requests to your site with 10 concurrent connections. Analyze the results for metrics like request per second and response time.
If you notice performance bottlenecks, consider tuning your NGINX configuration according to performance optimization best practices, which are often included in advanced sections of "How to Configure an NGINX Reverse Proxy."
8. Security and Hardening Test
Finally, conduct a security test to ensure your NGINX reverse proxy is secure. Tools like nmap and OpenVAS can scan for open ports and vulnerabilities.
For example, use nmap to scan your NGINX server:
nmap -v yourdomain.com
This scan checks for open ports and services running on your server. Ensure that only necessary ports (like 80 and 443) are open, as configured in "How to Configure an NGINX Reverse Proxy."
Additionally, review your firewall settings and consider implementing additional security measures like rate limiting, as recommended in various guides on "How to Configure an NGINX Reverse Proxy."
Testing your NGINX reverse proxy is an iterative process that requires careful attention to detail. By following the steps outlined above, you ensure that your proxy is configured correctly, secure, and capable of handling the expected traffic load. Always refer back to the guide on "How to Configure an NGINX Reverse Proxy" for troubleshooting and optimization tips to maintain a robust and efficient server setup.
Conclusion
In conclusion, configuring an NGINX reverse proxy is a powerful way to manage and optimize your web traffic. By following the steps outlined in this guide, you can set up NGINX to efficiently route requests to your backend servers, enhance security, and improve performance. Whether you're configuring NGINX as a reverse proxy for a simple application or a complex multi-server setup, understanding the key configuration directives and best practices is crucial. With NGINX's flexibility and robustness, you can tailor your reverse proxy configuration to meet specific needs, ensuring a smooth and reliable user experience.


 🚀")

 🔐")
![What Is Cold Data Storage? ❄️ [2026 Guide]](https://1gbits.com/cdn-cgi/image//https://s3.1gbits.com/blog/2026/02/what-is-cold-data-storage-750xAuto.webp "What Is Cold Data Storage? ❄️ [2026 Guide]")
![What Is Virtual Desktop Infrastructure? 🖥️ [VDI Explained]](https://1gbits.com/cdn-cgi/image//https://s3.1gbits.com/blog/2026/02/what-is-virtual-desktop-infrastructure-vdi-750xAuto.webp "What Is Virtual Desktop Infrastructure? 🖥️ [VDI Explained]")

