
In this post, we're exploring the essential topic of "how to change Linux DNS," providing you with a comprehensive exploration of the step-by-step process to customize and optimize your DNS settings. Linux, with its powerful capabilities and flexibility, offers users the ability to customize various aspects of their system. One such crucial aspect is the Domain Name System (DNS), which plays a pivotal role in translating human-friendly domain names into IP addresses. If you're looking to enhance your Linux experience by changing DNS settings, you're in the right place. In this guide, we'll walk through the process of Linux how to change DNS server and Linux how to change DNS IP address, covering different scenarios and distributions like a change DNS in Ubuntu.
If you're working with CentOS 7, we also have a step-by-step walkthrough on Install DNS (Bind) on CentOS 7. These resources provide in-depth instructions to seamlessly set up and configure BIND on your preferred Linux distribution.
How to Change Linux DNS
.jpg)

Changing the DNS on your Linux system is a straightforward process. Follow these steps to navigate through the maze of network configurations and make the switch seamlessly:
- Open the Terminal
Let's kick things off by opening the terminal. You can think of the terminal as your command center, where you wield the power to make impactful changes to your Linux environment. Access it by pressing `Ctrl + Alt + T` or searching for "Terminal" in your application menu.
- Edit the Network Configuration File
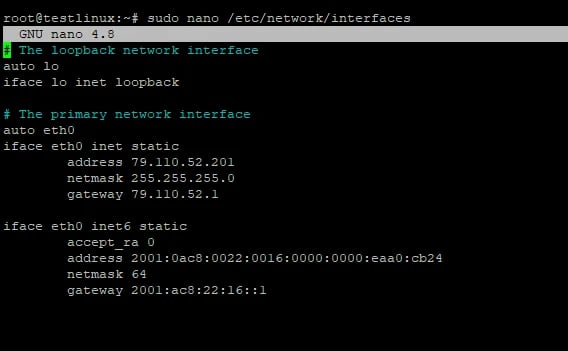
Once in the terminal, you'll want to edit the network configuration file. Use your preferred text editor, such as Nano or Vim, and open the file located at `/etc/network/interfaces`.
sudo nano /etc/network/interfaces
- Locate the DNS Configuration
Within the configuration file, you'll find lines related to DNS settings. These might look like:
dns-nameservers 8.8.8.8 8.8.4.4
Replace the existing DNS addresses with the ones you prefer. For instance, Google's public DNS servers are 8.8.8.8 and 8.8.4.4.
- Save and Exit
After making the necessary changes, save the file and exit the text editor. In Nano, you can do this by pressing `Ctrl + X`, then `Y` to confirm the changes, and finally `Enter` to exit.
- Restart the Networking Service
To apply the changes, restart the networking service using the following command:
sudo service networking restart
Congratulations! You've successfully changed the DNS on your Linux system. Now, let's explore more specific scenarios.
Congratulations! You've successfully changed the DNS on your Linux system. Now, let's explore more specific scenarios. If you're looking to customize your system further, check out our guide on how to change the hostname in Linux for a seamless configuration experience.
How to Change DNS IP in Linux
How to change DNS IP address in linux? If you're looking to change the DNS IP address without delving into the configuration files, here's a quicker method using the `systemd-resolve` command:
- Open the Terminal
Access the terminal using the previously mentioned shortcut or through your application menu.
- Execute the systemd-resolve Command
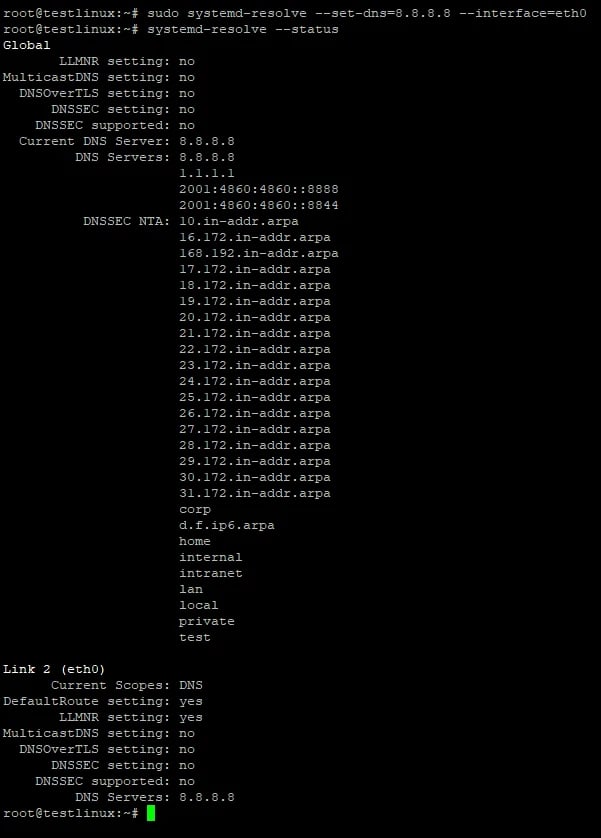
To set a new DNS server, use the following command:
sudo systemd-resolve --set-dns=YOUR_DNS_IP
Replace `YOUR_DNS_IP` with the IP address of your desired DNS server.
- Verify the Changes
Confirm that the changes took effect by running:
systemd-resolve --status
This will display the current DNS configuration.
How to Change DNS Server in Kali Linux
How to change DNS Kali Linux? Kali Linux, a popular choice for penetration testing, has a slightly different process for changing DNS servers:
- Open the Network Settings
Navigate to the network settings by clicking on the network icon in the system tray.
- Edit the Wired Connection
Locate your wired connection, right-click, and select "Edit Connections.
- Update the DNS Configuration
In the "IPv4 Settings" tab, switch the method to "Automatic (DHCP) addresses only." Here, you can add your preferred DNS server addresses.
- Save and Apply
Save the changes and close the window. The new DNS settings will take effect immediately.
If you're using Kali Linux and want to ensure your system is up to date after changing the DNS settings, check out our guide on How to Update Kali Linux for step-by-step instructions.
How to Change DNS Port Number in Linux
Sometimes, you may want to customize the DNS port number. Here's how you can do it:
- Open the Terminal
Access the terminal as we did in the first section.
- Edit the Resolve Configuration
Edit the `systemd-resolved` configuration file:
sudo nano /etc/systemd/resolved.conf
- Modify the DNS Port
Look for the line that begins with `DNS=` and add your desired port, for example:
DNS=8.8.8.8#5353
- Save and Exit
Save the changes and exit the text editor.
- Restart systemd-resolved
Restart the `systemd-resolved` service:
sudo systemctl restart systemd-resolved
Your DNS server will now operate on the specified port.
How to Change DNS in SUSE Linux
SUSE Linux, known for its reliability, allows users to configure DNS settings through the Yast Control Center:
- Open Yast Control Center
Launch Yast by entering the following command in the terminal:
sudo yast2
- Navigate to Network Settings
In the Yast Control Center, select "Network Settings."
- Edit DNS Configuration
Navigate to the "DNS and Hostname" tab and input your desired DNS server addresses.
- Save and Exit
Save the changes, exit Yast, and restart your network for the changes to take effect.
How to Change DNS Server in Red Hat Linux
Red Hat Linux, a stalwart in the world of enterprise Linux, allows users to manage DNS settings through the Network Manager:
- Open Network Manager
Access the Network Manager by clicking on the network icon in the system tray.
- Edit Connections
Choose "Edit Connections" from the dropdown menu.
- Update DNS Settings
Select your connection, go to the "IPv4 Settings" tab, and enter your preferred DNS server addresses.
- Save and Reconnect
Save the changes, close the window, and reconnect to the network to apply the new DNS settings.
How to Change DNS TTL in Linux
The Time-to-Live (TTL) value in DNS settings determines the lifespan of cached information. To adjust the DNS TTL in Linux, follow these steps:
- Open the Terminal
Launch the terminal using the keyboard shortcut `Ctrl + Alt + T` or through your application menu.
- Edit the Resolve Configuration
Use your preferred text editor to open the `systemd-resolved` configuration file:
sudo nano /etc/systemd/resolved.conf
- Modify the DNS TTL
Locate the line starting with `Cache`, and add or modify the TTL value to your preference:
Cache=yes
CacheTTLSec=YOUR_TTL_VALUE
Replace `YOUR_TTL_VALUE` with the desired TTL duration in seconds.
- Save and Exit
Save the changes and exit the text editor.
- Restart systemd-resolved
Restart the `systemd-resolved` service to apply the new TTL settings:
sudo systemctl restart systemd-resolved
Your DNS TTL in Linux is now adjusted according to your specifications.
How to Change DNS Server IP Address in Linux
When you need to switch to a different DNS server with a new IP address, here's a quick guide:
- Open the Terminal
Access the terminal using the keyboard shortcut or through your application menu.
- Edit the Network Configuration File
Open the network configuration file using a text editor like Nano or Vim:
sudo nano /etc/network/interfaces
- Update DNS Server IP
Locate the line with `dns-nameservers` and replace the existing IP addresses with those of your preferred DNS server.
- Save and Exit
Save the changes and exit the text editor.
- Restart the Networking Service
Restart the networking service to apply the new DNS server IP address:
sudo service networking restart
Your Linux system is now using the updated DNS server IP.
How to Change DNS Arch Linux
How to change DNS in arch Linux? Arch Linux, known for its simplicity and user-centric approach, allows for easy DNS configuration:
- Open the Terminal
Access the terminal as usual.
- Edit the Resolve Configuration
Edit the `systemd-resolved` configuration file:
sudo nano /etc/systemd/resolved.conf
- Modify DNS Settings
Adjust the DNS settings as needed, following the format:
DNS=YOUR_DNS_SERVER_IP
Replace `YOUR_DNS_SERVER_IP` with the IP address of your preferred DNS server.
- Save and Exit
Save the changes and exit the text editor.
- Restart systemd-resolved
Restart the `systemd-resolved` service to apply the changes:
sudo systemctl restart systemd-resolved
Your DNS settings in Arch Linux are now successfully updated.
How to Change DNS on Linux Mint
How to change DNS in Linux mint? Linux Mint, a user-friendly distribution, simplifies the process of changing DNS settings:
- Open Network Connections
Click on the network icon in the system tray and choose "Network Connections."
- Edit Wired Connection
Locate your wired connection, right-click, and select "Edit Connections."
- Update DNS Configuration
In the "IPv4 Settings" tab, switch the method to "Automatic (DHCP) addresses only" and enter your desired DNS server addresses.
- Save and Apply
Save the changes and close the window. The new DNS settings will take effect immediately.
How to Change DNS Address in Linux

For a general guide on modifying DNS addresses in Linux, consider the following steps:
- Open the Terminal
Access the terminal using the keyboard shortcut or through your application menu.
- Edit the Resolve Configuration
Edit the `systemd-resolved` configuration file:
sudo nano /etc/systemd/resolved.conf
- Modify DNS Address
Adjust the DNS address as needed:
DNS=YOUR_DNS_SERVER_IP
Replace `YOUR_DNS_SERVER_IP` with the IP address of your preferred DNS server.
- Save and Exit
Save the changes and exit the text editor.
- Restart systemd-resolved
Restart the `systemd-resolved` service to apply the changes:
sudo systemctl restart systemd-resolved
Your Linux system now uses the updated DNS address.
Change DNS in Linux Mint
If you're specifically using Linux Mint, follow these simplified steps to change your DNS:
- Open Network Settings
Access the network settings by clicking on the network icon in the system tray.
- Edit Connection
Right-click on your connection and choose "Edit Connections."
- Update DNS Configuration
In the "IPv4 Settings" tab, select "Automatic (DHCP) addresses only" and input your desired DNS server addresses.
- Save and Apply
Save the changes and close the window. Your Linux Mint system now operates with the new DNS configuration.
Change Local DNS Linux
Customizing the local DNS on your Linux system is essential for efficient networking. Follow these steps to make changes to your local DNS settings and master the art of how to change Linux DNS:
- Open the Terminal
Launch the terminal using the keyboard shortcut `Ctrl + Alt + T` or through your application menu.
- Edit the hosts File
Use a text editor to open the `/etc/hosts` file:
sudo nano /etc/hosts
- Modify Local DNS Entries
Within the file, you'll find IP addresses associated with hostnames. Edit these entries according to your preferences.
- Save and Exit
Save the changes and exit the text editor.
- Clear DNS Cache
To ensure the changes take effect, clear the DNS cache:
sudo systemd-resolve --flush-caches
How to Change DNS in Linux Command Line
How to change DNS Linux command line? Changing DNS settings via the command line in Linux is a quick and efficient process. Follow these steps and become adept at how to change Linux DNS:
- Open the Terminal
Access the terminal using the keyboard shortcut or through your application menu.
- Use the nmcli Command
To change DNS settings, use the `nmcli` command:
sudo nmcli con mod YOUR_CONNECTION_NAME ipv4.dns "YOUR_DNS_SERVER_IP"
Replace `YOUR_CONNECTION_NAME` with the name of your connection and `"YOUR_DNS_SERVER_IP"` with the IP address of your preferred DNS server.
- Apply Changes
Apply the changes by restarting the network manager:
sudo systemctl restart NetworkManager
Change DNS in Linux Ubuntu
How to change DNS Linux Ubuntu? Ubuntu, one of the most popular Linux distributions, simplifies the process of changing DNS settings. Follow these steps to become proficient in how to change Linux DNS on Ubuntu:
- Open Network Settings
Click on the network icon in the system tray and choose "Network Settings."
- Edit Connection
Right-click on your connection and select "Edit Connections."
- Update DNS Configuration
In the "IPv4 Settings" tab, switch the method to "Automatic (DHCP) addresses only" and enter your desired DNS server addresses.
- Save and Apply
Save the changes and close the window. Your Ubuntu system now operates with the new DNS configuration, underscoring the simplicity of how to change Linux DNS on this widely-used distribution.
For a detailed guide on installing BIND (DNS) on Ubuntu, check out our comprehensive tutorial on How To Install BIND (DNS) on Ubuntu.
How to Change DNS Configuration in Linux
For a more comprehensive approach to DNS configuration in Linux, follow these steps:
- Open the Terminal
Access the terminal using the keyboard shortcut or through your application menu.
- Edit the Resolve Configuration
Edit the `systemd-resolved` configuration file:
sudo nano /etc/systemd/resolved.conf
- Modify DNS Settings
Adjust the DNS settings as needed:
DNS=YOUR_DNS_SERVER_IP
Replace `YOUR_DNS_SERVER_IP` with the IP address of your preferred DNS server.
- Save and Exit
Save the changes and exit the text editor.
- Restart systemd-resolved
Restart the `systemd-resolved` service to apply the changes:
sudo systemctl restart systemd-resolved
Your Linux system now uses the updated DNS configuration.
How to Change DNS Domain Name in Linux
Modifying the DNS domain name in Linux involves adjusting the search domain settings. Follow these steps:
- Open the Terminal
Access the terminal using the keyboard shortcut or through your application menu.
- Edit the Resolve Configuration
Edit the `systemd-resolved` configuration file:
sudo nano /etc/systemd/resolved.conf
- Modify DNS Domain Name
Look for the line that begins with `Domains=` and add your desired domain:
Domains=yourdomain.com
Replace `yourdomain.com` with your preferred DNS domain.
- Save and Exit
Save the changes and exit the text editor.
- Restart systemd-resolved
Restart the `systemd-resolved` service:
sudo systemctl restart systemd-resolved
Your Linux system now uses the updated DNS domain name.
How to Change DNS Hostname in Linux
Customizing the DNS hostname in Linux involves adjusting the `/etc/hostname` file. Follow these steps:
- Open the Terminal
Access the terminal using the keyboard shortcut or through your application menu.
- Edit the Hostname File
Use a text editor to open the `/etc/hostname` file:
sudo nano /etc/hostname
- Modify Hostname
Replace the existing hostname with your desired one.
- Save and Exit
Save the changes and exit the text editor.
- Reboot
To apply the new hostname, reboot your Linux system:
sudo reboot
Your Linux system now operates with the updated DNS hostname.
Comparative Table: DNS Configuration in Different Linux Distributio
|
Linux Distribution |
Configuration File Path |
Edit Command |
Restart Network Service Command |
|
Ubuntu |
/etc/network/interfaces |
sudo nano /etc/network/interfaces |
sudo service networking restart |
|
Arch Linux |
/etc/systemd/resolved.conf |
sudo nano /etc/systemd/resolved.conf |
sudo systemctl restart systemd-resolved |
|
Kali Linux |
Handled via graphical settings |
N/A |
N/A |
|
Linux Mint |
Handled via graphical settings |
N/A |
N/A |
Final Words
In conclusion, mastering the art of “How to change Linux DNS” empowers users to tailor their systems to exact specifications, enhancing both performance and security. From adjusting local DNS for efficient networking to utilizing the command line for quick changes, this comprehensive guide has illuminated the diverse pathways available. Whether you're navigating the user-friendly Ubuntu or exploring the flexibility of Arch Linux, each distribution provides unique methods on how to change Linux DNS. Delving into nuances like TTL, server IP addresses, domain names, and hostnames ensures a holistic understanding of the subject. As you embark on the journey of Linux DNS customization, whether on a personal computer or a [Linux VPS], remember that these steps not only provide a personalized touch to your system but also contribute to a more seamless and efficient computing experience. Happy tinkering and exploring the vast landscape of Linux networking!
For those looking to expand their Linux skills further, learning how to install packages in Linux is an essential step. Mastering package installation ensures you can effortlessly add the tools and software needed to customize your system and optimize its functionality alongside DNS configurations.
People also read:
- How to Change DNS Server
- Best DNS Servers for Gaming
- How to Change Password Linux
- How to set the Date and Time on Linux
-

Leave A Comment