
When you type a URL in your browser's address bar, the website loads smoothly. However, behind the scenes, the process is more complex. Your request first goes to a server that uses the Domain Name System, or DNS, to translate the URL into a numeric IP address. This address identifies the web server that hosts the website, allowing your browser to display the page. Changing your DNS server tells your device which DNS resolver to ask when it needs to turn a hostname like example.com into an IP address. That's it useful, sometimes very useful, but not magic. This is especially helpful if you are managing critical infrastructure or hosting platforms like an unmanaged VPS where custom network optimization is required.
You might switch to a public DNS service for better reliability, lower DNS latency, privacy features, malware blocking, or parental controls. But don't expect it to fix every network problem. DNS affects name resolution, not the full path your traffic takes. In this article, we want to give you a complete guide on how to change DNS servers — covering Windows, macOS, Chromebook, Android, iPhone, Linux, and your router.
🌐 What is DNS?
DNS servers translate human-friendly domain names like "example.com" into numeric IP addresses like "192.0.2.1". Computers and servers communicate using these IP addresses, but people prefer memorable domain names. DNS bridges this gap by converting domain names into IP addresses. If you've ever asked what is a DNS server, the short version is this: DNS is the phonebook of the internet. Your browser asks for a domain, and DNS returns the IP address needed to connect.
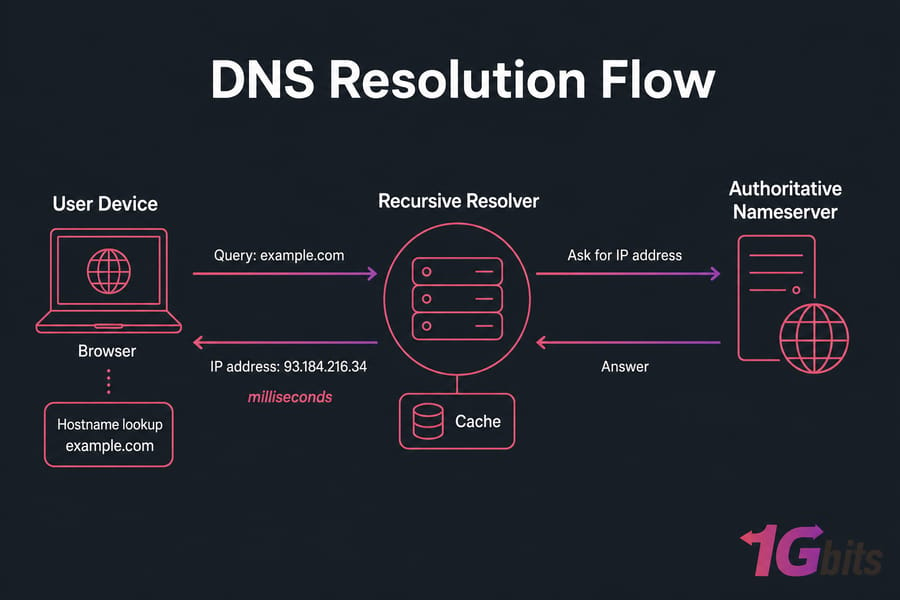
How DNS Resolution Works
When you type a domain name, your device usually asks a recursive resolver — often your ISP DNS or a public DNS provider. That resolver checks whether it already knows the answer. If not, it walks the DNS chain until it finds the right nameserver and returns the result. All of that happens fast, usually in milliseconds. Typically, your home network uses a DNS server provided by your Internet Service Provider (ISP). If the DNS server has recently looked up the domain, it may have the information cached, speeding up the process. Understanding this baseline architecture is helpful whether you are managing local web configurations or setting up a dedicated server for SQL database connections where query latency matters.
DNS Cache Explained
Your operating system, browser, router, and DNS provider may all keep a DNS cache. That cache stores recent answers so repeat lookups are quicker. In practice, this means your DNS change may not look immediate unless you clear old cached entries.
DNS Propagation vs Local DNS Cache
People mix these up constantly. DNS propagation is when a domain's records change across the wider internet. Local cache is what your own device or browser remembers. Changing your custom DNS won't speed up global propagation, but flushing cache can help your device stop using stale answers.
🔍 Why Change DNS Servers?
Changing your DNS server can enhance your internet experience. ISP-provided DNS servers may be slow or poorly configured, causing delays, especially on pages with content from multiple domains. Switching to a more efficient DNS server can speed up your browsing and improve your online security and privacy.
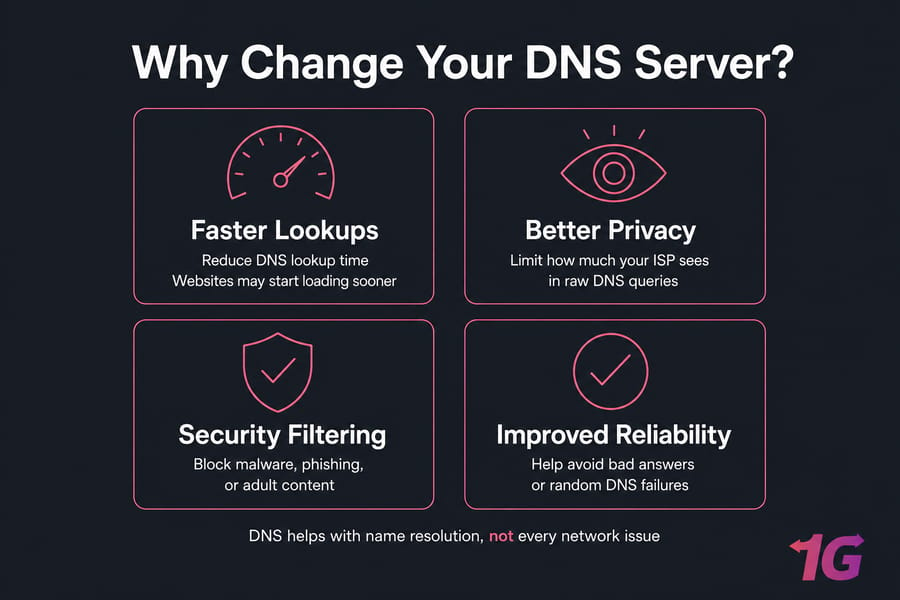
For Faster Browsing
A faster DNS server can reduce lookup time. That may make websites start loading a bit quicker, especially if your ISP DNS is slow or flaky. It won't suddenly double your internet speed, though.
For Better Privacy
Using public DNS instead of ISP DNS can limit how much your internet provider sees in raw DNS queries. But you are still trusting someone else — Cloudflare, Google, Quad9, whoever you pick. And changing DNS does not hide your IP or replace a VPN.
For Security Filtering
Some providers block known malware domains, phishing sites, or adult content. OpenDNS, Quad9, AdGuard DNS, NextDNS, and CleanBrowsing are common picks here. This kind of DNS filtering is simple to deploy and often worth it for families or small offices.
For Website Access Reliability
If your current resolver times out or returns bad answers, switching can help fix random failures. That's one reason people land on guides for DNS server not responding or the DNS_PROBE_FINISHED_NXDOMAIN error. Sometimes the issue is upstream. Sometimes it's just a lousy resolver.
When Changing DNS Will Not Help
If your Wi-Fi is unstable, your ISP link is down, or the website itself is broken, changing DNS won't save the day. Same goes for bandwidth problems. DNS isn't a cure-all — just one layer of the stack. In custom network setups or enterprise configurations, knowing how to manually adjust these settings ensures stable routing and avoids common connection drops.
ISP DNS vs Public DNS
ISP DNS is automatic and usually good enough. Public DNS gives you more control. That's the real trade-off. Public DNS may offer lower DNS latency, clearer privacy policies, or extra filtering. ISP DNS may be closer on the network path and can sometimes resolve local ISP services more cleanly. I'd test both if you're chasing the fastest DNS server for gaming or general browsing.
Should You Change DNS on Your Device or Router?
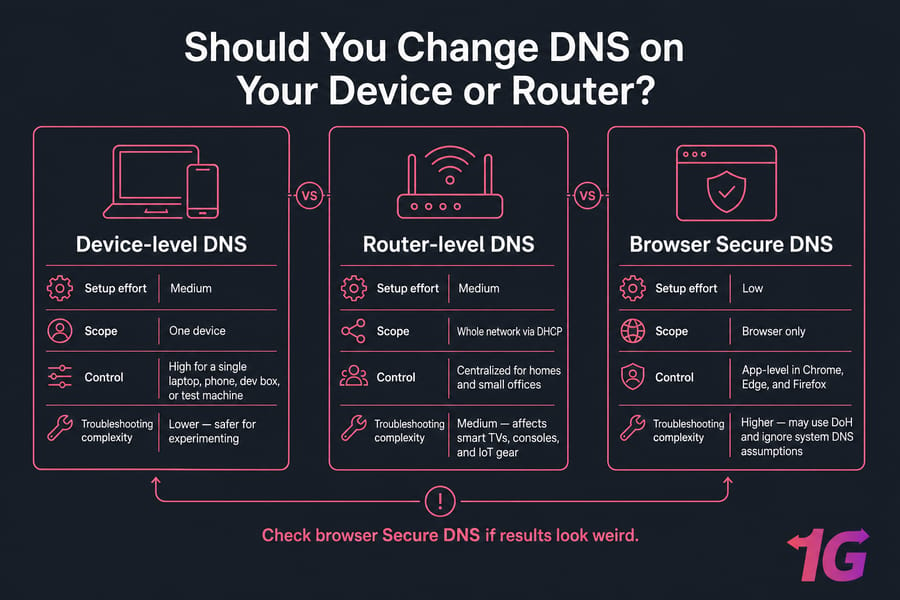
When to Change DNS on One Device
Use per-device settings when you only want custom DNS on your laptop, phone, dev box, or test machine. This is also safer if you're experimenting.
When to Change DNS on Your Router
Set DNS on the router when you want the whole network to use the same resolver through DHCP. That's easier for homes and small offices. It also helps with smart TVs, consoles, and IoT gear that don't expose DNS settings cleanly.
How Browser Secure DNS Can Affect Results
Chrome, Edge, and Firefox may use browser secure DNS with DoH and ignore your system DNS assumptions in some cases. So if you're testing and the results look weird, check the browser too. This trips people up all the time.
🏢 Best DNS Servers to Use
I usually recommend sticking with well-known providers that document their service clearly. Random resolver IPs from forum posts? Hard pass. Choosing the ideal provider will reduce your latency, bypass ISP tracking, and offer robust layers of security.
| Provider | IPv4 | IPv6 | Privacy Focus | Security Filtering | Best For |
|---|---|---|---|---|---|
| Cloudflare | 1.1.1.1 / 1.0.0.1 | 2606:4700:4700::1111 / ::1001 | Strong | Limited by default | Fast public DNS |
| Google Public DNS | 8.8.8.8 / 8.8.4.4 | 2001:4860:4860::8888 / ::8844 | Moderate | No default filtering | Compatibility and reach |
| OpenDNS | 208.67.222.222 / 208.67.220.220 | 2620:119:35::35 / ::53 | Moderate | Yes | Parental controls |
| Quad9 | 9.9.9.9 / 149.112.112.112 | 2620:fe::fe / ::9 | Good | Yes | Security-focused DNS |
| AdGuard DNS | 94.140.14.14 / 94.140.15.15 | 2a10:50c0::ad1:ff / ::ad2:ff | Good | Yes | Ad and tracker blocking |
⭐ Google Public DNS
Google Public DNS is a widely used third-party DNS service known for its speed and security features. It offers faster name and IP address resolution, protecting users against spoofing attacks that aim to redirect to malicious sites. Google provides detailed performance and security information on its DNS service website, along with an issue tracker and user forum. This global service infrastructure ensures reliable uptimes across standard consumer devices and corporate server setups alike.
- IPv4 Addresses: 8.8.8.8 and 8.8.4.4
- IPv6 Addresses: 2001:4860:4860::8888 and 2001:4860:4860::8844
⭐ Cloudflare DNS
Cloudflare DNS is another popular option focused on speed and privacy. It promises not to log user IP addresses, providing enhanced privacy compared to many ISP services. Cloudflare DNS offers fast resolution and protection against various online threats. Its unparalleled query speed makes it an excellent addition when optimizing private systems or configuring a secure VPS for VPN networks.
- IPv4 Addresses: 1.1.1.1 and 1.0.0.1
- IPv6 Addresses: 2606:4700:4700::1111 and 2606:4700:4700::1001
⭐ OpenDNS
OpenDNS, owned by Cisco, offers both free and paid packages catering to different user needs. The basic OpenDNS Home package provides enhanced security features, while the Family Shield plan blocks adult content, making it suitable for households with children. OpenDNS also offers paid options for additional protection against malicious domains.
OpenDNS Home Addresses:
- IPv4: 208.67.222.222 and 208.67.220.220
- IPv6: 2620:119:35::35 and 2620:119:53::53
OpenDNS Family Shield Addresses:
- IPv4: 208.67.222.123 and 208.67.220.123
⭐ Comodo SecureDNS
Comodo SecureDNS, provided by a reputable cybersecurity company, focuses on protecting users from phishing attacks and malware. It maintains a real-time list of malicious websites and warns users when attempting to access them, enhancing online security.
IPv4 Addresses: 8.26.56.26 and 8.20.247.20
📊 DNS Provider Comparison Summary
To help you pick the right service for your personal computer or cloud servers, here is a quick overview of what each leading DNS service emphasizes:
| Provider | Primary Benefit | Best For |
|---|---|---|
| Google Public DNS | High global reliability and solid speed parameters | General browsing and infrastructure stability |
| Cloudflare DNS | Fastest resolution time and strict zero-logging privacy policy | Speed-sensitive applications and secure VPN nodes |
| OpenDNS (Cisco) | Advanced web filtering and parental controls | Smart home networks and corporate content filtering |
| Comodo SecureDNS | Real-time tracking of malware and phishing hazards | Security-focused network configurations |
💻 How to Change DNS Server Windows 10
Learning how to change DNS server Windows 10 device can help improve internet speed, security, and reliability. If you are operating a high-performance workspace or working inside a dedicated Windows 10 VPS, having the right DNS records speeds up your asset delivery. Here's how to change DNS server using the Settings app:
1. Back Up Existing DNS Settings: Before you learn how to change DNS server address, note down your current DNS addresses. This will allow you to revert to your original settings if needed.
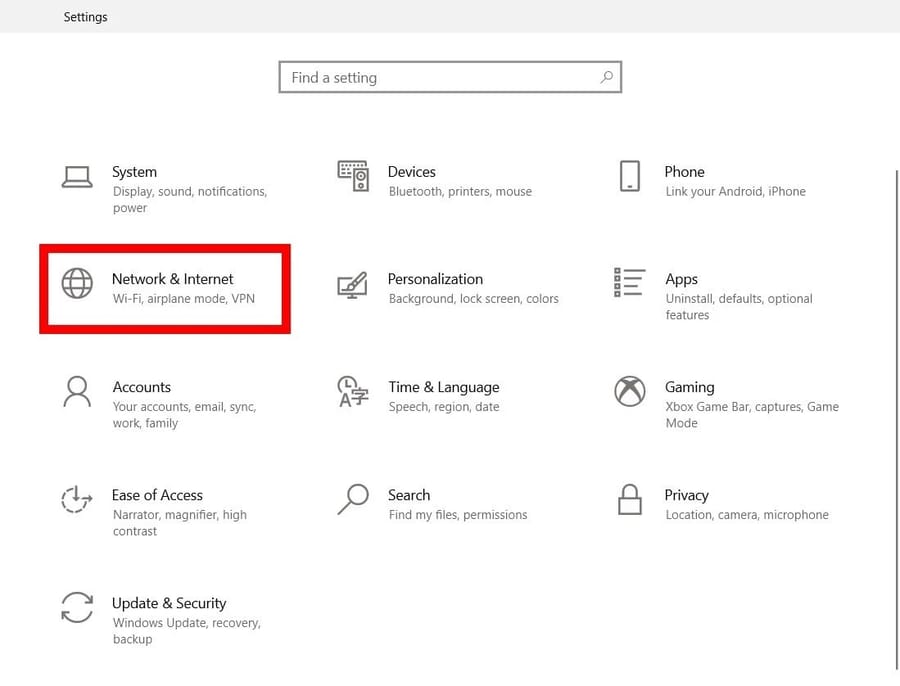
2. Open Settings: Click on the Start menu, then select the gear icon to open "Settings".
3. Navigate to Network Settings: In the Settings window, click on "Network & Internet".
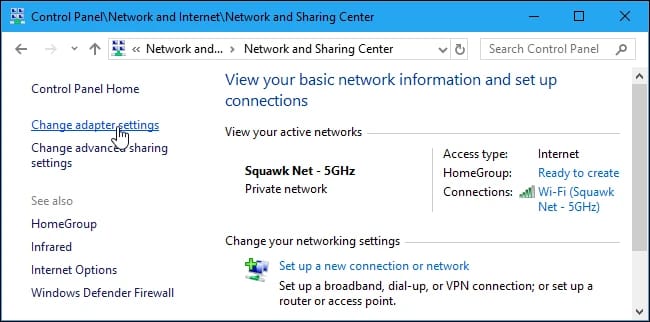
4. Change Adapter Options: Within the Network & Internet settings, select "Change adapter options". This will open the Network Connections window.
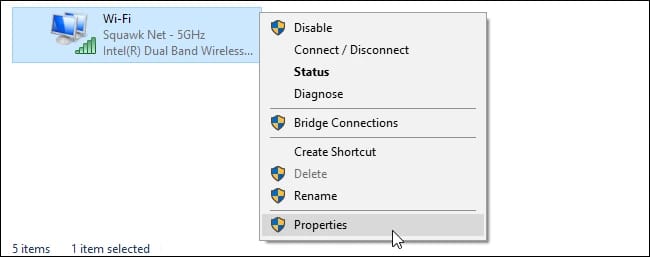
5. Select Network Properties: Right-click on the network connection you are using (either Ethernet or Wi-Fi) and select "Properties".
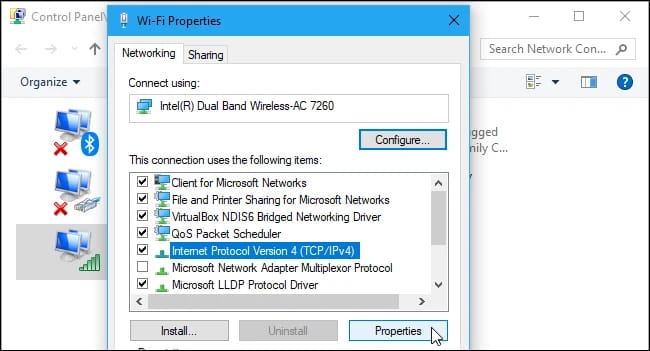
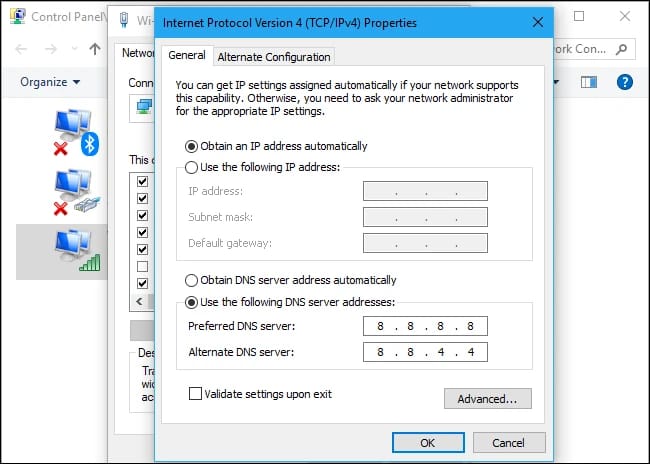
6. Configure IPv4 DNS Settings:
- In the properties window, find and select "Internet Protocol Version 4 (TCP/IPv4)".
- Click on "Properties".
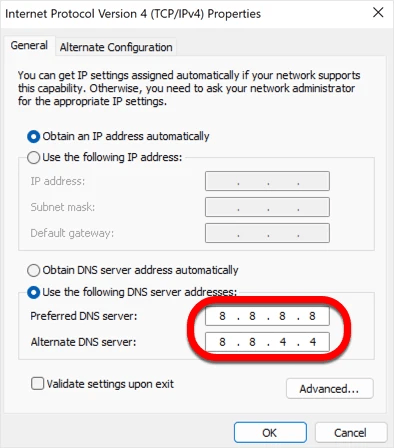
- Choose "Use the following DNS server addresses".
- Enter the preferred DNS server addresses based on your needs:
- Cloudflare DNS: 1.1.1.1 and 1.0.0.1
- Google Public DNS: 8.8.8.8 and 8.8.4.4
- OpenDNS: 208.67.222.222 and 208.67.220.220
7. Confirm IPv4 Changes: Click "OK" to apply the changes for IPv4.
8. Configure IPv6 DNS Settings:
- If your network uses IPv6, select "Internet Protocol Version 6 (TCP/IPv6)" in the properties window.
- Click on "Properties".
- Choose "Use the following DNS server addresses".
- Enter the preferred DNS server addresses for IPv6:
- Cloudflare DNS: 2606:4700:4700::1111 and 2606:4700:4700::1001
- Google Public DNS: 2001:4860:4860::8888 and 2001:4860:4860::8844
- OpenDNS: 2620:119:35::35 and 2620:119:53::53
9. Confirm IPv6 Changes: Click "OK" to apply the changes for IPv6.
10. Complete the Setup: Click "Close" to exit the network properties window. If you need to revert, go back to the same adapter screen and switch both IPv4 and IPv6 back to Obtain DNS server address automatically.
🚀 How to Change DNS Windows 11
The Settings app in Windows 11 has undergone significant improvements, making it more user-friendly and intuitive compared to its predecessor in Windows 10. If you utilize remote environments like a Windows 11 VPS, modifying these paths can optimize your remote desktop responsiveness. For broader Windows infrastructure, a Windows VPS gives you full control over DNS and network settings. Here's how to change DNS server Windows 11:
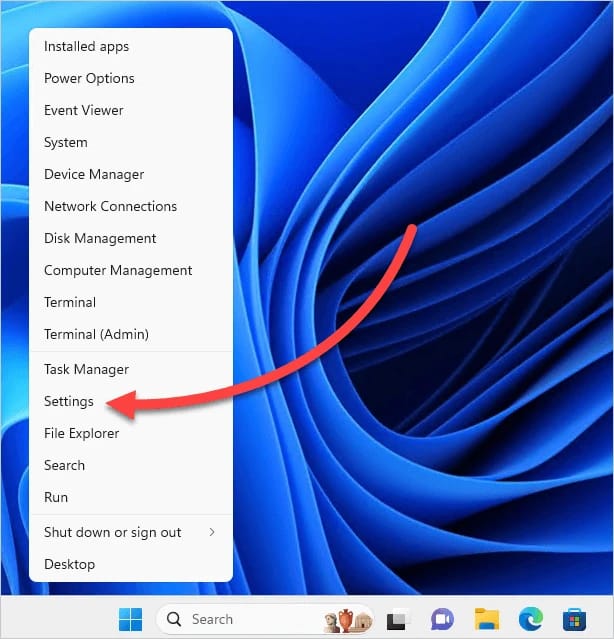
1. Open Settings: Right-click the Windows button on the taskbar. Then, select "Settings" from the context menu.
2. Navigate to Network & Internet: In the Settings window, click on "Network & internet" from the sidebar.
3. Choose Your Connection Type:
If you are using a Wi-Fi connection:
- Click on "Wi-Fi".
- Click on "Hardware properties".
- Next to "DNS server assignment", click "Edit".
If you are using an Ethernet connection:
- Click on "Ethernet".
- Next to "DNS server assignment", click "Edit".

4. Modify DNS Settings:
- A new window will appear. From the drop-down menu, select "Manual".
- Toggle the switch for "IPv4" to "On".
- Enter the preferred DNS server address and the alternate DNS server address. Here are some popular choices you can use:
- Google Public DNS: 8.8.8.8 and 8.8.4.4
- Cloudflare DNS: 1.1.1.1 and 1.0.0.1
- OpenDNS: 208.67.222.222 and 208.67.220.220

5. Save Your Changes: After entering the DNS server addresses, click "Save". Your DNS settings have now been updated. Windows 11 may also let you enable encrypted DNS for supported providers — a nice feature if your chosen resolver supports it. To revert, set DNS server assignment back to Automatic (DHCP).
🛠️ How to Set Your DNS Settings with PowerShell
For advanced users who prefer using command-line tools, you can modify DNS settings with PowerShell. This is highly efficient for managing infrastructure parameters at scale:
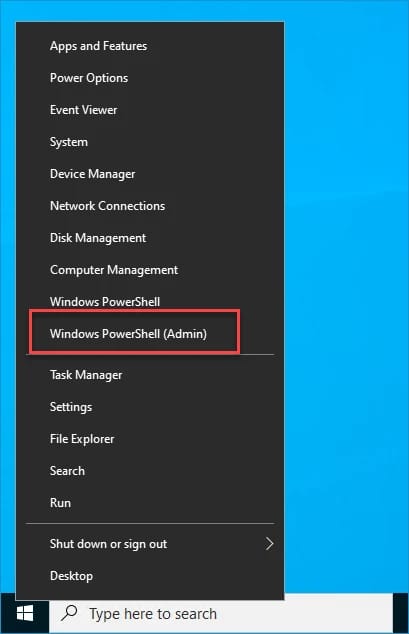
1. Open PowerShell: Right-click on the Windows button. Then, select "Windows Terminal (Admin)" if you're using Windows 11, or "Windows PowerShell (Admin)" if you prefer the older naming convention.
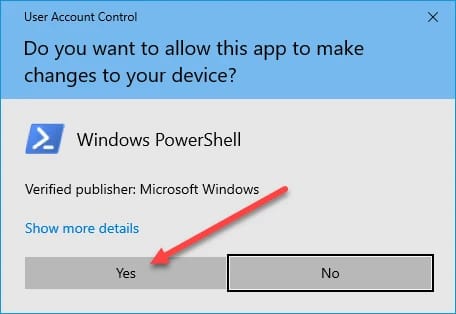
2. Run Commands: When prompted by User Account Control, click "Yes".
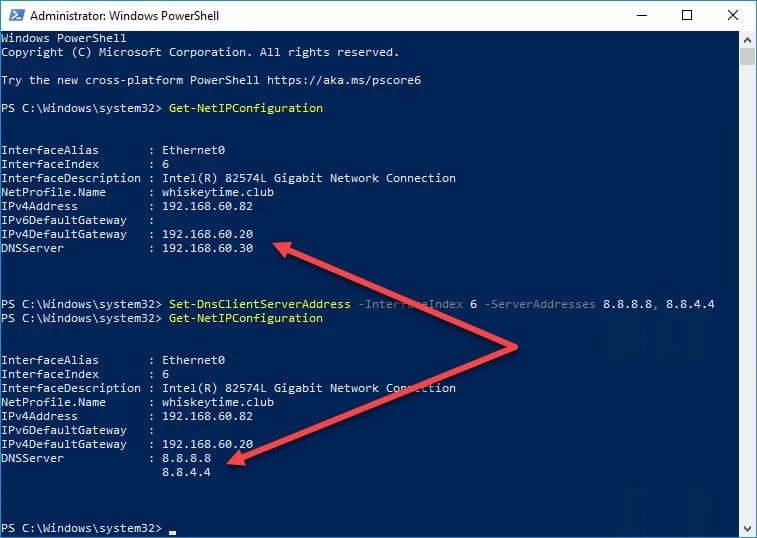
In the PowerShell window, type the following command to retrieve your current network configuration:
Get-NetIPConfiguration
Note the InterfaceIndex number associated with your network adapter.
3. Set New DNS Servers: Replace InterfaceIndex with your specific number and add your preferred DNS addresses:
Set-DnsClientServerAddress -InterfaceIndex 6 -ServerAddresses 8.8.8.8, 8.8.4.4
For IPv6, repeat with your IPv6 addresses. Double-check the interface index before you run it.
4. Verify the Change: Ensure the settings have been applied correctly by running:
Get-NetIPConfiguration
If you're working on servers, you may also want to review Windows Server DNS setup and troubleshooting for deeper configuration options.
🍏 How to Change DNS Server Mac
If you're using a macOS laptop, follow these steps to learn how to change DNS server on Mac:
1. Open System Settings: Click on the Apple menu and select "System Settings."
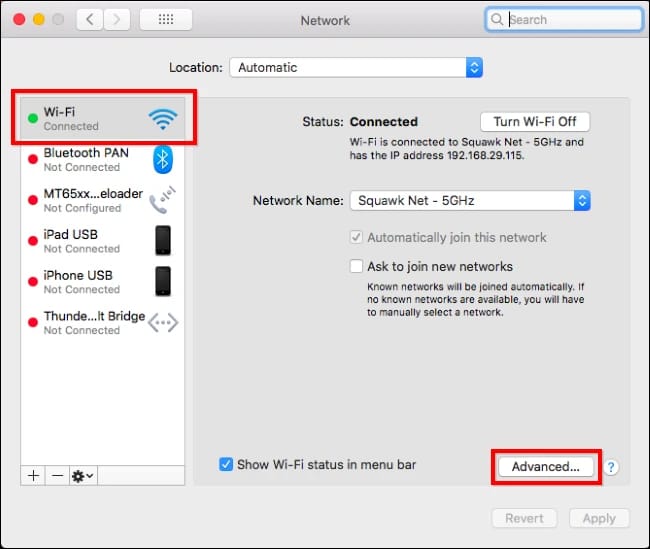
2. Access Network Settings: In the System Settings window, select "Network."
3. Select Your Connection: Highlight your Wi-Fi connection and click the "Advanced" button.
4. Open DNS Settings: Click on the "DNS" tab.
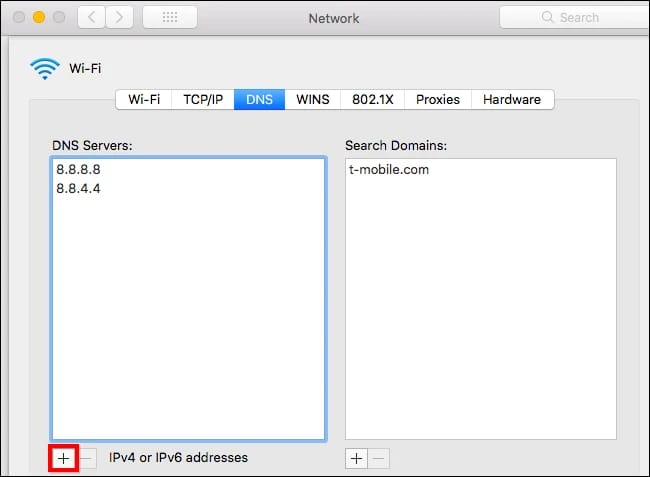
5. Add New DNS Addresses: Use the plus-sign (+) button to add new IPv4 and IPv6 DNS addresses.
6. Remove Existing Addresses: Use the minus-sign (–) button to remove any existing DNS addresses so the order is clear. macOS queries resolvers in order, and stale entries can confuse testing.
7. Save Your Changes: Click "OK" to save your changes.
Be careful when entering the DNS addresses, as macOS doesn't automatically check them for validity. Unlike Windows, which alerts you to errors, macOS allows you to enter incorrect addresses without warning. Double-check your entries to ensure they are correct. To verify, use scutil --dns in Terminal.
How to Change DNS on iPhone and iPad
1. Open Settings > Wi-Fi.
2. Tap the info icon next to your connected network.
3. Scroll to Configure DNS.
4. Switch from Automatic to Manual.
5. Remove old entries, add your custom DNS server addresses, and save.
This usually applies per Wi-Fi network, not globally across every connection. Your mobile data connection may still use carrier defaults. Apps using VPNs, encrypted DNS, or their own network stack may behave differently.
📱 How to Change DNS Server Android
On Android 9 and newer, go to Settings > Network & Internet > Private DNS. Choose Private DNS provider hostname and enter a hostname such as dns.google, dns.quad9.net, or 1dot1dot1dot1.cloudflare-dns.com. Tap "Save" to confirm.
It's worth noting that for Android, you can't enter an IP address directly like 1.1.1.1 or 8.8.8.8. Instead, you'll need to enter the corresponding hostname. If Private DNS breaks connectivity, switch it to automatic and test again — public Wi-Fi captive portals are a frequent culprit.
💻 How to Change DNS Server on Chromebook
Follow these steps to learn how to change DNS server on Chromebook:
1. Open Settings: Click on the notification tray located at the bottom-right corner of your screen. Press on the cogwheel icon to open the Settings screen.

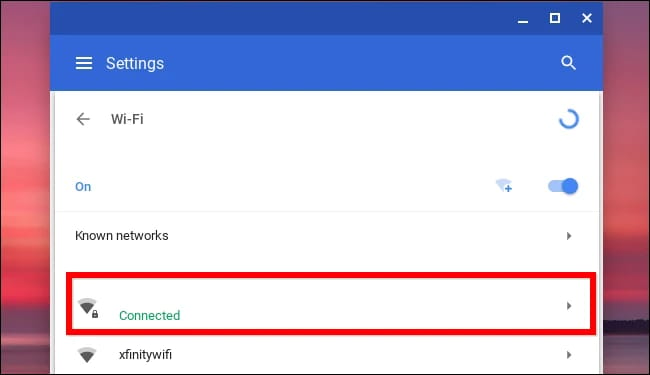
2. Access Wi-Fi Settings: In the Settings menu, click on the "Wi-Fi" tab at the top.
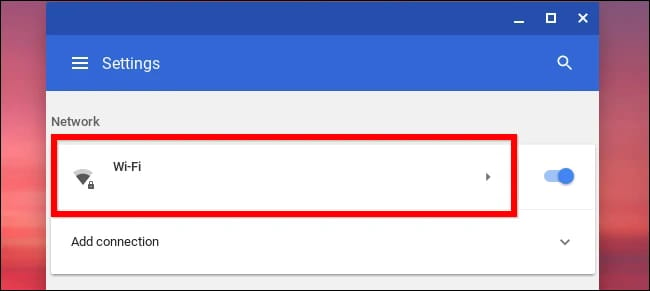
3. Select Your Wi-Fi Network: Locate and click on the Wi-Fi network you are currently connected to.
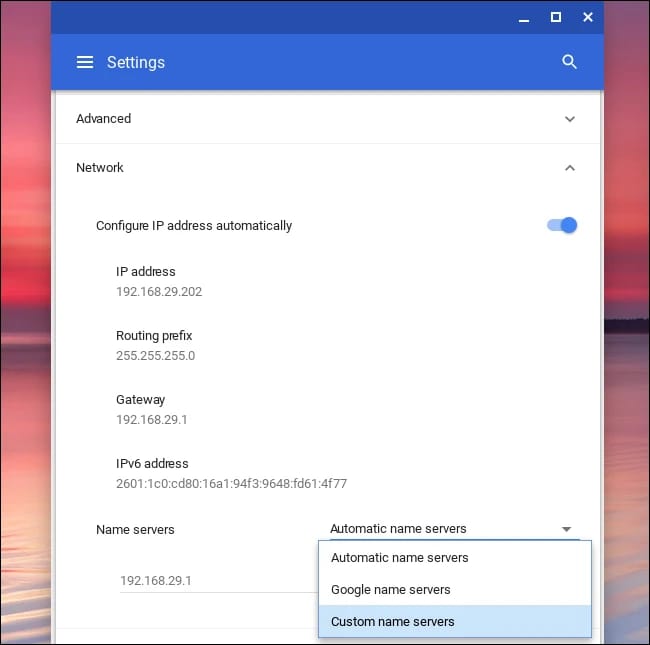
4. Navigate to Network Settings: Click on the "Network" tab. Once the section expands, locate the "Automatic name servers" window next to the "Name servers" tab.
5. Choose Custom Name Servers: Click on the "Automatic name servers" window and select "Custom name servers."
6. Enter DNS Addresses: Use mainstream public DNS values like 1.1.1.1 and 8.8.8.8 — not unexplained IPs from old forum posts.
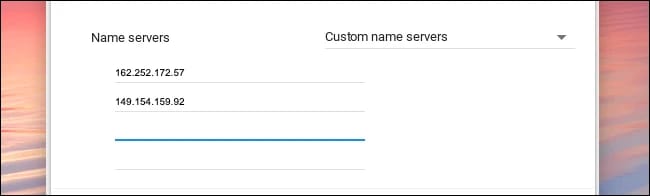
7. Save Your Changes: After entering the DNS addresses, press the Tab button on your keyboard or click somewhere next to the DNS address fields to save the changes. If the change doesn't stick right away, disconnect and reconnect to the network.
How to Change DNS on Linux
On most desktop Linux systems using NetworkManager, open network settings, edit the active connection, and enter custom DNS under IPv4 or IPv6. Disable automatic DNS for that profile if needed. Be careful with /etc/resolv.conf — on modern Linux, it may be auto-managed by NetworkManager or systemd-resolved. Editing it blindly can cause changes to be lost on reboot. To verify, use resolvectl status, dig example.com, or nslookup example.com. For a deeper walkthrough, see How to Change Linux DNS. If you're running DNS changes on a cloud instance, a Linux VPS gives you full root access to configure networking exactly how you need it.
📟 How to Change DNS Server on Router
If you want to change the DNS server for your entire home network, you'll need to do it on your router. This way, all the devices on your network — like PCs, smartphones, tablets, game consoles, smart speakers, TV streaming boxes, and even Wi-Fi-enabled light bulbs — will use the new DNS server automatically. By default, your router uses the DNS servers provided by your Internet service provider (ISP).
1. Accessing Your Router's Web Interface
Log in to your router, usually at an address like 192.168.1.1 or 192.168.0.1. Then look for WAN, Internet, LAN, or DHCP settings. The exact steps may vary depending on your router model. If you're unsure how to do this, check your router's manual or look up online documentation for your specific router model.
2. Changing DNS Server Settings
Enter your preferred DNS server and alternate DNS server, save the configuration, and make sure DHCP clients receive the new values. Changing this setting will affect your entire network because the DNS server information is distributed to all devices via the DHCP protocol. Setting proper routing rules at the hardware level is as practical as using reliable equipment like a Mikrotik VPS for specialized packet management.
3. Restart and Renew
Reboot the router, then reconnect devices or renew the lease. Router DNS is great for whole-home coverage. Alternatively, you can set up a custom DNS server on individual devices if you prefer — but changing the DNS settings on the router ensures all devices use the new DNS server without having to change each one individually.
How to Verify Your DNS Changes Worked
Check DNS Server in Windows
Get-DnsClientServerAddress
nslookup example.com
Check DNS Server on macOS and Linux
scutil --dns
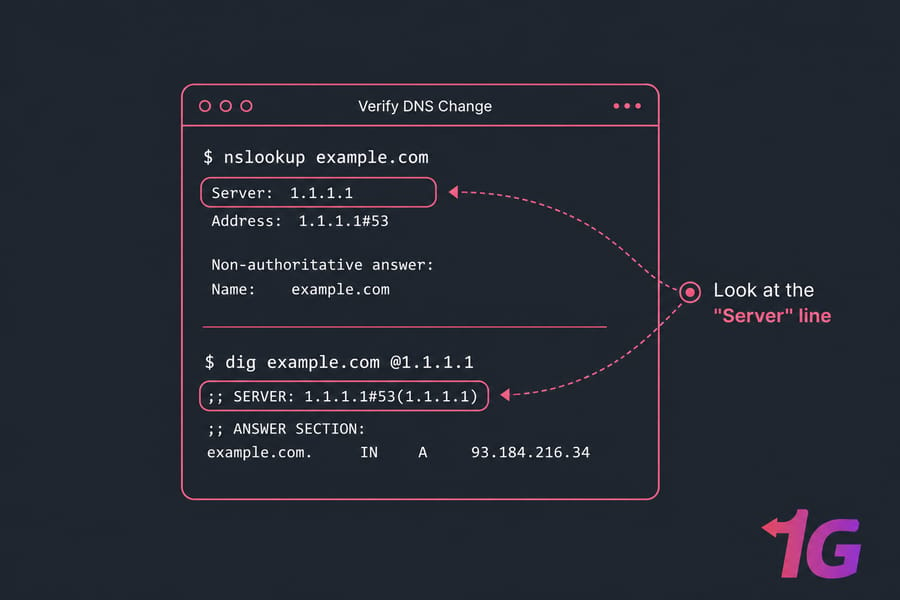
resolvectl statusUse nslookup or dig
Look at the Server line in the output. That's the practical check most people need.
Check for Browser-Level Secure DNS
If the OS says one thing but the browser behaves differently, disable browser secure DNS temporarily and test again.
How to Flush DNS Cache After Changing DNS
Flush DNS on Windows
ipconfig /flushdnsFlush DNS on macOS
sudo dscacheutil -flushcache; sudo killall -HUP mDNSResponderBrowser Cache Considerations
Browsers can cache DNS too. A restart often helps. If you need more detail, here's a guide to how to flush DNS caches to apply your new selections right away. And remember: clearing local cache is not the same as waiting for DNS propagation.
DNS over HTTPS (DoH) vs DNS over TLS (DoT)
What Each One Does
DoH sends DNS over HTTPS. DoT sends it over TLS. Both encrypt DNS queries in transit, which is better than plain DNS on untrusted networks.
Which Devices and Browsers Support Them
Android Private DNS uses DoT. Browsers like Chrome, Edge, and Firefox often use DoH. Windows 11 can support encrypted DNS too.
How They Affect Privacy and Troubleshooting
They improve query privacy, but they also add another layer when you're diagnosing issues. And no, they still don't replace a VPN.
⚠️ Common Problems After Changing DNS and How to Fix Them
No Internet After Changing DNS
Revert to automatic DNS first. Then test a known-good resolver like 1.1.1.1 or 8.8.8.8. If needed, reboot the device and router. If you notice persistent lookup issues even after an address adjustment, checking out how to solve DNS server not responding error can provide clear troubleshooting protocols.
Websites Load Slowly After DNS Change
Use a DNS benchmark or simply compare lookup speed with another resolver. Also test IPv4 and IPv6 separately. Slow browsing isn't always DNS-related.
Some Sites Still Resolve to Old Addresses
Flush DNS, restart the browser, and wait for cache expiry. If only one browser is wrong, browser secure DNS or its internal cache may be the cause.
Common Mistakes
- Mixing Up IPv4 and IPv6 Configurations: Entering an IPv4 address string into an IPv6 protocol prompt (or vice versa) will prevent the interface from saving or disrupt network activity.
- Forgetting Alternate Server Entry: Skipping the secondary/alternate DNS server row leaves you without an active backup if the primary public server experiences intermittent downtime.
- Using the Wrong DNS Format: Accidentally misplacing periods or switching numbers inside IPs will cause your operating system to lose track of the resolution network.
- Not Testing IPv6: If you only change IPv4 while IPv6 keeps using automatic DNS, you can end up with half-working setups.
- Browser Secure DNS Overriding System DNS: Chrome, Edge, and Firefox may ignore your OS-level DNS changes.
💡 Expert Tips for DNS Optimization
- Test for Latency: Use third-party benchmark software like Namebench to determine which public resolver operates closest to your geographic location for the absolute lowest ping.
- Deploy at Router Level: Instead of updating twenty unique items manually, modifying the properties on your central gateway saves effort and safeguards your entire residential or workplace perimeter.
- Keep ISP DNS as a Reference: Always document your original ISP configurations. If an unexpected routing problem happens globally, temporarily returning to default values helps isolate the failure source.
How to Revert to Default DNS Settings
If you want to reset everything, switch back to automatic DNS or DHCP-provided DNS on the device or router where you made the change. That's the cleanest fix when troubleshooting gets messy.
🎯 Final Words
Changing DNS is one of those small tweaks that can genuinely help — if you do it for the right reason. Better reliability, cleaner filtering, maybe a little faster name resolution. That's the realistic win. Whether you're on Windows, macOS, Chromebook, Android, iPhone, Linux, or even changing settings on your router, taking control of your DNS configuration empowers you to optimize your online connectivity.
If something breaks, don't panic. Revert to automatic DNS, clear cache, verify with nslookup or dig, and check whether the router or browser is overriding your settings. Simple steps first — they solve more than you'd think. If you're building a larger setup, a Dedicated server gives you complete control over DNS, networking, and every other layer of the stack. For more guides, visit the server infrastructure and networking blog hub. So, don't hesitate to explore these possibilities and take charge of your internet browsing experience today.

Leave A Comment