")
Windows Server DNS is the principal name resolution service for each enterprise or cloud network, performing the automatic conversion of human-readable domain names to IP addresses and vice versa so that devices and services can communicate without any delay.
In the context of server configurations, a properly set up DNS system influences the speed of finding and getting both internal and external resources. This tutorial will guide you through the entire process of Windows Server DNS configuration, starting from installation and creation of zones to managing forwarders, logs, caches, and even advanced security features like DNS over TLS.
It doesn't really matter if you are working with Windows Server 2016, 2019, or 2022; this guide will give you the power to set up, monitor, and troubleshoot DNS with the highest assurance.
🌐 DNS Fundamentals & Role in Windows Server
The Windows Server DNS service acts as the foundation of every enterprise network, managing domain name resolution between clients, servers, and external systems. Without a properly functioning DNS infrastructure, even basic operations such as email delivery, file sharing, or connecting to web applications can fail.
🧩 What is DNS and How It Works?
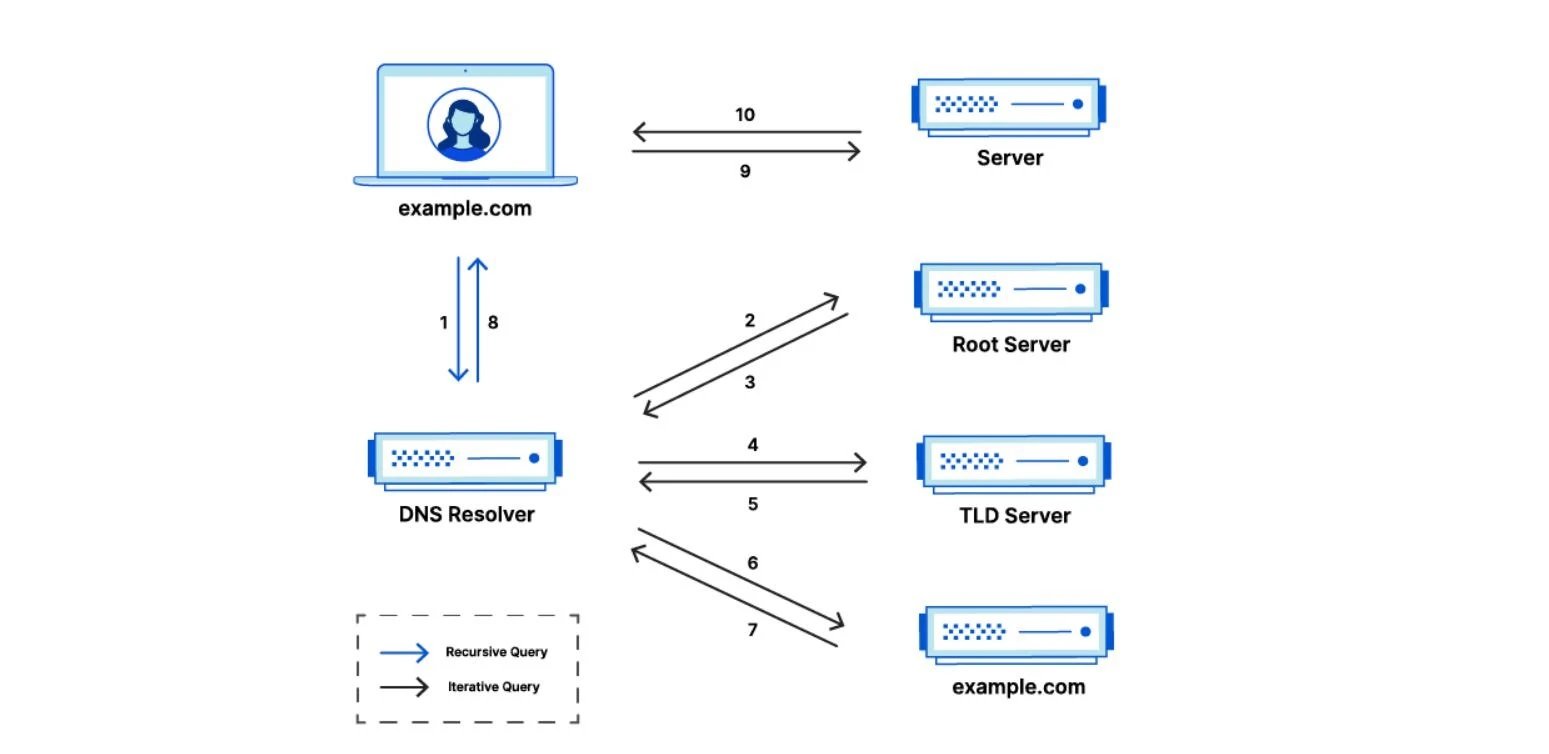
DNS (Domain Name System) translates user-friendly domain names like server into IP addresses that computers understand. The system relies on resource records such as A (Address) records that map hostnames to IPv4 addresses, AAAA for IPv6, CNAME (Canonical Name) for aliases, and NS (Name Server) records that identify authoritative servers for a zone.
In Windows Server DNS, recursive queries allow clients to resolve names outside their local domain using forwarders, which pass unresolved requests to external DNS servers like 8.8.8.8 or 1.1.1.1. This balance between recursion, caching, and forwarding ensures fast and efficient resolution across networks.
⚙️ DNS Roles and Features in Windows Server
Windows Server includes a built-in DNS role that can be installed through Server Manager or PowerShell, enabling the system to act as a full-featured DNS server. This role supports Forward Lookup Zones, Reverse Lookup Zones, and Conditional Forwarders, allowing fine-grained control over how queries are processed.
Integration with Active Directory DNS automates record registration and replication, while features like DNS Manager, DNS logs, and DNS over TLS (DoT) provide visibility and security. Whether running on-premises or in hybrid environments, the DNS role in Windows Server is designed for high reliability, scalability, and compatibility with both IPv4 and IPv6 networks.
🚀 Benefits & Use Cases
Implementing Windows Server DNS offers significant benefits in network stability, control, and speed. An internal DNS setup allows organizations to manage private domain namespaces and ensure local name resolution without depending on external servers. Split DNS (split-brain DNS) configurations provide different DNS responses for internal and external users, essential for hybrid setups where web apps or portals are hosted both on-premises and in the cloud.
Using DNS forwarders enhances resolution performance and security by directing queries to trusted upstream servers. Overall, Windows Server DNS provides the flexibility and efficiency needed for modern enterprise networks.
🛠️ Installing & Enabling Windows Server DNS Role
Setting up the Windows Server DNS role is one of the first steps toward building a reliable network infrastructure. You can install and configure it easily through either Server Manager or PowerShell, depending on your management preference and automation needs.
-
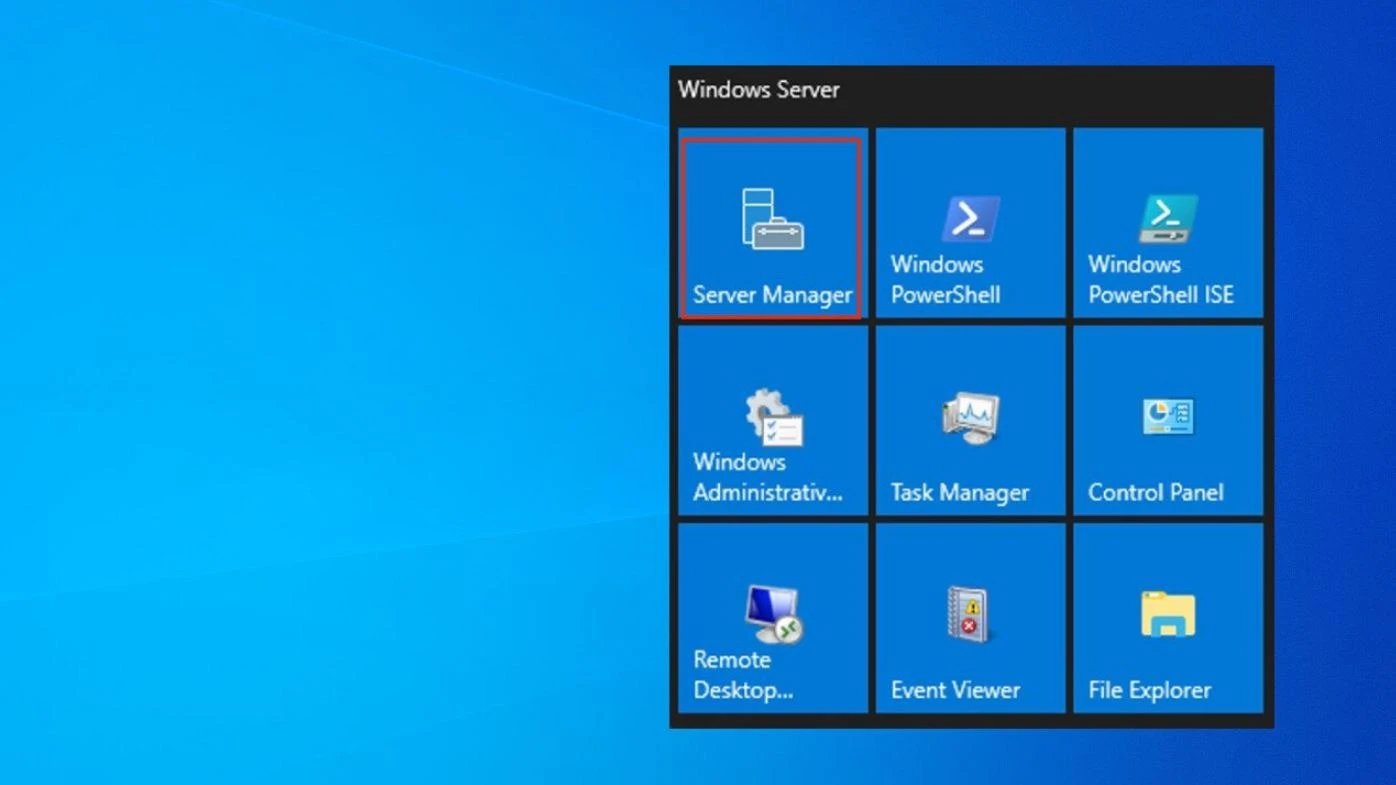
Open Server Manager: Launch Server Manager → select Add Roles and Features → proceed to the Server Roles section.
-
Select DNS Server: Check the DNS Server role and continue through the wizard until installation completes.
-
Use PowerShell (optional): Run the command:
Install-WindowsFeature -Name DNS -IncludeManagementTools
This enables the DNS role and installs the DNS Manager automatically.
-
Restart the Server (if prompted): Some configurations require a restart for changes to apply.
-
Access DNS Manager: Navigate to Tools → DNS in Server Manager or run dnsmgmt.msc to open the console.
-
Enable Remote Management: Allow Remote Server Administration Tools (RSAT) to manage DNS servers from another system if necessary.
-
Verify DNS Service Status: Check that the DNS service is running by executing:
Get-Service -Name DNS
Once installation is complete, the DNS Manager console becomes your primary tool for configuring zones, records, and forwarders.
After setting up your DNS role on the server, make sure your Windows clients are properly configured. Our guide on Change DNS in Windows walks you through the process step by step.
⚙️ Core DNS Configuration in Windows Server
Once the Windows Server DNS role is installed, the next step is configuring your DNS zones, records, and forwarders to ensure accurate and secure name resolution.
Create Forward Lookup Zones:
Open DNS Manager → New Zone Wizard → Forward Lookup Zone. Choose between Primary, Secondary, or Stub Zone depending on your setup. Forward Lookup Zones map hostnames (like webserver.local) to IP addresses, which are the foundation of internal DNS.
Add DNS Records (A, CNAME, SRV, MX):
Within the zone, right-click and select New Host (A or AAAA) to add entries. Use CNAME for aliases, SRV records for service discovery (e.g., LDAP or Kerberos), and MX records to route emails. These records are essential for both internal services and hybrid cloud environments.
Configure Forwarders & Conditional Forwarders:
Go to Server Properties → Forwarders tab, and add trusted external DNS servers (e.g., 8.8.8.8, 1.1.1.1) for non-local queries. Conditional forwarders route specific domain queries (like partnerdomain.com) to specific DNS servers, improving performance and security.
Adjust DNS Cache Settings and TTL:
Fine-tune Time-to-Live (TTL) values in the zone properties to control how long records are cached. Lower TTLs allow for faster propagation of updates, while higher TTLs reduce external lookup traffic.
Enable DNS over TLS (DoT):
Though Windows Server DNS doesn’t natively support DoT for internal queries yet, it can forward DNS traffic securely to upstream DoT-enabled resolvers. This enhances privacy by encrypting DNS queries.
Properly configuring your Windows Server DNS settings ensures efficient resolution and reliable performance across your network.
When setting up custom forwarders or switching to external resolvers like Google or Cloudflare, refer to our full tutorial on How to Change DNS Server for detailed guidance.
🔒 DNS Logs, Monitoring & Security
Monitoring your Windows Server DNS activity is essential for maintaining network stability, troubleshooting issues, and identifying potential security threats. Proper DNS logging and protection mechanisms such as DNSSEC and Access Control Lists (ACLs) help ensure your infrastructure remains both transparent and resilient.
You can view Windows Server DNS logs in the Event Viewer under:
Applications and Services Logs → Microsoft → Windows → DNS-Server. Alternatively, enable detailed DNS logging in DNS Manager → Server Properties → Debug Logging tab, where you can track queries, updates, and transfers. Log files are typically stored in:
C:\Windows\System32\dns\Logs.
Event Viewer & DNS Server Logs:
The Event Viewer provides insights into DNS startup events, query resolutions, and zone transfers. Regularly reviewing these logs helps detect anomalies like failed lookups, unauthorized zone changes, or replication errors.
Access Denied Errors in DNS (Common Causes & Fixes):
The “DNS Access Denied” error often occurs due to permission issues on zone files, missing administrative rights, or blocked network ports (UDP/TCP 53). Fix this by checking the DNS folder permissions, ensuring the DNS Server service runs with proper credentials, and allowing DNS traffic through the firewall.
Securing DNS (DNSSEC, ACLs, Scavenging):
Implement DNSSEC (Domain Name System Security Extensions) to prevent spoofing and cache poisoning. Use ACLs (Access Control Lists) to restrict who can create or modify DNS records, and enable scavenging to automatically remove stale records and reduce clutter.
Maintaining a secure and well-monitored Windows Server DNS server not only improves reliability but also protects your network from attacks like DNS hijacking and spoofing.
🧠 Advanced Scenarios & Tips
Beyond basic configurations, Windows Server DNS supports several advanced use cases that enhance flexibility, performance, and security in complex network environments.
|
Scenario |
Description |
Best Practice / Example |
|
Adding Entries for External Domains |
Manually add A or CNAME records in your internal DNS zone to point to external services (e.g., mail.google.com). |
Useful when certain applications rely on internal DNS for external resource access. |
|
Split-Brain (Split DNS) Setups |
Maintain separate internal and external DNS zones for the same domain name. |
Configure internal DNS to resolve private IPs and external DNS to resolve public IPs — ideal for hybrid cloud environments. |
|
Using DNS with Active Directory |
Integrate Windows Server DNS with Active Directory (AD) to enable automatic record registration and replication. |
In AD-integrated zones, records are stored in the AD database and replicated securely across domain controllers. |
|
Troubleshooting Common Issues |
Address issues like “DNS Access Denied,” missing A records, or slow lookups. |
Check event logs, validate zone permissions, clear DNS cache, and restart the DNS service if necessary. |
When these advanced configurations are applied correctly, Windows Server DNS becomes far more powerful and adaptive to enterprise-grade needs.
🧩 Best Practices & Common Mistakes
Managing a Windows Server DNS environment efficiently requires consistent optimization and disciplined maintenance. Following proven best practices not only enhances performance but also prevents common misconfigurations that can lead to slow lookups or failed resolutions.
|
Best Practice / Common Mistake |
Explanation |
Recommendation |
|
Keep Zones Lean and Records Clean |
Overloaded DNS zones with outdated or duplicate records increase query times and complexity. |
Regularly review and remove stale or unused entries; enable DNS scavenging for automation. |
|
Avoid Too Many Forwarders |
Adding excessive forwarders can slow down name resolution. |
Use only two or three trusted resolvers, such as 8.8.8.8 and 1.1.1.1, for stability. |
|
Regularly Monitor Logs & Audit |
Ignoring logs may hide issues like failed updates or unauthorized changes. |
Review DNS logs weekly and set up alerts for anomalies in Event Viewer. |
|
Use Proper TTLs |
Setting improper TTLs leads to outdated cache or high query loads. |
Assign shorter TTLs for dynamic records and longer TTLs for static or external entries. |
|
Backup DNS Data Regularly |
Data loss or corruption in DNS can disrupt entire networks. |
Schedule periodic backups of DNS zone files or enable system state backups for redundancy. |
By implementing these practices, your Windows Server DNS server remains secure, efficient, and easy to manage.
Conclusions
The complete knowledge and handling of Windows Server DNS are prerequisites for an organization's network infrastructure, which is fast, reliable, and secure. Each act, from setting up zones and forwarders through to implementing detailed logging and security using DNSSEC, promotes performance and uptime. It does not matter whether you are administering on-site or hybrid systems; having a steady environment with strong hosting is very significant.
If you want a fast, reliable environment for testing or hosting your DNS infrastructure, explore Windows VPS plans from 1Gbits with instant setup, 24/7 support, and global data centers for maximum performance.


 🚀")

 🔐")
![What Is Cold Data Storage? ❄️ [2026 Guide]](https://1gbits.com/cdn-cgi/image//https://s3.1gbits.com/blog/2026/02/what-is-cold-data-storage-750xAuto.webp "What Is Cold Data Storage? ❄️ [2026 Guide]")


