
A well-executed Windows VPS configuration can transform your digital operations, offering flexibility, performance, and enhanced security. Whether you're a developer, small business owner, or IT professional, knowing how to set up and optimize a Windows Virtual Private Server (VPS) is essential for hosting applications, websites, databases, or remote work environments.
In this in-depth guide, we'll walk you through how to setup a VPS server (Windows), share Windows VPS configuration best practices, and help you perform tasks like configuring Active Directory, setting up backups, and more.
What Is Windows VPS Configuration?
Windows VPS configuration refers to the process of setting up, customizing, and optimizing a Windows-based Virtual Private Server. A VPS runs its own copy of Windows Server OS and offers root-level access, allowing users to:
-
Install and manage applications
-
Host websites
-
Create a virtual desktop environment
-
Manage databases
-
Configure security protocols
This setup gives users the performance of a dedicated server at a fraction of the cost.
How to Setup a VPS Server (Windows): Step-by-Step Guide
Setting up a Windows VPS server might sound technical, but with a structured approach, anyone can get started in minutes. Below is a comprehensive step-by-step guide on how to setup a VPS server (Windows), from purchase to configuration.
Step 1: Buy a Windows VPS Plan
The first step is to choose a reliable hosting provider. At 1Gbits, you can Buy Windows VPS with high performance, full admin access, SSD storage, and flexible plans tailored for developers, businesses, or personal projects. Our Windows VPS plans are pre-configured for efficiency and come with 24/7 support.
Whether you're planning to host websites, run software remotely, or manage a private network, selecting a powerful and scalable VPS plan is the foundation of reliable Windows VPS configuration.
Step 2: Access Your VPS via Remote Desktop (RDP)
After purchasing, you’ll receive an email containing your server's IP address, username (usually “Administrator”), and password. These credentials are essential for connecting to your VPS via Remote Desktop Protocol (RDP).
Follow these steps on a Windows machine:
-
Press Win + R, type mstsc, and hit Enter to launch Remote Desktop Connection.
-
In the "Computer" field, enter your VPS IP address and click "Connect".
-
A prompt will appear asking for credentials—enter your username and password provided after purchase.
-
Once logged in, you’ll see the Windows Server desktop environment.
🔗 Need help on different devices? Check our complete guide on How to connect to a VPS on Mac and PC.
Step 3: Update Your Windows Server
After connecting to your server, it’s crucial to install system updates. Running the latest updates ensures better security, stability, and performance.
Here’s how:
-
Go to Start > Settings > Update & Security > Windows Update.
-
Click “Check for updates” and install any available updates.
-
Restart the server if prompted.
This step is essential for any proper Windows VPS basic configuration.
Windows Server Configure Active Directory
If you're using your Windows VPS to manage users or set up a domain environment, configuring Active Directory Domain Services (AD DS) is essential. This feature turns your VPS into a domain controller—a centralized server that handles user logins, permissions, and group policies.
Here’s how to configure Active Directory on a Windows Server:
-
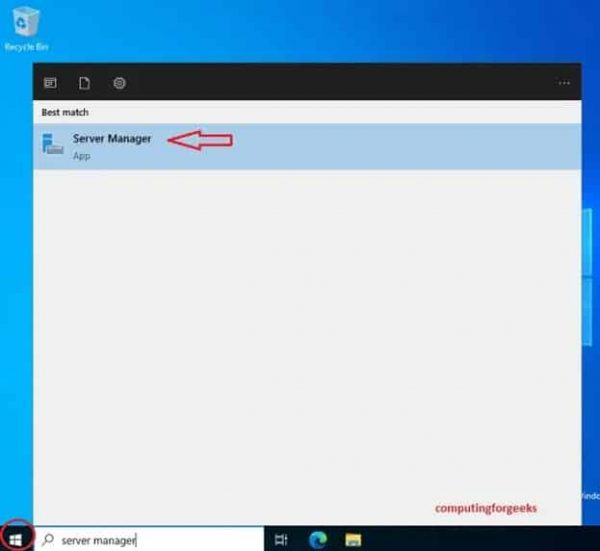
Launch Server Manager from the Start Menu.
-
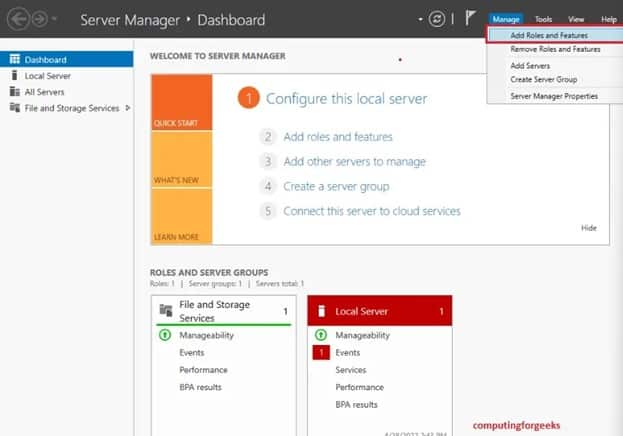
Go to Manage > Add Roles and Features.
-
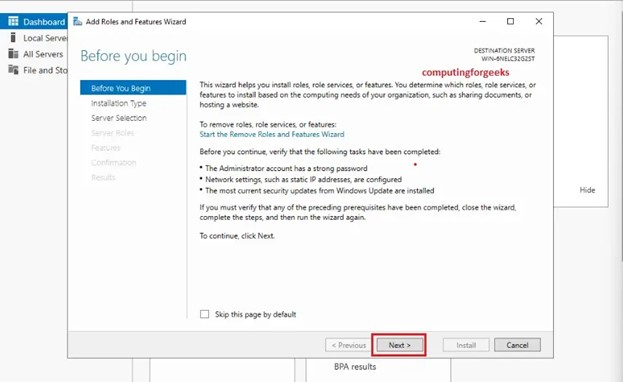
In the Before You Begin screen, click "Next".
-
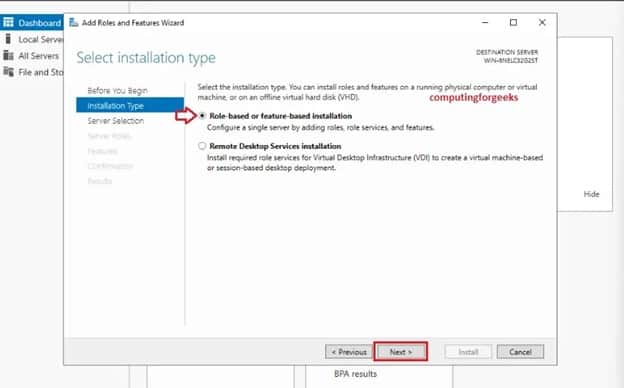
Choose Role-based or feature-based installation.
-
Select your server from the list and click "Next".
-
Under Server Roles, select Active Directory Domain Services (AD DS).

-
Follow the prompts to install the role and required features.
-
Once installation is complete, click the flag icon in Server Manager to promote your server to a Domain Controller.
-
Complete the configuration wizard to specify the domain name and directory services settings.
This setup is recommended for IT admins or businesses that need centralized user management, policy enforcement, and secure network administration through their Windows VPS configuration.
Windows VPS Configuration Best Practices
Setting up your server is just the beginning. For long-term success and stability, you should follow industry-proven Windows VPS configuration best practices. Here’s how to ensure your server remains secure, efficient, and well-managed:
1. Use Strong Authentication
-
Enforce complex passwords with a mix of letters, numbers, and special characters.
-
Enable Two-Factor Authentication (2FA) for all administrator accounts.
-
Create limited-access accounts for users instead of sharing the Administrator credentials.
2. Regular Backups
-
Use Windows Server Backup or a third-party tool like Veeam or Acronis.
-
Schedule automated backups to external storage or cloud services.
-
Regularly test backup recovery to ensure data integrity.
Want to explore options? Read our guide on How to do Windows VPS configuration backup for more.
3. Monitor Performance and Resource Usage
-
Open Task Manager or Resource Monitor to check CPU, RAM, and disk activity.
-
Consider installing third-party tools like SolarWinds or PRTG for in-depth monitoring.
-
Set up alerts to detect unusual activity or performance degradation early.
4. Configure Scheduled Updates
-
Go to Settings > Update & Security and choose advanced options to schedule installations.
-
Use Group Policy Editor to control update behavior for larger environments.
This keeps your VPS protected without needing manual intervention.
5. Secure Your Firewall
-
Limit access to only necessary ports, such as:
-
TCP 3389 (RDP)
-
TCP 80 (HTTP)
-
TCP 443 (HTTPS)
-
Block unused ports and IP addresses.
-
Create rules for inbound and outbound traffic as per your use case.
🔒 For a full walkthrough, visit our article on How to Configure a Firewall on Your VPS.
6. Enable Logging and Auditing
-
Use Event Viewer to monitor logs for login attempts, application errors, and system warnings.
-
Enable audit policies for login failures, file access, and administrative tasks.
Keeping track of system activity helps you detect and respond to potential threats promptly.
Windows VPS Basic Configuration Checklist
After initial setup, follow this basic configuration checklist:
|
Configuration Task |
Description |
|
Set a strong password |
Change the default password immediately |
|
Create new user accounts |
Manage access control with limited permissions |
|
Enable Windows Defender |
Protect the server from malware and threats |
|
Configure Windows Firewall |
Restrict unauthorized access (Learn how) |
|
Change RDP port |
Enhance RDP security by using a non-default port |
|
Install IIS or Apache |
If you're hosting a website or application |
|
Enable backups |
Protect your data with scheduled or cloud-based backups |
Windows VPS Configuration Free Tools
If you're looking for free ways to get started, consider:
-
Evaluation versions of Windows Server from Microsoft (valid for 180 days)
-
Free RDP clients like Microsoft Remote Desktop or AnyDesk
-
Free control panels such as Plesk (free version) or Webmin
While there are ways to make a VPS server at home, keep in mind that hosting on residential networks is not secure or reliable for production.
Advanced Features: How to Connect to VPS on Windows 11 and Ubuntu
Windows 11:
-
Open Remote Desktop Connection
-
Enter VPS IP and login credentials
-
Optionally, enable clipboard or drive redirection for file transfers
Ubuntu:
Use Remmina or rdesktop:
sudo apt install remmina
remmina
Enter VPS IP, protocol (RDP), and login info.
Learn more from our guide on How to connect to a VPS.
How to Setup VPS on Windows 10
You can use the built-in Remote Desktop Client or PowerShell to access your VPS:
powershell
mstsc /v:<VPS-IP>
Alternatively, use Hyper-V Manager if setting up a local Windows VPS environment.
How to Make a VPS Server at Home (Not Recommended for Production)
You can technically create a VPS server at home using:
-
Hyper-V (Windows) or VirtualBox
-
Install Windows Server ISO on a virtual machine
-
Configure networking (NAT or bridged)
-
Set up port forwarding on your router
-
Assign a static IP or use dynamic DNS
However, this setup lacks reliability, uptime guarantees, and proper DDoS protection.
Backup Options for Windows VPS Configuration
Backing up your VPS ensures business continuity. Options include:
-
Windows Server Backup: Built-in tool for local/remote backups
-
Cloud storage solutions: Google Drive, OneDrive, or AWS S3
-
Snapshot-based backups: Offered by VPS providers like 1Gbits
Schedule regular backups and test restoration processes regularly.
Operating Systems and Alternatives
Looking for different OS configurations? Explore our guide to VPS Operating Systems to learn about Ubuntu, CentOS, Debian, and more.
If you need Linux alternatives, check out:
-
How to setup VPS server Linux
-
Setup VPS server Ubuntu
-
How to connect to VPS Ubuntu
If you're looking for optimal performance, high-speed SSDs, and full root access, explore our curated list of the Best Windows VPS plans tailored for gaming, trading, development, and enterprise hosting.
Conclusion: Take Control of Your Hosting with Smart Windows VPS Configuration
Getting your Windows VPS configuration right from the beginning saves time, enhances security, and boosts performance. Whether you’re setting up Active Directory, exploring free configuration tools, or implementing backup strategies, a well-configured server can support everything from personal projects to enterprise workloads.
If you're ready to get started, Buy Windows VPS today and take full control of your hosting environment.
Need help logging in? Check our article on How to Login to VPS.


 🚀")

 🔐")
![What Is Cold Data Storage? ❄️ [2026 Guide]](https://1gbits.com/cdn-cgi/image//https://s3.1gbits.com/blog/2026/02/what-is-cold-data-storage-750xAuto.webp "What Is Cold Data Storage? ❄️ [2026 Guide]")


