

Many components that support a computer must work properly for it to function successfully. One such component is the BIOS. From the time the computer boots up to the operating system, it is critical to the operating system. If there are any conforming operating system upgrades, updating the BIOS is a good idea. But how to update BIOS?
When updating the BIOS, it's crucial to remember only to do so when absolutely necessary. Because the firmware gave by the motherboard's manufacturer frequently does not need to be updated. As a result, if you have any issues with your computer's gadgets, you do not need to upgrade your BIOS because the method of doing so is very complicated.
This guide walks through what a BIOS update actually changes, when it's worth the risk, how to check your current version, and the safest ways to flash new firmware — including recovery if something goes wrong.
🧠 What BIOS Actually Is — and What an Update Changes
BIOS is the firmware that wakes your machine up. It initializes the CPU, memory, and storage, then hands control to Windows or Linux. On almost every board built in the last decade you're really running UEFI firmware, but everyone still calls it "the BIOS." Fine by me. If you're new to what a machine actually does at this level, our primer on what a server is and how it works covers the fundamentals.
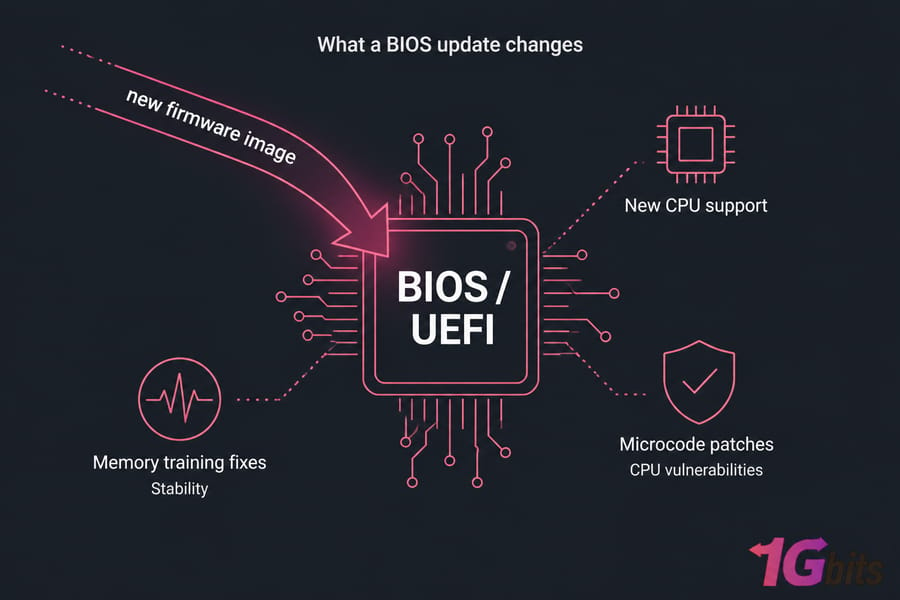
A BIOS update — flashing new system firmware onto the motherboard's chip — mostly changes three things: hardware compatibility, stability, and security. New CPU support. Memory training fixes. Microcode patches for CPU vulnerabilities. That's the honest list.
What it usually doesn't do is make your PC faster. I've flashed a few hundred boards over the years, and the times I saw a real performance jump were almost always memory-related (better DDR5 training, higher stable EXPO speeds), not magic. Anyone promising a speed boost from a firmware flash is selling something.
⏰ When Should You Update Your BIOS?
It's not easy to update your BIOS. The BIOS update is not a simple task, but it's not impossible. The reason for the complexity is that if the process is incorrect, you may end up with a motherboard that won't turn on, in which case you'll need to replace it or send a BIOS chip.
However, some current motherboards contain dual BIOS. This option allows you to restore the primary one. Check the documentation on your motherboard to check if this feature is available.
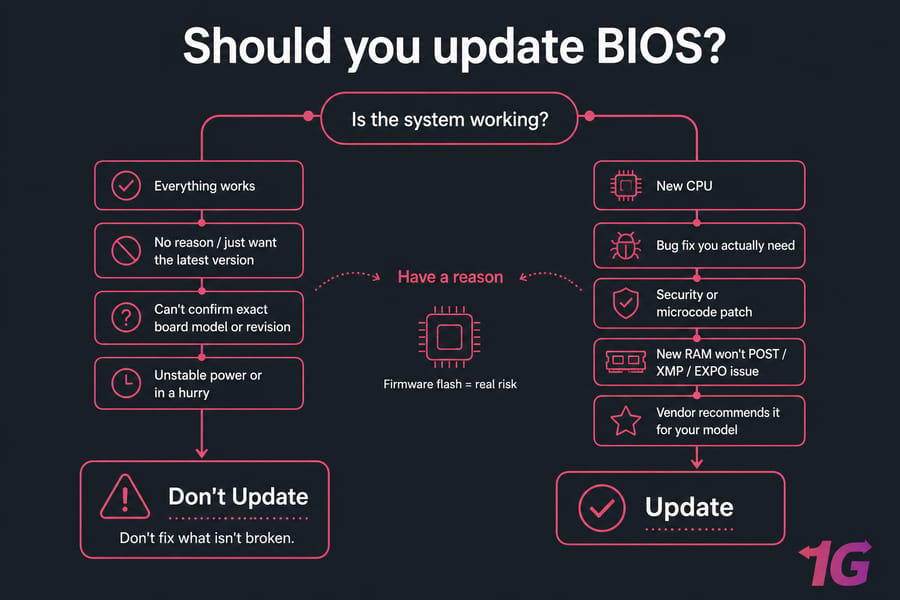
Short answer: only when you have a reason. Flashing firmware is the one maintenance task that can turn a working PC into a paperweight, so the risk needs a payoff. You may need to update your BIOS if you have significant security vulnerabilities that need to be patched, if you plan to switch to a newer CPU, or if new RAM won't POST or won't run its rated XMP/EXPO profile.
✅ When a BIOS update makes sense
- You're dropping in a newer CPU the board shipped too early to recognize.
- The release notes fix a bug you're actually hitting — random reboots, USB dropouts, NVMe not detected.
- There's a security or microcode patch (Spectre-class fixes, TPM/Secure Boot issues).
- New RAM won't POST or won't run its rated XMP/EXPO profile.
- The manufacturer or your system vendor explicitly recommends it for your model.
🚫 When to leave it alone
- Everything works. Genuinely — don't fix what isn't broken.
- You just want "the latest version" out of curiosity.
- You can't confirm your exact board model or revision.
- You're on unstable power, or you're in a hurry.
⚖️ BIOS vs UEFI in One Paragraph
Legacy BIOS uses MBR partitioning, a 2TB disk limit, and a text-only setup screen. UEFI supports GPT disks, drives well past 2TB, Secure Boot, and a graphical interface with mouse support. Same job, modern plumbing. If you want the full breakdown, read our guide on BIOS vs UEFI differences — it matters more than people think when you're partitioning disks, troubleshooting boot failures, or setting up a dual boot with Kali Linux and Windows.
🛡️ Before You Update BIOS: The Safety Checklist
Don't skip this part. Most beginners do, and it's exactly where things go sideways.
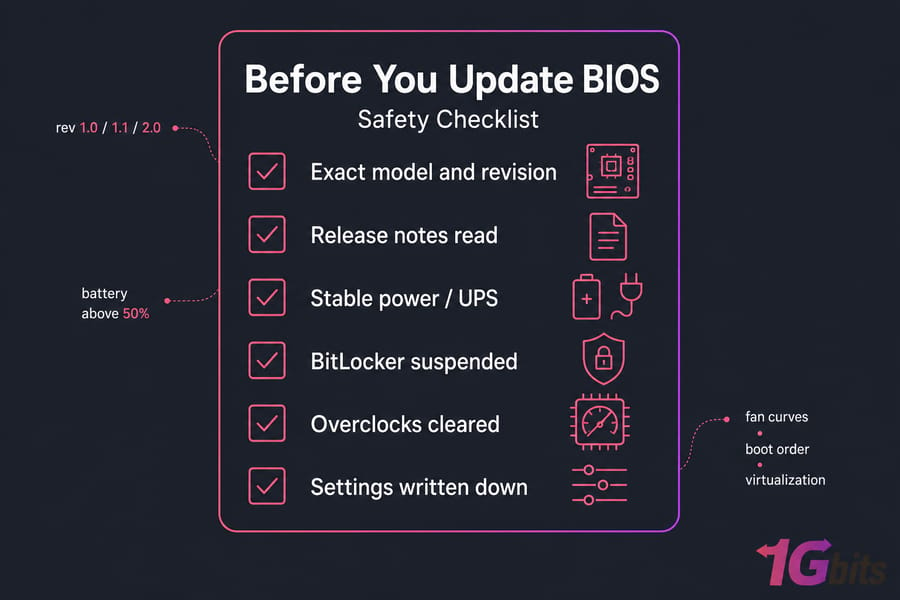
- Confirm the exact model and board revision. Gigabyte and ASRock ship boards as rev 1.0, 1.1, 2.0 — and firmware isn't always interchangeable. The revision is silkscreened near the PCIe slot or on the box label.
- Note your current BIOS version so you know whether the update is even newer.
- Read the release notes. Every single line. Some updates are one-way — after an AGESA or Intel ME bump, downgrading may be blocked.
- Use reliable power. Desktop on a UPS if you have one. Laptop plugged in with the battery above 50%. Most OEM utilities refuse to run otherwise, and for good reason.
- Suspend BitLocker before flashing, or you'll be hunting for your recovery key at the next boot. TPM measurements change when firmware changes.
- Clear your overclocks and write down your custom settings — fan curves, boot order, virtualization toggles. Updates typically wipe them.
- Back up your data. A flash doesn't touch your drives, but a dead board means you can't reach them either.
🔍 How to Check Your BIOS Version in Windows
Three ways, all quick.
- Command Prompt: run
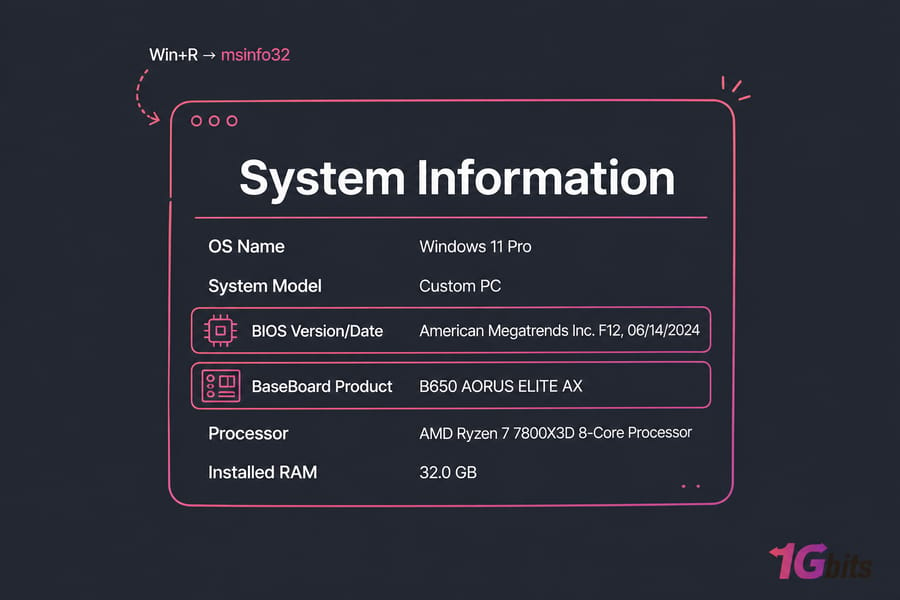
wmic bios get smbiosbiosversion. On newer Windows 11 builds WMIC is deprecated, so use PowerShell instead:Get-CimInstance Win32_BIOS | Select-Object SMBIOSBIOSVersion, Manufacturer, ReleaseDate. - System Information: press Win+R, type
msinfo32, hit Enter. Look at "BIOS Version/Date" and "BaseBoard Product" for the motherboard model. - The setup screen itself: reboot and tap Del or F2 (F1/F10 on some OEM machines). Version and build date sit right on the main page.
For the board model on a desktop, CPU-Z's Mainboard tab gives you manufacturer, model, and often the revision in one shot. On laptops, use the service tag or serial from the bottom label — that's what Dell, HP, and Lenovo support pages want.
📥 Downloading the Right BIOS File
Only from the official support page. Never a forum mirror, never a driver-pack site. Go to ASUS, MSI, Gigabyte, ASRock, Dell, HP, or Lenovo and search your exact model.
Then: match the revision, read the changelog and supported-CPU list, download the newest stable release (skip anything marked beta unless it fixes your specific problem), and extract the archive. The payload is usually a .CAP, .ROM, or numbered file. Some boards — ASRock and older Gigabyte especially — want the file renamed to something specific for recovery flashing. The included readme tells you.
🧰 Choosing Your Update Method
| Method | Best for | Risk | Notes |
| UEFI built-in utility | Desktop motherboards | Low | No OS involved — the safest route |
| USB flash drive + UEFI | Any desktop, incl. no-boot systems | Low | Needs FAT32-formatted stick |
| Windows utility | OEM laptops and prebuilts | Medium | Background apps can interfere |
| BIOS Flashback / USB BIOS | Recovery, no CPU or RAM installed | Low | Only on boards with the feature |
💾 Method 1: Update BIOS from UEFI Using a USB Flash Drive
This is the one I use. No OS, no drivers, nothing to interfere.
- Format a USB stick as FAT32 (MBR). 8GB or smaller works most reliably.
- Copy the extracted BIOS file to the root of the drive — not inside a folder. Rename it if the readme says so.
- Reboot and enter UEFI setup (Del or F2).
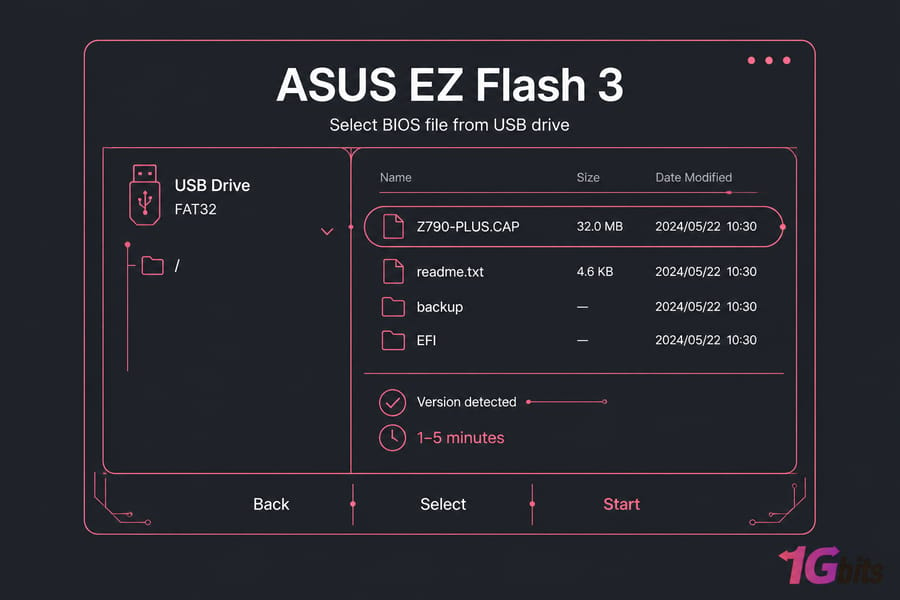
- Open the flash utility: EZ Flash on ASUS, M-Flash on MSI, Q-Flash on Gigabyte, Instant Flash on ASRock. Usually under Tool, Advanced, or the top-level menu.
- Select your USB drive, pick the file, confirm the version it reports back.
- Start it and walk away. Do not touch the power, keyboard, or reset button. Expect 1–5 minutes and one or two automatic reboots.
🪟 Method 2: Update BIOS from Windows
Acceptable on OEM laptops and prebuilts, where Dell Command Update, HP Support Assistant, or Lenovo Vantage handle the whole thing properly — they check the model, verify power, and stage the flash across a reboot. That's a tested path, so use it.
On DIY desktops I'd rather not. An antivirus scan or a runaway update service picking exactly the wrong moment is a real failure mode I've watched happen. If you must, close everything, disable your AV, plug in, and don't multitask. For anyone managing fleets remotely, the same discipline applies to server firmware — our Windows system administration guides and Linux server management resources cover out-of-band update workflows. If you need a clean Windows environment to test any of this without touching your main machine, a Windows 10 VPS or Windows 11 VPS is the fastest way to get one.
🔄 More Options for Upgrade
Some manufacturers provide the ability to flash the BIOS straight from the BIOS or by pressing a particular key when the machine boots up. The BIOS file is copied to the USB drive, the machine is restarted, and the BIOS or UEFI screen is displayed. Then pick the BIOS update option, choose the copied BIOS file from the USB device, and update the BIOS to the latest version.
The BIOS screen is usually accessed by pressing the relevant key when the computer is booting. It usually appears on the screen during bootup and is documented in the motherboard or computer documentation. Standard BIOS access keys are usually Delete and F2. Accessing the UEFI setup screen may vary slightly on each computer.
More classic DOS-based BIOS flash utilities are also available. You build a live DOS USB drive with those tools, then copy the BIOS flash software and BIOS file. The computer is then restarted, and you select to boot from the USB disc. You enter the necessary command in the minimum DOS environment that appears after reboot, and the utility will inject the new BIOS version into the firmware.
⚠️ Update BIOS by USB or CD (BIOS from DOS; BIOS from BIOS) - How to Flash BIOS
This procedure was formerly carried out using floppy disks and bootable CDs. However, in modern technology, a USB is the most convenient option. Flash tools for Windows are available from some manufacturers.
They may be run on a Windows desktop to flash the BIOS and reset the computer. These are not suggested for usage, and even if the manufacturer provides them, you should use them cautiously.
The BIOS can be flashed from within Windows, although this can cause extra issues. All background applications, including security programs, can interfere with the computer's BIOS writing process, causing the process to crash and corrupt the BIOS.
Restart the computer after using the BIOS flash application to load the latest BIOS or UEFI firmware version. If the new BIOS version causes you problems, you can downgrade by obtaining the previous version from the manufacturer's website and flashing it again (flash BIOS).
Again, changing a computer's BIOS can provide numerous benefits, but it's critical to be aware of the hazards. Don't touch it if there isn't a compelling cause to update the UEFI firmware. If you're planning the OS that will run on top of that firmware, our guide on choosing the best OS for dedicated servers is worth a read before you commit.
🔁 After the Update
- Enter setup and confirm the new version and build date.
- Load Optimized Defaults if the notes recommend it — settings often carry over badly.
- Re-enable XMP or EXPO, Secure Boot, TPM, virtualization, and fix the boot order.
- Check the system clock.
- Test stability: an hour of memory testing plus a CPU stress run. Skip this and you'll blame the wrong component later.
If your hardware compatibility and system setup changes after the flash — a drive vanishing, RAM downclocking — the release notes are the first place to look. When you need a clean Windows environment to verify everything works post-flash, a Windows VPS gives you exactly that without risking your daily machine.
🚑 If the Update Fails
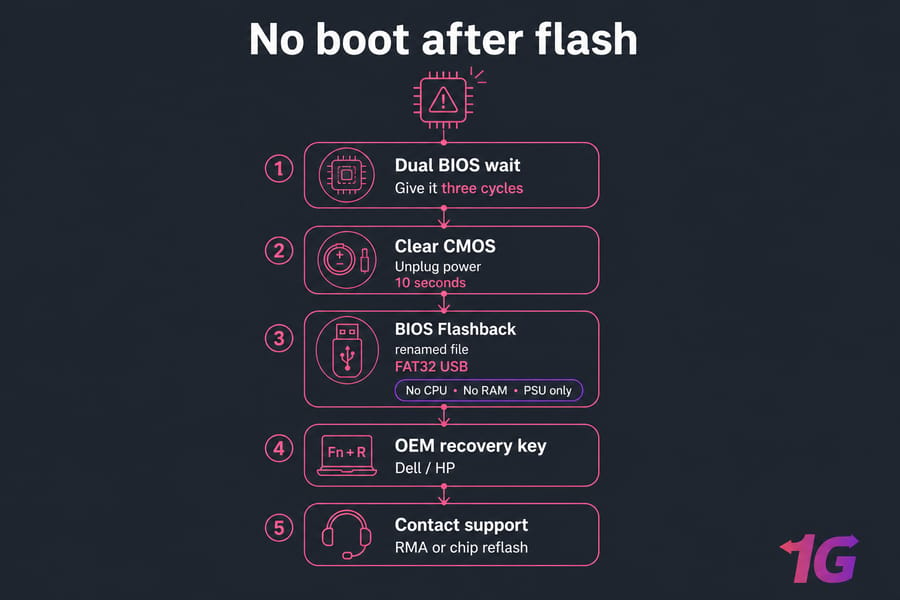
Stay calm. Most "bricked" boards aren't.
- BIOS Flashback / USB BIOS: ASUS, MSI, and Gigabyte high-end boards can flash from a renamed file on a USB stick in a dedicated port with only the PSU connected. No CPU, no RAM, no GPU needed.
- Dual BIOS: many Gigabyte and some ASRock boards auto-recover from a backup chip after a few failed POST attempts. Give it three cycles before you panic.
- Clear CMOS: power off, unplug, pull the coin cell, short the CLR_CMOS jumper for 10 seconds. Fixes a surprising number of post-flash no-boots.
- OEM recovery: Dell and HP laptops have keystroke-triggered BIOS recovery from a FAT32 stick — documented on their support sites.
- Escalate: if none of that works, RMA or a paid chip reflash from the vendor is your answer. Don't buy a random chip off a marketplace.
❌ Mistakes I See Over and Over
- Flashing firmware for the wrong revision or a similarly-named model.
- Interrupting the process — pressing a key "just to check."
- Updating with no reason at all.
- Flashing from a Windows install that's already unstable.
- Forgetting BitLocker, then discovering the recovery key is in an email you deleted.
- Not writing down custom settings first.
🎯 Conclusion
Significant risks are associated with the BIOS version update process, which should be considered. However, the system BIOS update tool allows the user to install a more recent version of the original software, speeding up and improving the system's performance. If something goes wrong while doing so, it can affect your system. However, this can be done on any laptop, desktop, tablet, or enterprise 2-in-1 in a way that can be done in a very efficient way to get the desired result.
Confirm you actually need the update. Verify your exact model, revision, and current version. Download the file from the manufacturer only. Prefer the UEFI-based flash utility over Windows. Keep the power steady and your hands off the keyboard. Then verify the version, restore your settings, and test. Follow that order and a BIOS update is a ten-minute job. Skip a step, and it's the kind of afternoon nobody wants.

Leave A Comment