")
Switching to the root user in Linux is a vital skill for anyone managing a Linux-based system (learn more about how Linux distributions work), whether you're a beginner or an experienced sysadmin. If you've ever asked, "how to switch to root user Linux," or you're specifically looking to switch to root user Ubuntu 20.04, this guide will walk you through all the best methods on how to switch to root user in Linux terminal, use cases, and security practices.

Quick Commands Summary (TL;DR)
If you need the fastest way to switch to root user in Linux, use this quick command cheatsheet below. Each command includes a one-line explanation so you can choose the safest option for your task.
| Command | What It Does | Best For |
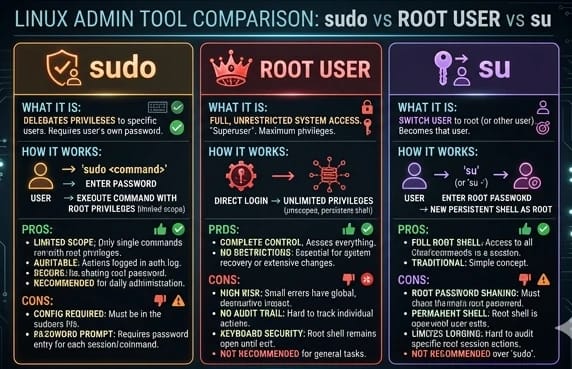
| sudo -i | Starts a full root login shell with root’s environment. | Multiple admin tasks in one session |
| sudo <command> | Runs one command with elevated privileges. | Safer one-off admin commands |
| sudo su | Opens a root shell through sudo, using a traditional workflow. | Users familiar with older UNIX/Linux habits |
| su - | Logs in as root directly, but only if the root account is enabled. | Advanced setups only |
| sudo passwd root | Sets a password for root and enables direct root login. | Temporary advanced troubleshooting |
| sudo passwd -l root | Locks the root account again after use. | Quick rollback for security |

Tip: In most cases, sudo -i or sudo <command> is safer than enabling direct root login.
What Is the Root User in Linux?
In Linux systems, the root user is the administrative superuser who has permission to perform all actions—delete files, install or remove packages, change ownerships and permissions, access restricted directories, and more. It's similar to the Administrator role on Windows but with even more system-level power.
By default, Ubuntu-based systems disable the root account to prevent users from logging in directly as root. Instead, they rely on the sudo command to grant temporary root access in a more controlled and secure manner. This approach is designed to protect your system from accidental misconfigurations and security breaches.
Before diving into how to switch to root user Linux, it’s important to recognize that any command run as root can alter or damage the system. Proceed with caution.
Why You May Need to Switch to Root User Linux
In Linux, many system-level tasks require elevated privileges that are restricted to the root user. While most Linux distributions like Ubuntu encourage using sudo for security reasons, there are still several legitimate scenarios where accessing the root user becomes not just helpful, but essential.
Here are common situations where change to root user Ubuntu can make your workflow smoother:
-
Installing or removing software packages (see how to install packages on Ubuntu)
Whether you're adding new tools via apt install or removing outdated programs, package management often requires administrative rights. -
Managing system services (for example how to restart services in Ubuntu>):
Starting, stopping, or restarting services like nginx, apache2, or mysql requires elevated permissions. -
Editing configuration files in restricted directories like /etc:
The /etc directory holds configuration files for your entire system. -
Changing file permissions or ownerships:
Modifying permissions using chmod or changing ownership with chown can’t be done on protected files without root access. -
Mounting disks or drives:
Mounting and unmounting storage devices, especially external drives or network shares, often requires administrative privileges. -
Managing user accounts (see how to manage and list users in Ubuntu):
Adding new users, changing passwords, assigning group memberships, or modifying login shells can only be performed with root privileges.
Prerequisites & Safety Checklist Before Switching to Root
Before you switch to the root user in Linux, it’s important to take a few precautions. Since root has unrestricted access to the system, even a small mistake can cause serious issues. Use the checklist below to stay safe:
- Backup important data: Always create a backup of critical files or configurations before making system-level changes.
- Use a stable session (screen or tmux): If you're connected via SSH, use tools like screen or tmux to prevent session drops during important operations.
- Limit root usage time: Only stay in a root session for as long as necessary. Exit immediately after completing your tasks.
- Avoid running unknown commands: Never execute commands you don’t fully understand, especially when operating as root.
- Check your working directory: Make sure you’re in the correct directory before running commands that modify or delete files.
- Restrict access to trusted networks: When managing servers, especially over SSH, ensure you're connected from a secure and trusted network.
- Verify sudo permissions: Confirm that your user has the correct privileges to avoid unexpected errors during execution.
Following these best practices will help you minimize risks and safely perform administrative tasks in Linux.
Expanded Security Best Practices Before Using Root
Before switching to root on a local machine or remote server, review the security basics that reduce the risk of lockouts, brute-force attacks, and accidental exposure.

Use SSH Public-Key Authentication Instead of Passwords
If you manage a remote Linux server, SSH access configuration are generally safer than password-based logins because they are harder to brute-force and easier to manage securely. If possible, use public-key authentication for administrative access and disable password-based SSH logins afterward.
Understand PermitRootLogin Before Enabling It
The PermitRootLogin setting in /etc/ssh/sshd_config controls whether direct root login over SSH is allowed. Enabling it can make emergency administration easier, but it also increases the attack surface and reduces accountability compared with using sudo under a named user account.
- Pros: Faster emergency access in tightly controlled environments
- Cons: Higher security risk, weaker auditability, and greater exposure to brute-force attacks
Use a Firewall on Internet-Facing Servers
If your server is reachable from the public internet, enable a ffirewall such as ufw (see network configuration on Ubuntu servers) and allow only the ports and services you actually need. This is especially important if you are testing SSH or root-related access changes.
Consider Fail2ban for SSH Protection
Fail2ban helps reduce repeated unauthorized login attempts by monitoring logs and temporarily blocking abusive IP addresses. It is not a replacement for proper SSH hardening, but it adds another useful layer of protection for VPS and public servers.
Prefer sudo Over Direct Root Login
On Ubuntu, using sudo instead of logging in directly as root is the safer default because it supports better access control, clearer audit trails, and less time spent in a full root shell.

Method 1: Use sudo – The Most Secure and Recommended Approach

If you're using Ubuntu 20.04 or any modern Linux distribution, sudo is the safest way to perform administrative tasks without logging in directly as root. Here’s how to switch to root user in Ubuntu terminal:
Option A: Gain a Full Root Shell Temporarily
sudo -i
This command gives you a persistent shell session with root privileges. Once entered, every command you run will act as if you're the root user.
This is particularly useful when you're performing a series of administrative tasks and don’t want to type sudo before each command.
Option B: Run a Single Root Command
sudo apt update
see how to update Linux packages
This option is perfect for executing a one-time command with root privileges without switching to the root user entirely.
Using sudo keeps your system logs clean and allows admins to audit actions later.
Difference Between sudo -i, sudo -s, and sudo -u
While all three commands use sudo to elevate privileges, they behave differently depending on how you want to switch users or environments:
- sudo -i: Starts a full root login shell. It loads the root user’s environment (like HOME, PATH) and behaves as if you logged in as root directly. This is the most recommended option for administrative tasks.
- sudo -s: Starts a shell with root privileges but keeps your current user environment. It’s faster but less “clean” compared to sudo -i.
- sudo -u <user>: Runs a command as another user (not necessarily root). For example: sudo -u www-data command. This is useful for testing permissions or running services as specific users.
In most cases, sudo -i is the safest and most predictable way to switch to a root shell in Linux.

| Command | Environment | Security Level | Best Use |
| sudo -i | Full root environment | High | Admin sessions |
| sudo -s | Current user env | Medium | Quick root shell |
| sudo -u | Custom user | High | Run as specific user |
How sudo Works (and Why It's Safer Than Root Login)
The sudo command is a core part of modern Linux security. Instead of logging in directly as the root user, sudo allows authorized users to execute commands with elevated privileges in a controlled and traceable way.
When you run a command with sudo, the system temporarily grants root-level access based on rules defined in the /etc/sudoers file. This approach reduces the risks associated with full-time root access while still allowing administrative tasks to be performed efficiently.
Key Security Advantages of sudo
- Authentication via PAM: sudo uses Pluggable Authentication Modules (PAM) to verify your identity before granting access, adding an extra layer of security.
- Command Logging and Audit Trails: Every sudo command is logged (typically in /var/log/auth.log), making it easier to track changes and audit system activity.
- Granular Permission Control: Administrators can define exactly which users can run which commands, rather than giving full root access.
- Reduced Risk of System Damage: Since sudo is used per command, it minimizes the chance of accidental system-wide changes compared to staying logged in as root.
For these reasons, using sudo is considered the best practice for managing Linux systems, especially on production servers and VPS environments.
Real-World Examples of When You Might Need Root Access
In practice, most users switch to root or use sudo for a specific system task rather than staying in a root shell for long periods. Here are two simple examples you may actually encounter.

Example 1: Edit /etc/hosts Safely
If you need to add a local hostname entry for testing, you can edit /etc/hosts with elevated privileges.
# Safer approach
sudoedit /etc/hosts

# Alternative
sudo nano /etc/hosts
Expected result: The file opens in your editor, you save the change, and the system applies the updated hostname mapping immediately.
Exit code: 0 usually means the command completed successfully.
Example 2: Restart Nginx After a Config Change
After updating an Nginx configuration file, you may need elevated privileges to reload or restart the service.
sudo systemctl restart nginx
(see Nginx installation and management)
Expected result: The command returns without error if Nginx restarts successfully.
Exit code: 0 means success. A non-zero exit code usually indicates a configuration error or permission problem.
Copy-and-Paste Commands with Expected Output and Exit Codes
The examples below are formatted for quick copy and paste. They also include the typical output pattern and what the exit code usually means.
Open a Root Shell Temporarily
$ sudo -i
[sudo] password for your_username:
root@hostname:~#
Expected output: Your shell prompt changes to a root prompt such as root@hostname:~#.
Exit code: 0 if the shell opens successfully.
Run a Single Administrative Command
$ sudo apt update
Hit:1 http://archive.ubuntu.com/ubuntu noble InRelease
Reading package lists... Done
Expected output: Package lists refresh without permission errors.
Exit code: 0 if the update succeeds.
Enable the Root Account Temporarily
$ sudo passwd root
New password:
Retype new password:
passwd: password updated successfully
Expected output: A success message confirms that the root password was set.
Exit code: 0 if the password was changed successfully.
Disable the Root Account Again
$ sudo passwd -l root
passwd: password changed.
Expected output: A confirmation message indicates the root account has been locked.
Exit code: 0 if the account lock succeeds.
Method 2: Use sudo su – Fast, Simple, and Effective
The sudo su command is one of the quickest ways to switch to the root user in Linux—especially if you're coming from a UNIX or CentOS background and prefer a more traditional method of gaining full system control.
Here’s how it works:
sudo su
This command tells the system to run the su (substitute user) command using elevated sudo privileges. By default, su switches the shell to another user—when no user is specified, it switches to root. Since most modern Ubuntu systems have the root account disabled, sudo is required to give su permission to execute.
Once the command is run successfully, you’re dropped into a root shell, where all commands are executed with administrative rights. You won’t need to prefix each command with sudo anymore during that session, which is handy when you're performing a chain of configuration tasks or debugging system issues.
Method 3: Enable the Root Account in Ubuntu (Not Recommended for Beginners)
By default, the root account is disabled in Ubuntu. However, advanced users may choose to enable root login for specific tasks or automated systems.
To enable and switch to root user Linux and Ubuntu-style:
Step 1: Set a Password for the Root Account
sudo passwd root
You’ll be prompted to enter a new password for the root user. Once the password is set, the root account becomes active.
Step 2: Log In as Root
su -
This command opens a root shell using the password you just created.
⚠️ Warning: Avoid using this method in a production environment. It's more difficult to track commands and more prone to accidental errors.
Once your task is complete, you can disable the root account again for safety:
sudo passwd -l root
Related: Read our article on how to disable root login in Linux to learn how to lock down your server after finishing sensitive tasks.
Quick Rollback: How to Disable the Root Account Again
If you’ve enabled the root account temporarily, it’s important to disable it again once your task is complete. Keeping the root account active can increase security risks, especially on servers or public-facing systems.
Ubuntu and most modern Linux distributions allow you to quickly lock the root account and prevent direct login.
Disable the Root Account (Step-by-Step)
-
Lock the root account using the following command:
sudo passwd -l root -
Verify that the root account is disabled:
sudo passwd -S root
Once locked, the root user can no longer be used for direct login, improving your system's security.
🔒 Best Practice: Only enable the root account when absolutely necessary, and always disable it immediately after completing your administrative tasks.
Method 4: Ubuntu Switch to Root User Linux Without Password (for Dev Environments Only)
Sometimes, in development environments or automated systems, entering the root password repeatedly can be inefficient. Here’s how to switch to root user in Linux without password:
Step 1: Open the sudoers File Safely
sudo visudo
Step 2: Add a Passwordless Rule for Your User
your_username ALL=(ALL) NOPASSWD:ALL
Save and exit the file. You can now use sudo commands without entering a password.
🔐 Security Tip: Only use this configuration on secure internal systems or virtual machines, never on public-facing servers.
If you’re hosting a website or app on a server, check our guide on Linux VPS Hosting options to learn about secure server configurations.
Method 5: Switch to Root on Remote Servers (via SSH)
On many Linux servers, especially Ubuntu VPS and cloud environments, direct root login over SSH is disabled by default or strongly discouraged. The safer workflow is to connect with a named user account and then use sudo.
Step 1: Connect as Your Regular User
ssh your_user@your_server_ipStep 2: Elevate Privileges Safely
sudo -iThis method is preferred because it preserves accountability and reduces the security risks of exposing a direct root login over SSH.
If You Must Review SSH Root Login Settings
Check the SSH daemon configuration file:
sudo nano /etc/ssh/sshd_configLook for:
PermitRootLogin noChanging this to yes may allow direct root login, but this is generally discouraged on public-facing systems unless you fully understand the risks and have additional protections in place such as SSH keys, firewall rules, and intrusion protection.
After any SSH configuration change, test carefully before closing your existing session.
If you're working with remote systems, most administrative tasks—especially those requiring root access—are performed on servers rather than local machines. For example, when managing a Ubuntu VPS server, using sudo and secure access methods becomes essential for maintaining stability and security.
Alternatives & Related Tools for Privilege Management
While sudo is the most common way to switch to root user in Linux, there are several alternative tools and methods that can help manage privileges more securely or flexibly depending on your use case.
pkexec (PolicyKit Execution)
pkexec is part of PolicyKit (polkit) and allows authorized users to execute commands as another user, similar to sudo. It is often used in graphical environments where applications request elevated privileges through a GUI prompt.
Example:
pkexec apt updateUnlike sudo, pkexec integrates with desktop authentication systems, making it more suitable for GUI-based systems.
sudoedit (Safe File Editing)
sudoedit allows you to edit files with elevated privileges without directly opening them as root. It copies the file to a temporary location, lets you edit it safely, and then applies the changes.
Example:
sudoedit /etc/nginx/nginx.confThis reduces the risk of accidental system damage when modifying critical configuration files.
PolicyKit (polkit)
PolicyKit (polkit) is a framework used to define and manage permissions for system-wide operations. It works behind the scenes in many Linux distributions, especially for desktop environments.
Instead of granting full root access, polkit allows fine-grained control over specific actions, making it ideal for multi-user systems.
usermod and gpasswd (Managing User Privileges)
Instead of switching to root, you can grant users the necessary permissions by adding them to specific groups.
Examples:
# Add user to sudo group
sudo usermod -aG sudo your_username

# Add user to another group
sudo gpasswd -a your_username group_name
(see how to add a user to sudo group)
This approach is often safer than using root access, as it limits permissions to only what is necessary.
When Not to Use Root (and What to Use Instead)
Not every privileged task requires a full root shell. In many situations, using root directly creates more risk than value.
- Editing one protected config file: Use sudoedit instead of opening a full root editor session.
- Running one administrative command: Use sudo <command> instead of switching users entirely.
- Running a command as a service account: Use sudo -u <user> <command> instead of root.
- Delegating specific privileges: Use groups, sudoers rules, or service-level permissions instead of giving blanket root access.
- Granting limited network privileges: Consider Linux capabilities for narrowly scoped permission needs instead of full root access.
As a rule, use the least privilege necessary. A full root shell should be the exception, not the default workflow.
| Task | Wrong Approach | Better Alternative |
| Edit config file | Login as root | sudoedit |
| Run one command | Switch to root shell | sudo <command> |
| Run as service user | Use root | sudo -u |
| Grant permissions | Give root access | Use groups / sudoers |
Auditing & Logs: How to Track sudo Activity in Linux
One of the biggest advantages of using sudo instead of logging in as root is the ability to track and audit every privileged action. Linux systems keep detailed logs of sudo usage, allowing administrators to monitor who executed commands and when.

Check sudo Logs in /var/log/auth.log
On most Debian-based systems like Ubuntu, all sudo activity is recorded in the /var/log/auth.log file.
grep sudo /var/log/auth.logThis command filters and displays all sudo-related entries, including the user, command executed, and timestamp.
Use journalctl (Systemd Systems)
On systems that use systemd, you can also view sudo logs using journalctl:
journalctl _COMM=sudoTo see recent sudo activity, you can limit the output:
journalctl _COMM=sudo --since "1 hour ago"Verify Who Ran a Command
Each sudo log entry typically includes:
- The username who ran the command
- The terminal (TTY) used
- The working directory
- The exact command executed
This makes it easy to audit system activity and identify unauthorized or accidental changes.
Why Logging Matters
Unlike direct root login, sudo creates a full audit trail of administrative actions. This is essential for troubleshooting, compliance, and maintaining system security—especially on production servers and VPS environments.
Troubleshooting: Common Errors When Switching to Root
Even experienced users can encounter errors when attempting to switch to root user Linux, especially if they're working with a freshly installed system or a cloud-based VPS with strict security defaults. Below are the most common issues you might face and how to resolve them:
“Permission Denied” or “User Not in the Sudoers File”
This message appears when your user account doesn’t have sudo privileges. In this case, you won’t be able to perform any root-level tasks unless another admin updates your permissions.
To resolve this, log in as a user with sudo rights and run:
sudo usermod -aG sudo your_username
This command adds your user to the sudo group, granting administrative privileges. After running it, you’ll need to either log out and back in or use:
newgrp sudo
to refresh your group memberships in the current session. Once done, you should be able to execute sudo commands without any issue.
“su: Authentication Failure”
This error usually indicates one of two things:
-
The root account is disabled.
-
The root account doesn't have a password set.
By default, on distributions like Ubuntu, the root account is locked for safety. To enable it temporarily or for specific use cases, you’ll need to assign a password:
sudo passwd root
(see resetting root password in Ubuntu)
You’ll be prompted to create and confirm a new password. Once completed, you can switch to the root account using:
su -
🛑 Important: Don’t forget to disable the root account when you're done by running:
sudo passwd -l root
This locks the root account and helps prevent unauthorized logins, especially if your system is publicly accessible.
Bonus: Switch Back from Root to Normal User
When you're done with administrative tasks, exit the root shell by typing:
exitThis returns you to your normal user session and reduces the risk of accidental system-wide changes.
Manage Your Linux Server More Easily
If you prefer a graphical interface instead of working entirely in the terminal, using a remote desktop setup can make administration much easier—especially for beginners or hybrid workflows.
With a secure Ubuntu remote desktop server, you can manage root-level tasks, system configurations, and services through a visual interface while still maintaining full control over your environment.
Final Thoughts: Which Method Should You Use?
| Method | Command | Use Case | Requires Password | Auditability |
| sudo (single command) | sudo <command> | Run one admin command safely | Usually yes | High |
| Full root shell | sudo -i | Multiple admin tasks in one session | Usually yes | High |
| Traditional root shell | sudo su | Users who prefer classic root-shell workflows | Usually yes | Medium |
| Direct root login | su - | Advanced troubleshooting only | Yes | Low |
| Passwordless sudo | sudo visudo | Local dev/test environments only | No | Medium to High |
(see how sudo permissions work)
If you're wondering which method is best to switch to root user Linux, here’s a quick recommendation:
-
Use sudo for safety, audit logs, and general use.
-
Use sudo su or sudo -i for multiple administrative commands in one session.
-
Enable root only when necessary and disable it afterward.
-
Avoid direct root login over SSH unless you know exactly what you're doing.
Knowing how to switch to root user Linux Ubuntu 20.04 style not only boosts your Linux skills but ensures you're managing your system responsibly.
Authoritative References & Further Reading
- Ubuntu Manpages — official Ubuntu manual pages for supported releases
- Ubuntu sudo_root Documentation — explains Ubuntu’s sudo-first model and locked root account
- sudo(8) Manual Page — command behavior, options, and security notes
- sudoers(5) Manual Page — configuration rules and access-control policy
- sudoedit(8) Manual Page — secure editing of privileged files
- journalctl(1) Manual Page — reviewing systemd journal logs
- DigitalOcean: Monitor Authentication Logs on Ubuntu — practical guidance for auth logs, sudo activity, and hardening
- Stack Overflow: Why su is not recommended in Ubuntu — canonical community explanation and context
People also read:

Leave A Comment