
Accessing a Linux server from another computer running macOS can be achieved in many ways. You can use remote desktop protocol (RDP) to connect Mac to Linux easily. However, as a more secure and efficient instance, many professionals and system administrators prefer to connect macOS to Linux via SSH (Secure Shell).
SSH creates a secure, encrypted network tunnel where you can connect two devices easily. As many users prefer a lightweight OS, like Linux, to host their servers, the SSH protocol is often developed and used as the primary method for remote management. If you are looking for robust performance to host your projects, you might want to explore our Linux VPS hosting solutions, which are optimized for SSH access.
So, if you are struggling with the same question and want to learn how to quickly SSH to Linux on Mac, stay tuned till the end!
You can also explore our detailed guide on What is SSH Used For? to understand the full potential and use cases of SSH before you start connecting to your Linux machine.
🖥️ How can I SSH to Linux on a Mac?
You don’t need third-party apps like PuTTY on Mac to be able to use the SSH protocol. You can use the built-in Mac Terminal, run some commands, enter your credentials, and connect to a remote Linux server pretty easily. This native approach is often more reliable than complex GUI-based remote access tools.
Go through the following steps to SSH from Mac to your server.
🔎 Find and open Terminal
- Click on the search bar or hit cmd + space to open the apps list
- Enter "Terminal" to find the app
- Click the Terminal app software that pops up on the search list
⌨️ Run SSH command
After opening the Terminal app, type in the following SSH command:
# ssh yourusername@yourserverdomain.com
Replace (yourusername) with the username you’ve set for the Linux server. Then, type the server’s domain name after the @ mark. At last, fill the rest of the command with the required credentials before hitting the Enter key.
If you don’t have any domain, fill in the specified part with your server’s IP address before hitting Enter. If you are managing your infrastructure, it is helpful to know how to get IP address in Linux to ensure you have the correct connection details.
🔌 Specify the SSH port number.
Most servers’ SSH port number is 22. However, if your server’s port number differs for security reasons, specify it in the command. In that case, use the following command instead:
ssh [username]@[ip-address] -p [port-number]
Change credentials as explained in the previous step and replace [port-number] with the custom port number configured for your remote SSH server. Then, move on to the next step.
If you don’t know your port number, run the following command in Mac Terminal to find out:
grep Port /etc/ssh/sshd_config
It is worth noting that changing your default port is one of the essential Linux server security practices to minimize brute-force attacks.
| Linux Distribution | Default SSH Port | Command to Change Port |
|---|---|---|
| Ubuntu | 22 | sudo nano /etc/ssh/sshd_config and change the Port value |
| CentOS | 22 | sudo vi /etc/ssh/sshd_config and change the Port value |
🔐 Enter the server’s password
If you enter your credentials correctly, you’ll receive an output which requires a password. Simply type in your server’s SSH password to move on.
Next, if all settings are correct, you’ll have successfully connected your Mac to a remote Linux server via SSH. The confirmation command will be something like this:
[root@yourserver.example.com ~] #
Now, your Terminal environment will change to a remote server’s shell environment, which allows you to run basic Linux commands from then on.
⚠️ Can’t access Linux server on Mac through SSH
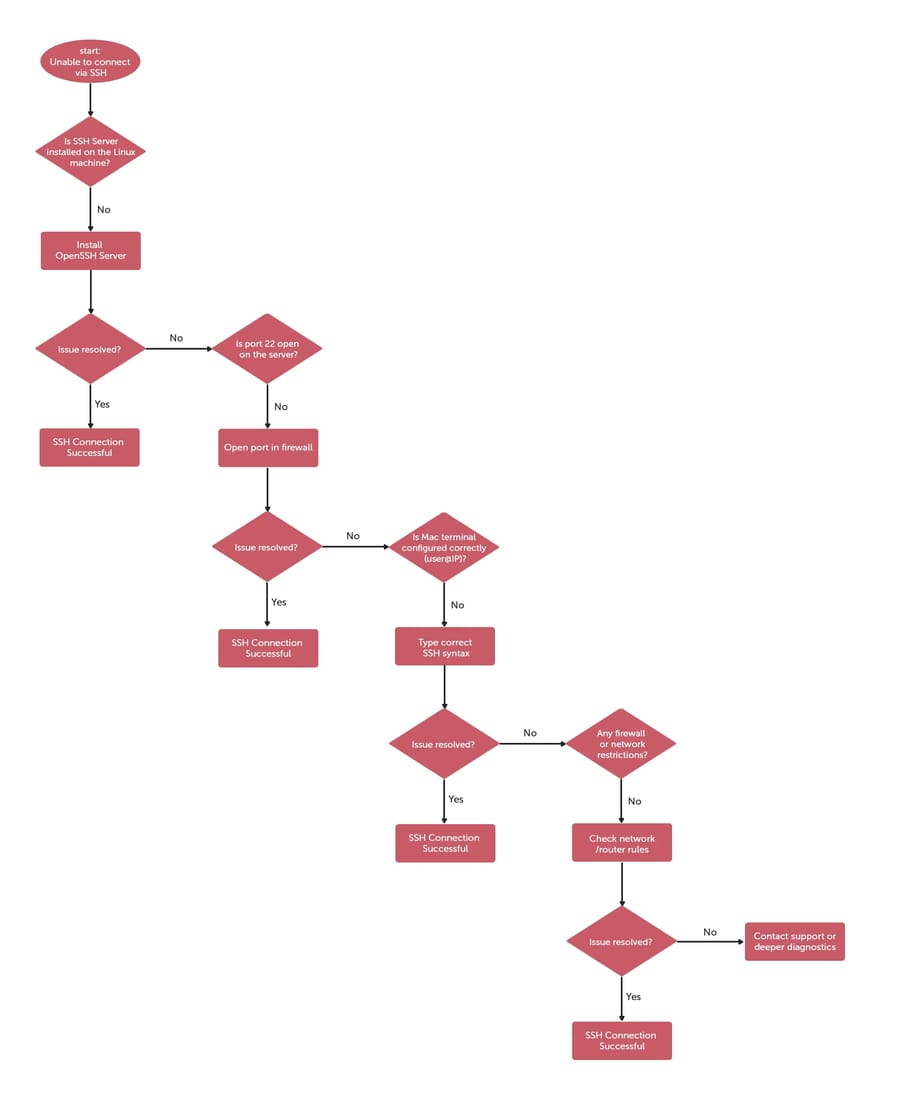
You may face an error even after carefully performing all the previous steps. The problem is usually because the Linux server doesn’t have an SSH server installed or the service is not running.
Although most Linux distributions, such as Ubuntu VPS server, have an SSH server preinstalled, double-check on the server or ask your host. If the Linux server doesn’t have any SSH protocol installed, first, you’ll have to set one on your server before trying to connect to it.
If you don’t know where to start, try installing SSH servers, such as OpenSSH, in Linux or use web-based versions.
Once you have SSH set up, it’s important to ensure that the necessary ports are open for a successful connection. You can learn how to check open ports on Linux by referring to our guide on how to check Linux open ports.
🚪 How to exit from an SSH session
Ending an SSH session is an easy task. All you have to do is type "exit" in the Linux shell environment and press Enter. That’s it!
You’ll get logged out of the SSH session, followed by showing the below output:
Logout Connection to [IP address] closed.
[Elevate your online ventures with our Linux VPS hosting - offering top-notch resources and a user-friendly interface perfect for beginners and experts.]
⚡ How to run commands on remote server leaving local shell environment
Sometimes, starting an SSH session and going through all those steps is redundant if you only need to execute a single command. In such cases, a simple shortcut prevents wasting time. You can stay in your local Terminal environment while executing commands on the remote Linux server.
🚀 Running a single command
Use the following syntax in your local Mac Terminal app to send single commands to Linux through SSH:
ssh [username]@[ip-address] [command]
Replace [username] with the username of the remote server, [ip-address] with the IP address of your server, and [command] with the specific instruction you would like to run. For instance, if you would like to see the list of files available in the home directory of your Linux server, run the following command:
ssh [username]@[ip-address] ls
📋 Running multiple commands
Sending multiple commands is similar to sending a single command. All you have to do is separate commands by a semi-colon mark and put them in double quotation marks.
ssh [username]@[ip-address] "[command-1]; [command-2]; [command-3]"
For example, if you want to check the files and the system uptime simultaneously, use:
ssh [username]@[ip-address] "ls; uptime"
By running these commands, you can see your server’s file structure and find the system status without needing a full terminal session.
🏁 Wrapping up
The Terminal app on Mac allows users to open an SSH session and access a Linux server through a secure network. Although you can use third-party apps for remote management, the native CLI approach is efficient and sufficient for most tasks.
SSH sessions provide secure access to any remote server. To make it even more secure, you can disable root access over SSH and specify specific user accounts that can log in.
If you want to use commands that require root privileges while using another user account, you can use "sudo" before the command. It’ll allocate privileges to the user account so the commands can be accomplished without direct root login.
You can also create and manage user accounts in Linux to ensure secure and organized access for different individuals. To learn more about creating users in Linux, check out our guide on how to create users in Linux.
Common Mistakes to Avoid:
- Forgetting to specify the port number when it's not the default 22.
- Attempting to log in as root when it's disabled for security.
- Failing to verify the server's public key on first connection.
People also read:

Leave A Comment