
If you could access the internet in the 1990s, Discord might look familiar. In this blog, we will go through the steps on how to make a discord server and briefly what it is and how to use it. It is a chat forum with an old-school interface. Discord has an audio chat, screen sharing, and video in addition to its dark interface. Conversations on Discord happen within a server. You might also find channels on specific topics within each individual server. Examples include music, general topics, and games.
If you just want to hang out and share game streams, voice chat channels are dedicated to that. Many gamers use these spaces to coordinate before jumping into their favorite multiplayer experiences, often hosted on a high-performance game VPS for minimal lag. Discord servers can be private or public, and most are on the small, specialized side. Big servers such as those where users follow product releases can easily hold millions of users. Because the platform has so much to offer, people from all walks of life are increasingly flocking to Discord. They want to build group chats revolving around their interests, including writing or film.
If you are interested in forming a chatroom for you and your friends or intend to build a community, making a server is simple. Whether you want to use it on your desktop or smartphone, it will only take a couple of minutes. Once your community grows, you might even consider creating an automated assistant to manage interactions, as detailed in our guide on how to create a discord bot.
🚀 How to create a Discord server on Mac or Windows
You can access Discord on Mac or Windows through the web app or by installing the actual desktop app. Once you’ve set it up, creating your server takes the same process regardless of the Discord app version you choose to use.
Follow these steps to create a Discord server using the web app:
- First, visit https://discord.com/.
- Next, select the “Open Discord in your browser” option on your monitor. If this button is unavailable, click on “Login,” found in the upper-right corner of your desktop screen.
- Key in your username and select the button with an arrow pointing rightward. Click on it.
- After completing this, you will probably be asked to solve a reCAPTCHA challenge. On solving it successfully, you’ll be able to access the Discord app.
- Type your date of birth, then click “Next.”
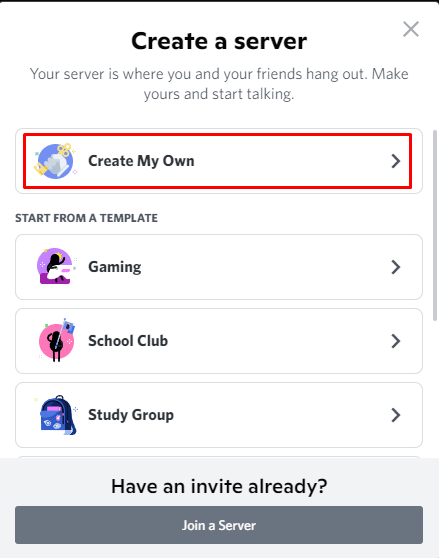
- The next screen will allow you to create a server from scratch. You can also use one of the common templates on this server. Because this tutorial describes the basics, click “Create My Own.”
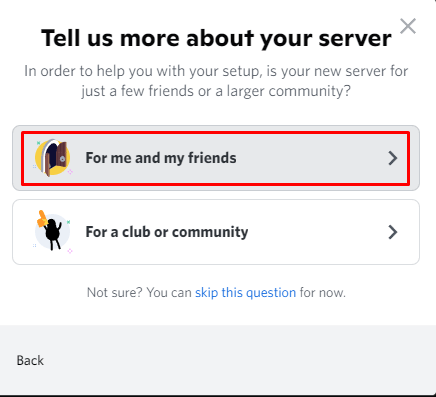
- Next, define whether you want to use the server for a community, club, or yourself. Choose “For me and friends” for now.
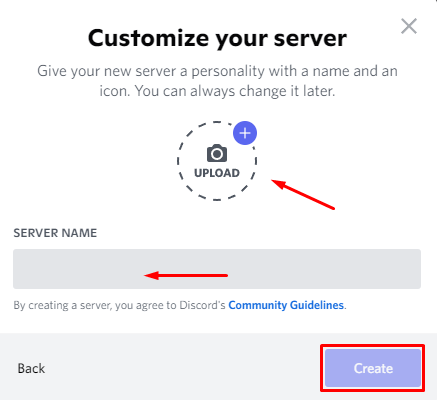
- Once you are done with this, you can customize your Discord server on the screen that appears next.
- Upload an image for your server and define its name. When you finish doing so, click “Create.”
- The last step here is to define your server’s topic. If you want to do it later, just click on the “Skip” button.
- After you are done, you will see a notification indicating that your server is ready. Click on “Take me to my server” to proceed.
- Lastly, Discord lets you claim the server that you have just created. To do this, enter your email address followed by a password to create your account.
This tutorial clearly shows that you don’t need to have a Discord account to make a server. However, it is best to have an account if you intend to use your server in the future. Having an account allows you to keep all the settings you’ve curated. If you enjoy managing digital communities and are interested in other platforms, you might also want to learn how to create a TeamSpeak server for alternative voice communication.
⚠️ Common Mistakes When Creating a Server
| Mistake | Corrective Action |
|---|---|
| Using a generic server name | Use a descriptive name that helps members identify your community instantly. |
| Forgetting to verify your email | Always confirm your email to prevent account loss and unlock full server features. |
| Ignoring permission settings | Review role settings early to ensure your server remains safe and organized. |
If you prefer to use the desktop app to create Discord server, the process will differ slightly, as seen below:
- Visit https://discord.com/.
- Next, select the “Download for …” button appearing in the main portion of your monitor. The wording for this button might vary depending on the OS you are using. For instance, “Download for Windows” in the case of the Windows OS.
- The application’s setup file will start downloading, so you have to wait until this is done. Because the Discord app is small, it should take about one minute to download.
- Once the file is completely downloaded, go to Downloads on your computer, and double click on the setup file. This will commence the setup process.
- The setup will have the most recent updates, and after everything is downloaded, you can open the app.
- A “Welcome back!” screen will appear, and if you don’t own a Discord account yet, you should click on “Register,” which appears right under the “Login” button to create one.
- Enter your date of birth, email, password, and username to create your account. On finishing, select “Continue.”
- Once this is done, Discord’s home page will appear, and you can start using the app.
- Before you start using the app, ensure that you verify the email address you’ve provided to Discord:
- Open your email mailbox.
- Look for the ‘Verify Email Address for Discord” email from Discord and open it.
- Select the “Verify Email” button.
- Next, a new tab will appear, saying “Email Verified!”
- When you see this confirmation, click “Continue to Discord.” That will automatically open the web app.
- When this happens, you will see an “Open Discord” notification. Select to go back to the Discord app. Alternatively, you can just close the new tab and click on the app’s icon in your taskbar to navigate back to the app.
When you return to the desktop app, you’ll see a yellow exclamation mark on the far left of your menu. This mark should be hovering over “Create a Server.” Click on it. Now follow steps 6-9 of the previous “Creating a Discord server using the web app” procedure to return to the new server.
🎯 Take away
Discord is a great platform that focuses on current conversations within numerous niche communities. Although the platform’s audience might be small compared to other mainstream social media platforms, it is more knowledgeable and dedicated. We hope that we managed to show you how to make a discord server with the steps mentioned above.
The site operates on a Nitro-based business model. That means that you can pay to upgrade your free server, and you can also customize your profile and boost your server for the best result. It is thus an ideal platform for brands. You will get better results as a brand, registering as a community founder instead of an advertiser. For those building larger communities, managing your digital infrastructure effectively—whether it’s a chat server or a dedicated game dedicated server—is key to sustaining long-term growth and high performance.

Leave A Comment