
Creating a Discord bot opens up a world of possibilities for automating tasks, managing servers, and engaging with communities. In this guide, we will walk you through how to create a Discord bot, ensuring you understand every step involved. Whether you're curious about how to create a Discord bot Python or how to create a discord bot in javascript, how to create a Discord bot on mobile, or how to create a Discord bot 2024, we've got you covered. We'll also explore how to create a Discord bot account, how to create a discord bot token, and how to create a Discord bot from scratch for your server.
For those new to coding, don't worry! We'll discuss how to create a Discord bot without coding, making it accessible for everyone. Additionally, we'll cover advanced topics like how to make a Discord bot always online, both using Python and other methods, and how to make a Discord bot send an embed message or a regular message. Curious about AI integration? We'll touch on how to make a Discord AI bot as well.
You'll learn how to make a Discord announcement bot, how to make a Discord application bot, and understand how to make a Discord bot always online. We will also answer common questions like "how do I create my own Discord bot?" and "does it cost money to make a Discord bot?" By the end of this guide, you'll have a comprehensive understanding of how create a Discord bot for your server, whether you're coding it yourself or using tools to simplify the process. So, let's dive into how do you create a discord bot and bring your server to life!
How to create a Discord bot: A step-by-step guide
1. Create a Discord account
To get started with how to create a Discord bot, the first step is to create a Discord account. Follow these steps.You can lear how to make a Discord by reading How to Make a Discord Server. Also, You can learn how to Delet Discord Server by reading How to Delete a Discord Server.

Create a Discord Account
· Visit the Discord website and sign up for a free account if you don't already have one.
· Verify your email address to activate your account.
Create a Discord Server:
· After logging in, click the "+" icon on the left sidebar to create a new server.
· Follow the prompts to set up your server, including choosing a name and region.
Now that you have a Discord account and server, you are ready to move on to how to create a Discord bot. This guide will explore various methods, such as how to create a Discord bot using Java, how to make a Discord bot always online Python, and how to make a bot on Discord mobile. Additionally, we'll discuss how to make a Discord bot without coding using tools like Discord Bot Maker.
Navigate to the Discord Developer Portal:
· Go to the Discord Developer Portal.
· Click on "New Application" to create a new application for your bot.
Create and Configure Your Bot:
· Give your application a name and click "Create".
· Navigate to the "Bot" tab and click "Add Bot".
· Customize your bot settings and save your changes.
Generate a Bot Token:
· In the Bot tab, you'll find the option to reveal your bot token. This token is crucial for authentication, so keep it secure.
Add Your Bot to Your Server:
· Under the "OAuth2" tab, select the "bot" scope.
· Copy the generated URL, paste it into your browser, and follow the prompts to add the bot to your server.
By now, you should have a solid foundation on how to create a Discord bot. Whether you aim to explore how to make a Discord bot Python, how to create a Discord bot using Java, or how to make a Discord bot always online Python, this initial setup is essential. For those interested in how to make a Discord bot without coding, tools like Discord Bot Maker offer user-friendly solutions. Moreover, knowing how to make a Discord bot JavaScript or How to make a Discord bot 2024 and beyond.
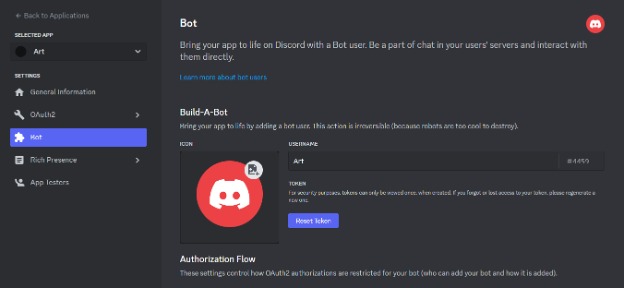
2. Select Bot
After you have created an application on the Discord Developer Portal, the next step in how to create a Discord bot is to configure your bot settings. Here’s a detailed guide on this process:

Navigate to the Bot Tab:
-
In your application, click on the "Bot" tab on the left-hand menu. This is a crucial step in how to create a Discord bot.
Add a Bot:
-
Click the "Add Bot" button. Confirm the action by clicking "Yes, do it!" This action will create a bot user under your application, a key part of how to create a Discord bot.
Customize Your Bot:
-
Set a username for your bot. You can also upload an avatar. These customizations make your bot more identifiable, enhancing your experience on how to create a Discord bot.
Generate a Bot Token:
-
Click "Copy" to copy your bot token. This token is essential for authenticating your bot. Be sure to keep this token secure, as it plays a critical role in how to create a Discord bot.
Set Permissions:
-
Under the "OAuth2" tab, select the "bot" scope and set the necessary permissions your bot will need to operate. This step is integral to how to create a Discord bot with specific functionalities.
Invite Your Bot to a Server:
-
Generate an invite link by selecting the appropriate permissions and scopes. Use this link to invite your bot to a server, completing another crucial aspect of how to create a Discord bot.
Throughout this process, understanding how to create a Discord bot involves various steps including selecting bot permissions and configuring settings. Whether you are looking into how to create a Discord bot using Java or how to make a Discord bot always online Python, these steps remain foundational.
Advanced Setup:
-
If you want to know how to make a Discord bot without coding, tools like Discord Bot Maker can be very helpful.
-
For specific programming languages, consider guides on how to make a Discord bot JavaScript or how to make a Discord Python bot for more detailed coding instructions.
Deployment and Hosting:
-
Ensure your bot remains operational by learning how to make a Discord bot always online Python or using hosting services. This is especially useful for those focusing on how to make a Discord bot 2024 with continuous availability.
By following these steps on how to create a Discord bot, you can successfully configure and deploy a bot tailored to your needs.
3. Navigate to the OAuth2 URL Generator tab
After configuring your bot settings, the next crucial step in how to create a Discord bot involves using the OAuth2 URL Generator to authorize your bot. Here’s a step-by-step guide:

Open the Discord Developer Portal:
· Log in to the Discord Developer Portal and select your application. This is an essential step in how to create a Discord bot.
Select the OAuth2 Tab
· From your application’s page, click on the “OAuth2” tab in the left-hand menu. Understanding how to navigate this section is key to how to create a Discord bot.
Access the URL Generator
In the OAuth2 section, locate the “OAuth2 URL Generator” tab. This tool will help you create the URL needed to authorize your bot, a critical part of how to create a Discord bot.
Configure the URL Generator:
Select the "bot" scope and any necessary permissions your bot will require. Permissions might include sending messages, managing roles, and more. This configuration is a vital aspect of how to create a Discord bot with the right access levels.
Generate the URL
· Once you’ve configured the necessary scopes and permissions, copy the generated URL. This URL is used to invite your bot to a server, which is fundamental in how to create a Discord bot that can interact within your server.
Authorize Your Bot
· Paste the URL into your browser, select the server where you want to add the bot, and authorize it. This final step ensures your bot is operational within the specified server, completing the process of how to create a Discord bot.
By following these steps on how to create a Discord bot, you can effectively navigate the OAuth2 URL Generator tab and ensure your bot is authorized and ready to function within your server. Whether you're learning how to create a Discord bot using Java, how to make a Discord bot always online Python, or how to make a bot on Discord mobile, these steps provide a comprehensive foundation. Additionally, tools like Discord bot Maker and guides on how to make a Discord bot without coding or how to make a Discord bot JavaScript are helpful resources for various development approaches.
4. Paste the bot’s URL into a browser and invite it to your server
After you have created a Discord bot and configured its scopes and permissions, the next step is to invite the bot to your server. Here's a detailed guide on how to do this:
Generate the Bot's URL
· Once you have configured the bot's scopes and permissions in the Discord Developer Portal, an invitation URL will be generated. This URL is essential as it contains the necessary parameters to add the bot to a server.
Copy the URL
· Copy the generated URL from the OAuth2 URL Generator tab. This URL includes the client ID of your bot and the permissions it requires.
Paste the URL into a Browser
· Open a web browser and paste the copied URL into the address bar. Press Enter to navigate to the URL. This step initiates the process of inviting the bot to your server.
Select a Server
· You will be prompted to select a server to which you have administrative access. This ensures that you have the necessary permissions to add the bot to that server.
Authorize the Bot
· After selecting the server, you will need to authorize the bot. Click on the "Authorize" button to grant the bot the permissions specified in the URL. This step is crucial as it allows the bot to perform its designated functions within the server.
Complete the Captcha
· As a security measure, you may be required to complete a CAPTCHA verification. This step ensures that the bot is being added by a human and not through automated means.
Confirmation
· Once the authorization is complete, the bot will be added to your server. You should see the bot appear in the member list of the selected server. The bot is now ready to be programmed and interact with your server based on its configured permissions and functionalities.
By following these steps, you can successfully invite your Discord bot to a server, enabling it to perform its designated tasks and interact with server members. This process is a fundamental part of understanding how to create a Discord bot and deploy it in a live environment.
Different ways to develop
Developing a Discord bot using Python
Developing a Discord bot using Python involves several key steps, from setting up your development environment to writing the bot's code and deploying it. Here is a comprehensive guide:
Set Up the Development Environment:
-
Python Installation: Ensure you have Python installed on your computer. You can download it from the official Python website.
-
Install discord.py: Use the command pip install discord.py to install the Discord library for Python.
Create a Discord Bot Account:
-
Discord Developer Portal: Go to the Discord Developer Portal and log in.
-
Create a New Application: Click "New Application" and provide a name for your bot.
-
Bot Configuration: Navigate to the "Bot" tab and click "Add Bot". Customize your bot’s profile and save the token; you'll need this to authenticate your bot.
Write the Bot's Code:
-
Basic Bot Script:
import discord
from discord.ext import commands
bot = commands.Bot(command_prefix="!")
@bot.event
async def on_ready():
print(f'We have logged in as {bot.user}')
@bot.command()
async def hello(ctx):
await ctx.send("Hello!")
bot.run('YOUR_BOT_TOKEN')
-
Replace YOUR_BOT_TOKEN with the token you saved earlier.
Run Your Bot
-
Save the script as a .py file and run it using the command python your_script_name.py.
-
Your bot will log in and be ready to interact in the server where it was invited.
Invite the Bot to Your Server:
-
OAuth2 URL Generator: In the Developer Portal, go to the "OAuth2" tab, select "bot" under "scopes," and choose the necessary permissions under "bot permissions."
-
Generate Invite Link: Copy the generated URL, paste it into your browser, and invite the bot to your server.
Extend Functionality
-
Handling Events: Use @bot.event to handle events like messages, member joins, etc.
-
Custom Commands: Define more commands using @bot.command() for various interactions.
Deploy Your Bot
-
Hosting: For continuous availability, host your bot on a cloud platform like Heroku, AWS, or Repl.it. Follow their documentation to deploy Python applications.
By following these steps, you can successfully create and deploy a Discord bot using Python, adding interactive features and automations to your Discord server.
Installing Discord library
Installing the Discord library in Python, specifically discord.py, is straightforward and involves a few key steps. Here’s a comprehensive guide:
Ensure Python is Installed:
· Make sure you have Python 3.8 or higher installed on your system. You can download it from the official Python website.
Install discord.py
· Open your command prompt or terminal.
· Run the following command to install the discord.py library:
pip install -U discord.py
-
This command will install the latest stable version of the discord.py library from the Python Package Index (PyPI) .
Verify the Installation:
· To verify that discord.py has been installed correctly, you can open a Python interactive shell and try importing the library:
import discord
print(discord.__version__)
· If no errors are thrown and the version number prints out, the installation was successful.
Alternative Installation Methods:
· If you cannot use pip, you can manually download the discord.py library. Download the source code from the discord.py repository, extract it, navigate to the extracted directory in your command prompt, and run:
python setup.py install
-
This will manually install the library from the source code .
By following these steps, you will have successfully installed the discord.py library, enabling you to create and run Discord bots using Python.
Conclusion
Creating a Discord bot involves a series of systematic steps that culminate in a fully functional and interactive bot. Begin by setting up your bot account on the Discord Developer Portal. Here, you create an application and generate a bot token, which will serve as the bot’s identity in your code.
Next, configure the OAuth2 settings to generate an invite link for your bot. This link allows you to add the bot to your Discord server, so you can start testing its functionalities. Ensure you set appropriate permissions for the bot to perform its tasks effectively.
With your bot account set up, move on to coding. Use libraries like discord.py for Python or discord.js for JavaScript to write the bot’s code. This code will define how your bot interacts with users, handles commands, and performs various actions on the server.
Once coded, host your bot on a server or local machine. Ensure it remains operational and responsive to user interactions.
Finally, rigorously test your bot within your server, making adjustments as needed. This iterative process will help refine its performance and functionality, leading to a well-rounded and engaging bot experience.


 🚀")

 🔐")
![What Is Cold Data Storage? ❄️ [2026 Guide]](https://1gbits.com/cdn-cgi/image//https://s3.1gbits.com/blog/2026/02/what-is-cold-data-storage-750xAuto.webp "What Is Cold Data Storage? ❄️ [2026 Guide]")
![What Is Virtual Desktop Infrastructure? 🖥️ [VDI Explained]](https://1gbits.com/cdn-cgi/image//https://s3.1gbits.com/blog/2026/02/what-is-virtual-desktop-infrastructure-vdi-750xAuto.webp "What Is Virtual Desktop Infrastructure? 🖥️ [VDI Explained]")

