
Windows Server NFS is the use of the lightweight Network File System protocol, and thus, it enables to sharing of files between Windows and Linux or UNIX systems. It is still one of the most reliable methods to cope with storage solutions through cross-platform systems in the modern world. In the year 2025, the NFS feature of Windows Server has achieved a significant level of performance, NFSv4 enhancements, and better cooperation with Windows 10, Windows 11, and Windows Server clients.
This guide provides the necessary information about installation, configuration, optimization, and troubleshooting so that you can confidently deploy Windows Server NFS.
What Is Windows Server NFS?
Windows Server NFS is Microsoft’s implementation of the Network File System protocol, built to enable smooth file sharing between Windows, Linux, and UNIX environments. It offers a lightweight, reliable way to access shared directories across mixed operating systems. In enterprise networks where cross-platform compatibility matters, NFS remains one of the simplest and most efficient solutions.
Before configuring NFS, make sure your operating system is installed and prepared correctly; if needed, you can follow the full setup guide in Windows Server Installation
⚙️ How NFS Works on Windows Server?
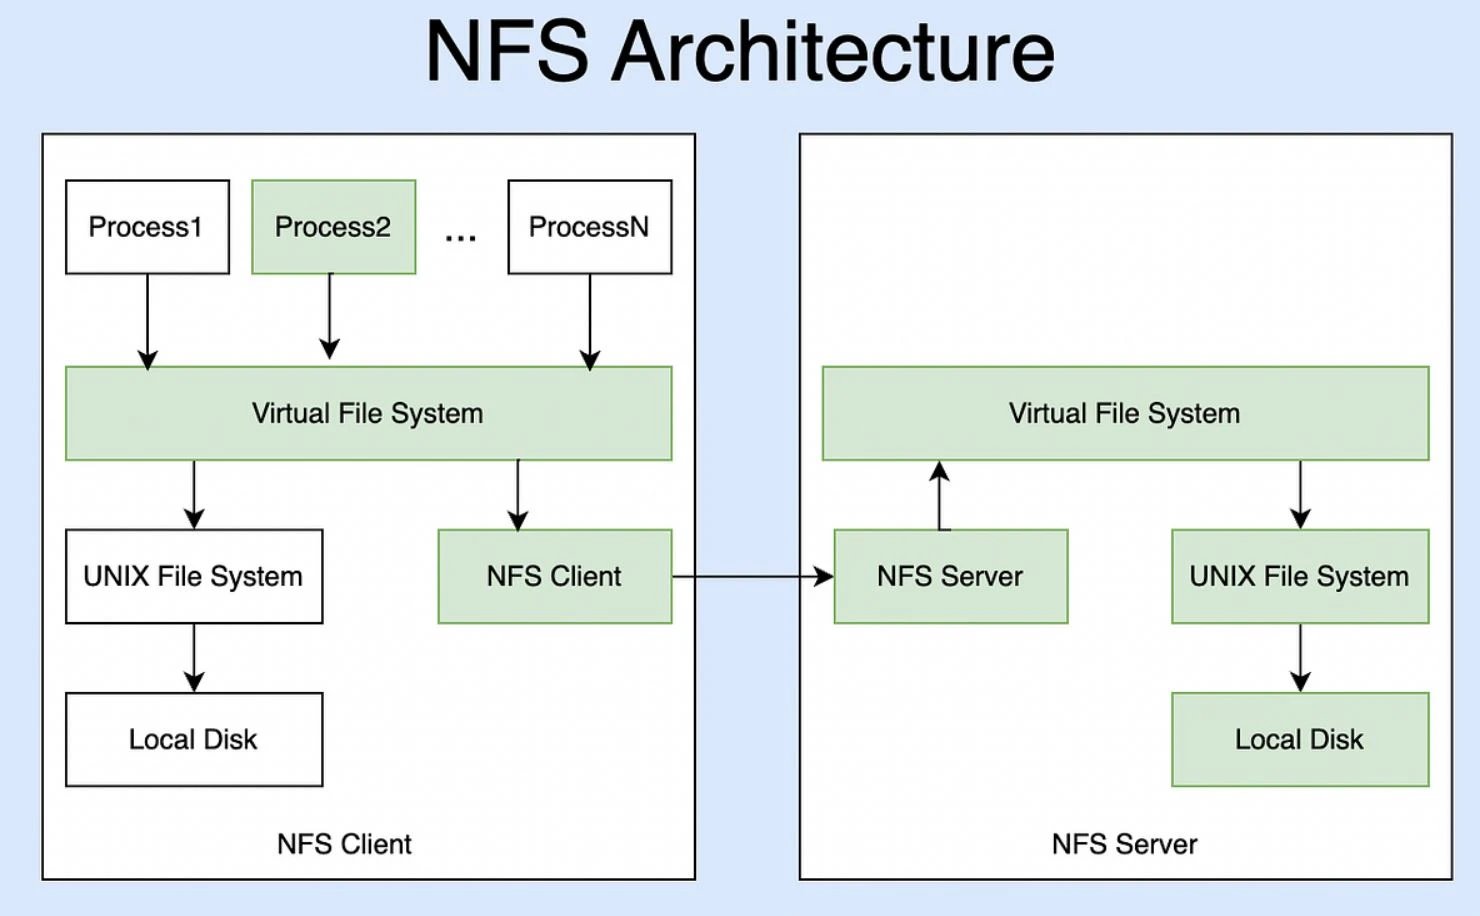
Windows Server NFS shares directories by exporting them so that authorized Linux, UNIX, and Windows clients can mount them over the network. The server manages permissions, authentication, and access rules to ensure secure, consistent file operations. Once mounted, the NFS share behaves like a local directory for the client machine.
🔁 NFS vs SMB: Key Differences
NFS and SMB both provide network file sharing, but each is geared toward different environments and performance needs. SMB is tightly integrated with Windows ecosystems, while NFS is optimized for Linux, UNIX, and large enterprise workloads.
-
Protocol structure: NFS is more lightweight and stateless (v3), while SMB is stateful with broader native features.
-
Performance: NFS often offers lower overhead and faster throughput in virtualized or Linux-heavy setups.
-
Compatibility: SMB relies on Windows authentication; NFS is ideal for heterogeneous environments.
-
Typical usage: SMB is suitable for office file sharing; NFS is preferred for containers, hypervisors, and distributed storage.
This comparison helps administrators select the protocol that aligns best with their infrastructure and workload requirements.

Windows Server NFS Compatibility & Requirements
Windows Server NFS is supported across multiple generations of Windows Server, making it a reliable option for hybrid environments running both modern and legacy systems. Administrators can use the built-in Windows NFS client as well as configure NFS sharing on Windows 10 and Windows 11 systems for lab, development, or lightweight production use. Support for NFSv3 remains universal, while Windows Server NFSv4 brings improved security and performance features in newer releases.
|
Feature / Version |
Windows Server 2016 |
Windows Server 2019 |
Windows Server 2022 |
Windows Server 2025 |
Windows 10 NFS Server |
Windows 11 NFS Server |
|
NFSv3 Support |
✔️ Full |
✔️ Full |
✔️ Full |
✔️ Full |
✔️ Basic (via features) |
✔️ Basic (via features) |
|
NFSv4 Support |
❌ Not supported |
❌ Limited |
✔️ Improved |
✔️ Enhanced (2025) |
❌ Not supported |
❌ Not supported |
|
Windows NFS Client |
✔️ Yes |
✔️ Yes |
✔️ Yes |
✔️ Yes |
✔️ Client available |
✔️ Client available |
|
Export NFS Shares |
✔️ Yes |
✔️ Yes |
✔️ Yes |
✔️ Yes |
✔️ Limited |
✔️ Limited |
|
Kerberos Support |
❌ No |
❌ No |
✔️ Yes (Server 2022) |
✔️ Improved (2025) |
❌ No |
❌ No |
|
Best Use Case |
Legacy environments |
Stable enterprise |
Modern datacenters |
Hybrid cloud setups |
Labs/testing |
Labs/testing |
These compatibility differences help you choose the right Windows edition for your NFS deployment and ensure your environment supports the performance and security features you need.
How to Install and Enable NFS on Windows Server?
Setting up Windows Server NFS begins with installing the NFS server role, which provides the core components needed to create and manage NFS shares. If you prefer a graphical interface or automation through PowerShell, both methods are fully supported and work consistently across Windows Server 2016 through 2025.
🖥️ Enable NFS Role via Server Manager
You can install the NFS role directly through Server Manager, which offers a visual, step-by-step workflow for enabling all required features. This method is ideal for administrators who want to validate installed components, check NFS support, and review configuration options before applying changes.
Steps to enable the NFS role:
-
Open Server Manager and select Add Roles and Features.
-
Choose Role-based or feature-based installation.
-
Select the target server from the server pool.
-
Under File and Storage Services, enable Server for NFS.
-
Confirm required dependencies and complete the installation.
-
Restart the server if prompted.
This approach provides a clear overview of installed components and makes troubleshooting easier if issues appear in the NFS event log later.
💻 Install NFS via PowerShell
Installing NFS with PowerShell is fast, scriptable, and works well in automated deployments or environments with multiple servers. It also provides administrators with greater control and easier access to logging, especially when reviewing the Windows Server NFS event log for verification.
-
Run PowerShell as Administrator.
-
Enter the command below to install the NFS server role:
Install-WindowsFeature NFS-Server
-
Wait for the installation to complete and verify NFS support using Get-WindowsFeature.
-
Restart the server if necessary to finalize the setup.
This method is efficient for large-scale environments and ensures consistent configuration across all Windows Server NFS deployments.
For administrators running a lightweight environment, Windows Server Core provides an efficient platform for installing and managing the NFS role through PowerShell.
📁 How to Create an NFS Share on Windows Server?
Creating a Windows Server NFS share is a straightforward process that allows your Linux, UNIX, and Windows clients to access exported directories over the network. The setup involves defining permissions, authentication rules, and root access behavior to ensure secure and predictable file sharing.
🔐 Configure NFS Share Permissions
Before clients can access your Windows Server NFS share, you need to define proper permissions that determine which hosts can read, write, or modify data. Windows Server provides granular NFS share permissions to control access at both the host and network levels.
-
Open File Explorer and right-click the folder you want to share.
-
Select Properties, then go to the NFS Sharing tab.
-
Click Manage NFS Sharing or Advanced Sharing, depending on the version.
-
Check Share this folder to enable NFS.
-
Click Permissions and add allowed hosts or networks.
-
Choose access levels: Read-Only, Read-Write, or No Access.
-
Apply and save the configuration.
Setting accurate Windows Server NFS share permissions ensures that only approved systems can interact with your data.
🛡️ Configure Authentication and Root Access
Authentication and root mapping determine how clients, especially Linux systems, authenticate when accessing the NFS export. This is essential when you windows server add nfs share and want consistent user identity mapping across your environment.
-
Open the NFS Sharing settings for your selected directory.
-
Choose the authentication mode: UNIX permissions, Kerberos, or both (depending on server version).
-
Configure Root Access to determine whether root users on clients become root or are mapped to anonymous users.
-
Enable or disable Allow root access based on your security policy.
-
Adjust anonymous UID/GID mapping if needed.
-
Apply changes and confirm the configuration.
Proper authentication and root access settings help maintain secure and predictable behavior across all clients mounting your NFS share.
📤 Exporting NFS Shares on Windows Server
The main purpose of the Windows Server NFS export is directory exporting, which at the same time gives every client controlled access to the shared data over the network with permissions and identity mapping. Exporting a folder causes Windows Server to apply access rules based on host, handle permissions in a UNIX-like manner, and optionally do root mapping to make the behavior predictable across the different NFS clients of Linux, UNIX, and Windows.
This entire export process determines how the share acts, anonymous user mapping, or secure client restrictions. A proper NFS permission design is crucial for keeping both performance and security up in enterprise installations.
📡 Mount NFS Share on Windows (Client Side)
Mounting an NFS share on Windows is a key part of using the Windows Server NFS client, allowing systems to access exported directories as if they were local drives. The process is similar across Windows Server 2019, Windows 10, Windows 11, and Windows Server 2025, with only slight differences in commands and feature availability.
🖥️ Mount NFS Share on Windows Server 2019
Windows Server 2019 includes a built-in NFS client, making it easy to perform a Windows Server NFS mount using commands or GUI tools. Before mounting, ensure the NFS Client feature is installed through Server Manager or PowerShell.
-
Install the NFS client with: Install-WindowsFeature NFS-Client.
-
Open Command Prompt or PowerShell as Administrator.
-
Use a Windows Server NFS mount command, such as:
-
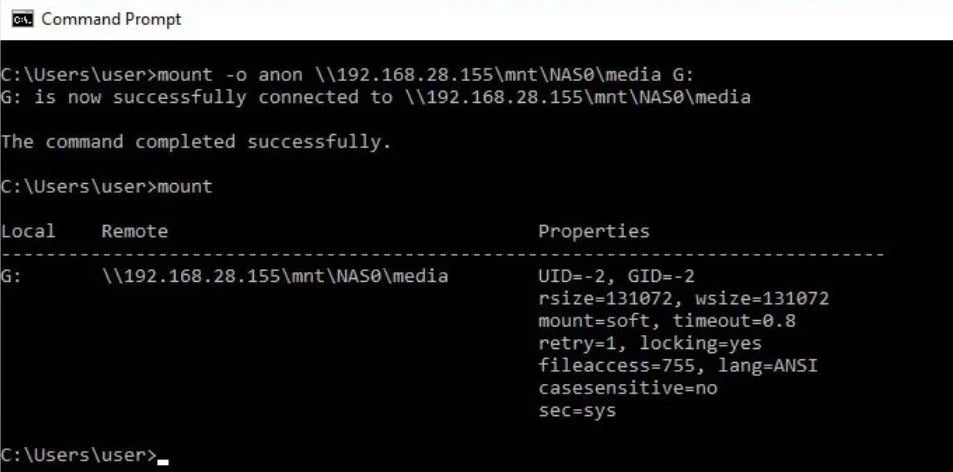
mount \\server\share Z:
-
mount -o anon 192.168.1.10:/export/data Z:
-
Verify that drive Z: appears in File Explorer.
-
Test read/write access to confirm permission settings.
Mounting NFS on Server 2019 provides efficient cross-platform access, especially for Linux-hosted storage.
💻 Windows 10 / Windows 11 NFS Client Setup
Both Windows 10 and Windows 11 include optional NFS client features that allow them to mount NFS shares from Windows Server or Linux servers. This setup is especially useful for mixed environments where desktop clients need lightweight access to NFS storage.
-
Open Turn Windows features on or off.
-
Enable Services for NFS and Administrative Tools.
-
Restart the system to apply changes.
-
Open Command Prompt as Administrator.
-
Mount using:
-
mount \\server\share Z:
-
mount -o anon 192.168.1.10:/export/data Z:
-
Verify the mounted drive appears in File Explorer.
This setup enables desktop users to connect seamlessly to NFS resources managed by a Windows Server NFS client environment.
🚀 Windows Server 2025 NFS Client
Windows Server 2025 introduces improved stability and compatibility for the NFS client, making Windows Server nfs mount operations more reliable in hybrid cloud environments. Administrators can use the same familiar Windows Server nfs mount command while benefiting from updated protocol support and better event log visibility.
-
Install the NFS client using: Install-WindowsFeature NFS-Client.
-
Confirm installation with Get-WindowsFeature.
-
Open PowerShell or CMD with elevated privileges.
-
Run one of the supported commands:
-
mount \\server\share Z:
-
mount -o anon 192.168.1.10:/export/data Z:
-
Validate the connection by browsing the mounted drive.
Windows Server 2025 provides a more optimized Windows Server NFS client experience, especially in enterprise and virtualized environments.
🔍 Monitoring & Troubleshooting Windows Server NFS
Monitoring NFS activity on Windows Server is essential for diagnosing access issues, performance problems, or permission conflicts. The Windows Server NFS event log provides detailed insights into client connections, authentication failures, and export-related errors.
|
Error Message |
Possible Cause |
Solution |
|
Access denied |
Incorrect NFS share permissions |
Review NFS permissions and the allowed hosts list |
|
Mount failed: Network path not found |
Client can't reach the server |
Check firewall rules and verify server IP |
|
Permission denied during write |
Read-only share or root squash |
Adjust share settings and root access policy |
|
RPC errors |
NFS service not running |
Restart NFS services using the Services console |
|
UID/GID mismatch |
Incorrect identity mapping |
Update anonymous UID/GID or configure proper mapping |
|
Slow file access |
Network latency or an outdated NFS version |
Optimize the network and consider NFSv4 on supported servers |
Proper event log monitoring helps administrators pinpoint NFS-related issues quickly. With structured troubleshooting and clear visibility into server behavior, NFS deployments remain reliable and predictable.
To protect exported directories and ensure recovery in case of data issues, pairing NFS shares with Windows Server Backup offers a reliable safety layer.
🛠️ Best Practices for Windows Server NFS
Optimizing Windows Server NFS requires a combination of security hardening, performance tuning, and choosing the right protocol for the right workload. By applying these updated 2025 best practices, administrators can achieve faster throughput, safer access control, and more stable cross-platform operations.
-
Enable Kerberos authentication when available (Server 2022/2025) to protect against spoofing and unauthorized access.
-
Restrict NFS access to specific IPs or subnets instead of using open wildcard permissions.
-
Use root mapping to avoid granting full root privileges to Linux clients unless necessary.
-
Optimize MTU and enable jumbo frames on supported networks to improve large file transfer speeds.
-
Place NFS shares on SSD-backed storage to increase read/write throughput for virtual machines and containers.
-
Monitor the NFS event log regularly to detect permission mismatches, timeouts, or authentication failures.
-
Use NFS for Linux-heavy and containerized workloads, and SMB for Windows-native environments or domain authentication.
-
Separate NFS traffic onto dedicated VLANs to reduce congestion and improve security.
Following these recommendations ensures that your Windows Server NFS environment stays secure, efficient, and aligned with modern enterprise requirements.
In networks where IP allocation is handled dynamically, integrating your NFS deployment with Windows Server DHCP helps maintain stable connectivity and predictable client access.
Conclusion
Windows Server NFS is a reliable way to share information amongst Windows, Linux, and UNIX systems, and when done right, it gives excellent performance, predictable access control, and smooth interoperability. With the proper permissions, the authentication methods, and the network optimizations, the admin can have a secure and efficient NFS environment that fits perfectly with modern workloads and hybrid infrastructures.
If deploying NFS or a larger server setup is in your plans, consider a hosting platform like 1Gbits that is stable, has fast provisioning, global locations, and 24/7 tech support to make your life much easier. A good infrastructure guarantees that your Windows Server NFS will be reliable from the very first day and will be optimized as your storage needs develop.
If you're planning to deploy NFS in a stable, high-performance environment, choosing a Windows VPS with instant setup and 24/7 support can significantly streamline your server operations.
