
NPM (Node Package Manager) plays a vital role in the world of web development, acting as the package manager for Node.js, and is an essential tool for JavaScript developers. Regularly update NPM to ensure that you have access to the latest features, security enhancements, and bug fixes, keeping your projects running smoothly and securely.
NPM is the default package manager for Node.js and is written entirely in JavaScript. It manages all the packages and modules for Node.js and consists of a command-line client npm. To learn more about What is NPM and how to use it to install Node.js packages, read our article on this topic.
Upon installing Node.js, NPM is automatically installed into the system. It facilitates the installation of required packages and modules in Node projects. In this article, we’ll guide you through updating npm on different operating systems.
Why You Should Update NPM
Node Package Manager (npm) is an essential part in the modern web developer's toolkit. It serves as the default package manager for the JavaScript runtime environment Node.js, allowing developers to share and consume code packages, manage project dependencies, and publish their contributions to the npm registry.
To update NPM and node Windows is crucial for several reasons:
-
Enhanced Security: Regular updates ensure you have the latest security patches, vital for protecting your projects from vulnerabilities.
-
Access to Latest Features: Updating provides access to the latest features and improvements in npm itself, enhancing the efficiency and reliability of your development workflow.
-
Compatibility with Dependencies: Having the latest version of npm is sometimes necessary to use specific packages that rely on newer features or fixes introduced in recent npm releases.
How to Update NPM on Different Operating Systems
Updating npm is different for each OS. In this section, we’ll help you to update npm to specific version that you want:
Update NPM-Windows
Updating npm on your Windows machine is essential to ensure you have access to the latest features and security patches. Here are two methods you can use to update npm Windows:
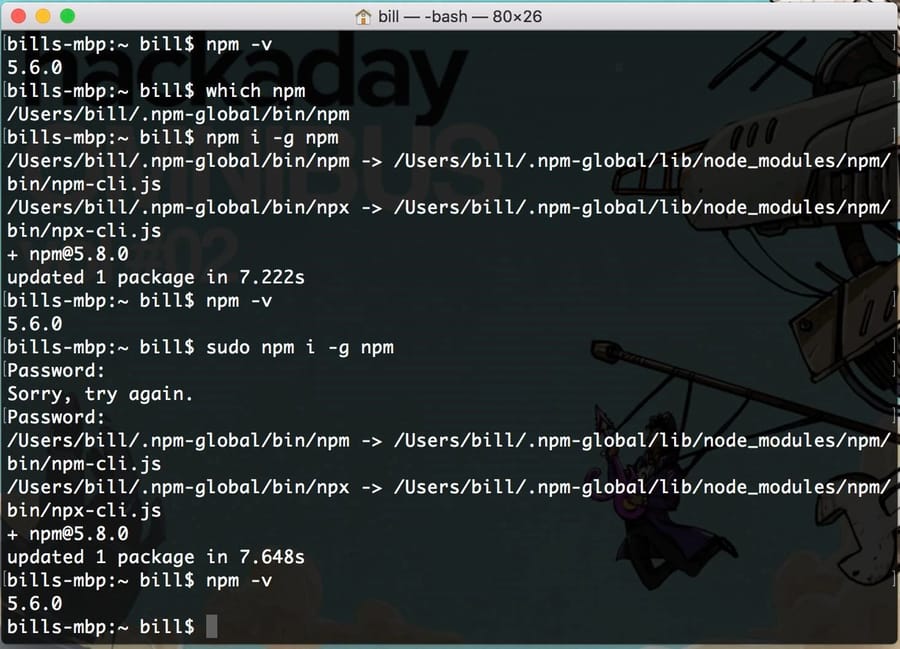
Updating npm using npm itself
Updating NPM (Node Package Manager) is a straightforward process, and one of the most convenient methods is using NPM itself.
1. Open Your Command Prompt: Launch your Command Prompt by searching for "Command Prompt" in the Windows search bar and selecting it from the results.
2. Check Your Current NPM Version: Before updating, it's a good practice to check your current NPM version. You can do this by running the following command in your Command Prompt:
npm -v
3. Update NPM: To have the npm latest version using NPM itself, simply use the following command in your Command Prompt:
npm install -g npm

This command tells NPM to install the latest version of NPM globally (hence the -g flag).
4. Wait for the Update: NPM will automatically download and install the latest NPM version. Depending on your internet connection speed, this process should only take a few moments.
5. Verify the Update: After the update is complete, run the following command in your Command Prompt to verify that NPM is now running on the latest version:
npm -v
The Command Prompt should display the new version of NPM.
Updating npm using Node.js Installer
For Windows users, updating NPM (Node Package Manager) is a straightforward process that can be accomplished using the Node.js Installer.
1. Download the Latest Node.js Installer: Visit the official Node.js website at nodejs.org and choose the "LTS" (Long-Term Support) version, which is recommended for most development purposes. Click on the "Windows Installer" to download the installer.
2. Run the Installer: Once the installer is downloaded, double-click the executable file to run the Node.js Installer. This will launch the installation wizard.
3. Select "Modify" Installation: In the installation wizard, you will be presented with an option to choose the components to modify. Select the "Modify" option.
4. Update npm: After selecting "Modify," you will see a list of components to modify. Find and check the box next to "npm" in the list.
5. Complete the Modification: Click the "Next" button to proceed with the modification. The installer will update NPM to the latest version. Follow the on-screen prompts to complete the process.
6. Verify the Update: After the modification is complete, open your Command Prompt or PowerShell and type the following command to verify that NPM has been updated successfully:
npm -v
The Command Prompt should display the new version of NPM.
Update npm Mac Using Homebrew
macOS users have a powerful package manager called Homebrew at their disposal, providing a convenient method to update NPM (Node Package Manager) to the latest version. Here's a step-by-step guide on how to update NPM Mac using Homebrew:
1. Open Terminal: To start the update npm and node Mac process, launch the Terminal application on your macOS system. You can find it in the "Utilities" folder within the "Applications" directory.
2. Install Homebrew (if not already installed): If you haven't already installed Homebrew, you can do so by running the following command in your Terminal:
/bin/bash -c "$(curl -fsSL https://raw.githubusercontent.com/Homebrew/install/master/install.sh)"
Follow the on-screen instructions to complete the Homebrew installation.
3. Check Your Current NPM Version: Before updating NPM, it's a good practice to check your current NPM version. You can do this by running the following command in your Terminal:
npm -v
4. Update NPM: To update NPM using Homebrew, execute the following commands one by one in your Terminal:
brew update
This command ensures that Homebrew itself is updated.
brew upgrade npm
This command updates NPM to the latest version.
5. Verify the Update: After the update is complete, run the following command in your Terminal to verify that NPM is now running on the latest version:
npm -v
The Terminal should display the new version of NPM.
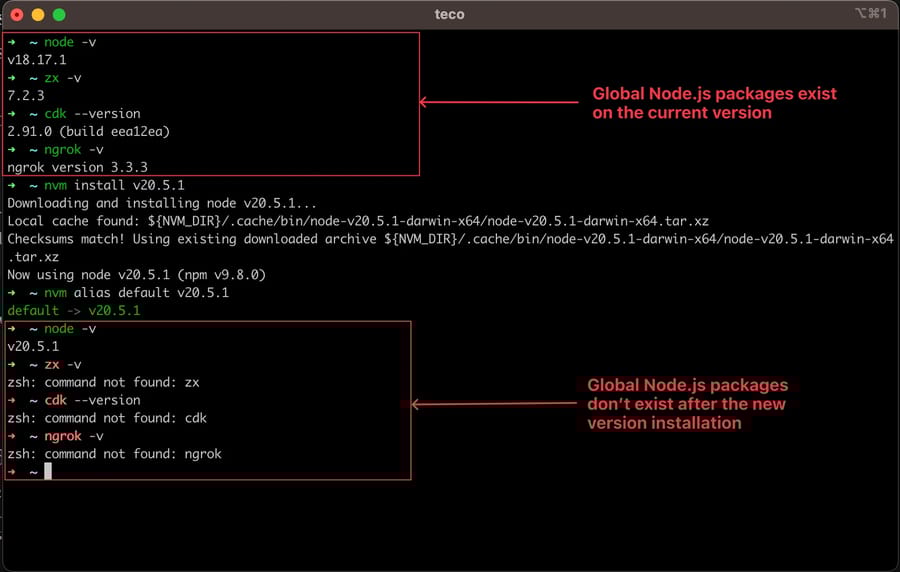
Update npm Ubuntu/Linux using NVM (Node Version Manager)
Linux users often prefer using NVM (Node Version Manager) to manage Node.js and NPM installations. Here's a step-by-step guide on how to update NPM Ubuntu using NVM:
1. Open Your Terminal: Launch your terminal application. Depending on your Linux distribution, you may use Terminal, Konsole, or another terminal emulator.
2. Check Your Current NPM Version: Before updating NPM, it's a good practice to check your current NPM versions. You can do this by running the following command in your terminal:
npm -v
3. Install NVM (if not already installed): If you haven't already installed NVM, you can do so using a one-liner script. For continuing the update npm and node Ubuntu process, open your terminal and run the following command:
curl -o- https://raw.githubusercontent.com/nvm-sh/nvm/v0.39.0/install.sh | bash
This will download and install NVM. Make sure to use the latest NVM version by checking the NVM GitHub repository for the latest release.
4. Close and Reopen the Terminal: After installing NVM, it's a good practice to close and reopen your terminal or run the following command to apply the changes to your current session:
source ~/.bashrc
Make sure to replace ~/.bashrc with the appropriate file for your shell if you're not using Bash.
5. Install and Use the Latest Node.js Version: Use NVM to install the latest LTS (Long-Term Support) version of Node.js, which also includes NPM. Run the following commands:
nvm install --lts
nvm use --lts
This installs and activates the latest Node.js LTS version, which includes the latest NPM version.
6. Verify the Update: After the update is complete, run the following command in your terminal to verify that NPM is now running on the latest version:
npm -v
Your terminal should display the new version of NPM.
Update npm Packages
Ensuring that your npm packages are up to date is essential for maintaining the security, stability, and functionality of your Node.js projects. Here's why updating npm packages is necessary and how you can accomplish it:
Why updating npm packages is necessary:
-
Security: Updates often include patches for vulnerabilities discovered in previous versions, reducing the risk of security breaches.
-
Stability: Updated packages may contain bug fixes and performance improvements, enhancing the overall stability and efficiency of your application.
-
Compatibility: Keeping packages up to date ensures compatibility with other dependencies and frameworks, preventing potential conflicts or errors.
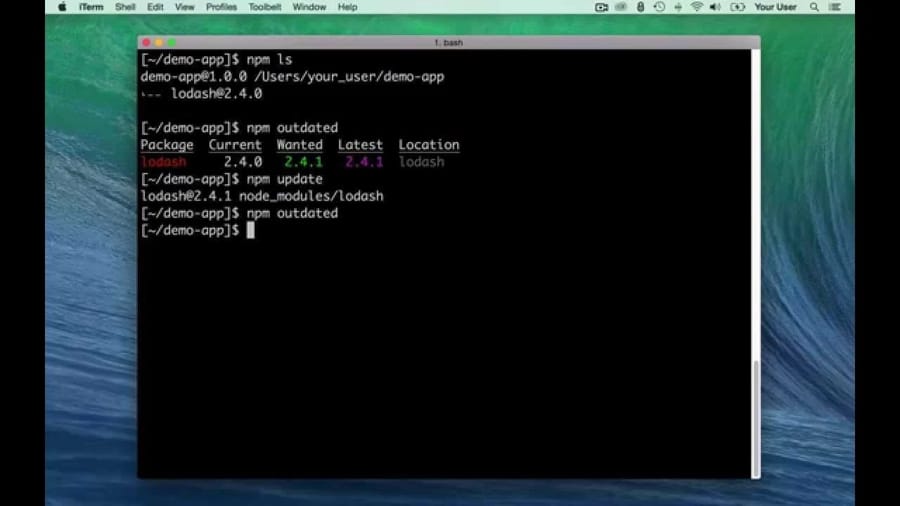
Command to update npm packages:
-
Vanilla npm approach: The npm command-line interface provides tools to upgrade packages directly. Use npm outdated to identify packages with available updates and npm update {package-name} to update individual packages.
How to update npm package to specific version:
-
Using npm-check-updates:
-
Install npm-check-updates: npm install -g npm-check-updates
-
Check for updates: npx ncu
-
Update a single package: npx ncu -uf {package-name}, followed by npm install
-
Update all packages: npx ncu -u, followed by npm install
By using update npm commands and following these methods, you can ensure that the process to update npm all packages has been done successfully.
Angular and npm Updates
The Angular update npm packages are crucial to ensure compatibility, security, and performance. Here's how to update npm update:
Command to update npm packages for Angular:
-
To update the global Angular CLI, use:
npm install -g @angular/cli
OR
ng update @angular/cli @angular/core
How to Angular update npm for Angular projects:
Use the npm-check-updates (ncu) utility to simplify the process:
Install npm-check-updates:
npm i -g npm-check-updates
Run npm-check-updates with the -u flag to upgrade the package.json file:
ncu -u
Install updated packages:
npm install
This updates the local Angular project's package.json file to the latest versions and installs or updates new package dependencies in "node_modules".
Additional Note:
-
To check for new versions available in the local package.json file, use:
ncu
OR
ncu -g
Explore all available options in the npm-check-updates utility on the official npm page.
Troubleshooting: Tips to Update npm to Specific Version
Encountering issues with npm can be frustrating, but there are solutions available for common problems. If you can't update npm, here's a quick guide to troubleshooting some common npm errors:
-
Broken npm installation:
-
Mac or Linux: Reinstall npm.
-
Windows: Reinstall Node.js using the official installer.
-
Random errors:
-
Sometimes running npm cache clean and retrying can resolve strange issues.
-
Use the -verbose option with npm install to get more details about errors.
-
No compatible version found:
-
Update npm to the latest stable version.
-
Permissions errors:
-
Refer to discussions on downloading and installing Node.js and resolving permissions errors for solutions.
-
Error: ENOENT, stat 'C:\Users<user>\AppData\Roaming\npm' on Windows 7:
-
Ensure that the specified directory exists and is writable with your user account.
-
No space:
-
Free up disk space or set the temporary folder to a location with more space using npm config set tmp /path/to/big/drive/tmp.
-
No git:
-
Install git or add git information to your npm profile.
-
SSL Error:
-
Check proxy configurations and ensure SSL is properly configured.
-
Invalid JSON:
-
Clear npm cache using npm cache clean and try again later.
-
Many ENOENT / ENOTEMPTY errors in output:
-
Update npm to the latest version to address synchronization issues.
-
cb() never called! when using shrinkwrapped dependencies:
-
Move npm-shrinkwrap.json file until the issue is fixed or update npm to the latest version.
-
npm login errors:
-
Ensure your npmjs.com email matches the email used for npm login, and clear login-related fields from ~/.npmrc.
-
npm hangs on Windows at addRemoteTarball:
-
Check for duplicate temp directories in .npmrc and remove extra entries.

Leave A Comment