
Selecting all text in the Nano text editor is a common task for Linux users seeking efficiency. While Nano doesn’t have a direct "nano select all" command like some GUI-based editors, it offers practical shortcuts to achieve similar results. To select all in Nano, you can use a combination of keyboard actions to highlight and manipulate text. Understanding how to select all in Nano is essential for tasks like copying or editing the entire content of a file. If you're wondering how to select all text in Nano, the process typically involves using the Ctrl+A shortcut to position your cursor at the beginning and Ctrl+Shift+6 to mark the starting point before moving through the content. For those asking how to select all in Nano editor or trying to nano copy all text, mastering these techniques ensures smooth navigation. This guide simplifies nano select text on Linux. If You need Linux VPS, visit Linux VPS Hosting.
Quick Answer (TL;DR): Select All, Copy, and Delete in Nano
To quickly select, copy, or delete all text in Nano, use this exact sequence:
Select All:
Ctrl + A → Ctrl + Shift + 6 → Ctrl + V (repeat until end)Copy All:
Ctrl + A → Ctrl + Shift + 6 → Ctrl + V → Ctrl + K → Ctrl + UDelete All:
Ctrl + A → Ctrl + Shift + 6 → Ctrl + V → Ctrl + KExplanation (short):
- Ctrl + A → move cursor to beginning
- Ctrl + Shift + 6 → start selection (set mark)
- Ctrl + V → jump forward (repeat to reach end)
- Ctrl + K → cut (delete or copy)
- Ctrl + U → paste (for copy use case)
This is the fastest way to perform nano select all, copy, and delete operations using only keyboard shortcuts.
What Does "Nano Select All" Mean?
When using the Nano text editor, many users wonder how to select all in Nano for tasks like copying, editing, or deleting text. While Nano doesn’t have a single nano select all shortcut like modern GUI-based editors, it provides flexible methods for selecting text. Understanding nano select all commands is essential for efficient text editing in Linux, macOS, or other platforms where Nano is commonly used. َAlso read Nano, Linux Command-Line Text Editor.
How Nano Selection Actually Works
Unlike graphical text editors, Nano does not have a built-in “select all” button. Instead, it relies on a simple yet powerful selection mechanism based on setting a mark and moving the cursor.
Understanding how Nano selection works is essential if you want to efficiently select, copy, or delete text within the editor.
Understanding “Set Mark” in Nano
In Nano, selecting text begins by setting a mark, which defines the starting point of your selection.
To set the mark:
Ctrl + Shift + 6Once the mark is active:
- Moving the cursor (using arrow keys or shortcuts) will highlight text
- The selection expands from the mark to your current cursor position
This is how Nano replicates features like select all, even though it doesn’t provide a single dedicated command for it.
How Selection Expands in Nano
After setting the mark, you can expand your selection in several ways:
- Use arrow keys to select text character by character
- Use Ctrl + V to move forward by pages
- Use navigation shortcuts to quickly select large sections
For example, to perform a full nano select all:
-
Move to the beginning:
Ctrl + A -
Set the mark:
Ctrl + Shift + 6 - Move to the end of the file
This process highlights the entire file content.
Nano Selection Buffer vs System Clipboard
One of the most important concepts to understand is that Nano uses its own internal buffer, not the system clipboard.
Nano Internal Buffer:
- Ctrl + K → cuts (or copies) selected text
- Ctrl + U → pastes text inside Nano
- Works only within the Nano editor session
System Clipboard:
- Managed by your operating system
- Used for copy/paste between applications
- Not directly connected to Nano by default
⚠️ Important:
If you copy text in Nano, you cannot paste it into another application (such as a browser or another terminal) unless you use external tools like xclip, pbcopy, or wl-copy.
Why This Matters for Nano Users
Understanding this behavior helps prevent common confusion, such as:
- Why can’t I paste Nano text into another application?
- Why doesn’t Ctrl+C work as expected in Nano?
By knowing the difference between Nano’s internal buffer and the system clipboard, you can choose the right method depending on your goal—whether you're editing content inside Nano or copying data to use outside the editor.
How to Select All in Nano
Selecting all text in Nano may not be as straightforward as in graphical editors, but it is still simple once you understand the correct sequence of commands. In this section, you will learn how to select, copy, and delete text efficiently using Nano keyboard shortcuts across different systems.
Selecting All in Nano
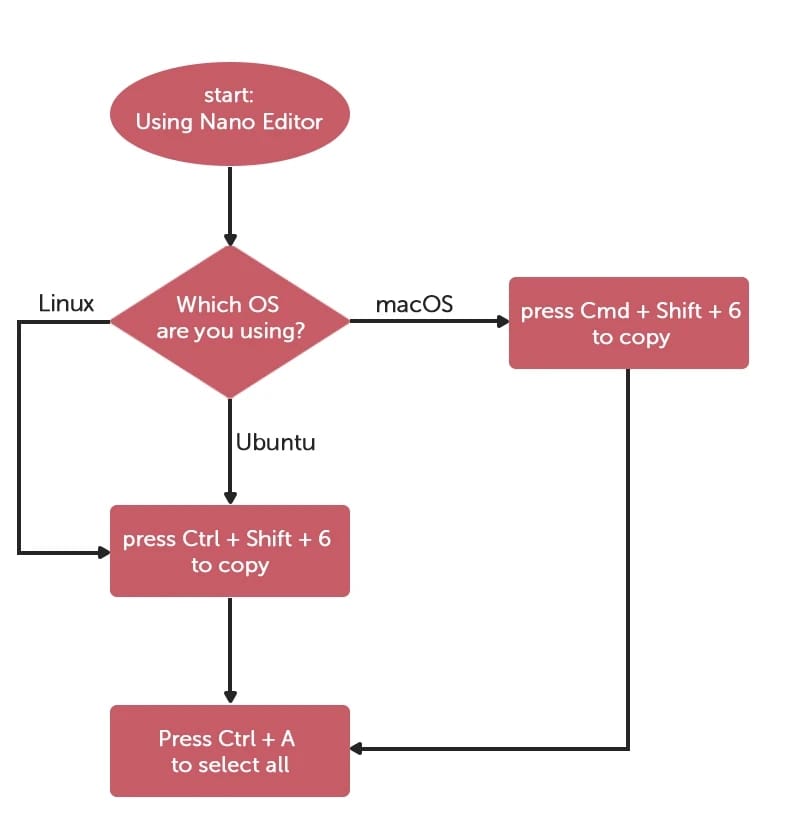
To achieve nano select all, start by positioning your cursor at the beginning of the text with Ctrl + A. Then, press Ctrl + Shift + 6 to begin marking the text. Use the arrow keys to move the cursor to the end of the file, effectively highlighting the entire content. This process works universally, whether you’re on Linux, macOS, or another system.
Nano Select All and Copy
Once you’ve marked the text using the nano select all shortcuts, you can copy it. For nano select all and copy to clipboard, use Ctrl + K to cut the highlighted text and then paste it with Ctrl + U. This works as a basic copy-paste operation within Nano.
Nano Select All and Delete
If you want to delete everything, follow the steps for nano select all text and delete on macOS or Linux systems. Highlight all content as described and use Ctrl + K to cut the text, effectively clearing the file. This method also applies to GNU Nano.
Nano Select All on macOS
For Mac users, the process is slightly adapted for nano select all on macOS. Use the same shortcuts—Ctrl + Shift + 6 and arrow keys—to select the text, then follow up with the appropriate action like deleting or copying. These steps ensure compatibility across macOS environments.
Selecting Multiple Lines
Nano also supports selecting multiple lines and copying specific sections of text. Simply set the mark using Ctrl + Shift + 6, move the cursor using arrow keys, and press Ctrl + K to cut or copy the selected portion.
Mastering nano select all commands—whether for copying, deleting, or modifying text—can significantly improve your workflow. By learning these shortcuts across Linux, macOS, and GNU Nano, you can manage files more efficiently and perform bulk text operations with ease.
| Operation | Linux | MacOS | Ubuntu |
| Select All | Ctrl+A | Ctrl+A | Ctrl+A |
| Copy | Ctrl+Shift+6 | Cmd+Shift+6 | Ctrl+Shift+6 |
| Delete | Ctrl+K | Ctrl+K | Ctrl+K |
Copy Selection to System Clipboard in Nano
By default, Nano does not copy text to your system clipboard. Instead, it uses an internal buffer, which means that standard copy operations (Ctrl + K) only work within Nano itself.
If you want to copy text from Nano to your system clipboard (so you can paste it into a browser, editor, or another application), you need to use external tools depending on your operating system.
Copy to Clipboard on Linux (X11)
On most Linux distributions using X11, you can use xclip or xsel.
Using xclip:
cat file.txt | xclip -selection clipboardUsing xsel:
xsel --clipboard < file.txtThese commands allow you to copy the entire file content directly to your system clipboard.
Copy to Clipboard on Linux (Wayland)
If your system uses Wayland instead of X11, use:
cat file.txt | wl-copy
This works similarly to xclip but is designed for Wayland environments.
Copy to Clipboard on macOS
On macOS, you can use the built-in pbcopy command:
cat file.txt | pbcopyThis instantly copies the file content to your clipboard, allowing you to paste it anywhere.
Copy Selected Text from Nano
If you specifically want to copy selected text from Nano:
-
Select text using:
Ctrl + Shift + 6 -
Cut the selection:
Ctrl + K - Then use external tools (like xclip) if needed for system-wide access
⚠️ Note: Nano does not directly integrate with the system clipboard, so additional tools are required.
When Should You Use Clipboard Tools?
Using clipboard tools is especially useful when:
- You need to paste Nano content into a web browser
- You are copying configuration files between systems
- You are working over SSH and need local clipboard access
Understanding these tools makes Nano far more powerful in real-world workflows.
Alternative Ways to Copy File Contents Without Using Nano
In many cases, you don’t actually need to open Nano to copy the contents of a file. Linux and macOS provide several command-line tools that allow you to copy or transfer file data quickly and more efficiently.
These methods are especially useful when working with large files, remote servers, or automation scripts.
Using cat to Copy File Content
The cat command is one of the simplest ways to display or copy file content.
cat file.txtYou can combine it with clipboard tools:
cat file.txt | xclip -selection clipboardThis method is fast and widely used for quick access to file content.
Using tee to Copy Output to Another File
The tee command allows you to copy content while also displaying it in the terminal.
tee copy.txt < file.txtThis creates a duplicate file while still showing the content on screen.
Using cp to Duplicate Files
If your goal is to copy the entire file (not just its content), use:
cp file.txt backup.txtThis is the safest and most common way to create a full backup of a file.
Using Output Redirection
You can also copy file content using shell redirection:
cat file.txt > newfile.txtOr even simpler:
> newfile.txt < file.txtThis method is useful for scripting and automation tasks.
When to Use These Methods
These alternatives are ideal when:
- You don’t need to edit the file
- You want faster performance than opening Nano
- You are working over SSH or automation scripts
- You need to copy files or content in bulk
Using command-line tools instead of Nano can significantly improve efficiency, especially for advanced users and system administrators.
Nano Inside tmux, SSH, and iTerm2: Common Key Mapping Issues
When using Nano inside environments like tmux, SSH sessions, or terminal emulators such as iTerm2, you may encounter issues with keyboard shortcuts—especially when trying to select text.
These problems are usually caused by key mapping conflicts, where certain key combinations are not correctly transmitted to Nano.
Why Nano Shortcuts May Not Work
Nano relies on specific key combinations like:
Ctrl + Shift + 6However, in some environments:
- The terminal may not send the correct key signal
- tmux may intercept or remap the shortcut
- SSH sessions may behave differently depending on configuration
As a result, the “set mark” command might not work as expected.
Common Issue: Ctrl + Shift + 6 Not Working
One of the most frequent problems is that Ctrl + Shift + 6 does nothing.
Quick Fix:
Try this alternative:
Ctrl + ^On many keyboards, this produces the same signal as Ctrl + Shift + 6.
Fixing Key Issues in tmux
If you're using tmux, it may override or block certain keybindings.
Possible solutions:
- Check your .tmux.conf for key remapping
- Ensure prefix keys do not conflict with Nano shortcuts
- Test Nano outside tmux to confirm the issue
You can also try running:
tmux -L testto start a clean session for testing.
Fixing Key Issues Over SSH
When connected via SSH:
- Key behavior depends on both local and remote terminal settings
- Some key combinations may not transmit correctly
Tips:
- Use a standard terminal emulator
- Avoid custom key remapping on the client side
- Test shortcuts locally vs remotely
iTerm2 and Terminal Emulator Fixes
In tools like iTerm2 (macOS):
- Some shortcuts are reserved by the terminal itself
- Others may require manual mapping
How to fix:
- Open iTerm2 Preferences
- Go to Keys → Key Mappings
- Add or adjust mappings for problematic shortcuts
You may need to explicitly map Ctrl + Shift + 6 to send the correct control character.
Best Practices to Avoid Key Mapping Issues
- Use default keybindings whenever possible
- Test shortcuts in a clean environment
- Avoid overlapping key mappings in tmux or terminal
- Learn alternative shortcuts like Ctrl + ^
Understanding how terminal environments affect Nano ensures a smoother editing experience, especially when working on remote servers or advanced setups.
Troubleshooting: Nano Mark or Selection Not Working
If you are unable to select text in Nano, the issue is usually related to keyboard input or terminal key mapping. Since Nano relies on specific control sequences, even a small mismatch in your environment can prevent selection from working properly.
Common Issue: Ctrl + Shift + 6 Not Working
The most common problem is that the shortcut for setting the mark does not respond.
Nano uses the following key combination to start selection:
Ctrl + Shift + 6However, many terminals do not correctly send this key combination.
Try Alternative Shortcut: Ctrl + ^
In most cases, the following shortcut works as an alternative:
Ctrl + ^This produces the same control signal as Ctrl + Shift + 6 and is more reliable across different keyboards and terminal environments.
Check Terminal Key Mapping
Some terminal emulators override or block certain key combinations.
What to check:
- Terminal keyboard settings
- Custom keybindings
- Conflicts with system shortcuts
If necessary, reset key mappings to default or manually assign the correct control sequence.
Issues in tmux or SSH Sessions
If you are working inside tmux or over SSH:
- tmux may intercept key combinations
- SSH sessions may not transmit keys correctly
Fixes:
- Test Nano outside tmux
- Try a clean tmux session
- Use a different terminal emulator
Verify Nano Version
Older versions of Nano may behave differently or lack certain features.
Check your version:
nano --versionUpdating Nano can resolve unexpected behavior.
Quick Checklist
If selection is not working, go through this checklist:
- Try Ctrl + ^ instead of Ctrl + Shift + 6
- Check terminal key mappings
- Test outside tmux or SSH
- Verify Nano version
- Use a different terminal emulator if needed
Understanding these common issues can save time and prevent frustration when working with Nano.
Nano Versions and Custom Keybindings
Nano behavior can vary depending on the version you are using and how your keybindings are configured. Understanding your Nano version and customizing shortcuts can significantly improve your workflow, especially when dealing with selection and editing commands.
How to Check Your Nano Version
Before troubleshooting or customizing Nano, it’s important to know which version you are running.
Use the following command:
nano --versionThis will display the installed version along with additional build information. Newer versions of Nano may include improved key handling and additional features.
Why Nano Version Matters
Different Nano versions may:
- Handle key combinations differently
- Support additional features or shortcuts
- Fix bugs related to selection or clipboard behavior
If you are experiencing issues with shortcuts like Ctrl + Shift + 6, updating Nano might resolve them.
Understanding Nano Keybindings
Nano uses predefined keybindings for actions such as:
- Setting the mark (Ctrl + Shift + 6)
- Cutting text (Ctrl + K)
- Pasting text (Ctrl + U)
However, these keybindings can be customized to better match your workflow or avoid conflicts with your terminal.
How to Customize Keybindings in Nano
Nano allows you to override default shortcuts using a configuration file.
The main config file is:
~/.nanorcExample: Custom Keybinding
You can define your own shortcuts by adding lines like this:
bind ^A beginning-of-line mainbind ^E end-of-line mainThis example ensures that:
- Ctrl + A moves to the beginning of the line
- Ctrl + E moves to the end of the line
Remapping Problematic Keys
If certain shortcuts do not work in your environment, you can remap them.
For example, if Ctrl + Shift + 6 is not recognized, you may define an alternative binding depending on your needs.
Custom keybindings are especially useful when working in:
- tmux
- SSH sessions
- macOS terminals like iTerm2
Best Practices for Nano Configuration
- Keep your .nanorc file simple and well-documented
- Avoid overriding too many default shortcuts
- Test changes after each update
- Backup your configuration file before modifying it
Customizing Nano ensures a smoother and more predictable editing experience, especially in complex terminal environments.
Why is "Select All in Nano" Useful?
When editing a file, you may need to manipulate large blocks of text. Using nano select all macOS or linux nano select all, you can quickly highlight the entire file. This capability is essential for actions such as reformatting content, bulk deletion, or transferring text to another file. For instance, with nano select all copy, you can copy the entire file to the clipboard and paste it elsewhere.
Nano Select All for Cross-Platform Usage
The nano select all ubuntu feature ensures consistency across platforms. Whether on Ubuntu or macOS, you can achieve the same results using the same shortcuts. Mac users can leverage nano copy all text mac for efficient copying, while Linux users benefit from linux nano select all to streamline file management tasks.
Enhancing Workflow with Nano Select All
The nano select all and copy to clipboard function is particularly useful when transferring data between files or applications. Highlighting the entire content with nano select text and delete also simplifies bulk deletions without manually erasing each line. These workflows save significant time and effort, especially for repetitive tasks.
Practical Use Cases
-
Text Transfers: Use nano select all copy to duplicate file content into another program.
-
Mass Editing: Quickly format or replace content across the entire file.
-
Efficient Deletion: The nano select text and delete feature allows you to clear all text with minimal effort.
Nano Select’s Impact Factor
The nano select impact factor lies in its ability to improve text editing speed and precision. For coders, writers, or administrators, these features streamline their workflow. With nano select line capabilities, you can also focus on smaller portions of text when needed.
How to Select All in Nano? [Nano Select All]
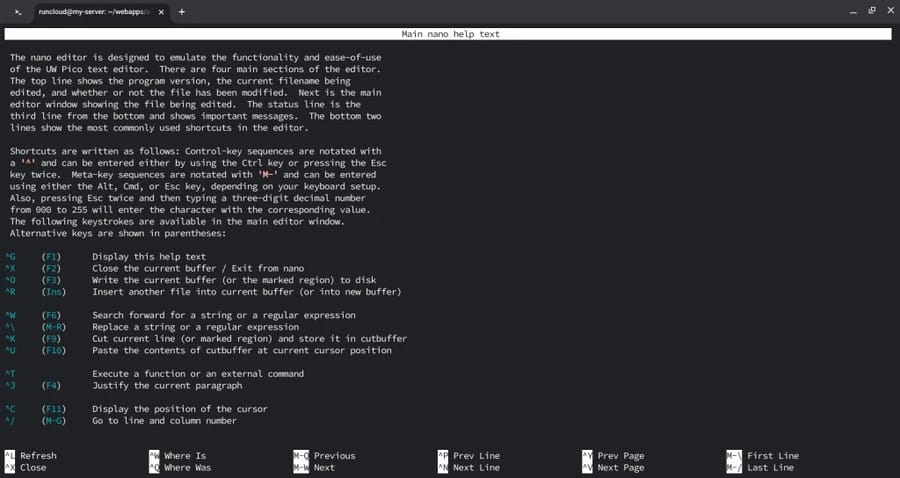
Nano is a powerful, lightweight text editor that is popular among Linux users for its simplicity and ease of use. However, some operations, such as selecting all text in a file, may not be immediately intuitive. This comprehensive guide will walk you through everything you need to know about how to select all in Nano, commonly referred to as "nano select all."
1. Open the File in Nano
Opening a file in the Nano text editor is the first and most straightforward step for editing text files. Whether you’re managing configurations or creating scripts, understanding this process lays the foundation for advanced actions like nano select all. Once you open a file in Nano, you can perform tasks such as selecting, copying, or deleting content seamlessly.
Opening a File
To begin, use the command:
· nano filename
This will open the specified file in Nano. If the file doesn’t exist, Nano will create a new one. This simplicity makes Nano a preferred choice for Linux users. When working in environments like Linux Nano select all, this initial step is universal across distributions.
Navigating Within the File
Once the file is open, you can navigate using the arrow keys. At this stage, you can utilize nano select all to highlight and manipulate the text. For Mac users, Nano select all Mac is equally intuitive. Simply move the cursor to the starting point of the text you wish to edit, and you’re ready to perform actions like bulk selection or deletion.
Preparing for Advanced Actions
Opening a file in Nano also prepares you for complex operations, such as linux nano select all commands. For instance, after the file is open, you might need to highlight all content using nano select all Mac or Linux-based shortcuts. This functionality is vital for tasks like applying uniform changes across the document.
Editing After Opening
Once the file is open, you can edit text, add new lines, or use select all nano to copy or delete content. Highlight the entire text using Ctrl+Shift+6 and move the cursor to the file’s end. This simple command facilitates advanced actions like bulk edits or copying all text to another file.
Importance of Opening the File
Without opening the file, none of Nano’s powerful features, such as nano select all, are accessible. Whether you’re using linux nano select all commands or managing files on a Mac, this step is integral to every operation in Nano.
By starting with the simple command to open a file, you unlock Nano's efficiency and power, paving the way for advanced text management tasks.
2. Navigate to the Start of the File
When working with Nano, navigating to the start of a file is an essential skill that enables efficient text editing. This step becomes even more critical when performing actions like nano select all to manipulate or analyze the entire file. Understanding how to navigate efficiently ensures you can use Nano’s full potential across platforms like Linux and macOS.
Navigating to the File’s Start
Once you open a file in Nano, the cursor typically begins at the file’s starting point. However, if you’ve scrolled through or edited the text, returning to the top is crucial for operations like linux nano select all. To quickly navigate to the start, press Ctrl+A. This shortcut positions the cursor at the very beginning of the text, preparing it for commands such as nano select all or line-specific editing.
Preparing for Nano Select All
When working with large files, starting from the top simplifies the process of using nano select all. For Linux users, this is particularly useful when applying commands like linux nano selects all, as the feature operates more smoothly when beginning from the file’s start. Similarly, Mac users can utilize Nano select all Mac for identical functionality.
Why Start at the File’s Beginning?
Navigating to the start of a file ensures you can perform bulk operations with precision. For example:
-
Select All Nano: Highlighting all text in a file begins from the starting point.
-
Editing the Header: For configuration files, the most critical settings often reside at the top, requiring immediate access.
-
Global Changes: Tools like linux nano select all make it easier to apply changes to the entire document starting from the top.
Practical Use Cases for Nano Select All
After positioning the cursor at the start of the file, you can utilize commands like nano select all to highlight everything for editing. This is particularly useful in scenarios such as:
-
Linux Nano Select All for Bulk Deletion: Quickly remove the file’s content to start fresh.
-
Nano Select All Mac for Copying: Copy the file’s content for use elsewhere.
-
Select All Nano for Analysis: Review large amounts of text systematically.
Navigating Across Platforms
The functionality of linux nano selects all remains consistent whether you’re using Nano on Linux or macOS. For instance, pressing Ctrl+A to navigate to the start of a file is identical on both platforms, ensuring that commands like nano select all Mac work seamlessly for cross-platform users.
Efficiency in Workflow
By starting at the file’s beginning, you ensure streamlined workflows. Whether your goal is to copy content using nano select all Mac or analyze a file with linux nano select all, navigating to the start reduces errors and enhances productivity.
Navigating to the start of a file is a foundational skill for Nano users. It simplifies tasks like nano select all, enabling efficient editing, copying, and deleting. By mastering this step, you can maximize Nano’s versatility and manage text files with ease.Top of Form
3. Set the Mark
One of the key steps in effectively using nano select all is understanding how to set the mark. Setting the mark in Nano allows you to highlight and select portions of text or even the entire file. This feature is a critical part of replicating the select all nano functionality, as Nano doesn't have a straightforward "Select All" command. Whether you're working on Linux nano select all or Nano select all Mac, setting the mark is a consistent and indispensable step.
What Does Setting the Mark Mean?
In Nano, "setting the mark" refers to enabling a selection starting from the cursor's current position. When the mark is set, moving the cursor expands the selection, creating a highlighted area of text. This feature is essential when you want to replicate the nano select all process, as it allows you to highlight and interact with an entire file or specific parts of it.
How to Set the Mark in Nano
-
Navigate to the Starting Point: First, position your cursor at the start of the text you want to highlight. If you're aiming for nano select all, move the cursor to the beginning of the file by pressing Ctrl+A.
-
Enable Selection Mode: Press Ctrl+Shift+6 to set the mark. This action starts the selection process.
-
Expand the Selection: Use the arrow keys or Ctrl+V to move the cursor, expanding the highlight. To achieve linux nano select all, move to the end of the file.
By setting the mark and moving the cursor to the file's end, you can simulate a full nano select all action, whether on Linux or macOS.
Why Is Setting the Mark Important?
Setting the mark is central to the functionality of nano select all because it:
-
Enables Bulk Editing: Highlighting an entire file allows you to make extensive changes, such as replacing all text or adjusting formatting.
-
Facilitates Copying and Deleting: Once selected, the text can be copied to the clipboard (using system-specific commands like Ctrl+C on Nano select all Mac) or deleted (Ctrl+K to cut).
-
Simplifies Text Manipulation: It helps users interact with large sections of text more efficiently than line-by-line editing.
Differences Between Linux Nano Select All and Mac
The process of setting the mark is identical across platforms. However, macOS users might need to adjust key mappings to ensure that shortcuts like Ctrl+Shift+6 function correctly. This ensures that Nano select all Mac delivers the same seamless experience as Linux nano select all.
Common Use Cases for Setting the Mark
-
Editing Configurations: Highlight configuration files to make sweeping adjustments.
-
Copying Entire Files: Use Nano select all Mac to copy all text to the clipboard for transfer or backup.
-
Clearing Files: Combine linux nano select all with the cut command (Ctrl+K) to quickly delete all content.
Mastering the Mark Setting Process
For efficient use of nano select all, practice setting the mark regularly. Familiarize yourself with the required shortcuts and test them across both Linux and macOS.
Setting the mark is a foundational skill for using nano select all effectively. Whether you're working with linux nano select all Nano select all Mac or Nano select all Mac, this step empowers you to manipulate text files with precision and efficiency, making Nano a versatile and powerful text editor.
4. Navigate to the End of the File
Navigating to the end of a file in Nano is a crucial step when performing various editing tasks, especially when you need to select all in Nano or manipulate large chunks of text. Whether you’re using linux nano select all or Nano select all Mac, knowing how to quickly jump to the end of your file can save you valuable time and effort.
The Importance of Navigating to the End of the File
When you’re working with text files in Nano, navigating to the end of the file is often necessary for several reasons. It may be required when:
-
Selecting All Text: To select the entire content of a file, you first need to move your cursor to the beginning and the end of the file. Once you’ve set the mark at the start, moving to the end allows you to create a full selection.
-
Appending Content: If you want to add content to the bottom of a file, you need to quickly get to the end, and this can be accomplished easily in Nano.
-
Efficient Editing: For large files, reaching the end allows you to perform bulk edits, copy or delete content, or format your file without having to scroll manually.
How to Navigate to the End of the File in Nano
There are two primary ways to navigate to the end of a file in Nano: using keyboard shortcuts or using a command in the editor.
Method 1: Using Keyboard Shortcuts
The most common way to navigate to the end of a file is by using a keyboard shortcut. Nano allows you to jump directly to the end of the file with the following steps:
-
Press Ctrl+_: This combination is used to invoke the "go to line" command in Nano. Once you press it, Nano will prompt you for a line number.
-
Press Ctrl+V: Alternatively, Ctrl+V can be used to move the cursor down by a page, but to jump to the absolute end of the file, the easiest method is using Ctrl+_ followed by Ctrl+V.
Once you have done this, Nano will immediately position your cursor at the very bottom of the file, allowing you to quickly begin editing or selecting content.
Method 2: Using the Arrow Keys
In case you are already familiar with the structure of your file and want to navigate to the end manually, simply press the down arrow key repeatedly until you reach the end. However, this is slower than using the keyboard shortcut and can be impractical when working with larger files.
How to Use the End of the File for Selecting All
Now that you know how to navigate to the end of your file, let’s explore how this ties into the process of selecting all text in Nano. Whether you’re using linux nano select all or Nano select all Mac, the basic principle of text selection remains the same.
-
Set the Mark: To start, move the cursor to the top of your file using Ctrl+A and press Ctrl+Shift+6 to set the mark.
-
Navigate to the End: Now that your mark is set, you can use the previously mentioned shortcut Ctrl+_ and Ctrl+V to jump to the end of the file. Your text will be selected in the process.
-
Copy or Edit: Once all the text is selected, you can either copy it using Ctrl+Shift+C (for Mac) or delete the selected text using Ctrl+K.
Navigating to the End of a File in Different Systems
While the basic method to navigate to the end of a file in Nano is the same across platforms, there are some differences you may encounter when working with different operating systems.
Linux Nano Select All
In Linux, nano select all and navigating to the end of the file typically works without any additional configurations. Nano is often pre-installed in most Linux distributions, and the default shortcuts should function properly. If you use linux nano select all, the Ctrl+_ command to go to a specific line number and then press Ctrl+V to reach the end works seamlessly.
Nano Select All Mac
On macOS, the process of navigating to the end of the file in Nano remains similar, but there are slight differences in the keyboard shortcuts. On Mac, you may find that Ctrl+_ might not be effective in all configurations. If that’s the case, you can still use the down arrow key or rely on Ctrl+V to move one page at a time to reach the end of the file. To ensure smooth functionality, check if you need to remap keys or adjust your Nano configuration file.
Advanced Techniques for Faster Navigation
If you're working with larger files and need to navigate quickly, here are some additional tips to enhance your workflow:
-
Use Search: If you know the last word or line in your document, you can quickly search for it by pressing Ctrl+W and typing the word. Nano will take you directly to it, saving you time compared to scrolling or using the down arrow key repeatedly.
-
Split Your Screen: For even greater efficiency, you can use the Ctrl+X and Ctrl+R combination to open another file within the same Nano session, which allows you to compare documents or refer to the contents while navigating to the end of the file.
5. Verifying the Selection
Verifying your selection in Nano is an essential step when editing text, especially when you need to ensure that you’ve selected the correct part of the file. This process is crucial when using commands like nano select all, nano copy all, or nano delete all. The selection process in Nano is typically done by setting a mark at the start of the text and navigating to the end to highlight the desired portion. However, verifying that the correct text has been selected is important to avoid mistakes, especially in larger files.
Steps to Verify Your Selection
1. Set the Mark: The first step is to position your cursor at the starting point where you want to begin your selection. Press Ctrl+Shift+6 to set the mark.
2. Navigate to the End: Use the arrow keys to move to the point where you want the selection to end. If you're selecting all text, navigate to the end of the file by using the Ctrl+_ and Ctrl+V commands.
3. Check the Highlighted Text: Once you’ve navigated to the end of the selection, check the highlighted text on your screen. Nano will visually highlight the selected text with a reverse video effect. Ensure that the highlighted text matches your intended selection.
4. Adjust the Selection: If the selection is incorrect, you can adjust it by moving the cursor to the correct point and re-setting the mark (Ctrl+Shift+6). You can also delete the selection by pressing Ctrl+K or copy it with Ctrl+Shift+C.
Conclusion
In conclusion, mastering the process of selecting all text in the Nano text editor can significantly enhance your productivity and efficiency. Whether you need to select all in Nano, copy all text, or delete all text, the steps are simple yet powerful. By using commands such as Ctrl+Shift+6 to set the mark, navigating with the arrow keys, and ensuring your selection is correct, you can easily manipulate large blocks of text. Additionally, understanding how to select all in Nano on different systems like Mac or Linux allows for a more seamless editing experience across platforms. Whether you're working with a small or large file, Nano select all features provide a quick way to manage and modify content without any hassle. By following these straightforward instructions, you can make the most of Nano's text selection capabilities, streamlining your text editing workflow.
People also read:

Leave A Comment